
 数据结构
数据结构 网络
网络 关系数据库管理系统 (RDBMS)
 操作系统
操作系统 Java
Java iOS
iOS HTML
HTML CSS
CSS Android
 Python
 C 语言编程
 C++
C++ C#
C# MongoDB
 MySQL
MySQL Javascript
 PHP
PHP如何在 Ubuntu 16.04 上配置和安装 Ghost
在这篇文章中,我们将学习如何在 Ubuntu 16.04 上安装和配置 Ghost。Ghost 是一个轻量级且开源的博客程序,易于使用且可定制,并提供许多主题。
先决条件
此安装需要以下条件:
- 已安装 Ubuntu 16.04 的服务器。
- 具有 Sudo 权限的非 root 用户。
- 在服务器上安装了 Nginx 网络服务器。
在 Ubuntu 16.04 上安装 Ghost
我们将使用 Ghost 官方 GitHub 仓库来安装 Ghost。
首先,我们将使用以下命令获取 Ghost 的最新版本。(此处应补充具体命令)
$ wget https://ghost.org/zip/ghost-latest.zip
Output:
   --2017-05-18 12:06:25-- https://ghost.org/zip/ghost-latest.zip
Resolving ghost.org (ghost.org)... 104.16.32.191, 104.16.34.191, 104.16.33.191, ...
Connecting to ghost.org (ghost.org)|104.16.32.191|:443... connected.
HTTP request sent, awaiting response... 301 Moved Permanently
Location: /zip/ghost-latest.zip/ [following]
   --2017-05-18 12:06:27-- https://ghost.org/zip/ghost-latest.zip/
Reusing existing connection to ghost.or
g:443.
HTTP request sent, awaiting response... 302 Found
Location: https://github.com/TryGhost/Ghost/releases/download/0.11.9/Ghost-0.11.9.zip [following]
   --2017-05-18 12:06:28-- https://github.com/TryGhost/Ghost/releases/download/0.11.9/Ghost-0.11.9.zip
Resolving github.com (github.com)... 192.30.253.113, 192.30.253.112
Connecting to github.com (github.com)|192.30.253.113|:443... connected.
HTTP request sent, awaiting response... 302 Found
Location: https://github-cloud.s3.amazonaws.com/releases/9852918/d047ce0e-3a8d-1 1e7-937c-58bc76a5c547.zip?X-Amz-Algorithm=AWS4-HMAC-SHA256&X-Amz-Credential=AKIA ISTNZFOVBIJMK3TQ%2F20170518%2Fus-east-1%2Fs3%2Faws4_request&X-Amz-Date=20170518T       063630Z&X-Amz-Expires=300&X-Amz-Signature=495ca36c4d81720b86bef7f49c9a99720aab30 cdcd8f7e0c62350e48a7a417cb&X-Amz-SignedHeaders=host&actor_id=0&response-content- disposition=attachment%3B%20filename%3DGhost-0.11.9.zip&response-content-type=ap       plication%2Foctet-stream [following]
   --2017-05-18 12:06:31-- https://github-cloud.s3.amazonaws.com/releases/9852918/ d047ce0e-3a8d-11e7-937c-58bc76a5c547.zip?X-Amz-Algorithm=AWS4-HMAC-SHA256&X-Amz- Credential=AKIAISTNZFOVBIJMK3TQ%2F20170518%2Fus-east-1%2Fs3%2Faws4_request&X-Amz -         Date=20170518T063630Z&X-Amz-Expires=300&X-Amz-Signature=495ca36c4d81720b86bef7f 49c9a99720aab30cdcd8f7e0c62350e48a7a417cb&X-Amz-SignedHeaders=host&actor_id=0&re sponse-content-disposition=attachment%3B%20filename%3DGhost-0.11.9.zip&response-       content-type=application%2Foctet-stream
Resolving github-cloud.s3.amazonaws.com (github-cloud.s3.amazonaws.com)... 52.21       6.65.72
Connecting to github-cloud.s3.amazonaws.com (github-cloud.s3.amazonaws.com)|52.2       16.65.72|:443... connected.
HTTP request sent, awaiting response... 200 OK
Length: 4219850 (4.0M) [application/octet-stream]
Saving to: ‘ghost-latest.zip’
ghost-latest.zip.1          100%[======================================>] 4.02M 1.26MB/s    in 3.2s
2017-05-18 12:10:14 (1.26 MB/s) - ‘ghost-latest.zip’ saved [4219850/4219850]
下载软件包后,我们将使用以下命令将下载的文件解压缩到服务器上的 /var/www/ghost 文件夹。(此处应补充具体命令)
$ sudo unzip -d /var/www/ghost ghost-latest.zip
从软件包文件中解压缩文件后,我们将切换到 /var/www/ghost 文件夹,并使用 npm 命令行工具安装生产环境所需的 Ghost 依赖项。
以下是安装 Ghost 及生产环境所需依赖项的命令。(此处应补充具体命令)
$ sudo npm install --production
Output:
[ ...............] | cloneCurrentTree: sill cloneCurrentTree Finishing
npm WARN lifecycle ghost@0.11.9~preinstall: cannot run in wd %s %s (wd=%s) ghost@0.11.9 node core/server/utils/npm/preinstall.js /var/www/ghost
> dtrace-provider@0.8.1 install /var/www/ghost/node_modules/gscan/node_modules/ghost-ignition/node_modules/bunyan/node_modules/dtrace-provider
> node scripts/install.js
> sqlite3@3.1.8 install /var/www/ghost/node_modules/sqlite3
> node-pre-gyp install --fallback-to-build
[sqlite3] Success: "/var/www/ghost/node_modules/sqlite3/lib/binding/node-v48-linux-x64/node_sqlite3.node" is installed via remote
> jsonpath@0.2.11 postinstall /var/www/ghost/node_modules/jsonpath
> node lib/aesprim.js > generated/aesprim-browser.js
ghost@0.11.9 /var/www/ghost
….
….
   | | `-- ms@0.7.3
   | +-- form-data@2.1.4
   | | +-- asynckit@0.4.0
   | | +-- combined-stream@1.0.5
   | | | `-- delayed-stream@1.0.0
   | | `-- mime-types@2.1.15
   | | `-- mime-db@1.27.0
   | +-- formidable@1.1.1
   | +-- methods@1.1.2
   | +-- mime@1.3.6
   | `-- readable-stream@2.2.9
   | +-- buffer-shims@1.0.0
   | +-- core-util-is@1.0.2
   | +-- inherits@2.0.3
   | +-- isarray@1.0.0
   | +-- process-nextick-args@1.0.7
   | +-- string_decoder@1.0.0
   | `-- util-deprecate@1.0.2
   +-- unidecode@0.1.8
   +-- uuid@3.0.0
   +-- validator@6.3.0
   +-- vary@1.1.1
   +-- xml@1.0.1
   `-- xtend@4.0.1
配置 Ghost
安装依赖项后,我们需要修改位于 /var/www/ghost 的 Ghost 配置文件。配置文件并不直接存在,但 Ghost 安装包包含一个名为 config.example.js 的配置文件,我们将暂时使用它进行配置。
首先,我们将文件复制到 /var/www/ghost 文件夹并命名为 config.js,以下是如何复制配置文件的命令。(此处应补充具体命令)
$ sudo cp config.example.js config.js
将示例文件复制到 config.js 后,我们将根据我们的环境编辑配置文件。
$ sudo vi config.js
在这里,我们将编辑 Ghost 服务器的 URL 配置。如果不更改 URL,博客上的链接将指向默认 URL my-ghost-blog.com。因此,我们需要更改“url”的值,可以使用域名或服务器的 IP 地址,在本演示中我们只使用 IP 地址,实际应用中将使用博客的域名。
Output:
// # Ghost Configuration
// Setup your Ghost install for various [environments](http://support.ghost.org/config/#about-environments).
// Ghost runs in `development` mode by default. Full documentation can be found at http://support.ghost.org/config/var path = require('path'),config;
config = {
   // ### Production
   // When running Ghost in the wild, use the production environment.
   // Configure your URL and mail settings here
   production: {
      url: 'http://192.168.1.123',
      mail: {
         transport: 'SMTP',
         options: {
            service: 'Gmail',
            auth: {
               user: 'youremail@gmail.com',
               pass: 'yourpassword'
            }
         }
      },
   database: {
      client: 'sqlite3',
      connection: {
         filename: path.join(__dirname, '/content/data/ghost.db')
      },
      debug: false
   },
   server: {
      host: '127.0.0.1',
      port: '2368'
   }
},
…
…
我的本地设置使用了我的机器的 IP 地址。
接下来,我们将配置电子邮件通知,这对于 Ghost 用户的密码恢复或任何用户更新通知是必要的。保存配置文件并退出 vi 编辑器。
使用以下命令启动 Ghost(此处应补充具体命令)
$ sudo npm start –production
Output:
> ghost@0.11.9 start /var/www/ghost
> node index
WARNING: Ghost is attempting to use a direct method to send an email.It is recommended that you explicitly configure an email service.
Help and documentation can be found at http://support.ghost.org/mail.
Migrations: Creating tables...
Migrations: Creating table: posts
Migrations: Creating table: users
Migrations: Creating table: roles
Migrations: Creating table: roles_users
Migrations: Creating table: permissions
Migrations: Creating table: permissions_users
Migrations: Creating table: permissions_roles
Migrations: Creating table: permissions_apps
Migrations: Creating table: settings
Migrations: Creating table: tags
Migrations: Creating table: posts_tags
Migrations: Creating table: apps
Migrations: Creating table: app_settings
Migrations: Creating table: app_fields
Migrations: Creating table: clients
Migrations: Creating table: client_trusted_domains
Migrations: Creating table: accesstokens
Migrations: Creating table: refreshtokens
Migrations: Creating table: subscribers
Migrations: Running fixture populations
Migrations: Creating owner
Ghost is running in production...
Your blog is now available on http://192.168.1.123
Ctrl+C to shut down
配置 Nginx 将 Web 请求代理到 Ghost
默认情况下,Ghost 将在端口 2368 上运行,我们需要配置 Nginx 以允许在端口 80 上连接,并在不向域名或 IP 地址添加 2368 的情况下访问 Ghost。
按 CTRL+C 停止 Ghost。
现在更改目录到 /etc/nginx。
$ cd /etc/nginx.
删除 sites-enabled/default 中的默认 Nginx 配置。
$ sudo rm sites-enabled/default
在 /etc/nginx/sites-available/ 中创建一个名为 ghost 的新配置文件。
$ sudo nano /etc/nginx/sites-available/ghost
粘贴以下配置并更改 your-domain-name。(此处应补充具体Nginx配置)
$ vi /etc/nginx/sites-available/ghost
server {
   listen 80;
   server_name 192.168.1.123; # Your-IP-Address
   location / {
      proxy_set_header HOST $host;
      proxy_set_header X-Forwarded-Proto $scheme;
      proxy_set_header X-Real-IP $remote_addr;
      proxy_set_header X-Forwarded-For $proxy_add_x_forwarded_for;
      proxy_pass http://127.0.0.1:2368;
   }
}
保存文件并退出编辑器。
我们需要通过在 /etc/nginx/sites-enabled 文件夹中创建 ghost 文件的符号链接来启用此配置。(此处应补充具体命令)
$ sudo ln -s /etc/nginx/sites-available/ghost /etc/nginx/sites-enabled/ghost
现在重新启动 Nginx 以应用更改。(此处应补充具体命令)
$ sudo service nginx restart
重新启动 Nginx 后,我们将访问博客站点进行初始设置。
我们可以通过访问服务器的 http://your_ip_address 来访问博客,但对于初始设置,我们需要使用以下 URL 访问博客:http://your_ip_address/ghost。
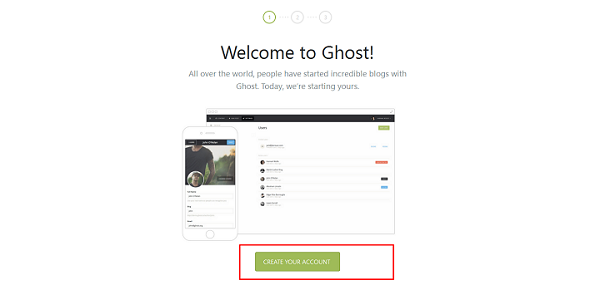
作为博客管理员,我们需要在博客上创建一个帐户,以便管理并邀请用户加入博客。点击“创建您的帐户”。
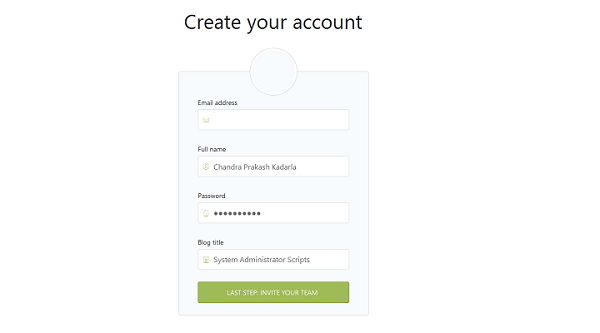
在下一页,我们将提供管理员电子邮件 ID、全名、密码和博客标题。
接下来,我们将邀请一些人加入博客。
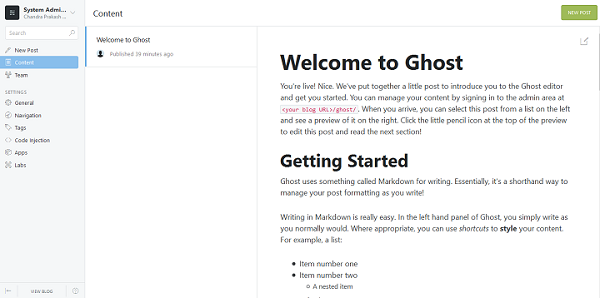
欢迎屏幕如下所示。(此处应补充图片)
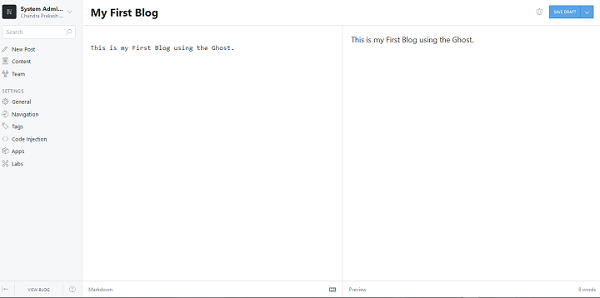
现在,我们将通过点击“新建博客”,然后点击“新建文章”来撰写博客。
编辑文章后,我们将通过点击“保存草稿”列表然后点击“发布”来发布文章。
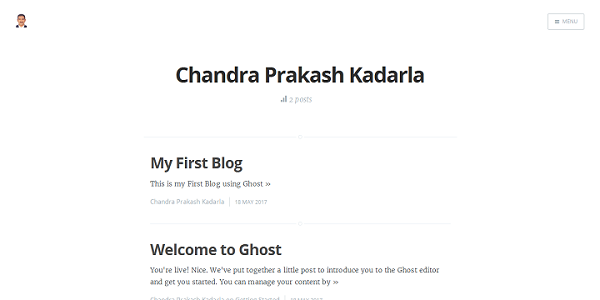
我们现在可以使用 URL http://your_ip_address 访问博客。
Ghost 博客如下所示。(此处应补充图片)
在这篇文章中,我们学习了如何安装和配置 Ghost。Ghost 是一个非常易于使用的博客站点应用程序,我们还学习了如何使用 Ghost 博客软件创建我们的第一个博客,请探索更多选项,因为 Ghost 可以做很多事情。

276 次查看
