
 数据结构
数据结构 网络
网络 关系数据库管理系统 (RDBMS)
 操作系统
操作系统 Java
Java iOS
iOS HTML
HTML CSS
CSS Android
 Python
 C 编程
C 编程 C++
C++ C#
C# MongoDB
 MySQL
MySQL Javascript
 PHP
PHP如何在 Ubuntu 16.04 上安装和配置 Postfix
本文将介绍如何在 Ubuntu 16.04 上安装配置 Postfix。Postfix 是一个非常流行的开源邮件传输代理 (MTA),可用于在 Ubuntu Linux 系统上中继电子邮件。大多数真实世界的公共邮件服务器都只使用 Postfix。
前提条件
完成此演示需要以下条件:
- 安装了 Ubuntu 16.04 的机器,以及具有 sudo 权限的非 root 用户。
- 指向该机器的完全限定域名 (FQDN)。
- 我们假设域名 FQDN 为 mail.mydomain.com
安装 Postfix
由于 Postfix 可从 Ubuntu 默认存储库获取,因此可以直接进行安装。
在开始安装之前,我们将首先使用以下命令更新 apt-get。
$ sudo apt-get update
现在,我们将使用以下命令安装 postfix。
$ sudo apt-get install postfix
Output:
Reading package lists... Done
Building dependency tree
Reading state information... Done
The following additional packages will be installed: ssl-cert
Suggested packages:
procmail postfix-mysql postfix-pgsql postfix-ldap postfix-pcre sasl2-bin dovecot-common
postfix-cdb mail-reader postfix-doc openssl-blacklist
The following NEW packages will be installed:
postfix ssl-cert
0 upgraded, 2 newly installed, 0 to remove and 19 not upgraded.
Need to get 1,169 kB of archives.
After this operation, 3,759 kB of additional disk space will be used.
Do you want to continue? [Y/n] y
Get:1 http://in.archive.ubuntu.com/ubuntu xenial/main amd64 ssl-cert all 1.0.37 [16.9 kB]
Get:2 http://in.archive.ubuntu.com/ubuntu xenial/main amd64 postfix amd64 3.1.0-3 [1,152 kB]
Fetched 1,169 kB in 2s (434 kB/s)
Preconfiguring packages ...
Selecting previously unselected package ssl-cert.
(Reading database ... 59373 files and directories currently installed.)
Preparing to unpack .../ssl-cert_1.0.37_all.deb ...
Unpacking ssl-cert (1.0.37) ...
Selecting previously unselected package postfix.
Preparing to unpack .../postfix_3.1.0-3_amd64.deb ...
Unpacking postfix (3.1.0-3) ...
Processing triggers for man-db (2.7.5-1) ...
Processing triggers for libc-bin (2.23-0ubuntu3) ...
Processing triggers for systemd (229-4ubuntu7) ...
…
…
…
/etc/aliases does not exist, creating it.
WARNING: /etc/aliases exists, but does not have a root alias.
Postfix is now set up with a default configuration. If you need to make
changes, edit
/etc/postfix/main.cf (and others) as needed. To view Postfix configuration
values, see postconf(1).
After modifying main.cf, be sure to run '/etc/init.d/postfix reload'.
Running newaliases
Processing triggers for libc-bin (2.23-0ubuntu3) ...
Processing triggers for systemd (229-4ubuntu7) ...
Processing triggers for ureadahead (0.100.0-19) ...
Processing triggers for ufw (0.35-0ubuntu2) ...
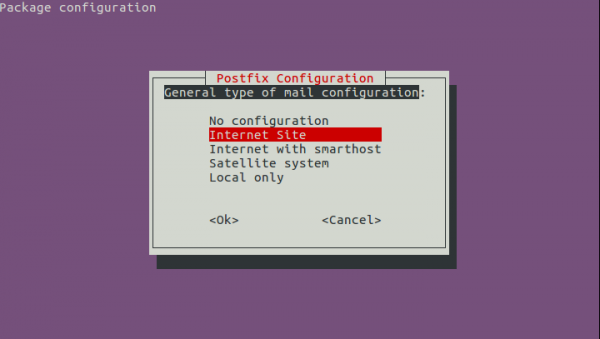
安装启动后,将询问以下内容。
邮件配置的常规类型。我们必须选择“Internet 站点”。
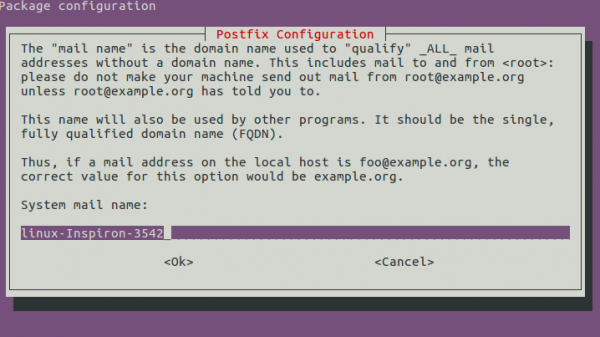
输入要与 postfix 一起使用的域名,系统邮件名称(例如 mail.mydomain.com)。
安装完成后,我们将检查服务是否已启动。为确认,我们将运行以下命令。
$ netstat –ntlp
netstat -ntlp
Active Internet connections (only servers)
Proto    Recv-Q    Send-Q    Local Address    Foreign Address    State    PID/Program name
tcp          0          0    0.0.0.0:22          0.0.0.0:*       LISTEN    4212/sshd
tcp          0          0    0.0.0.0:25          0.0.0.0:*       LISTEN    5747/master
tcp6         0          0    :::22                :::*          LISTEN     4212/sshd
tcp6         0          0    :::25                :::*           LISTEN    5747/master
我们应该看到端口 25 已打开。
postfix 配置文件位于 /etc/postfix/main.cf
$ sudo vi /etc/postfix/main.cf
Output:
# See /usr/share/postfix/main.cf.dist for a commented, more complete version
# Debian specific: Specifying a file name will cause the first
# line of that file to be used as the name. The Debian default
# is /etc/mailname.
#myorigin = /etc/mailname
smtpd_banner = $myhostname ESMTP $mail_name (Ubuntu)
biff = no
# appending .domain is the MUA's job.
append_dot_mydomain = no
# Uncomment the next line to generate "delayed mail" warnings
#delay_warning_time = 4h
readme_directory = no
# TLS parameters
smtpd_tls_cert_file=/etc/ssl/certs/ssl-cert-snakeoil.pem
smtpd_tls_key_file=/etc/ssl/private/ssl-cert-snakeoil.key
smtpd_use_tls=yes
smtpd_tls_session_cache_database = btree:${data_directory}/smtpd_scache
smtp_tls_session_cache_database = btree:${data_directory}/smtp_scache
# See /usr/share/doc/postfix/TLS_README.gz in the postfix-doc package for
# information on enabling SSL in the smtp client.
smtpd_relay_restrictions = permit_mynetworks permit_sasl_authenticated defer_unauth_destination
myhostname = ubuntu16.mydomain.com
alias_maps = hash:/etc/aliases
alias_database = hash:/etc/aliases
myorigin = /etc/mailname
mydestination = $myhostname, mail.mydomain.com, localhost.mydomain.com, , localhost
relayhost =
mynetworks = 127.0.0.0/8 [::ffff:127.0.0.0]/104 [::1]/128
mailbox_size_limit = 0
recipient_delimiter = +
inet_interfaces = all
inet_protocols = all
设置说明如下:
- 邮件配置的常规类型?:Internet 站点
- 系统邮件名称:mydomain.com(而不是 mail.mydomain.com)
- Root 和 postmaster 邮件收件人:root
- 其他接受邮件的目标:$myhostname, mydomain.com, mail.mydomain.com, localhost.mydomain.com, localhost
- 强制同步更新邮件队列?:否
- 本地网络:127.0.0.0/8 [::ffff:127.0.0.0]/104 [::1]/128
- 邮箱大小限制:0
- 本地地址扩展字符:+
- 要使用的互联网协议:全部
如果要重新配置,可以使用以下命令更改 postfix 配置。
$ sudo dpkg-reconfigure postfix
将邮箱映射到 Linux 帐户。
我们必须编辑虚拟映射文件以将邮箱映射到本地 Linux 帐户,为此,我们需要编辑以下文件。
$ sudo nano /etc/postfix/virtual
例如,如果我们想接受 noreply@mydomain.com 和 admin@mydomain.com 的邮件,我们需要将以下几行添加到 /etc/postfix/virtual 文件中。
roreply@mydomain.com ubuntu
admin@mydomain.com ubuntu
将设置添加到配置文件后,我们需要使用以下命令应用这些更改。
$ sudo postmap /etc/postfix/virtual
应用设置后,我们需要重新启动 postfix 服务。
$ sudo systemctl restart postfix.
配置环境以设置邮件位置
在开始安装邮件客户端之前,我们需要确保邮件环境已正确配置。我们必须在几个位置设置变量 /etc/bash.bashrc 和 /etc/profile.d,以确保用户已配置邮件。
$ echo 'export MAIL=~/Maildir' | sudo tee -a /etc/bash.bashrc | sudo tee -a /etc/profile.d/mail.sh
配置好设置后,我们需要将这些设置加载到当前会话。
$ source /etc/profile.d/mail.sh
安装和配置邮件客户端
默认情况下未安装邮件客户端,我们需要使用以下命令安装邮件客户端:
$ apt install mailutils –y
使用客户端工具发送邮件
要测试邮件,我们将以 root 用户身份登录并向“ubuntu”用户发送邮件,为此,我们可以使用以下命令:
# echo "test " | mail -s 'Test email subject line' ubuntu@mail.mydomain.com
为了验证邮件,我们已从本地系统的 root 用户向 ubuntu 用户发送邮件。
$ mail
Output:
"/var/mail/ubuntu": 2 messages 2 new
>N 1 Mail Delivery Syst Wed Oct 19 09:44 67/2299 Undelivered Mail Returned to Sender
N 2 root Wed Oct 19 09:45 12/490
? 2
Return-Path: <root@ubuntu16.example.com>
X-Original-To: ubuntu@ubuntu16.example.com
Delivered-To: ubuntu@ubuntu16.example.com
Received: by ubuntu16.example.com (Postfix, from userid 0)
id 5C631FF732; Wed, 19 Oct 2016 09:45:30 +0530 (IST)
To: <test@ubuntu16.example.com>,<ubuntu@ubuntu16.example.com>
X-Mailer: mail (GNU Mailutils 2.99.99)
Message-Id: <20161019041530.5C631FF732@ubuntu16.example.com>
Date: Wed, 19 Oct 2016 09:45:30 +0530 (IST)
From: root@ubuntu16.example.com (root)
test
?
现在您将看到我们可以接收来自 root 用户的电子邮件。
在本文中,我们学习了如何在 Ubuntu 16.04 上安装和配置 Postfix MTA(邮件传输代理),它可以用来发送邮件。使用上述配置,我们拥有了开始使用的基本邮件功能。

浏览量:598
