
 数据结构
数据结构 网络
网络 关系数据库管理系统
 操作系统
操作系统 Java
Java iOS
iOS HTML
HTML CSS
CSS Android
 Python
 C语言编程
C语言编程 C++
C++ C#
C# MongoDB
 MySQL
MySQL Javascript
 PHP
PHP如何在Android中创建CircularImageView?
此示例演示了如何在Android中**创建CircularImageView**。
**步骤 1** - 在Android Studio中创建一个新项目,转到文件⇒新建项目,并填写所有必需的详细信息以创建新项目。
**步骤 2** - 要创建圆形视图,我们应该在gradle文件中添加CircularImageView库,如下所示。
apply plugin: 'com.android.application'
android {
   compileSdkVersion 28
   defaultConfig {
      applicationId "com.example.andy.myapplication"
      minSdkVersion 15
      targetSdkVersion 28
      versionCode 1
      versionName "1.0"
      testInstrumentationRunner "android.support.test.runner.AndroidJUnitRunner"
   }
   buildTypes {
      release {
         minifyEnabled false
         proguardFiles getDefaultProguardFile('proguard-android.txt'), 'proguard-rules.pro'
      }
   }
}
dependencies {
   implementation fileTree(dir: 'libs', include: ['*.jar'])
   implementation 'com.android.support:appcompat-v7:28.0.0'
   implementation 'com.android.support.constraint:constraint-layout:1.1.3'
   testImplementation 'junit:junit:4.12'
   androidTestImplementation 'com.android.support.test:runner:1.0.2'
   implementation 'com.mikhaellopez:circularimageview:3.2.0'
   androidTestImplementation 'com.android.support.test.espresso:espresso-core:3.0.2'
}
**步骤 3** - 以下是修改后的主活动文件MainActivity.java的内容。此文件可以包含每个基本的生命周期方法。我们在activity_main.xml中创建了一个**CircularImageView**。
import android.support.v7.app.AppCompatActivity;
import android.os.Bundle;
public class MainActivity extends AppCompatActivity {
   @Override
   protected void onCreate(Bundle savedInstanceState) {
      super.onCreate(savedInstanceState);
      setContentView(R.layout.activity_main);
   }
}
**步骤 4** - 以下将是res/layout/activity_main.xml文件的内容,以包含**CircularImageView**。
<?xml version = "1.0" encoding = "utf-8"?>
<android.support.constraint.ConstraintLayout xmlns:android = "http://schemas.android.com/apk/res/android"
xmlns:app = "http://schemas.android.com/apk/res-auto"
   xmlns:tools = "http://schemas.android.com/tools"
   android:layout_width = "match_parent"
   android:layout_height = "match_parent"
   tools:context = ".MainActivity">
<LinearLayout
   android:layout_width = "match_parent"
   android:gravity = "center_horizontal"
   android:orientation = "vertical"
   android:layout_height = "match_parent">
   <com.mikhaellopez.circularimageview.CircularImageView
      android:layout_width = "250dp"
      android:layout_height = "250dp"
      android:src = "@drawable/image"
      app:civ_border_color = "#EEEEEE"
      app:civ_border_width = "4dp"
      app:civ_shadow = "true"
      app:civ_shadow_radius = "10"
      app:civ_shadow_color = "#8BC34A"/>
   <TextView
      android:text = "Mohammad Mohtashim"
      android:layout_width = "match_parent"
      android:layout_height = "match_parent"
      android:layout_marginTop = "20dp"
      android:textSize = "20sp"
      android:textAlignment = "center"/>
</LinearLayout>
</android.support.constraint.ConstraintLayout>
在上述布局中,我们已将CircularImageView声明为com.mikhaellopez.circularimageview.CircularImageView,并从drawable添加了图像,其id为image。
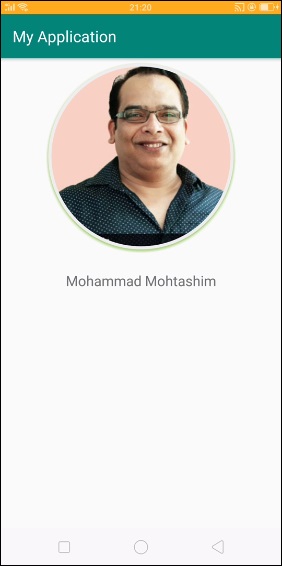
让我们尝试运行您的应用程序。我假设您已将您的实际Android移动设备连接到您的计算机。要从Android Studio运行应用程序,请打开您项目的一个活动文件,然后单击运行![]() 工具栏中的图标。选择您的移动设备作为选项,然后检查您的移动设备,它将显示您的默认屏幕 -
工具栏中的图标。选择您的移动设备作为选项,然后检查您的移动设备,它将显示您的默认屏幕 -
CircularImageView的属性
**app:civ_border** - 此属性用于创建边框,默认值为true
**app:civ_border_color** - 此属性用于创建边框颜色,默认颜色为白色
**app:civ_border_width** - 此属性用于创建边框宽度,默认值为4dp
**app:civ_background_color** - 此属性用于创建背景颜色,默认背景颜色为白色
**app:civ_shadow** - 此属性用于为图像创建阴影,默认值为false,如果需要阴影,则需要将其设置为true
**app:civ_shadow_color** - 此属性用于为图像创建阴影颜色,默认值为黑色
**app:civ_shadow_radius** - 此属性用于为图像创建阴影半径,默认值为8.0f
**app:civ_shadow_gravity** - 此属性用于为图像创建阴影重力,默认值为底部。
点击此处下载有关此主题的项目。

926 次浏览
