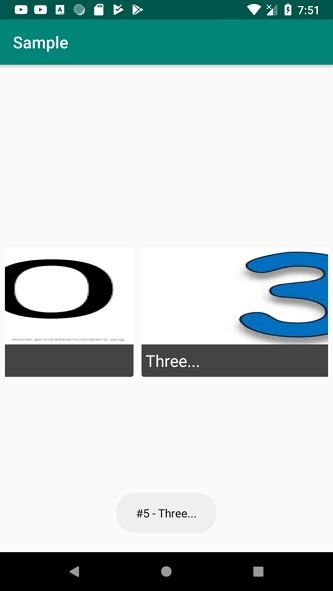
如何在Android中创建水平ListView?
此示例演示了如何在Android中创建水平ListView。
步骤1 - 在Android Studio中创建一个新项目,转到文件 ⇒ 新建项目,并填写所有必需的详细信息以创建新项目。
请在Gradle中添加以下依赖项 -
implementation 'com.android.support:recyclerview-v7:28.0.0'
implementation 'com.android.support:cardview-v7:28.0.0'
步骤2 - 将以下代码添加到res/layout/activity_main.xml中。
<RelativeLayout xmlns:android="http://schemas.android.com/apk/res/android"
   xmlns:tools="http://schemas.android.com/tools"
   android:layout_width="match_parent"
   android:layout_height="match_parent"
   android:padding="6dp"
   tools:context=".MainActivity">
   <androidx.recyclerview.widget.RecyclerView
      android:id="@+id/recyclerView"
      android:layout_centerInParent="true"
      android:layout_width="wrap_content"
      android:layout_height="wrap_content" />
</RelativeLayout>
步骤3 - 将以下代码添加到src/MainActivity.java中
import androidx.appcompat.app.AppCompatActivity;
import androidx.recyclerview.widget.LinearLayoutManager;
import androidx.recyclerview.widget.RecyclerView;
import android.os.Bundle;
import java.util.ArrayList;
import java.util.Arrays;
public class MainActivity extends AppCompatActivity {
   RecyclerView recyclerView;
   RecyclerView.LayoutManager layoutManager;
   RecyclerView.Adapter adapter;
   ArrayList<String> numberName;
   ArrayList<Integer> numberImage;
   @Override
   protected void onCreate(Bundle savedInstanceState) {
      super.onCreate(savedInstanceState);
      setContentView(R.layout.activity_main);
      numberName = new ArrayList<>(Arrays.asList("Four...", "Nine... ", "Seven...", "Six...", "Ten...", "Three...", "Two..."));
      numberImage = new ArrayList<>(Arrays.asList(R.drawable.four, R.drawable.nine, R.drawable.seven,
R.drawable.six, R.drawable.ten, R.drawable.three, R.drawable.two));
      // Calling the RecyclerView
      recyclerView = findViewById(R.id.recyclerView);
      recyclerView.setHasFixedSize(true);
      // The number of Columns
      layoutManager = new LinearLayoutManager(this, LinearLayoutManager.HORIZONTAL, false);
      recyclerView.setLayoutManager(layoutManager);
      adapter = new MyAdapter(MainActivity.this, numberName, numberImage);
      recyclerView.setAdapter(adapter);
   }
}
步骤4 - 创建一个Java类(MyAdapter.java)并添加以下代码 -
import android.content.Context;
import android.content.Intent;
import android.view.LayoutInflater;
import android.view.View;
import android.view.ViewGroup;
import android.widget.ImageView;
import android.widget.TextView;
import android.widget.Toast;
import java.util.ArrayList;
import androidx.recyclerview.widget.RecyclerView;
class MyAdapter extends RecyclerView.Adapter <MyAdapter.ViewHolder>{
   private ArrayList<String>numberName;
   private ArrayList<Integer> numberImage;
   private Context context;
   MyAdapter(Context context, ArrayList<String> numberName, ArrayList<Integer> numberImage) {
      super();
      this.context = context;
      this.numberName = numberName;
      this.numberImage = numberImage;
   }
   @Override
   public ViewHolder onCreateViewHolder(ViewGroup viewGroup, int i) {
      View v = LayoutInflater.from(viewGroup.getContext())
      .inflate(R.layout.gridlayout, viewGroup, false);
      return new ViewHolder(v);
   }
   @Override
      public void onBindViewHolder(ViewHolder viewHolder, int i) {
         viewHolder.textView.setText(numberName.get(i));
         viewHolder.imgThumbnail.setImageResource(numberImage.get(i));
         viewHolder.setClickListener(new ItemClickListener() {
            @Override
            public void onClick(View view, int position, boolean isLongClick) {
               if (isLongClick) {
                  Toast.makeText(context, "#" + position + " - " + numberName.get(position) + " (Long
click)", Toast.LENGTH_SHORT).show();
                  context.startActivity(new Intent(context, MainActivity.class));
               } else {
                  Toast.makeText(context, "#" + position + " - " + numberName.get(position),
                  Toast.LENGTH_SHORT).show();
               }
            }
         });
      }
      @Override
      public int getItemCount() {
         return numberName.size();
      }
      public static class ViewHolder extends RecyclerView.ViewHolder implements View.OnClickListener,
View.OnLongClickListener {
         ImageView imgThumbnail;
         TextView textView;
         private ItemClickListener clickListener;
         ViewHolder(View itemView) {
            super(itemView);
            imgThumbnail = itemView.findViewById(R.id.imgThumbnail);
            textView = itemView.findViewById(R.id.textView);
            itemView.setOnClickListener(this);
            itemView.setOnLongClickListener(this);
         }
         void setClickListener(ItemClickListener itemClickListener) {
            this.clickListener = itemClickListener;
         }
         @Override
            public void onClick(View view) {
               clickListener.onClick(view, getPosition(), false);
            }
         @Override
         public boolean onLongClick(View view) {
            clickListener.onClick(view, getPosition(), true);
            return true;
         }
      }
}
步骤5 - 创建一个布局资源文件并在listitem中添加以下代码
<?xml version="1.0" encoding="utf-8"?>
<LinearLayout xmlns:android="http://schemas.android.com/apk/res/android"
   xmlns:card_view="http://schemas.android.com/apk/res-auto"
   android:orientation="vertical"
   android:layout_width="match_parent"
   android:layout_height="match_parent">
   <androidx.cardview.widget.CardView
      android:layout_width="match_parent"
      android:layout_height="wrap_content"
      android:layout_marginBottom="0dp"
      android:layout_marginLeft="5dp"
      android:layout_marginRight="5dp"
      android:layout_marginTop="9dp"
      card_view:cardCornerRadius="3dp"
      card_view:cardElevation="0.01dp">
      <RelativeLayout
         android:id="@+id/topLayout"
         android:layout_width="match_parent"
         android:layout_height="160dp">
         <ImageView
            android:id="@+id/imgThumbnail"
            android:layout_width="match_parent"
            android:layout_height="150dp"
            android:layout_above="@+id/textView"
            android:layout_centerHorizontal="true"
            android:scaleType="fitXY" />
         <TextView
            android:id="@+id/textView"
            android:layout_width="fill_parent"
            android:layout_height="40dp"
            android:layout_alignParentBottom="true"
            android:layout_alignParentStart="true"
            android:layout_gravity="bottom"
            anroid:background="#ff444444"
            android:gravity="center_vertical"
            android:paddingStart="5dp"
            android:paddingEnd="2dp"
            android:text="Test"
            android:textColor="#fff"
            android:textSize="20sp" />
      </RelativeLayout>
   </androidx.cardview.widget.CardView>
</LinearLayout>
步骤6 - 创建一个接口(ItemClickListener.java)并添加以下代码 -
import android.view.View;
   interface ItemClickListener {
      void onClick(View view, int position, boolean isLongClick);
   }
步骤7 - 将以下代码添加到androidManifest.xml中
<?xml version="1.0" encoding="utf-8"?>
<manifest xmlns:android="http://schemas.android.com/apk/res/android"
   package="app.com.sample">
   <application
      android:allowBackup="true"
      android:icon="@mipmap/ic_launcher"
      android:label="@string/app_name"
      android:roundIcon="@mipmap/ic_launcher_round"
      android:supportsRtl="true"
      android:theme="@style/AppTheme">
      <activity android:name=".MainActivity">
         <intent-filter>
         <action android:name="android.intent.action.MAIN" />
         <category android:name="android.intent.category.LAUNCHER" />
      </intent-filter>
   </activity>
</application>
</manifest>
让我们尝试运行您的应用程序。我假设您已将您的实际Android移动设备连接到您的计算机。要从Android Studio运行应用程序,请打开项目的活动文件之一,然后单击工具栏中的运行![]() 图标。选择您的移动设备作为选项,然后检查您的移动设备,它将显示您的默认屏幕 -
图标。选择您的移动设备作为选项,然后检查您的移动设备,它将显示您的默认屏幕 -


广告

 数据结构
数据结构 网络
网络 关系型数据库管理系统
 操作系统
操作系统 Java
Java iOS
iOS HTML
HTML CSS
CSS Android
 Python
 C语言编程
C语言编程 C++
C++ C#
C# MongoDB
 MySQL
MySQL Javascript
 PHP
PHP