
 数据结构
数据结构 网络
网络 关系数据库管理系统 (RDBMS)
 操作系统
操作系统 Java
Java iOS
iOS HTML
HTML CSS
CSS Android
 Python
 C语言编程
C语言编程 C++
C++ C#
C# MongoDB
 MySQL
MySQL Javascript
 PHP
PHP如何在Android中创建自定义ListView?
在进入ListView示例之前,我们应该了解ListView。ListView是从ArrayList、List或任何数据库中提取项目的集合。ListView最常用的用途是以垂直格式显示项目的集合,我们可以上下滚动并点击任何项目。
什么是自定义ListView?
自定义ListView基于自定义适配器(customAdapter)。在这个自定义适配器中,我们可以传递自定义对象。我们像下面这样将主题数据传递给ListView:
**步骤1** - 在Android Studio中创建一个新项目,转到文件 ⇒ 新建项目,并填写所有必需的详细信息以创建新项目。
**步骤2** - 将以下代码添加到res/layout/activity_main.xml。
<?xml version = "1.0" encoding = "utf-8"?>
<android.support.constraint.ConstraintLayout
xmlns:android = "http://schemas.android.com/apk/res/android" xmlns:tools = "http://schemas.android.com/tools" android:layout_width = "match_parent"
   android:layout_height = "match_parent">
<LinearLayout
   android:layout_width = "match_parent"
   android:layout_height = "match_parent"
   android:orientation = "vertical">
   <ListView
      android:id = "@+id/list"
      android:layout_width = "wrap_content"
      android:layout_height = "match_parent"
      android:divider = "#000"
      android:dividerHeight = "1dp"
      android:footerDividersEnabled = "false"
      android:headerDividersEnabled = "false"/>
</LinearLayout>
</android.support.constraint.ConstraintLayout>
在上面的activity_main.xml中,我们声明了一个ListView并添加了分隔符,如下所示。
<ListView
   android:id = "@+id/list"
   android:layout_width = "wrap_content"
   android:layout_height = "match_parent"
   android:divider = "#000"
   android:dividerHeight = "1dp"
   android:footerDividersEnabled = "false"
   android:headerDividersEnabled = "false"
/>
**步骤3** - 将以下代码添加到src/MainActivity.java
import android.os.Bundle;
import android.support.v7.app.AppCompatActivity;
import android.widget.ListView;
import java.util.ArrayList;
public class MainActivity extends AppCompatActivity {
   @Override
   protected void onCreate(Bundle savedInstanceState) {
      super.onCreate(savedInstanceState);
      setContentView(R.layout.activity_main);
      final ListView list = findViewById(R.id.list);
      ArrayList<SubjectData> arrayList = new ArrayList<SubjectData>();
      arrayList.add(new SubjectData("JAVA", "https://tutorialspoint.com/java/",             "https://tutorialspoint.com/java/images/java-mini-logo.jpg"));
      arrayList.add(new SubjectData("Python", "https://tutorialspoint.com/python/", "https://tutorialspoint.com/python/images/python-mini.jpg"));
      arrayList.add(new SubjectData("Javascript", "https://tutorialspoint.com/javascript/", "https://tutorialspoint.com/javascript/images/javascript-mini-logo.jpg"));
      arrayList.add(new SubjectData("Cprogramming", "https://tutorialspoint.com/cprogramming/", "https://tutorialspoint.com/cprogramming/images/c-mini-logo.jpg"));
      arrayList.add(new SubjectData("Cplusplus", "https://tutorialspoint.com/cplusplus/", "https://tutorialspoint.com/cplusplus/images/cpp-mini-logo.jpg"));
      arrayList.add(new SubjectData("Android", "https://tutorialspoint.com/android/", "https://tutorialspoint.com/android/images/android-mini-logo.jpg"));
      CustomAdapter customAdapter = new CustomAdapter(this, arrayList);
      list.setAdapter(customAdapter);
   }
}
在MainActivity中,我们声明了CustomAdapter并传递了SubjectData,如下所示:
CustomAdapter customAdapter = new CustomAdapter(this, arrayList);
list.setAdapter(customAdapter);
**步骤4** - 创建一个CustomAdapter类,将以下代码添加到src/CustomAdapter.java
import android.content.Context;
import android.database.DataSetObserver;
import android.view.LayoutInflater;
import android.view.View;
import android.view.ViewGroup;
import android.widget.ImageView;
import android.widget.ListAdapter;
import android.widget.TextView;
import com.squareup.picasso.Picasso;
import java.util.ArrayList;
class CustomAdapter implements ListAdapter {
   ArrayList<SubjectData> arrayList;
   Context context;
   public CustomAdapter(Context context, ArrayList<SubjectData> arrayList) {
      this.arrayList=arrayList;
      this.context=context;
   }
   @Override
   public boolean areAllItemsEnabled() {
      return false;
   }
   @Override
   public boolean isEnabled(int position) {
      return true;
   }
   @Override
   public void registerDataSetObserver(DataSetObserver observer) {
   }
   @Override
   public void unregisterDataSetObserver(DataSetObserver observer) {
   }
   @Override
   public int getCount() {
      return arrayList.size();
   }
   @Override
   public Object getItem(int position) {
      return position;
   }
   @Override
   public long getItemId(int position) {
      return position;
   }
   @Override
   public boolean hasStableIds() {
      return false;
   }
   @Override
   public View getView(int position, View convertView, ViewGroup parent) {
      SubjectData subjectData=arrayList.get(position);
      if(convertView==null) {
         LayoutInflater layoutInflater = LayoutInflater.from(context);
         convertView=layoutInflater.inflate(R.layout.list_row, null);
         convertView.setOnClickListener(new View.OnClickListener() {
            @Override
            public void onClick(View v) {
            }
         });
         TextView tittle=convertView.findViewById(R.id.title);
         ImageView imag=convertView.findViewById(R.id.list_image);
         tittle.setText(subjectData.SubjectName);
         Picasso.with(context)
         .load(subjectData.Image)
         .into(imag);
      }
      return convertView;
   }
   @Override
   public int getItemViewType(int position) {
      return position;
   }
   @Override
   public int getViewTypeCount() {
      return arrayList.size();
   }
   @Override
   public boolean isEmpty() {
      return false;
   }
}
**步骤5** - 创建一个SubjectData类,将以下代码添加到src/SubjectData.java
class SubjectData {
   String SubjectName;
   String Link;
   String Image;
   public SubjectData(String subjectName, String link, String image) {
      this.SubjectName = subjectName;
      this.Link = link;
      this.Image = image;
   }
}
**步骤6** - 在CustomAdapter类中,我们显示了网络图片资源。为了显示网络图片资源,我们添加了Picasso库,如下所示。
Picasso.with(context)
.load(subjectData.Image)
.into(imag);
**步骤7** - 为了实现Picasso库,我们必须在gradle中添加Picasso库,如下所示。
apply plugin: 'com.android.application'
android {
   compileSdkVersion 28
   defaultConfig {
      applicationId "com.example.andy.myapplication"
      minSdkVersion 15
      targetSdkVersion 28
      versionCode 1
      versionName "1.0"
      testInstrumentationRunner "android.support.test.runner.AndroidJUnitRunner"
   }
   buildTypes {
      release {
         minifyEnabled false
         proguardFiles getDefaultProguardFile('proguard-android.txt'), 'proguard-rules.pro'
      }
   }
}
dependencies {
   implementation fileTree(dir: 'libs', include: ['*.jar'])
   implementation 'com.android.support:appcompat-v7:28.0.0'
   implementation 'com.android.support.constraint:constraint-layout:1.1.3'
   testImplementation 'junit:junit:4.12'
   implementation 'com.squareup.picasso:picasso:2.5.1'
   androidTestImplementation 'com.android.support.test:runner:1.0.2'
   androidTestImplementation 'com.android.support.test.espresso:espresso-core:3.0.2'
}
**步骤8** - 为了访问互联网信息,我们必须在清单文件中授予互联网权限,如下所示。
<?xml version = "1.0" encoding = "utf-8"?>
<manifest xmlns:android = "http://schemas.android.com/apk/res/android"
   package = "com.example.andy.myapplication">
<uses-permission android:name = "android.permission.INTERNET"/>
   <application
      android:allowBackup = "true"
      android:icon = "@mipmap/ic_launcher"
      android:label = "@string/app_name"
      android:roundIcon = "@mipmap/ic_launcher_round"
      android:supportsRtl = "true"
      android:theme = "@style/AppTheme">
      <activity android:name = ".MainActivity">
         <intent-filter>
            <action android:name = "android.intent.action.MAIN" />
            <category android:name = "android.intent.category.LAUNCHER" />
         </intent-filter>
      </activity>
   </application>
</manifest>
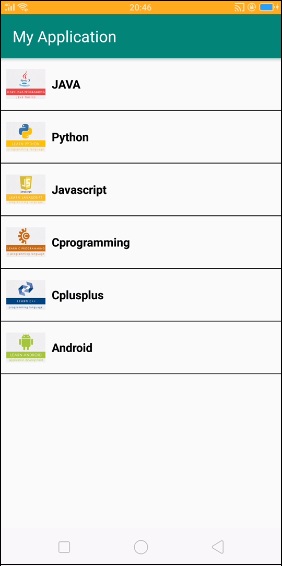
让我们尝试运行您的应用程序。我假设您已将您的实际Android移动设备连接到您的计算机。要在Android Studio中运行该应用程序,请打开项目中的一个活动文件,然后单击运行 ![]() 工具栏中的图标。选择您的移动设备作为选项,然后检查您的移动设备,它将显示您的默认屏幕。
工具栏中的图标。选择您的移动设备作为选项,然后检查您的移动设备,它将显示您的默认屏幕。
点击这里下载项目代码

3K+ 次浏览
