如何在Android中创建自定义通知布局和文本颜色?
此示例演示了如何在Android中创建自定义通知布局和文本颜色。
步骤 1 - 在Android Studio中创建一个新项目,转到文件 ⇒ 新建项目,并填写所有必需的详细信息以创建新项目。
步骤 2 - 将以下代码添加到res/layout/activity_main.xml。
<?xml version="1.0" encoding="utf-8"?>
<androidx.constraintlayout.widget.ConstraintLayout
   xmlns:android="http://schemas.android.com/apk/res/android"
   xmlns:app="http://schemas.android.com/apk/res-auto"
   xmlns:tools="http://schemas.android.com/tools"
   android:layout_width="match_parent"
   android:layout_height="match_parent"
   tools:context=".MainActivity">
   <TextView
      android:layout_width="wrap_content"
      android:layout_height="wrap_content"
      android:text="Hello World!"
      app:layout_constraintBottom_toBottomOf="parent"
      app:layout_constraintLeft_toLeftOf="parent"
      app:layout_constraintRight_toRightOf="parent"
      app:layout_constraintTop_toTopOf="parent" />
</androidx.constraintlayout.widget.ConstraintLayout>
步骤 3 - 将以下代码添加到src/MainActivity.java
package com.app.sample;
import androidx.appcompat.app.AppCompatActivity;
import androidx.core.app.NotificationCompat;
import android.os.Bundle;
import android.os.Bundle;
import android.app.Activity;
import android.app.NotificationManager;
import android.app.PendingIntent;
import android.content.Intent;
import android.view.Menu;
import android.view.View;
import android.view.View.OnClickListener;
import android.widget.Button;
import android.widget.RemoteViews;
public class MainActivity extends AppCompatActivity {
   @Override
   protected void onCreate(Bundle savedInstanceState) {
      super.onCreate(savedInstanceState);
      setContentView(R.layout.notificationmain);
      Button bnotify = (Button) findViewById(R.id.notification);
      Button bcustomnotify = (Button) findViewById(R.id.customnotification);
      bnotify.setOnClickListener(new OnClickListener() {
         public void onClick(View arg0) {
            Notification();
         // TODO Auto-generated method stub
         }
      });
      bcustomnotify.setOnClickListener(new OnClickListener() {
         public void onClick(View arg0) {
            CustomNotification();
            // TODO Auto-generated method stub
         }
      });
   }
   public void Notification() {
      // Set Notification Title
      String strtitle = getString(R.string.notificationtitle);
      String strtext = getString(R.string.notificationtext);
      Intent intent = new Intent(this, NotificationView.class);
      intent.putExtra("title", strtitle);
      intent.putExtra("text", strtext);
      PendingIntent pIntent = PendingIntent.getActivity(this, 0, intent, PendingIntent.FLAG_UPDATE_CURRENT);
      NotificationCompat.Builder builder = new NotificationCompat.Builder(this)
         .setSmallIcon(R.drawable.logosmall)
         .setTicker(getString(R.string.notificationticker))
         .setContentTitle(getString(R.string.notificationtitle))
         .setContentText(getString(R.string.notificationtext))
         .addAction(R.drawable.ic_launcher, "Action Button", pIntent)
         .setContentIntent(pIntent) .setAutoCancel(true);
      NotificationManager notificationmanager = (NotificationManager) getSystemService(NOTIFICATION_SERVICE);
      notificationmanager.notify(0, builder.build());
   }
   public void CustomNotification() {
      RemoteViews remoteViews = new RemoteViews(getPackageName(), R.layout.customnotification);
      String strtitle = getString(R.string.customnotificationtitle);
      String strtext = getString(R.string.customnotificationtext);
      Intent intent = new Intent(this, NotificationView.class);
      intent.putExtra("title", strtitle);
      intent.putExtra("text", strtext);
      PendingIntent pIntent = PendingIntent.getActivity(this, 0, intent, PendingIntent.FLAG_UPDATE_CURRENT);
      NotificationCompat.Builder builder = new NotificationCompat.Builder(this)
         .setSmallIcon(R.drawable.logosmall)
         .setTicker(getString(R.string.customnotificationticker))
         .setAutoCancel(true) .setContentIntent(pIntent)
         .setContent(remoteViews);
      remoteViews.setImageViewResource(R.id.imagenotileft,R.drawable.ic_launcher);
      remoteViews.setImageViewResource(R.id.imagenotiright,R.drawable.androidhappy);
      remoteViews.setTextViewText(R.id.title,getString(R.string.customnotificationtitle));
      remoteViews.setTextViewText(R.id.text,getString(R.string.customnotificationtext));
      // Create Notification Manager
      NotificationManager notificationmanager = (NotificationManager) getSystemService(NOTIFICATION_SERVICE);
      // Build Notification with Notification Manager
      notificationmanager.notify(0, builder.build());
   }
   @Override
   public boolean onCreateOptionsMenu(Menu menu) {
      // Inflate the menu; this adds items to the action bar if it is present.
      getMenuInflater().inflate(R.menu.activity_main, menu);
      return true;
   }
}
步骤 4 - 将以下代码添加到res/layout/notification.xml。
<?xml version="1.0" encoding="utf-8"?>
<RelativeLayout xmlns:android="http://schemas.android.com/apk/res/android"
   android:orientation="vertical"
   android:layout_width="match_parent"
   android:layout_height="match_parent">
   <Button
      android:id="@+id/notification"
      android:layout_width="wrap_content"
      android:layout_height="wrap_content"
      android:layout_centerInParent="true"
      android:text="Notification - 1" />
   <Button
      android:id="@+id/customnotification"
      android:layout_width="wrap_content"
      android:layout_height="wrap_content"
      android:layout_centerInParent="true"
      android:layout_below="@+id/notification"
      android:text="Custom Notification - 1" />
</RelativeLayout>
步骤 5 - 将以下代码添加到res/layout/customnotification.xml。
<?xml version="1.0" encoding="utf-8"?>
<RelativeLayout xmlns:android="http://schemas.android.com/apk/res/android"
   android:orientation="vertical"
   android:layout_width="match_parent"
   android:layout_height="match_parent">
   <ImageView
      android:id="@+id/imagenotileft"
      android:layout_width="wrap_content"
      android:layout_height="wrap_content" />
   <TextView
      android:id="@+id/title"
      android:layout_width="wrap_content"
      android:layout_height="wrap_content"
      android:layout_toRightOf="@+id/imagenotileft" />
   <TextView
      android:id="@+id/text"
      android:layout_width="wrap_content"
      android:layout_height="wrap_content"
      android:layout_below="@+id/title"
      android:layout_toRightOf="@+id/imagenotileft" />
   <ImageView
      android:id="@+id/imagenotiright"
      android:layout_width="wrap_content"
      android:layout_height="wrap_content"
      android:layout_alignParentRight="true"
      android:padding="10dp" />
</RelativeLayout>
步骤 6 - 将以下代码添加到res/layout/notificationview.xml。
<?xml version="1.0" encoding="utf-8"?>
<RelativeLayout xmlns:android="http://schemas.android.com/apk/res/android"
   android:orientation="vertical"
   android:layout_width="fill_parent"
   android:layout_height="fill_parent">
   <TextView
      android:id="@+id/lbltitle"
      android:layout_width="wrap_content"
      android:layout_height="wrap_content"
      android:text="@string/lbltitle" />
   <TextView
      android:id="@+id/lbltext"
      android:layout_width="wrap_content"
      android:layout_height="wrap_content"
      android:layout_below="@+id/lbltitle"
      android:text="@string/lbltext" />
   <TextView
      android:id="@+id/title"
      android:layout_width="wrap_content"
      android:layout_height="wrap_content"
      android:layout_toRightOf="@+id/lbltitle" />
   <TextView
      android:id="@+id/text"
      android:layout_width="wrap_content"
      android:layout_height="wrap_content"
      android:layout_below="@+id/title"
      android:layout_toRightOf="@+id/lbltext" />
</RelativeLayout>
步骤 7 - 将以下代码添加到Manifests/AndroidManifest.xml
<?xml version="1.0" encoding="utf-8"?>
<manifest xmlns:android="http://schemas.android.com/apk/res/android" package="com.app.sample">
   <application
      android:allowBackup="true"
      android:icon="@mipmap/ic_launcher"
      android:label="@string/app_name"
      android:roundIcon="@mipmap/ic_launcher_round"
      android:supportsRtl="true"
      android:theme="@style/AppTheme">
      <activity android:name=".MainActivity">
         <intent-filter>
            <action android:name="android.intent.action.MAIN" />
            <category android:name="android.intent.category.LAUNCHER" />
         </intent-filter>
      </activity>
   </application>
</manifest>
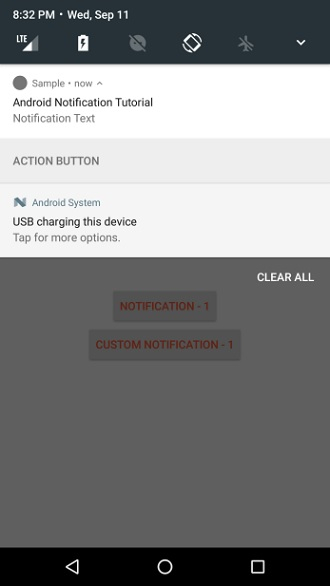
让我们尝试运行您的应用程序。我假设您已将您的实际Android移动设备连接到您的计算机。要从Android Studio运行应用程序,请打开您的项目的一个活动文件,然后点击运行 ![]() 工具栏中的图标。选择您的移动设备作为选项,然后检查您的移动设备,它将显示您的默认屏幕 -
工具栏中的图标。选择您的移动设备作为选项,然后检查您的移动设备,它将显示您的默认屏幕 -

点击这里下载项目代码。

广告

 数据结构
数据结构 网络
网络 关系型数据库管理系统
 操作系统
操作系统 Java
Java iOS
iOS HTML
HTML CSS
CSS Android
 Python
 C语言编程
C语言编程 C++
C++ C#
C# MongoDB
 MySQL
MySQL Javascript
 PHP
PHP