
 数据结构
数据结构 网络
网络 关系型数据库管理系统
 操作系统
操作系统 Java
Java iOS
iOS HTML
HTML CSS
CSS Android
 Python
 C编程
C编程 C++
C++ C#
C# MongoDB
 MySQL
MySQL Javascript
 PHP
PHP如何在Android中实现偏好设置屏幕?
构建一个用户友好的Android应用程序需要为用户提供可自定义的偏好设置。为了完成这项任务,集成一个偏好设置屏幕至关重要。此屏幕让用户能够通过修改不同的选项和配置来个性化其应用程序体验,以满足其需求和愿望。
修改偏好设置的中心包括一个屏幕,应用程序用户可以在其中轻松访问和自定义设置以符合其喜好。用户友好的界面包括主题选择、通知偏好设置、语言选择等选项,所有这些都旨在增强用户参与度和满意度。通过允许开发人员根据个人需求定制应用程序,此功能增强了用户体验。
本指南深入探讨了在Android中实现偏好设置屏幕的方法。其目标是确保用户获得个性化的体验,而不会出现中断或不便。本指南旨在提供无缝流程的实用步骤。
偏好设置屏幕
Android中的偏好设置屏幕是一个组件,它为用户提供了一个用户界面来个性化其应用程序体验。它充当一个中心位置,用户可以在其中根据自己的个人偏好修改与应用程序行为、外观和功能相关的设置。
用户友好的偏好设置屏幕允许方便地管理偏好设置。这包括选择首选语言、自定义主题、选择通知设置、管理帐户详细信息、确保隐私设置等等。
用户可以通过根据其确切的需求和偏好调整应用程序的行为来个性化其应用程序体验。开发人员整合此功能以确保灵活性、满意度并改善用户的整体体验。
方法
使用Java在Android中实现偏好设置屏幕涉及多个步骤和方法。以下是可以用来实现此目标的不同方法
创建偏好设置XML文件
创建偏好设置片段
处理偏好设置更改
创建偏好设置XML文件
为了在Android中实现偏好设置屏幕,您需要使用XML文件定义屏幕的布局和结构。此文件将包含偏好设置类别、偏好设置项及其属性。通过在XML中定义偏好设置,您可以轻松自定义其外观、定义偏好设置之间的依赖关系并指定默认值。
算法
使用XML文件定义偏好设置屏幕的结构。
指定偏好设置类别和项及其各自的属性。
根据需要自定义偏好设置的外观、依赖关系和默认值。
示例
//res/preferences.xml
<PreferenceCategory
   android:title="General">
   <SwitchPreference
      android:key="pref_key_push_notification"
      android:title="Enable Push Notification"
      android:summary="Toggle push notification on/off"
      android:defaultValue="false" />

   <SwitchPreference
      android:key="pref_key_send_weekly_emails"
      android:title="Send Weekly Emails"
      android:summary="Toggle sending of weekly emails on/off"
      android:defaultValue="false" />
</PreferenceCategory>

<PreferenceCategory
   android:title="Account">
   <EditTextPreference
      android:key="pref_key_email"
      android:title="Email"
      android:summary="Enter your email address"
      android:defaultValue="" />

   <EditTextPreference
      android:key="pref_key_name"
      android:title="Name"
      android:summary="Enter your name"
      android:defaultValue="" />
</PreferenceCategory>

//arrays.xml
<?xml version="1.0" encoding="utf-8"?>
<resources>
   <string-array name="language_entries">
      <item>English</item>
      <item>Spanish</item>
      <item>French</item>
   </string-array>
   <string-array name="language_values">
      <item>en</item>
      <item>es</item>
      <item>fr</item>
   </string-array>
</resources>

//SettingsFragment.java
public class SettingsFragment extends PreferenceFragmentCompat {
   @Override
   public void onCreatePreferences(Bundle savedInstanceState,
String rootKey) {
      setPreferencesFromResource(R.xml.preferences, rootKey);
   }
}

//MainActivity.java
public class MainActivity extends AppCompatActivity {
   @Override
   protected void onCreate(Bundle savedInstanceState) {
      super.onCreate(savedInstanceState);
      setContentView(R.layout.activity_main);

      getSupportFragmentManager()
            .beginTransaction()
            .replace(R.id.container, new SettingsFragment())
            .commit();
   }
}

//activity_main.xml
<LinearLayout xmlns:android="http://schemas.android.com/apk/res/
android"
   android:layout_width="match_parent"
   android:layout_height="match_parent"
   android:orientation="vertical">

   <!-- Other views in your activity layout -->

   <FrameLayout
      android:id="@+id/settings_container"
      android:layout_width="match_parent"
      android:layout_height="match_parent" />

</LinearLayout>

//MainActivity.java
import android.os.Bundle;
import androidx.appcompat.app.AppCompatActivity;

public class MainActivity extends AppCompatActivity {
   @Override
   protected void onCreate(Bundle savedInstanceState) {
      super.onCreate(savedInstanceState);
      setContentView(R.layout.activity_main);

      if (savedInstanceState == null) {
         getSupportFragmentManager().beginTransaction()
            .replace(R.id.settings_container, new SettingsFragment())
            .commit();
      }
   }
}
输出

创建偏好设置片段
为了显示在XML文件中定义的偏好设置,您需要创建一个偏好设置片段。此片段类扩展了PreferenceFragmentCompat类,并充当显示偏好设置的容器。在片段的onCreateView()方法中,您可以使用addPreferencesFromResource()方法加载偏好设置XML,以加载并在屏幕上显示偏好设置。
算法
创建一个扩展PreferenceFragmentCompat的片段类。
覆盖onCreateView()方法以加载偏好设置XML布局。
使用addPreferencesFromResource()加载并在屏幕上显示偏好设置。
通过实现其他方法或添加事件侦听器(如有必要)来自定义片段。
示例
// PreferenceFragmentCompat.java
import android.os.Bundle;
import androidx.preference.PreferenceFragmentCompat;

public class MyPreferencesFragment extends
PreferenceFragmentCompat {

   @Override
   public void onCreatePreferences(Bundle savedInstanceState,
   String rootKey) {
      setPreferencesFromResource(R.xml.preferences, rootKey);
   }
}

//res/preferences.xml
<PreferenceScreen xmlns:android=
"http://schemas.android.com/apk/res/android">
   <PreferenceCategory
      android:title="General Settings">

      <CheckBoxPreference
         android:key="pref_key_notification"
         android:title="Enable Notifications"
         android:summary="Receive notifications"
         android:defaultValue="true" />

      <EditTextPreference
         android:key="pref_key_username"
         android:title="Username"
         android:summary="Enter your username"
         android:dialogTitle="Enter username"
         android:defaultValue="JohnDoe" />

      <!-- Add more preferences here -->
   </PreferenceCategory>
</PreferenceScreen>

// SettingsActivity.java
import android.os.Bundle;
import androidx.appcompat.app.AppCompatActivity;

public class SettingsActivity extends AppCompatActivity {

   @Override
   protected void onCreate(Bundle savedInstanceState) {
      super.onCreate(savedInstanceState);
      getSupportFragmentManager().beginTransaction()
            .replace(android.R.id.content, new
            MyPreferencesFragment())
            .commit();
   }
}

// MainActivity.java
import android.content.Intent;
import android.os.Bundle;
import androidx.appcompat.app.AppCompatActivity;
import android.view.View;
import android.widget.Button;

public class MainActivity extends AppCompatActivity {

   private Button settingsButton;

   @Override
   protected void onCreate(Bundle savedInstanceState) {
      super.onCreate(savedInstanceState);
      setContentView(R.layout.activity_main);

      settingsButton = findViewById(R.id.settings_button);
      settingsButton.setOnClickListener(new View.OnClickListener() {
         @Override
         public void onClick(View v) {
            startActivity(new Intent(MainActivity.this,
ettingsActivity.class));
         }
      });
   }
}
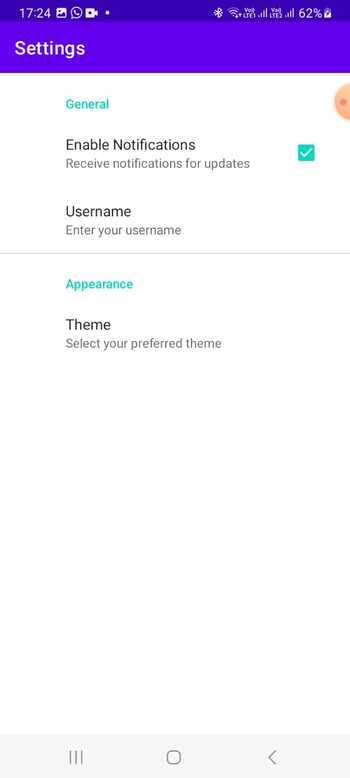
输出

处理偏好设置更改
为了响应用户对偏好设置所做的更改,您需要实现onSharedPreferenceChanged()方法。通过注册SharedPreferences.OnSharedPreferenceChangeListener,您可以侦听偏好设置的更改并相应地更新应用程序的行为。此方法允许您访问更新后的偏好设置值,并根据用户选择的新的偏好设置执行诸如更新UI元素或触发特定功能等操作。
共享偏好设置更改侦听器应始终正确注册和注销,以确保正确的内存管理并避免任何潜在的内存泄漏。
算法
在偏好设置片段中实现onSharedPreferenceChanged()方法。
注册SharedPreferences.OnSharedPreferenceChangeListener。
侦听偏好设置的更改并接收更新。
根据新的偏好设置值更新应用程序的行为。
在不再需要时注销共享偏好设置更改侦听器,以防止内存泄漏。
示例
// preferences.xml
<?xml version="1.0" encoding="utf-8"?>
<PreferenceScreen
xmlns:android="http://schemas.android.com/apk/res/android">
   <CheckBoxPreference
      android:key="notification_preference"
      android:title="Enable Notifications"
      android:summary="Enable/disable notifications"
      android:defaultValue="true" />
   <!-- Add more preferences as needed -->
</PreferenceScreen>

// PreferencesFragment.java
import android.os.Bundle;
import androidx.preference.CheckBoxPreference;
import androidx.preference.Preference;
import androidx.preference.PreferenceFragmentCompat;

public class PreferencesFragment extends PreferenceFragmentCompat {
   @Override
   public void onCreatePreferences(Bundle savedInstanceState,
String rootKey) {
      setPreferencesFromResource(R.xml.preferences, rootKey);

      CheckBoxPreference notificationPreference =
findPreference("notification_preference");
      notificationPreference.setOnPreferenceChangeListener(new
Preference.OnPreferenceChangeListener() {
         @Override
         public boolean onPreferenceChange(Preference preference,
Object newValue) {
            boolean enableNotifications = (boolean) newValue;
            // Handle preference change, e.g., save to
SharedPreferences or trigger an action
            return true; // Return 'true' to update the preference
value
         }
      });
      // Add more preference change listeners as needed
   }
}

//activity_main.xml
<FrameLayout
   xmlns:android="http://schemas.android.com/apk/res/android"
   android:id="@+id/preferences_container"
   android:layout_width="match_parent"
   android:layout_height="match_parent" />

// MainActivity.java
import android.os.Bundle;
import androidx.appcompat.app.AppCompatActivity;

public class MainActivity extends AppCompatActivity {
   @Override
   protected void onCreate(Bundle savedInstanceState) {
      super.onCreate(savedInstanceState);
      setContentView(R.layout.activity_main);

      getSupportFragmentManager().beginTransaction()
         .replace(R.id.preferences_container, new
PreferencesFragment())
         .commit();
   }
}
输出
结论
开发人员可以通过在Android中实现偏好设置屏幕为用户提供个性化的体验。本教程概述了这些步骤,包括创建XML文件、偏好设置片段以及处理偏好设置更改。通过为用户提供一个直观的界面来管理根据其喜好定制的设置和偏好设置,应用程序变得更加用户友好和引人入胜。这最终增强了所有参与使用应用程序的人员的满意度。

849 次浏览
