
 数据结构
数据结构 网络
网络 关系数据库管理系统
 操作系统
操作系统 Java
Java iOS
iOS HTML
HTML CSS
CSS Android
 Python
 C 编程
C 编程 C++
C++ C#
C# MongoDB
 MySQL
MySQL Javascript
 PHP
PHP如何在 Android 应用中集成 PayPal?
介绍
在任何 Android 应用程序中,我们都可以看到不同的支付网关用于从应用程序用户那里收取费用,以提供特定的服务,例如 Paytm、Razorpay、Paypal 等。在本文中,我们将了解如何在 Android 应用程序中集成 PayPal。
实施
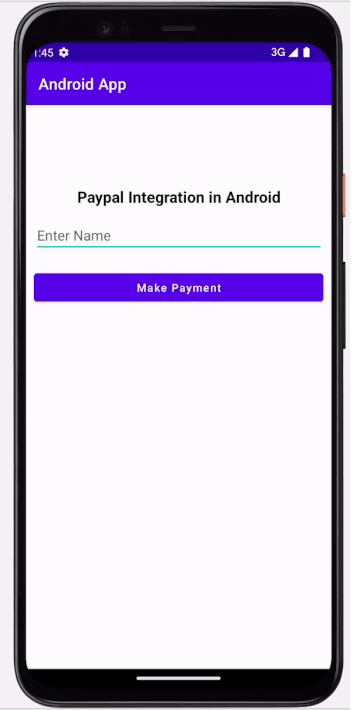
我们将创建一个简单的应用程序,其中我们将创建一个 TextView 用于显示应用程序的标题。之后,我们将创建一个 EditText 用于输入用户需要支付的金额,以及一个用于进行支付的按钮。
步骤 1:创建用于使用 PayPal SDK 的客户端 ID
导航到 URL 并使用您的 PayPal ID 和密码登录。在其中,您将看到一个创建应用程序的选项。只需单击该选项即可在此处创建新的应用程序,并在其中指定应用程序名称和其他所需详细信息。填写所有必需数据后,将创建一个新应用程序,您将看到一个屏幕,其中您可以看到我们创建的应用程序的客户端 ID。我们将在项目中使用该客户端 ID,因此请确保将其复制。
步骤 2:在 Android Studio 中创建一个新项目
导航到 Android Studio,如下面的屏幕所示。在下面的屏幕中,单击“新建项目”以创建一个新的 Android Studio 项目。
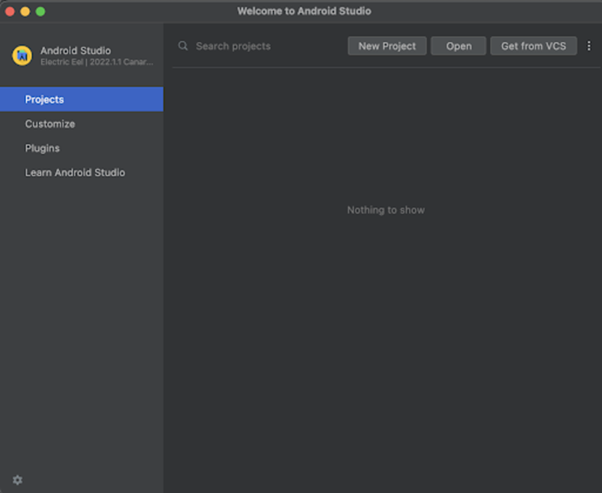
单击“新建项目”后,您将看到下面的屏幕。
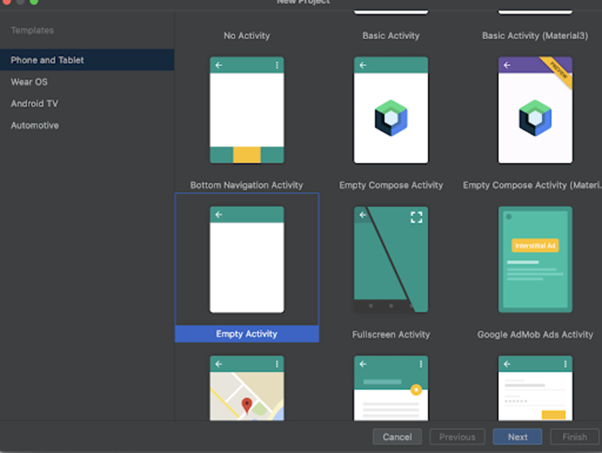
在此屏幕中,我们只需选择“空活动”并单击“下一步”。单击“下一步”后,您将看到下面的屏幕。
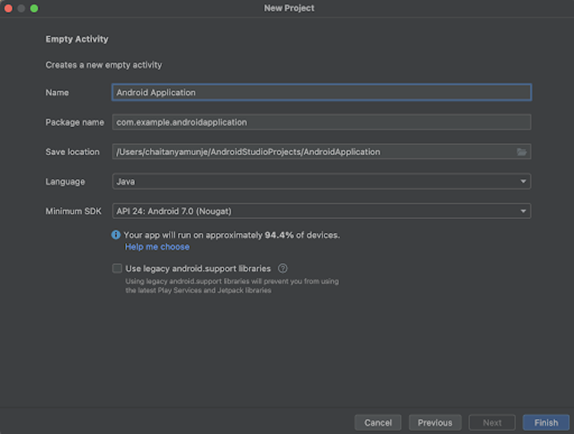
在此屏幕中,我们只需指定项目名称。然后,包名称将自动生成。
注意 - 请确保将语言选择为 Java。
指定所有详细信息后,单击“完成”以创建一个新的 Android Studio 项目。
创建项目后,我们将看到两个打开的文件,即 activity_main.xml 和 MainActivity.java 文件。
步骤 3:在 build.gradle 文件中添加 paypal sdk 依赖项
导航到 Gradle 脚本 > build.gradle 文件(app)级别,并在依赖项部分添加以下依赖项。
implementation 'com.paypal.sdk:paypal-android-sdk:2.14.2'
添加上述依赖项后,只需同步您的项目即可安装它。
步骤 4:使用 activity_main.xml
导航到 activity_main.xml。如果此文件不可见,则要打开此文件。在左侧窗格中导航到 app > res > layout > activity_main.xml 以打开此文件。打开此文件后,将以下代码添加到其中。代码中添加了注释以详细了解。
<?xml version="1.0" encoding="utf-8"?>
<RelativeLayout xmlns:android="http://schemas.android.com/apk/res/android"
   xmlns:tools="http://schemas.android.com/tools"
   android:layout_width="match_parent"
   android:layout_height="match_parent"
   android:orientation="vertical"
   tools:context=".MainActivity">
   <!-- on below line creating a text view for displaying the heading of our application -->
   <TextView
       android:id="@+id/idTVHeading"
       android:layout_width="match_parent"
       android:layout_height="wrap_content"
       android:layout_marginStart="10dp"
       android:layout_marginTop="100dp"
       android:layout_marginEnd="10dp"
       android:gravity="center"
       android:padding="4dp"
       android:text="Paypal Integration in Android"
       android:textAlignment="center"
       android:textColor="@color/black"
       android:textSize="20sp"
       android:textStyle="bold" />
   <!-- on below line creating edit text for name -->
   <EditText
       android:id="@+id/idEdtAmount"
       android:layout_width="match_parent"
       android:layout_height="wrap_content"
       android:layout_below="@id/idTVHeading"
       android:layout_margin="10dp"
       android:hint="Enter Name"
       android:inputType="number" />
   <!-- on below line creating a button for making a payment-->
   <Button
       android:id="@+id/idBtnMakePayment"
       android:layout_width="match_parent"
       android:layout_height="wrap_content"
       android:layout_below="@id/idEdtAmount"
       android:layout_margin="10dp"
       android:padding="4dp"
       android:text="Make Payment"
       android:textAllCaps="false" />
</RelativeLayout>
说明:在上面的代码中,我们正在创建一个根布局作为相对布局。在此布局内,我们正在创建一个 TextView 用于显示应用程序的标题。之后,我们正在创建一个 EditText 用于输入用户需要支付的金额。然后创建一个用于进行支付的按钮。
步骤 5:在 AndroidManifest.xml 文件中添加权限
导航到 app > AndroidManifest.xml 文件,并在清单标记中添加以下权限以访问互联网。
<uses-permission
   android:name="android.permission.INTERNET" />
步骤 6:使用 MainActivity.java 文件
导航到 MainActivity.java。如果此文件不可见,则要打开此文件。在左侧窗格中导航到 app > res > layout > MainActivity.java 以打开此文件。打开此文件后,将以下代码添加到其中。代码中添加了注释以详细了解。
package com.example.java_test_application;
import android.app.Activity;
import android.content.Intent;
import android.os.Bundle;
import android.util.Log;
import android.view.View;
import android.widget.Button;
import android.widget.EditText;
import android.widget.Toast;
import androidx.annotation.Nullable;
import androidx.appcompat.app.AppCompatActivity;
import com.paypal.android.sdk.payments.PayPalConfiguration;
import com.paypal.android.sdk.payments.PayPalPayment;
import com.paypal.android.sdk.payments.PayPalService;
import com.paypal.android.sdk.payments.PaymentActivity;
import com.paypal.android.sdk.payments.PaymentConfirmation;
import org.json.JSONException;
import org.json.JSONObject;
import java.math.BigDecimal;
public class MainActivity extends AppCompatActivity {
   // on below line creating a variable for client id of pay pal.
   private static final String clientID = "Paste your client id here";
   // creating variables for edit text on below line.
   private EditText amountEdt;
   // creating variable for button on below line.
   private Button payBtn;
   // on below line creating a variable to store request code for paypal sdk
   public static final int PAYPAL_REQUEST_CODE = 123;
   // on below line creating a Paypal Configuration Object
   private static PayPalConfiguration config = new PayPalConfiguration()
           // Start with mock environment.  When ready,
           // switch to sandbox (ENVIRONMENT_SANDBOX)
           // or live (ENVIRONMENT_PRODUCTION)
           .environment(PayPalConfiguration.ENVIRONMENT_SANDBOX)
           // on below line we are passing a client id.
           .clientId(clientID);
   @Override
   protected void onCreate(Bundle savedInstanceState) {
       super.onCreate(savedInstanceState);
       setContentView(R.layout.activity_main);
       // initializing variables for edit text on below line.
       amountEdt = findViewById(R.id.idEdtAmount);
       // initializing variables for button on below line.
       payBtn = findViewById(R.id.idBtnMakePayment);
       // adding click listener for button on below line.
       payBtn.setOnClickListener(new View.OnClickListener() {
           @Override
           public void onClick(View v) {
               // on below line validating if name and age is empty or not.
               if (amountEdt.getText().toString().isEmpty()) {
                   // if both name and age is empty we are displaying a toast message on below line.
                   Toast.makeText(getApplicationContext(), "Please enter amout to be paid", Toast.LENGTH_SHORT).show();
               } else {
                   makePayment(amountEdt.getText().toString());
               }
           }
       });
   }
   private void makePayment(String amount) {
       // Creating a paypal payment on below line.
       PayPalPayment payment = new PayPalPayment(new BigDecimal(String.valueOf(amount)), "USD", "Course Fees",
               PayPalPayment.PAYMENT_INTENT_SALE);
       // Creating Paypal Payment activity intent on below line
       Intent intent = new Intent(this, PaymentActivity.class);
       //putting the paypal configuration to the intent from the configuration we have created above.
       intent.putExtra(PayPalService.EXTRA_PAYPAL_CONFIGURATION, config);
       // Putting paypal payment to the intent on below line.
       intent.putExtra(PaymentActivity.EXTRA_PAYMENT, payment);
       // Starting the intent activity for result
       // the request code will be used on the method onActivityResult
       startActivityForResult(intent, PAYPAL_REQUEST_CODE);
   }
   @Override
   protected void onActivityResult(int requestCode, int resultCode, @Nullable Intent data) {
       super.onActivityResult(requestCode, resultCode, data);
       // If the result is from paypal request code
       if (requestCode == PAYPAL_REQUEST_CODE) {
           // If the result is OK i.e. user has not canceled the payment
           if (resultCode == Activity.RESULT_OK) {
               // Getting the payment confirmation
               PaymentConfirmation confirm = data.getParcelableExtra(PaymentActivity.EXTRA_RESULT_CONFIRMATION);
               // if confirmation is not null
               if (confirm != null) {
                   try {
                       // Getting the payment details
                       String paymentDetails = confirm.toJSONObject().toString(4);
                       // on below line we are extracting json response and displaying it in a text view.
                       JSONObject payObj = new JSONObject(paymentDetails);
                       String payID = payObj.getJSONObject("response").getString("id");
                       String state = payObj.getJSONObject("response").getString("state");
                       // on below line displaying a toast message with the payment status
                       Toast.makeText(this, "Payment : " + state + "
 with payment id is : " + payID, Toast.LENGTH_SHORT).show();
                   } catch (JSONException e) {
                       // handling json exception on below line
                       Log.e("Error", "an extremely unlikely failure occurred: ", e);
                   }
               }
           } else if (resultCode == Activity.RESULT_CANCELED) {
               // on below line we are displaying a toast message as user cancelled the payment.
               Toast.makeText(this, "User cancelled the payment..", Toast.LENGTH_SHORT).show();
           } else if (resultCode == PaymentActivity.RESULT_EXTRAS_INVALID) {
               // on below line displaying toast message for invalid payment config.
               Toast.makeText(this, "Invalid payment config was submitted..", Toast.LENGTH_SHORT).show();
           }
       }
   }
}
说明:在上面的代码中,首先我们为我们的客户端 ID 创建一个字符串变量,我们必须在其中添加您的客户端 ID,然后我们为我们的按钮和 EditText 创建一个变量,最后为请求代码创建一个变量,我们将使用它来检查意图。之后,我们创建一个名为 config 的变量,该变量用于生成我们将用于使用 PayPal 进行支付的 PayPal 支付配置。现在我们将看到 onCreate 方法。这是每个 Android 应用程序的默认方法。此方法在创建应用程序视图时调用。在此方法中,我们设置内容视图,即名为 activity_main.xml 的布局文件,以从该文件中设置 UI。在 onCreate 方法中,我们使用我们在 activity_main.xml 文件中给出的 ID 初始化 EditText 和按钮变量。
之后,我们为两个按钮添加了一个点击监听器。在点击监听器中,我们首先检查金额的 EditText 字段是否为空。如果 EditText 为空,我们将显示一条吐司消息,在另一个条件下,我们调用 make payment 方法并在该方法中传递我们的金额。
在 make payment 方法中,我们为 PayPal 支付创建一个变量。然后,我们调用 PayPal 支付活动意图以进行支付。我们调用 start activity for result 方法以进行 PayPal 支付。
现在,我们创建了一个活动结果方法,在其中我们检查用户进行的支付状态,无论是已支付、已取消还是已失败。相应地,我们还会向用户显示吐司消息。
添加上述代码后,现在我们只需单击顶部的绿色图标即可在移动设备上运行我们的应用程序。
注意 - 请确保您已连接到您的真实设备或模拟器并添加您的客户端 ID。
输出
结论
在本文中,我们了解了如何在 Android 应用程序中集成 PayPal 以接收付款。

2K+ 次查看
