
 数据结构
数据结构 网络
网络 关系型数据库管理系统
 操作系统
操作系统 Java
Java iOS
iOS HTML
HTML CSS
CSS Android
 Python
 C 编程
C 编程 C++
C++ C#
C# MongoDB
 MySQL
MySQL Javascript
 PHP
PHP如何在 Pygame 中移动游戏角色?
Pygame 是一个强大的库,允许开发人员使用 Python 编程语言创建引人入胜的2D 游戏。游戏开发的一个基本方面是角色移动。
在本文中,我们将学习如何在 Pygame 中移动游戏角色。本文适合所有人,无论您是初学者还是经验丰富的开发人员,都将为您提供在游戏中实现流畅且响应迅速的角色移动所需的知识和技能。
在 Pygame 中移动游戏角色的步骤
以下是如何在 Pygame 中移动游戏角色的完整步骤
步骤 1:设置游戏窗口并初始化 Pygame
首先,通过在代码开头包含以下行来导入必要的模块:import pygame。然后,通过调用 pygame.init() 初始化 Pygame。接下来,使用 s_width 和 s_height 变量定义宽度和高度来设置游戏窗口。使用 pygame.display.set_mode((s_width, s_height)) 创建游戏窗口,并使用 pygame.display.set_caption("Your Game Window Title") 设置窗口所需的标题。
语法
import pygame
pygame.init()
s_width, s_height = 800, 600
screen = pygame.display.set_mode((s_width, s_height))
pygame.display.set_caption("Your Game Window Title")
步骤 2:加载角色图像并定义角色的位置
使用 char_img = pygame.image.load("character.png") 加载游戏角色的图像文件。通过调用 char_rect = char_img.get_rect() 创建一个矩形对象来表示角色的尺寸。要将角色放置在游戏窗口的中心,请使用 char_rect.center = (s_width // 2, s_height // 2) 设置矩形的中心。
语法
char_img = pygame.image.load("character.png")
char_rect = char_img.get_rect()
char_rect.center = (s_width // 2, s_height // 2)
步骤 3:处理用户输入以进行角色移动
在游戏循环内,使用 keys = pygame.key.get_pressed() 获取当前按下键的列表。检查 keys 列表以确定按下了哪些键。例如,要按下左箭头键时将角色向左移动,请使用以下条件:if keys[pygame.K_LEFT]: char_rect.x −= movement_speed。类似地,检查其他箭头键以处理不同方向的角色移动。
语法
keys = pygame.key.get_pressed()
if keys[pygame.K_LEFT]:
    char_rect.x -= movement_speed
if keys[pygame.K_RIGHT]:
    char_rect.x += movement_speed
if keys[pygame.K_UP]:
    char_rect.y -= movement_speed
if keys[pygame.K_DOWN]:
    char_rect.y += movement_speed
步骤 4:更新屏幕
处理用户输入后,必须更新屏幕以反映更改。首先使用 screen.fill((255, 255, 255)) 清空屏幕,使其填充白色背景。接下来,使用 screen.blit(char_img, char_rect) 将角色图像在其当前位置绘制到屏幕上。最后,使用 pygame.display.flip() 更新所有显示的更改。
语法
screen.fill((255, 255, 255))
screen.blit(char_img, char_rect)
pygame.display.flip()
步骤 5:处理事件和控制游戏循环
为了确保游戏窗口保持打开状态,直到用户决定关闭它,请在游戏循环中包含事件处理。使用 for event in pygame.event.get() 迭代事件列表。检查事件类型是否为 pygame.QUIT,这表示用户想要关闭窗口。如果满足此条件,则设置 running = False 以退出游戏循环并退出游戏。
语法
screen.fill((255, 255, 255))
screen.blit(char_img, char_rect)
pygame.display.flip()
步骤 6:添加时钟并设置所需的帧速率
要控制游戏的帧速率,请使用 clock = pygame.time.Clock() 创建一个时钟对象。通过将 FPS 设置为合适的值来指定所需的帧速率。在游戏循环内,调用 clock.tick(FPS) 来调节帧速率。
语法
screen.fill((255, 255, 255))
screen.blit(char_img, char_rect)
pygame.display.flip()
示例 1:使用 pygame 进行基本角色移动
#import the pygame and keyboard
import pygame
import keyboard

# Initialize Pygame
pygame.init()

# Set up the game window
s_width, s_height = 800, 600
screen = pygame.display.set_mode((s_width, s_height))
pygame.display.set_caption("Example to move character")

# Load the character image
char_img = pygame.image.load("tplogo.png")
char_rect = char_img.get_rect()
char_rect.center = (s_width // 2, s_height // 2)

# Set up the clock
clock = pygame.time.Clock()
FPS = 60

# Set the game loop
running = True
while running:
    dt = clock.tick(FPS) / 1000.0

    for event in pygame.event.get():
        if event.type == pygame.QUIT:
            running = False

    if keyboard.is_pressed('left'):
        char_rect.x -= 5
    if keyboard.is_pressed('right'):
        char_rect.x += 5
    if keyboard.is_pressed('up'):
        char_rect.y -= 5
    if keyboard.is_pressed('down'):
        char_rect.y += 5

    # Update the screen
    screen.fill((255, 255, 255))
    screen.blit(char_img, char_rect)
    pygame.display.flip()

# Quit the game
pygame.quit()
输出

示例 2:使用 pygame 进行基于网格的移动
image
char_img = pygame.image.load("tplogo.png")
char_rect = char_img.get_rect()
char_rect.center = (s_width // 2, s_height // 2)

# Set up the clock
clock = pygame.time.Clock()
FPS = 60

# Define grid size and movement speed
grid_size = 100
movement_speed = 5

# Set the game loop
running = True
while running:
    dt = clock.tick(FPS) / 1000.0

    for event in pygame.event.get():
        if event.type == pygame.QUIT:
            running = False

    if keyboard.is_pressed('left'):
        char_rect.x -= movement_speed * dt
    if keyboard.is_pressed('right'):
        char_rect.x += movement_speed * dt
    if keyboard.is_pressed('up'):
        char_rect.y -= movement_speed * dt
    if keyboard.is_pressed('down'):
        char_rect.y += movement_speed * dt

    # Snap the character to the nearest grid position
    char_rect.x = round(char_rect.x / grid_size) * grid_size
    char_rect.y = round(char_rect.y / grid_size) * grid_size

    # Update the screen
    screen.fill((255, 255, 255))
    screen.blit(char_img, char_rect)
    pygame.display.flip()

# Quit the game
pygame.quit()
输出
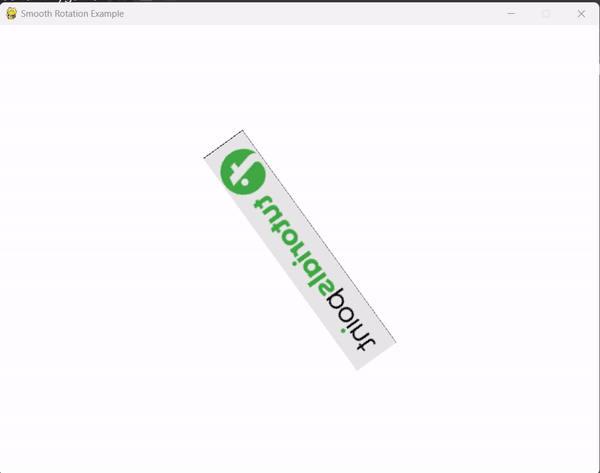
示例 3:平滑旋转和角色翻转
在此示例中,角色图像 (tplogo.png) 最初被加载并居中于游戏窗口。然后通过根据旋转速度递增旋转角度来平滑旋转图像。为了实现水平翻转效果,使用 pygame.transform.flip() 函数将旋转后的图像翻转,并将 True 作为第一个参数进行水平翻转。
import pygame

# Initialize Pygame
pygame.init()
# Set up the game window
s_width, s_height = 800, 600
screen = pygame.display.set_mode((s_width, s_height))
pygame.display.set_caption("Smooth Rotation Example")

# Load the character image
char_img = pygame.image.load("tplogo.png")
char_rect = char_img.get_rect()
char_rect.center = (s_width // 2, s_height // 2)

# Set up the clock
clock = pygame.time.Clock()
FPS = 60

# Define rotation angle and speed
rotation_angle = 0
rotation_speed = 2

# Set the game loop
running = True
while running:
    dt = clock.tick(FPS) / 1000.0

    for event in pygame.event.get():
        if event.type == pygame.QUIT:
            running = False

    # Rotate the image
    rotation_angle += rotation_speed * dt
    rotated_image = pygame.transform.rotate(char_img, rotation_angle)

    # Flip the image horizontally
    flipped_image = pygame.transform.flip(rotated_image, True, False)

    # Update the screen
    screen.fill((255, 255, 255))
    screen.blit(flipped_image, flipped_image.get_rect(center=char_rect.center))
    pygame.display.flip()

# Quit the game
pygame.quit()
输出
结论
通过遵循本文中给出的步骤,您可以成功地将游戏角色移动到 Pygame 中。实现游戏窗口、角色图像、用户输入、事件处理和时钟控制将确保游戏中的角色移动流畅。

2K+ 浏览量
