
 数据结构
数据结构 网络
网络 关系数据库管理系统 (RDBMS)
 操作系统
操作系统 Java
Java iOS
iOS HTML
HTML CSS
CSS Android
 Python
 C语言编程
C语言编程 C++
C++ C#
C# MongoDB
 MySQL
MySQL Javascript
 PHP
PHP如何在Android上显示当前位置在谷歌地图上?
此示例演示了如何在Android上显示当前位置在谷歌地图上。
步骤 1 − 在Android Studio中创建一个新项目,转到文件 ⇒ 新建项目,并填写所有必需的详细信息以创建新项目。
步骤 2 − 将以下代码添加到res/layout/activity_main.xml。
<?xml version="1.0" encoding="utf-8"?>
<fragment xmlns:android="http://schemas.android.com/apk/res/android"
   xmlns:tools="http://schemas.android.com/tools"
   android:id="@+id/myMap"
   android:name="com.google.android.gms.maps.SupportMapFragment"
   android:layout_width="match_parent"
   android:layout_height="match_parent"
   tools:context=".MainActivity" />
步骤 3 – 在build.gradle (Module: app)中添加以下依赖项
implementation 'com.google.android.gms:play-services-maps:17.0.0'
implementation 'com.google.android.gms:play-services-location:17.0.0'
步骤 4 − 将以下代码添加到src/MainActivity.java
import android.Manifest;
import android.content.pm.PackageManager;
import android.location.Location;
import android.os.Bundle;
import android.widget.Toast;
import com.google.android.gms.maps.CameraUpdateFactory;
import com.google.android.gms.maps.SupportMapFragment;
import com.google.android.gms.location.FusedLocationProviderClient;
import com.google.android.gms.location.LocationServices;
import com.google.android.gms.maps.GoogleMap;
import com.google.android.gms.maps.OnMapReadyCallback;
import com.google.android.gms.maps.model.LatLng;
import com.google.android.gms.maps.model.MarkerOptions;
import com.google.android.gms.tasks.OnSuccessListener;
import com.google.android.gms.tasks.Task;
import androidx.annotation.NonNull;
import androidx.core.app.ActivityCompat;
import androidx.fragment.app.FragmentActivity;
public class MainActivity extends FragmentActivity implements OnMapReadyCallback {
   Location currentLocation;
   FusedLocationProviderClient fusedLocationProviderClient;
   private static final int REQUEST_CODE = 101
   @Override
   protected void onCreate(Bundle savedInstanceState) {
      super.onCreate(savedInstanceState);
      setContentView(R.layout.activity_main);
      fusedLocationProviderClient = LocationServices.getFusedLocationProviderClient(this);
      fetchLocation();
   }
   private void fetchLocation() {
      if (ActivityCompat.checkSelfPermission(
         this, Manifest.permission.ACCESS_FINE_LOCATION) != PackageManager.PERMISSION_GRANTED && ActivityCompat.checkSelfPermission(
         this, Manifest.permission.ACCESS_COARSE_LOCATION) != PackageManager.PERMISSION_GRANTED) {
         ActivityCompat.requestPermissions(this, new String[]{Manifest.permission.ACCESS_FINE_LOCATION}, REQUEST_CODE);
         return;
      }
      Task<Location> task = fusedLocationProviderClient.getLastLocation();
      task.addOnSuccessListener(new OnSuccessListener<Location>() {
         @Override
         public void onSuccess(Location location) {
            if (location != null) {
               currentLocation = location;
               Toast.makeText(getApplicationContext(), currentLocation.getLatitude() + "" + currentLocation.getLongitude(), Toast.LENGTH_SHORT).show();
               SupportMapFragment supportMapFragment = (SupportMapFragment) getSupportFragmentManager().findFragmentById(R.id.myMap);
               assert supportMapFragment != null;
               supportMapFragment.getMapAsync(MainActivity.this);
            }
         }
      });
   }
   @Override
   public void onMapReady(GoogleMap googleMap) {
      LatLng latLng = new LatLng(currentLocation.getLatitude(), currentLocation.getLongitude());
      MarkerOptions markerOptions = new MarkerOptions().position(latLng).title("I am here!");
      googleMap.animateCamera(CameraUpdateFactory.newLatLng(latLng));
      googleMap.animateCamera(CameraUpdateFactory.newLatLngZoom(latLng, 5));
      googleMap.addMarker(markerOptions);
   }
   @Override
   public void onRequestPermissionsResult(int requestCode, @NonNull String[] permissions, @NonNull int[] grantResults) {
      switch (requestCode) {
         case REQUEST_CODE:
            if (grantResults.length > 0 && grantResults[0] == PackageManager.PERMISSION_GRANTED) {
               fetchLocation();
         }
         break;
      }
   }
}
步骤 5 – 打开strings.xml并添加以下代码 −
<resources>
   <string name="app_name">Sample</string>
   <string name="map_key" translatable="false">Enter your google API key here</string>
</resources>
步骤 6 – 要获取谷歌API密钥 (map_key),请按照以下步骤操作
- 单击项目下拉菜单,选择或创建要为其添加API密钥的项目。
- 单击菜单按钮
 并选择APIs & Services > Credentials。
 - 在“凭据”页面上,单击“创建凭据”>“API密钥”。创建的API密钥对话框将显示您新创建的API密钥。
- 单击关闭。
新的API密钥列在“凭据”页面上的“API密钥”下。(请记住在生产环境中使用之前限制API 密钥。)
步骤 7 − 将以下代码添加到androidManifest.xml
<?xml version="1.0" encoding="utf-8"?>
<manifest xmlns:android="http://schemas.android.com/apk/res/android" package="app.com.sample">
   <uses-permission android:name="android.permission.INTERNET"/>
   <uses-permission android:name="android.permission.ACCESS_FINE_LOCATION"/>
   <uses-permission android:name="android.permission.ACCESS_COARSE_LOCATION"/>
   <application
      android:allowBackup="true"
      android:icon="@mipmap/ic_launcher"
      android:label="@string/app_name"
      android:roundIcon="@mipmap/ic_launcher_round"
      android:supportsRtl="true"
      android:theme="@style/AppTheme">
      <meta-data android:name="com.google.android.geo.API_KEY" android:value="@string/map_key"/>
      <activity android:name=".MainActivity">
         <intent-filter>
            <action android:name="android.intent.action.MAIN" />
            <category android:name="android.intent.category.LAUNCHER" />
         </intent-filter>
      </activity>
   </application>
</manifest>
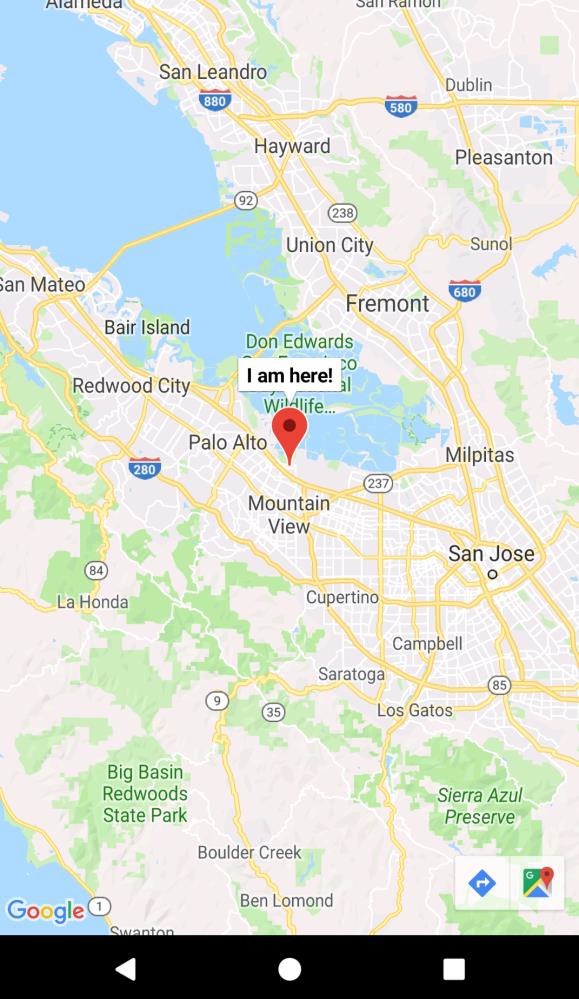
让我们尝试运行您的应用程序。我假设您已将您的实际Android移动设备连接到您的计算机。要在Android Studio中运行该应用程序,请打开项目中的一个活动文件,然后单击运行 ![]() 工具栏中的图标。选择您的移动设备作为选项,然后检查您的移动设备,它将显示您的默认屏幕 –
工具栏中的图标。选择您的移动设备作为选项,然后检查您的移动设备,它将显示您的默认屏幕 –
单击此处下载项目代码。

更新于:2019年8月30日
7K+ 次浏览

广告