
 数据结构
数据结构 网络
网络 RDBMS
RDBMS 操作系统
操作系统 Java
Java iOS
iOS HTML
HTML CSS
CSS Android
 Python
 C 编程
C 编程 C++
C++ C#
C# MongoDB
 MySQL
MySQL Javascript
 PHP
PHP在 Android 中使用 Glide 加载图片
在深入了解 Glide 示例之前,我们应该了解什么是 Glide。Glide 是 muyangmin 开发的一个图像处理库。使用 Glide 库,我们可以显示图像、解码图像、缓存图像、动画 GIF 等等。
此示例演示了如何在 Android 中集成 Glide。
步骤 1 - 在 Android Studio 中创建一个新项目,转到文件 ⇒ 新建项目,并填写所有必需的详细信息以创建新项目。
步骤 2 - 在build.gradle(Module:app)中添加以下代码。
apply plugin: 'com.android.application'
android {
   compileSdkVersion 28
   defaultConfig {
      applicationId "com.example.andy.myapplication"
      minSdkVersion 15
      targetSdkVersion 28
      versionCode 1
      versionName "1.0"
      testInstrumentationRunner "android.support.test.runner.AndroidJUnitRunner"
   }
   buildTypes {
      release {
         minifyEnabled false
         proguardFiles getDefaultProguardFile('proguard-android.txt'), 'proguard-rules.pro'
      }
   }
}
dependencies {
   implementation fileTree(dir: 'libs', include: ['*.jar'])
   implementation 'com.android.support:appcompat-v7:28.0.0'
   implementation 'com.android.support.constraint:constraint-layout:1.1.3'
   testImplementation 'junit:junit:4.12'
   implementation 'com.github.bumptech.glide:glide:4.8.0'
   annotationProcessor 'com.github.bumptech.glide:compiler:4.8.0'
   androidTestImplementation 'com.android.support.test:runner:1.0.2'
   androidTestImplementation 'com.android.support.test.espresso:espresso-core:3.0.2'
}
步骤 3 - 在 build.gradle(Project:Myapplication) 中添加以下代码。
// Top-level build file where you can add configuration options common to all sub-projects/modules.
buildscript {
   repositories {
      google()
      jcenter()
   }
   dependencies {
      classpath 'com.android.tools.build:gradle:3.2.1'
      // NOTE: Do not place your application dependencies here; they belong
      // in the individual module build.gradle files
   }
}
allprojects {
   repositories {
      google()
      jcenter()
   }
}
task clean(type: Delete) {
   delete rootProject.buildDir
}
步骤 4 - 将以下代码添加到 res/layout/activity_main.xml 中。
<?xml version = "1.0" encoding = "utf-8"?>
<android.support.constraint.ConstraintLayout
   xmlns:android = "http://schemas.android.com/apk/res/android" xmlns:tools = "http://schemas.android.com/tools" android:layout_width = "match_parent"
   android:layout_height = "match_parent">
   <LinearLayout
      android:layout_width = "match_parent"
      android:layout_height = "match_parent"
      android:background = "#797979"
      android:gravity = "center"
      android:orientation = "vertical">
      <ImageView
         android:id = "@+id/imageView"
         android:layout_width = "wrap_content"
         android:layout_height = "wrap_content" />
   </LinearLayout>
</android.support.constraint.ConstraintLayout>
步骤 5 - 将以下代码添加到 src/MainActivity.java 中
import android.os.Bundle;
import android.support.v7.app.AppCompatActivity;
import android.widget.ImageView;
import com.bumptech.glide.Glide;
public class MainActivity extends AppCompatActivity {
@Override
protected void onCreate(Bundle savedInstanceState) {
super.onCreate(savedInstanceState);
setContentView(R.layout.activity_main);
ImageView imageView = findViewById(R.id.imageView);
Glide.with(this)
.load("https://tutorialspoint.com/images/tp-logo-diamond.png")
.into(imageView);
}
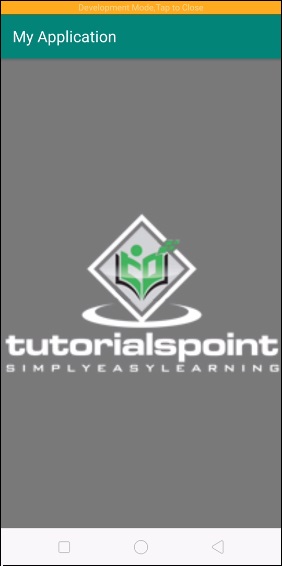
}让我们尝试运行您的应用程序。我假设您已将您的实际 Android 移动设备连接到您的计算机。要从 Android Studio 运行应用程序,请打开您项目中的一个活动文件,然后单击运行 ![]() 工具栏中的图标。选择您的移动设备作为选项,然后检查您的移动设备,它将显示您的默认屏幕
工具栏中的图标。选择您的移动设备作为选项,然后检查您的移动设备,它将显示您的默认屏幕
点击这里下载项目代码

更新于: 2019年7月30日
4K+ 次查看

广告