- Zend Framework 教程
- Zend Framework - 首页
- Zend Framework - 简介
- Zend Framework - 安装
- 框架应用程序
- Zend Framework - MVC 架构
- Zend Framework - 概念
- Zend Framework - 服务管理器
- Zend Framework - 事件管理器
- Zend Framework - 模块系统
- 应用程序结构
- Zend Framework - 创建模块
- Zend Framework - 控制器
- Zend Framework - 路由
- Zend Framework - 视图层
- Zend Framework - 布局
- 模型与数据库
- 不同的数据库
- 表单与验证
- Zend Framework - 文件上传
- Zend Framework - Ajax
- Cookie 管理
- 会话管理
- Zend Framework - 身份验证
- 邮件管理
- Zend Framework - 单元测试
- Zend Framework - 错误处理
- Zend Framework - 工作示例
- Zend Framework 有用资源
- Zend Framework - 快速指南
- Zend Framework - 有用资源
- Zend Framework - 讨论
Zend Framework - 模型与数据库
在本章中,我们将讨论 Zend Framework 的各种模型和数据库。
Zend Framework 中的模型
模型定义了应用程序的逻辑数据表示。例如,在购物车应用程序中 - 产品、客户、购物车和订单都是模型。它们定义了实体所具有的属性。模型的一些概念如下:
控制器与模型通信并要求它们检索所需的信息。然后,控制器将检索到的信息传递给视图。最后,视图将模型呈现为用户可消费的表示数据。
模型很少直接与视图交互,但有时可能会发生。
模型可以相互通信,并且不是自包含的。它们彼此之间存在关系。这些关系使控制器更容易、更快速地获取信息,因为它不必与不同的模型交互;模型本身可以做到这一点。
让我们来看一个简单的模型 - **MyModel**
<?php
namespace Tutorial\Model;
class Book {
   public $id;
   public $author;
   public $title;
}
Zend Framework 中的数据库
Zend 框架提供了一个简单且功能丰富的类,Zend\Db\TableGateway\TableGateway,用于查找、插入、更新和删除数据库表中的数据。
让我们看看如何通过以下步骤在 Zend 框架中通过 PHP 的 PDO 驱动程序连接 **MySqlservice**。
步骤 1:在 MySQL 中创建数据库
在本地 MySQL 服务器中创建数据库 **tutorials**。我们可以为此目的使用 **phpmyadmin** 或任何其他 MySQL GUI 工具。让我们在命令提示符中使用 **MySQL 客户端**。连接到 mysql 服务器并运行以下命令以创建 **tutorial** 数据库。
create database tutorials
步骤 2:在 tutorials 数据库中创建表
现在让我们使用以下 SQL 命令在 **tutorials** 数据库中创建一个数据库 **book**。
use tutorials;
CREATE TABLE book (
   id int(11) NOT NULL auto_increment,
   author varchar(100) NOT NULL,
   title varchar(100) NOT NULL,
   PRIMARY KEY (id)
);
步骤 3:填充 book 表中的数据
使用示例数据填充 **book** 表。使用以下 SQL 命令。
INSERT INTO book (author, title) VALUES ('Dennis Ritchie', 'C Programming');
INSERT INTO book (author, title) VALUES ('James gosling', 'Java Programming');
INSERT INTO book (author, title) VALUES ('Rasmus Lerdorf', 'Programming PHP');
步骤 4:更新数据库连接
更新全局配置文件,即 – myapp/config/autoload/global.php,其中包含必要的数据库驱动程序信息。
<?php
return array(
   'db' => array(
      'driver' => 'Pdo',
      'dsn' => 'mysql:dbname = tutorials;host = localhost',
      'driver_options' => array(
         PDO::MYSQL_ATTR_INIT_COMMAND => 'SET NAMES \'UTF8\''
      ),
   ),
   'service_manager' => array(
      'factories' => array(
         'Zend\Db\Adapter\Adapter' => 'Zend\Db\Adapter\AdapterServiceFactory',
      ),
   ),
);
步骤 5:更新数据库凭据
更新本地配置文件中的数据库凭据,即 – myapp/config/autoload/local.php。这样,我们可以分离本地和实时数据库连接凭据。
<?php
return array(
   'db' => array(
      'username' => '<user_name>',
      'password' => '<password>',
   ),
);
步骤 6:为 Book 创建模型
让我们在模块 **src** 目录中创建一个模型 **Book**。通常,模型在 Model 文件夹下分组 - /myapp/module/Tutorial/src/Model/Book.php。
<?php
namespace Tutorial\Model;
class Book {
   public $id;
   public $author;
   public $title;
}
步骤 7:在 book 模型中实现 exchangeArray
**TableGateway** 通过 **exchangeArray** 函数与模型交互。exchangeArray 函数的标准参数是存储为 PHP 数组的数据库结果集。使用 **exchangeArray 函数**,可以轻松地将模型的属性与相应的数据库表同步。
如下所示更新模型 **Book**:
<?php
namespace Tutorial\Model;
class Book {
   public $id;
   public $author;
   public $title;
   public function exchangeArray($data) {
      $this->id = (!empty($data['id'])) ? $data['id'] : null;
      $this->Author = (!empty($data['author'])) ? $data['author'] : null;
      $this->Title = (!empty($data['title'])) ? $data['title'] : null;
   }
}
步骤 8:使用 TableGateway 获取 book
创建一个类 **BookTable** 以从数据库中获取 book 信息。在 **Model** 文件夹中创建类 BookTable。
<?php
namespace Tutorial\Model;
use Zend\Db\TableGateway\TableGatewayInterface;
class BookTable {
   protected $tableGateway;
   public function __construct(TableGatewayInterface $tableGateway) {
      $this->tableGateway = $tableGateway;
   }
   public function fetchAll() {
      $resultSet = $this->tableGateway->select();
      return $resultSet;
   }
}
我们使用了 TableGateway 类的 **select()** 方法从数据库中获取 book 信息。但是,我们在代码中没有使用任何对表 **book** 的引用。TableGateway 本质上是通用的,它可以通过使用某些配置从任何表中获取数据。通常,这些配置是在 **module.config.php** 文件中完成的,我们将在后续步骤中讨论。
步骤 9:配置 BookTable 类
使用 **getServiceConfig()** 方法更新教程模块 **Module.php**。
<?php
namespace Tutorial;
use Zend\Db\Adapter\AdapterInterface;
use Zend\Db\ResultSet\ResultSet;
use Zend\Db\TableGateway\TableGateway;
use Zend\ModuleManager\Feature\ConfigProviderInterface;

class Module implements ConfigProviderInterface {

   public function getConfig() {
      return include __DIR__ . '/../config/module.config.php';
   }
   public function getServiceConfig() {
      return [
         'factories' => [
            Model\BookTable::class => function ($container) {
               $tableGateway = $container->get(Model\BookTableGateway::class);
               $table = new Model\BookTable($tableGateway);
               return $table;
            },
            Model\BookTableGateway::class => function ($container) {
               $dbAdapter = $container->get(AdapterInterface::class);
               $resultSetPrototype = new ResultSet();
               $resultSetPrototype->setArrayObjectPrototype(new Model\Book());
               return new TableGateway('book', $dbAdapter, null, $resultSetPrototype);
            },
         ],
      ];
   }
}
在这里,我们使用服务管理器注册了 **BookTable** 类。BookTable 类用于获取 book 信息,通过注册它,我们可以在任何需要的地方访问它。由于注册的服务是共享的,因此它们提高了性能,减少了内存消耗等。
另一个项目 Model\BookTableGateway::class 是专门用于 **Book** 模型的 TableGateway 对象,并且是 **BookTable** 的依赖项。
步骤 10:更新 TutorialController 配置
我们需要教程控制器中的 **BookTable** 服务来获取 book 信息。要获取 BookTable 服务,请将其注册为 TutorialController 中的构造函数依赖项。
此构造函数依赖项有助于在控制器本身处于初始化阶段时获取 BookTable 服务。如下所示更新教程模块配置 **module.config.php** 中的控制器部分。
'controllers' => [
   'factories' => [
      Controller\TutorialController::class => function($container) {
         return new Controller\TutorialController(
            $container->get(Model\BookTable::class)
         );
      },
   ],
],
步骤 11:更新 Tutorial 控制器
这是通过遵循以下三个步骤完成的。
- 添加以 *BookTable* 作为参数的构造函数。
private $table;
public function __construct(BookTable $table) {
   $this->table = $table;
}
使用 **BookTable 的 fetchAll()** 方法获取 book 信息并将其注册到视图中。
public function indexAction() {
   $view = new ViewModel([
      'data' => $this->table->fetchAll(),
   ]);
   return $view;
}
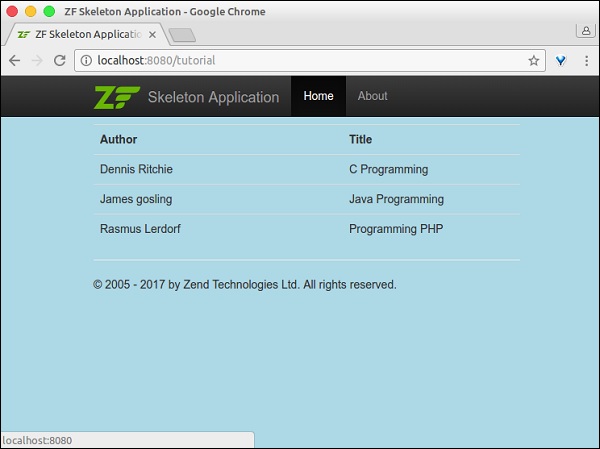
在视图脚本中显示 book 信息。
<table class = "table">
   <tr>
      <th>Author</th>
      <th>Title</th>
      <th> </th>
   </tr>
   <?php foreach ($data as $sampledata) : ?>
   <tr>
      <td><?php echo $this->escapeHtml($data->author);?></td>
      <td><?php echo $this->escapeHtml($data->title);?></td>
   </tr>
   <?php endforeach ?>
</table>
步骤 12:运行应用程序
通过运行以下命令检查应用程序:**https://:8080/tutorial**。
