
- Apex编程教程
- Apex - 首页
- Apex - 概述
- Apex - 环境
- Apex - 示例
- Apex - 数据类型
- Apex - 变量
- Apex - 字符串
- Apex - 数组
- Apex - 常量
- Apex - 决策
- Apex - 循环
- Apex - 集合
- Apex - 类
- Apex - 方法
- Apex - 对象
- Apex - 接口
- Apex - DML
- Apex - 数据库方法
- Apex - SOSL
- Apex - SOQL
- Apex - 安全性
- Apex - 调用
- Apex - 触发器
- Apex - 触发器设计模式
- Apex - 限制
- Apex - 批处理
- Apex - 调试
- Apex - 测试
- Apex - 部署
Apex 快速指南
Apex - 概述
什么是Apex?
Apex是由Salesforce.com开发的一种专有语言。根据官方定义,Apex是一种强类型、面向对象的编程语言,允许开发人员在Force.com平台服务器上执行流程和事务控制语句,并结合对Force.com API的调用。
它具有类似Java的语法,并且像数据库存储过程一样工作。它使开发人员能够向大多数系统事件添加业务逻辑,包括按钮点击、相关记录更新和Visualforce页面。Apex代码可以由Web服务请求以及对象上的触发器启动。Apex包含在Performance Edition、Unlimited Edition、Enterprise Edition和Developer Edition中。
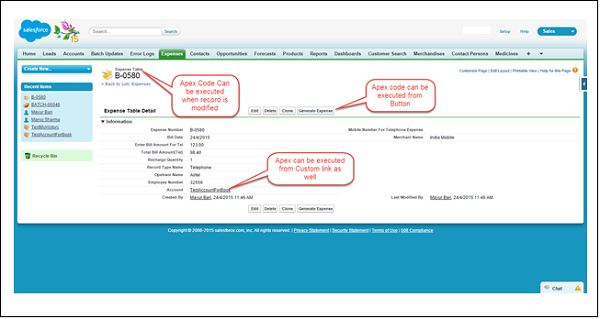
Apex作为一种语言的特性
现在让我们讨论一下Apex作为一种语言的特性:
集成
Apex内置支持DML操作,如INSERT、UPDATE、DELETE,以及DML异常处理。它支持内联SOQL和SOSL查询处理,这些查询返回sObject记录集。我们将在以后的章节中详细学习sObject、SOQL、SOSL。
类似Java的语法,易于使用
Apex易于使用,因为它使用类似Java的语法。例如,变量声明、循环语法和条件语句。
与数据紧密集成
Apex以数据为中心,旨在一起执行多个查询和DML语句。它在数据库上发出多个事务语句。
强类型
Apex是一种强类型语言。它使用对架构对象的直接引用,如sObject,如果对象被删除或数据类型错误,任何无效引用都会快速失败。
多租户环境
Apex在多租户环境中运行。因此,Apex运行时引擎旨在严格防止代码失控,防止它独占共享资源。任何违反限制的代码都会失败,并显示易于理解的错误消息。
自动升级
Apex作为Salesforce版本的一部分进行升级。我们不必手动升级它。
易于测试
Apex为单元测试的创建和执行提供了内置支持,包括指示代码覆盖率的测试结果,以及哪些代码部分可以更有效率。
何时选择Apex?
当我们无法使用预构建的和现有的开箱即用的功能实现复杂的业务功能时,应该使用Apex。以下是在Salesforce配置中需要使用Apex的情况。
Apex应用程序
当我们想要:
创建与其他系统集成的Web服务。
创建用于电子邮件群发或电子邮件设置的电子邮件服务。
对多个对象同时执行复杂的验证,以及自定义验证实现。
创建现有工作流功能或流程不支持的复杂业务流程。
创建自定义事务逻辑(在整个事务过程中发生的逻辑,而不仅仅是单个记录或对象),例如使用数据库方法更新记录。
在记录被修改时执行某些逻辑,或者在某些事件导致触发器触发时修改相关对象的记录。
Apex的工作结构
如下图所示(参考:Salesforce开发人员文档),Apex完全在按需的Force.com平台上运行

操作流程
当开发人员保存代码以及最终用户执行某些操作调用Apex代码时,有两种操作序列,如下所示:
开发人员操作
当开发人员将Apex代码写入并保存到平台时,平台应用程序服务器首先将代码编译成Apex运行时解释器可以理解的一组指令,然后将这些指令保存为元数据。
最终用户操作
当最终用户通过点击按钮或访问Visualforce页面触发Apex的执行时,平台应用程序服务器从元数据中检索编译后的指令,并在返回结果之前通过运行时解释器发送它们。与标准应用程序平台请求相比,最终用户在执行时间上没有观察到任何差异。
由于Apex是Salesforce.com的专有语言,因此它不支持通用编程语言的一些功能。以下是Apex不支持的一些功能:
它无法在用户界面中显示元素。
您无法更改标准SFDC提供的功能,也无法阻止标准功能的执行。
创建多个线程也不像在其他语言中那样可能。
理解Apex语法
Apex代码通常包含许多我们可能从其他编程语言中熟悉的东西。
变量声明
作为强类型语言,您必须在Apex中使用数据类型声明每个变量。如下面的代码所示(下面的屏幕截图),lstAcc被声明为帐户列表的数据类型。
SOQL查询
这将用于从Salesforce数据库中获取数据。下面屏幕截图中显示的查询正在从帐户对象中获取数据。
循环语句
此循环语句用于迭代列表或迭代一段代码指定次数。在下面屏幕截图中显示的代码中,迭代次数与我们拥有的记录数相同。
流程控制语句
If语句用于此代码中的流程控制。根据某些条件,决定是继续执行还是停止执行特定代码段。例如,在下面显示的代码中,它正在检查列表是否为空或是否包含记录。
DML语句
对数据库中记录执行记录插入、更新、upsert、删除操作。例如,下面给出的代码有助于使用新字段值更新帐户。
以下是Apex代码片段的外观示例。我们将在本教程中进一步学习所有这些Apex编程概念。

Apex - 环境
在本章中,我们将了解Salesforce Apex开发的环境。假设您已经设置了一个用于执行Apex开发的Salesforce版本。
您可以在Salesforce的沙盒或开发人员版本中开发Apex代码。沙盒组织是您组织的副本,您可以在其中编写代码并进行测试,而无需承担数据修改或干扰正常功能的风险。根据标准行业实践,您必须在沙盒中开发代码,然后将其部署到生产环境。
在本教程中,我们将使用Salesforce的开发人员版本。在开发人员版本中,您将没有创建沙盒组织的选项。沙盒功能在Salesforce的其他版本中可用。
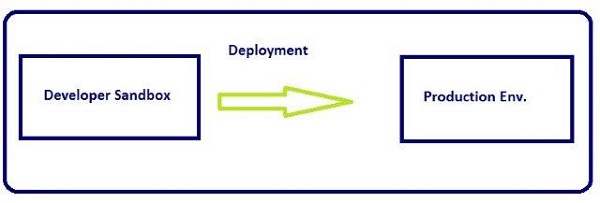
Apex代码开发工具
在所有版本中,我们可以使用以下三种工具中的任何一种来开发代码:
- Force.com开发人员控制台
- Force.com IDE
- Salesforce用户界面中的代码编辑器
注意 - 在整个教程中,我们将使用开发人员控制台来执行代码,因为它对于学习来说简单且用户友好。
Force.com开发人员控制台
开发人员控制台是一个集成开发环境,其中包含您可以用来在Salesforce组织中创建、调试和测试应用程序的工具集合。
按照以下步骤打开开发人员控制台:
步骤1 - 转到名称 → 开发人员控制台

步骤2 - 点击“开发人员控制台”,将出现一个窗口,如下面的屏幕截图所示。
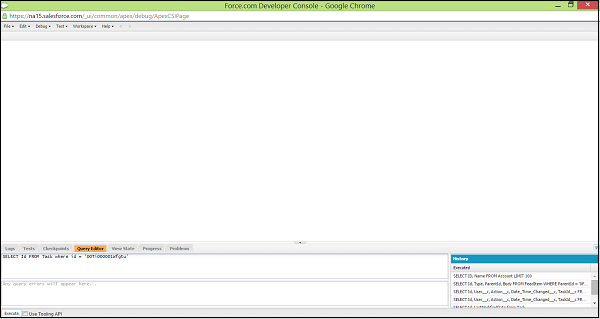
以下是使用开发人员控制台可以执行的一些操作。
编写和编译代码 - 您可以使用源代码编辑器编写代码。当您保存触发器或类时,代码会自动编译。任何编译错误都将被报告。
调试 - 您可以使用源代码编辑器编写代码。当您保存触发器或类时,代码会自动编译。任何编译错误都将被报告。
测试 - 您可以查看调试日志并设置有助于调试的检查点。
检查性能 - 您可以执行特定测试类的测试或组织中的所有类,并且可以查看测试结果。此外,您可以检查代码覆盖率。
SOQL查询 - 您可以检查调试日志以查找性能瓶颈。
颜色编码和自动完成 - 源代码编辑器使用颜色方案使代码元素更易于阅读,并为类和方法名称提供自动完成。
在开发人员控制台中执行代码
本教程中提到的所有代码片段都需要在开发人员控制台中执行。请按照以下步骤在开发人员控制台中执行步骤。
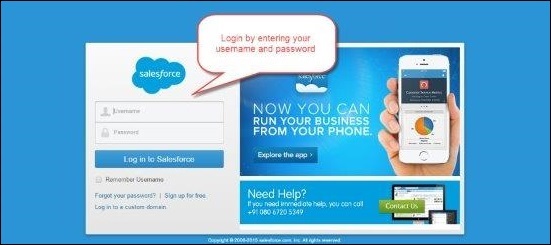
步骤1 - 使用login.salesforce.com登录到Salesforce.com。复制教程中提到的代码片段。目前,我们将使用以下示例代码。
String myString = 'MyString';
System.debug('Value of String Variable'+myString);
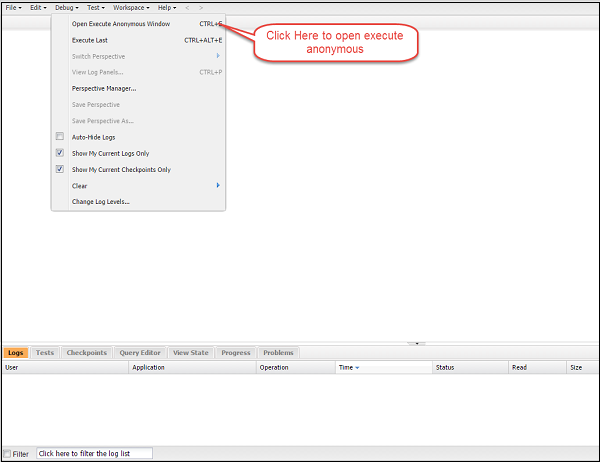
步骤2 - 要打开开发人员控制台,请点击名称 → 开发人员控制台,然后点击执行匿名,如下所示。

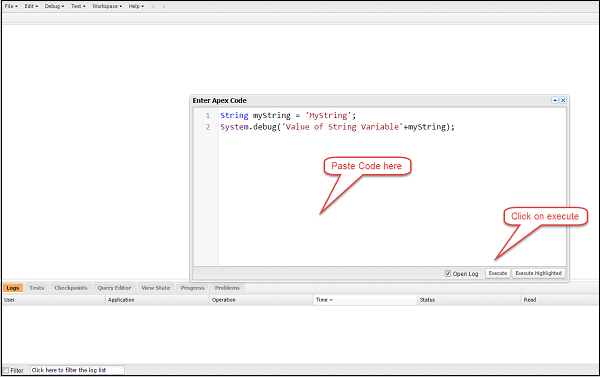
步骤3 - 在此步骤中,将出现一个窗口,您可以在其中粘贴代码。
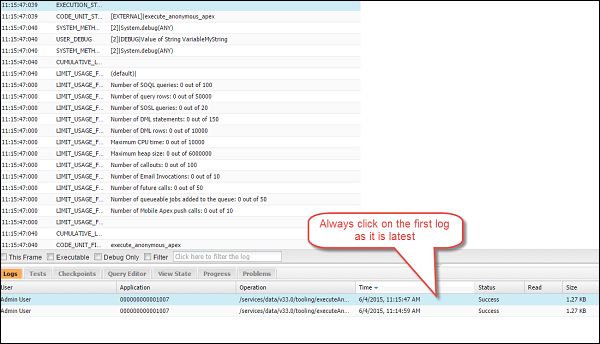
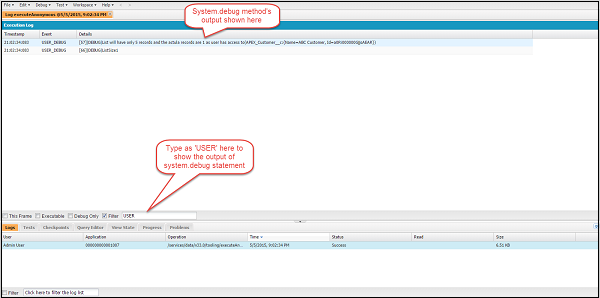
步骤4 - 当我们点击执行时,调试日志将打开。调试日志出现在窗口中(如下所示)后,点击日志记录。
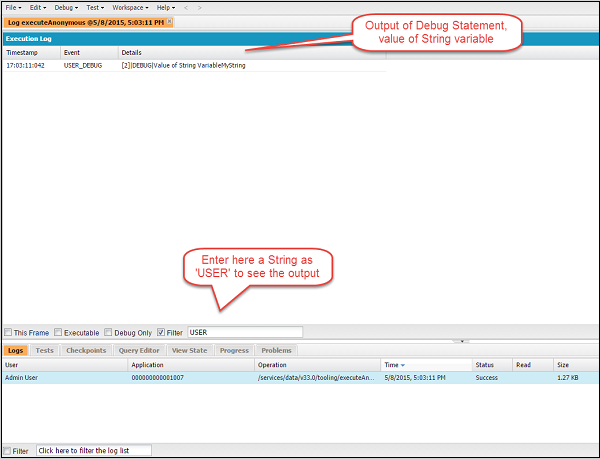
然后在窗口中键入“USER”,如下所示,输出语句将出现在调试窗口中。此“USER”语句用于过滤输出。
因此,基本上,您将按照上述所有步骤在本教程中执行任何代码片段。
Apex - 示例
企业应用程序开发示例
在本教程中,我们将为一家化工设备和加工公司实施CRM应用程序。该公司与供应商打交道并提供服务。在整个教程中,我们将针对此示例制定一些小的代码片段,以详细了解每个概念。
要执行本教程中的代码,您需要创建两个对象:客户对象和发票对象。如果您已经知道如何在 Salesforce 中创建这些对象,则可以跳过以下步骤。否则,您可以按照以下分步指南操作。
创建客户对象
我们将首先设置客户对象。
步骤 1 − 转到设置,然后搜索“对象”,如下所示。然后单击下面的“对象”链接。

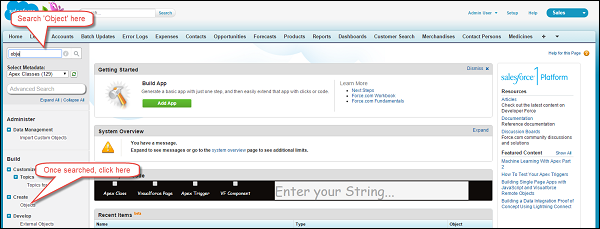
步骤 2 − 打开对象页面后,单击“创建新对象”按钮,如下所示。

步骤 3 − 单击按钮后,将出现新对象创建页面,然后输入如下所示的所有对象详细信息。对象名称应为客户。您只需在屏幕截图中所示的字段中输入信息,并将其他默认内容保持原样。
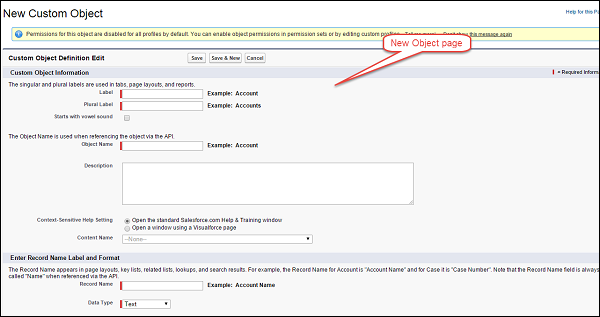
输入信息,然后单击“保存”按钮 −
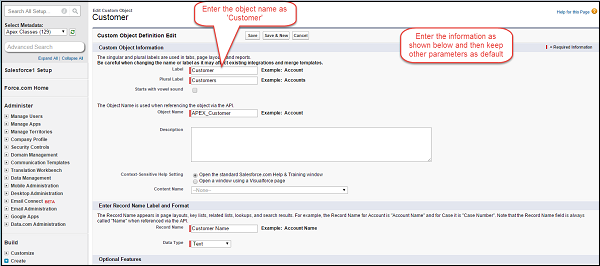
通过以上步骤,我们已成功创建了客户对象。
为客户对象创建自定义字段
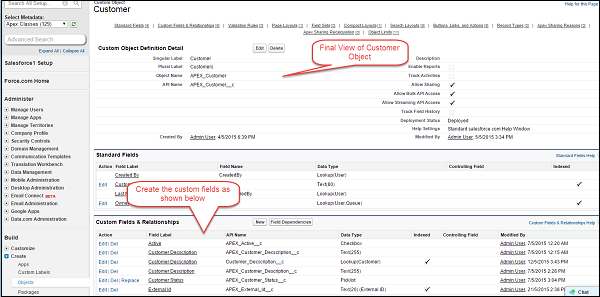
现在我们已经设置了客户对象,我们将创建一个名为“活动”的字段,然后您可以按照类似的步骤创建其他字段。字段的名称和 API 名称将在屏幕截图中给出。
步骤 1 − 我们将创建一个名为“活动”的字段,数据类型为复选框。转到设置并单击它。

步骤 2 − 搜索“对象”,如下所示,然后单击它。
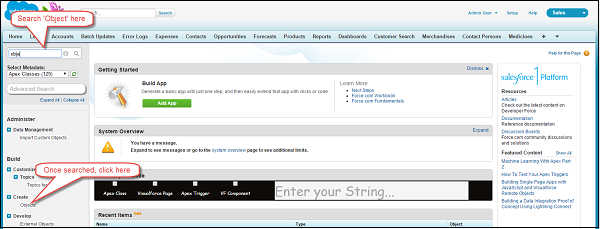
步骤 3 − 单击对象“客户”。

步骤 4 − 单击客户对象链接并出现对象详细信息页面后,单击“新建”按钮。

步骤 5 − 现在,选择数据类型为复选框,然后单击“下一步”。

步骤 6 − 输入字段名称和标签,如下所示。

步骤 7 − 单击“可见”,然后单击“下一步”。
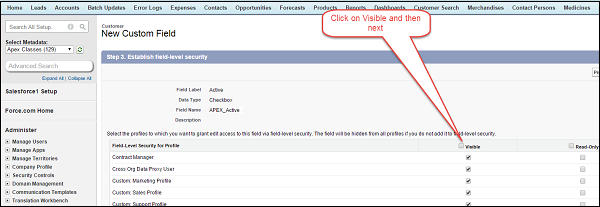
步骤 8 − 现在单击“保存”。

通过以上步骤,我们创建了自定义字段“活动”。您必须对其余字段遵循所有上述自定义字段创建步骤。这是创建所有字段后客户对象的最终视图 −
创建发票对象
步骤 1 − 转到设置,搜索“对象”,然后单击下面的“对象”链接。

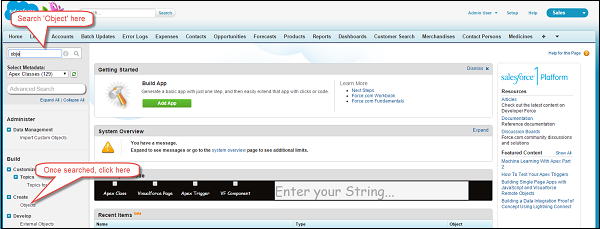
步骤 2 − 打开对象页面后,单击“创建新对象”按钮,如下所示。

步骤 3 − 单击按钮后,将出现新的对象创建页面,如下面的屏幕截图所示。您需要在此处输入详细信息。对象名称应为发票。这与我们在本教程前面创建客户对象的方式类似。

步骤 4 − 输入如下所示的信息,然后单击“保存”按钮。
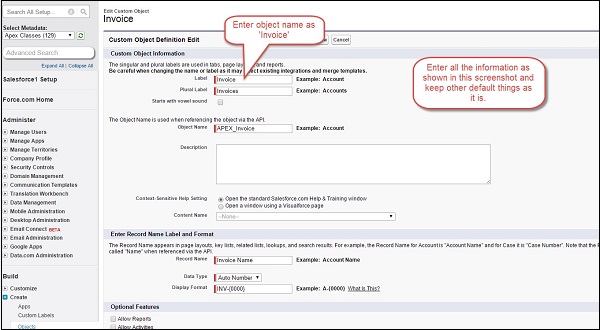
按照这些步骤,将创建您的发票对象。
为发票对象创建自定义字段
我们将如下所示在发票对象上创建字段“描述”−
步骤 1 − 转到设置并单击它。

步骤 2 − 搜索“对象”,如下所示,然后单击它。

步骤 3 − 单击对象“发票”。
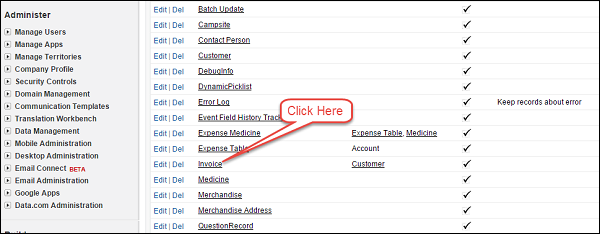
然后单击“新建”。

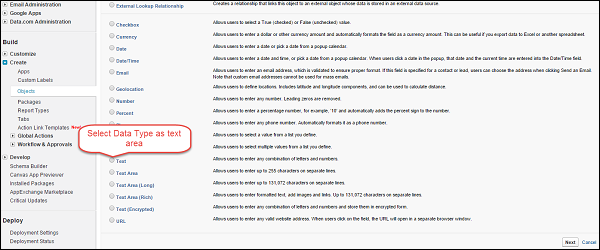
步骤 4 − 选择数据类型为文本区域,然后单击“下一步”按钮。
步骤 5 − 输入如下所示的信息。

步骤 6 − 单击“可见”,然后单击“下一步”。

步骤 7 − 单击“保存”。
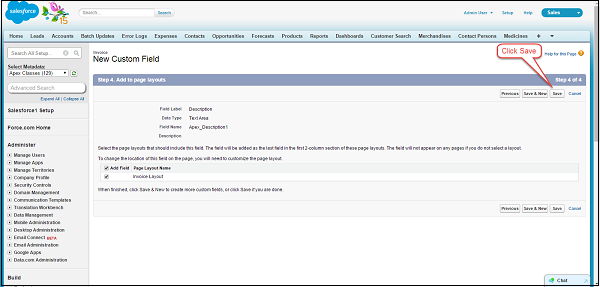
同样,您可以在发票对象上创建其他字段。
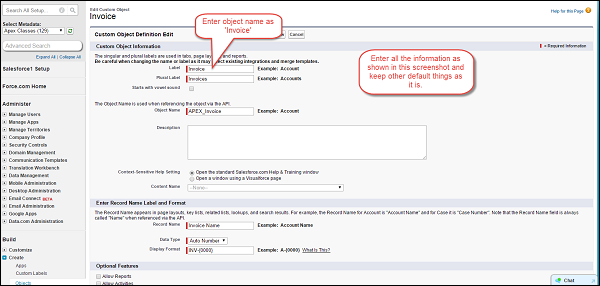
这样,我们就创建了本教程所需的多个对象。我们将在后续章节中学习基于这些对象的各种示例。
Apex - 数据类型
了解数据类型
Apex 语言是强类型语言,因此 Apex 中的每个变量都将声明为特定数据类型。所有 apex 变量最初都初始化为 null。始终建议开发人员确保为变量分配正确的值。否则,在使用此类变量时,将引发空指针异常或任何未处理的异常。
Apex 支持以下数据类型 −
原始类型(整数、双精度数、长整数、日期、日期时间、字符串、ID 或布尔值)
集合(列表、集合和映射)(将在第 6 章中介绍)
sObject
枚举
类、对象和接口(将在第 11、12 和 13 章中介绍)
在本节中,我们将了解所有原始数据类型、sObject 和枚举。我们将分别在后续章节中介绍集合、类、对象和接口,因为它们是需要单独学习的关键主题。
原始数据类型
在本节中,我们将讨论 Apex 支持的原始数据类型。
整数
一个 32 位数字,不包含任何小数点。此值的范围从 -2,147,483,648 开始,最大值为 2,147,483,647。
示例
我们想声明一个变量,该变量将存储需要运送到化工处理厂买家的桶的数量。
Integer barrelNumbers = 1000;
system.debug(' value of barrelNumbers variable: '+barrelNumbers);
System.debug() 函数打印变量的值,以便我们可以使用它进行调试或了解变量当前保存的值。
将以上代码粘贴到开发者控制台中,然后单击“执行”。生成日志后,它将显示变量“barrelNumbers”的值为 1000。
布尔值
此变量可以是 true、false 或 null。很多时候,这种类型的变量可以用作编程中的标志,以识别特定条件是否已设置或未设置。
示例
如果要将布尔值 shipmentDispatched 设置为 true,则可以将其声明为 −
Boolean shipmentDispatched;
shipmentDispatched = true;
System.debug('Value of shipmentDispatched '+shipmentDispatched);
日期
此变量类型表示日期。它只能存储日期,不能存储时间。要保存日期和时间,我们需要将其存储在 DateTime 类型的变量中。
示例
请考虑以下示例以了解 Date 变量的工作原理。
//ShipmentDate can be stored when shipment is dispatched.
Date ShipmentDate = date.today();
System.debug('ShipmentDate '+ShipmentDate);
长整数
这是一个 64 位数字,没有小数点。当我们需要比整数提供的范围更宽的值范围时,可以使用它。
示例
如果要存储公司收入,则我们将使用 Long 数据类型。
Long companyRevenue = 21474838973344648L;
system.debug('companyRevenue'+companyRevenue);
对象
我们可以将其称为 Apex 支持的任何数据类型。例如,类变量可以是该类的对象,sObject 通用类型也是一个对象,类似地,像 Account 这样的特定对象类型也是一个对象。
示例
请考虑以下示例以了解对象变量的工作原理。
Account objAccount = new Account (Name = 'Test Chemical');
system.debug('Account value'+objAccount);
注意 − 您还可以创建预定义类的对象,如下所示 −
//Class Name: MyApexClass
MyApexClass classObj = new MyApexClass();
这是将用作类变量的类对象。
字符串
字符串是单引号内的任何字符集。它对字符数没有限制。这里,将使用堆大小来确定字符数。这限制了 Apex 程序对资源的垄断,并确保它不会变得太大。
示例
String companyName = 'Abc International';
System.debug('Value companyName variable'+companyName);
时间
此变量用于存储特定时间。此变量应始终使用系统静态方法声明。
Blob
Blob 是存储为对象的二进制数据的集合。当我们想将 Salesforce 中的附件存储到变量中时,将使用它。此数据类型将附件转换为单个对象。如果要将 Blob 转换为字符串,则可以使用 toString 和 valueOf 方法来实现。
sObject
这是 Salesforce 中的一种特殊数据类型。它类似于 SQL 中的表,包含类似于 SQL 中列的字段。sObject 有两种类型:标准和自定义。
例如,帐户是标准 sObject,任何其他用户定义的对象(如我们创建的客户对象)是自定义 sObject。
示例
//Declaring an sObject variable of type Account
Account objAccount = new Account();

//Assignment of values to fields of sObjects
objAccount.Name = 'ABC Customer';
objAccount.Description = 'Test Account';
System.debug('objAccount variable value'+objAccount);

//Declaring an sObject for custom object APEX_Invoice_c
APEX_Customer_c objCustomer = new APEX_Customer_c();

//Assigning value to fields
objCustomer.APEX_Customer_Decscription_c = 'Test Customer';
System.debug('value objCustomer'+objCustomer);
枚举
枚举是一种抽象数据类型,它存储指定标识符的有限集中一个值。您可以使用关键字 Enum 定义枚举。枚举可以用作 Salesforce 中的任何其他数据类型。
示例
您可以通过执行以下代码来声明化学化合物的可能名称 −
//Declaring enum for Chemical Compounds
public enum Compounds {HCL, H2SO4, NACL, HG}
Compounds objC = Compounds.HCL;
System.debug('objC value: '+objC);
Apex - 变量
Java 和 Apex 在很多方面都很相似。Java 和 Apex 中的变量声明也大致相同。我们将讨论一些示例以了解如何声明局部变量。
String productName = 'HCL';
Integer i = 0;
Set<string> setOfProducts = new Set<string>();
Map<id, string> mapOfProductIdToName = new Map<id, string>();
请注意,所有变量都分配了 null 值。
声明变量
您可以像 String 和 Integer 一样在 Apex 中声明变量,如下所示 −
String strName = 'My String';  //String variable declaration
Integer myInteger = 1;         //Integer variable declaration
Boolean mtBoolean = true;      //Boolean variable declaration
Apex 变量不区分大小写
这意味着以下代码将引发错误,因为变量“m”已声明了两次,并且两者都将被视为相同。
Integer m = 100;
for (Integer i = 0; i<10; i++) {
   integer m = 1; //This statement will throw an error as m is being declared
   again
   System.debug('This code will throw error');
}
变量的作用域
Apex 变量从其在代码中声明的位置开始有效。因此,不允许在代码块中再次重新定义相同的变量。此外,如果在方法中声明任何变量,则该变量的作用域将仅限于该特定方法。但是,可以在整个类中访问类变量。
示例
//Declare variable Products
List<string> Products = new List<strings>();
Products.add('HCL');

//You cannot declare this variable in this code clock or sub code block again
//If you do so then it will throw the error as the previous variable in scope
//Below statement will throw error if declared in same code block
List<string> Products = new List<strings>();
Apex - 字符串
与任何其他编程语言一样,Apex 中的字符串是任何字符集,没有字符限制。
示例
String companyName = 'Abc International';
System.debug('Value companyName variable'+companyName);
字符串方法
Salesforce 中的 String 类有很多方法。在本节中,我们将介绍一些最重要和最常用的字符串方法。
包含
如果给定字符串包含提到的子字符串,则此方法将返回 true。
语法
public Boolean contains(String substring)
示例
String myProductName1 = 'HCL';
String myProductName2 = 'NAHCL';
Boolean result = myProductName2.contains(myProductName1);
System.debug('O/p will be true as it contains the String and Output is:'+result);
等于
如果给定字符串和方法中传递的字符串具有相同的字符二进制序列,并且它们不为空,则此方法将返回 true。您还可以使用此方法比较 SFDC 记录 ID。此方法区分大小写。
语法
public Boolean equals(Object string)
示例
String myString1 = 'MyString';
String myString2 = 'MyString';
Boolean result = myString2.equals(myString1);
System.debug('Value of Result will be true as they are same and Result is:'+result);
equalsIgnoreCase
如果 stringtoCompare 与给定字符串具有相同的字符序列,则此方法将返回 true。但是,此方法不区分大小写。
语法
public Boolean equalsIgnoreCase(String stringtoCompare)
示例
以下代码将返回 true,因为字符串字符和序列相同,忽略大小写。
String myString1 = 'MySTRING';
String myString2 = 'MyString';
Boolean result = myString2.equalsIgnoreCase(myString1);
System.debug('Value of Result will be true as they are same and Result is:'+result);
移除
此方法从给定字符串中移除 stringToRemove 中提供的字符串。当您想从字符串中移除一些特定字符并且不知道要移除的字符的确切索引时,这很有用。此方法区分大小写,如果出现相同的字符序列但大小写不同,则不起作用。
语法
public String remove(String stringToRemove)
示例
String myString1 = 'This Is MyString Example';
String stringToRemove = 'MyString';
String result = myString1.remove(stringToRemove);
System.debug('Value of Result will be 'This Is Example' as we have removed the MyString
   and Result is :'+result);
removeEndIgnoreCase
此方法从给定字符串中移除 stringToRemove 中提供的字符串,但前提是它出现在末尾。此方法不区分大小写。
语法
public String removeEndIgnoreCase(String stringToRemove)
示例
String myString1 = 'This Is MyString EXAMPLE';
String stringToRemove = 'Example';
String result = myString1.removeEndIgnoreCase(stringToRemove);
System.debug('Value of Result will be 'This Is MyString' as we have removed the 'Example'
   and Result is :'+result);
startsWith
如果给定字符串以方法中提供的开头字符串开头,则此方法将返回 true。
语法
public Boolean startsWith(String prefix)
示例
String myString1 = 'This Is MyString EXAMPLE';
String prefix = 'This';
Boolean result = myString1.startsWith(prefix);
System.debug(' This will return true as our String starts with string 'This' and the
   Result is :'+result);
Apex - 数组
Apex 中的数组基本上与 Apex 中的列表相同。数组和列表之间没有逻辑区别,因为它们的内部数据结构和方法也相同,但数组语法有点传统,类似于 Java。
以下是产品数组的表示形式 −
索引 0 − HCL
索引 1 − H2SO4
索引 2 − NACL
索引 3 − H2O
索引 4 − N2
索引 5 − U296
语法
<String> [] arrayOfProducts = new List<String>();
示例
假设,我们必须存储我们产品的名称 - 我们可以使用数组,在其中我们将存储产品名称,如下所示。您可以通过指定索引来访问特定产品。
//Defining array
String [] arrayOfProducts = new List<String>();

//Adding elements in Array
arrayOfProducts.add('HCL');
arrayOfProducts.add('H2SO4');
arrayOfProducts.add('NACL');
arrayOfProducts.add('H2O');
arrayOfProducts.add('N2');
arrayOfProducts.add('U296');

for (Integer i = 0; i<arrayOfProducts.size(); i++) {
   //This loop will print all the elements in array
   system.debug('Values In Array: '+arrayOfProducts[i]);
}
使用索引访问数组元素
您可以使用索引访问数组中的任何元素,如下所示 −
//Accessing the element in array
//We would access the element at Index 3
System.debug('Value at Index 3 is :'+arrayOfProducts[3]);
Apex - 常量
与任何其他编程语言一样,常量是在声明或分配值后不会更改其值的变量。
在 Apex 中,当我们想要定义在整个程序执行过程中应具有常数值的变量时,会使用常量。Apex 常量使用关键字“final”声明。
示例
考虑一个CustomerOperationClass类和其中的常量变量regularCustomerDiscount−
public class CustomerOperationClass {
   static final Double regularCustomerDiscount = 0.1;
   static Double finalPrice = 0;

   public static Double provideDiscount (Integer price) {
      //calculate the discount
      finalPrice = price - price * regularCustomerDiscount;
      return finalPrice;
   }
}
要查看上述类的输出,您必须在开发者控制台匿名窗口中执行以下代码 −
Double finalPrice = CustomerOperationClass.provideDiscount(100);
System.debug('finalPrice '+finalPrice);
Apex - 决策
决策结构要求程序员指定一个或多个条件,由程序进行评估或测试,以及在条件确定为真时要执行的语句或语句,以及可选地,在条件确定为假时要执行的其他语句。
在本章中,我们将学习 Apex 中决策和条件语句的基本和高级结构。决策对于在满足或不满足特定条件时控制执行流程是必要的。以下是大多数编程语言中常见的决策结构的一般形式
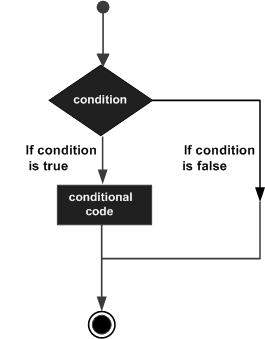
| 序号 | 语句及描述 |
|---|---|
| 1 | if 语句
if 语句包含一个布尔表达式,后跟一个或多个语句。 |
| 2 | if...else 语句
if 语句后面可以跟一个可选的else语句,当布尔表达式为假时执行。 |
| 3 | if...elseif...else 语句
if 语句后面可以跟一个可选的else if...else语句,这对于使用单个 if...else if 语句测试各种条件非常有用。 |
| 4 | 嵌套 if 语句
您可以在另一个if 或 else if语句中使用一个if 或 else if语句。 |
Apex - 循环
当需要重复执行一段特定的代码并进行所需次数的迭代时,使用循环。Apex 支持标准的传统 for 循环以及其他高级类型的循环。在本章中,我们将详细讨论 Apex 中的循环。
循环语句允许我们多次执行一个语句或一组语句,以下是大多数编程语言中循环语句的一般形式:
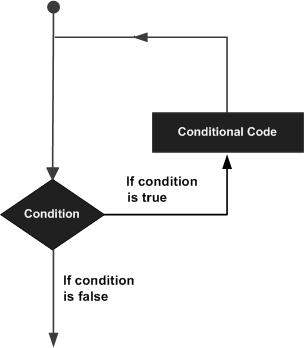
下表列出了处理 Apex 编程语言中循环需求的不同循环。点击以下链接查看它们的详细信息。
| 序号 | 循环类型及描述 |
|---|---|
| 1 | for 循环
此循环对记录集中每个项目执行一组语句。 |
| 2 | SOQL for 循环
直接对 SOQL 查询返回的记录集执行一系列语句。 |
| 3 | 类似 Java 的 for 循环
以传统的类似 Java 的语法执行一系列语句。 |
| 4 | while 循环
在给定条件为真时重复执行一个语句或一组语句。它在执行循环体之前测试条件。 |
| 5 | do...while 循环
类似于 while 语句,但它在循环体末尾测试条件。 |
Apex - 集合
集合是一种可以存储多个记录的变量类型。例如,列表可以存储多个帐户对象的记录。现在让我们详细了解所有集合类型。
列表
列表可以包含任意数量的原始数据、集合、sObject、用户定义和内置 Apex 类型的记录。这是最重要的集合类型之一,它还有一些专门用于列表的系统方法。列表索引始终从 0 开始。这与 Java 中的数组类似。列表应使用关键字“List”声明。
示例
以下是包含原始数据类型(字符串)列表的列表,即城市列表。
List<string> ListOfCities = new List<string>();
System.debug('Value Of ListOfCities'+ListOfCities);
声明列表的初始值是可选的。但是,我们将在此处声明初始值。以下是一个显示相同内容的示例。
List<string> ListOfStates = new List<string> {'NY', 'LA', 'LV'};
System.debug('Value ListOfStates'+ListOfStates);
帐户列表(sObject)
List<account> AccountToDelete = new List<account> (); //This will be null
System.debug('Value AccountToDelete'+AccountToDelete);
我们也可以声明嵌套列表。它可以最多嵌套五层。这称为多维列表。
这是整数集合的列表。
List<List<Set<Integer>>> myNestedList = new List<List<Set<Integer>>>();
System.debug('value myNestedList'+myNestedList);
列表可以包含任意数量的记录,但为了防止性能问题和占用资源,对堆大小有限制。
列表方法
列表有一些可用的方法,我们在编程时可以利用这些方法来实现一些功能,例如计算列表的大小、添加元素等。
以下是一些最常用的方法:
- size()
- add()
- get()
- clear()
- set()
以下示例演示了所有这些方法的使用
// Initialize the List
List<string> ListOfStatesMethod = new List<string>();

// This statement would give null as output in Debug logs
System.debug('Value of List'+ ListOfStatesMethod);

// Add element to the list using add method
ListOfStatesMethod.add('New York');
ListOfStatesMethod.add('Ohio');

// This statement would give New York and Ohio as output in Debug logs
System.debug('Value of List with new States'+ ListOfStatesMethod);

// Get the element at the index 0
String StateAtFirstPosition = ListOfStatesMethod.get(0);

// This statement would give New York as output in Debug log
System.debug('Value of List at First Position'+ StateAtFirstPosition);

// set the element at 1 position
ListOfStatesMethod.set(0, 'LA');

// This statement would give output in Debug log
System.debug('Value of List with element set at First Position' + ListOfStatesMethod[0]);

// Remove all the elements in List
ListOfStatesMethod.clear();

// This statement would give output in Debug log
System.debug('Value of List'+ ListOfStatesMethod);
您也可以使用数组表示法来声明列表,如下所示,但这在 Apex 编程中不是一般做法:
String [] ListOfStates = new List<string>();
集合
集合是一种集合类型,它包含多个无序的唯一记录。集合不能包含重复记录。与列表一样,集合也可以嵌套。
示例
我们将定义公司正在销售的产品集合。
Set<string> ProductSet = new Set<string>{'Phenol', 'Benzene', 'H2SO4'};
System.debug('Value of ProductSet'+ProductSet);
集合方法
集合支持我们在编程时可以利用的方法,如下所示(我们正在扩展上面的示例):
// Adds an element to the set
// Define set if not defined previously
Set<string> ProductSet = new Set<string>{'Phenol', 'Benzene', 'H2SO4'};
ProductSet.add('HCL');
System.debug('Set with New Value '+ProductSet);

// Removes an element from set
ProductSet.remove('HCL');
System.debug('Set with removed value '+ProductSet);

// Check whether set contains the particular element or not and returns true or false
ProductSet.contains('HCL');
System.debug('Value of Set with all values '+ProductSet);
映射
它是一个键值对,每个值都包含唯一的键。键和值都可以是任何数据类型。
示例
以下示例表示产品名称与产品代码的映射。
// Initialize the Map
Map<string, string> ProductCodeToProductName = new Map<string, string>
{'1000'=>'HCL', '1001'=>'H2SO4'};

// This statement would give as output as key value pair in Debug log
System.debug('value of ProductCodeToProductName'+ProductCodeToProductName);
映射方法
以下是一些演示可与映射一起使用的方法的示例:
// Define a new map
Map<string, string> ProductCodeToProductName = new Map<string, string>();

// Insert a new key-value pair in the map where '1002' is key and 'Acetone' is value
ProductCodeToProductName.put('1002', 'Acetone');

// Insert a new key-value pair in the map where '1003' is key and 'Ketone' is value
ProductCodeToProductName.put('1003', 'Ketone');

// Assert that the map contains a specified key and respective value
System.assert(ProductCodeToProductName.containsKey('1002'));
System.debug('If output is true then Map contains the key and output is:'
   + ProductCodeToProductName.containsKey('1002'));

// Retrieves a value, given a particular key
String value = ProductCodeToProductName.get('1002');
System.debug('Value at the Specified key using get function: '+value);

// Return a set that contains all of the keys in the map
Set SetOfKeys = ProductCodeToProductName.keySet();
System.debug('Value of Set with Keys '+SetOfKeys);
映射值可能无序,因此我们不应该依赖存储值的顺序,并尝试始终使用键访问映射。映射值可以为 null。声明为字符串的映射键区分大小写;例如,ABC 和 abc 将被视为不同的键并被视为唯一。
Apex - 类
什么是类?
类是创建对象的模板或蓝图。对象是类的实例。这是类的标准定义。Apex 类类似于 Java 类。
例如,InvoiceProcessor 类描述了包含可以在发票上执行的所有方法和操作的类。如果您创建此类的实例,则它将表示当前处于上下文的单个发票。
创建类
您可以从开发者控制台、Force.com Eclipse IDE 和 Apex 类详细信息页面创建 Apex 类。
从开发者控制台
请按照以下步骤从开发者控制台创建 Apex 类:
步骤 1 - 转到名称并点击开发者控制台。
步骤 2 - 点击文件 ⇒ 新建,然后点击 Apex 类。
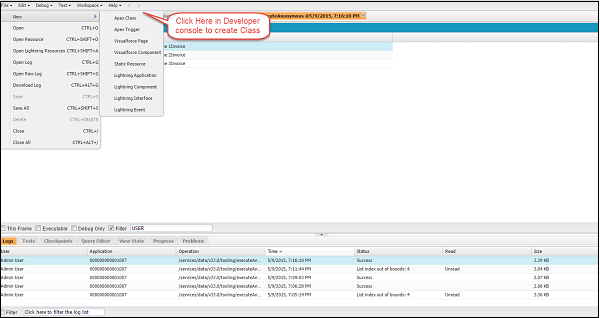
从 Force.com IDE
请按照以下步骤从 Force.com IDE 创建类:
步骤 1 - 打开 Force.com Eclipse IDE
步骤 2 - 通过点击文件 ⇒ 新建 ⇒ Apex 类创建新项目。
步骤 3 - 为类提供名称,然后点击确定。
完成此操作后,将创建新类。
从 Apex 类详细信息页面
请按照以下步骤从 Apex 类详细信息页面创建类:
步骤 1 - 点击名称 ⇒ 设置。
步骤 2 - 搜索“Apex 类”并点击链接。它将打开 Apex 类详细信息页面。
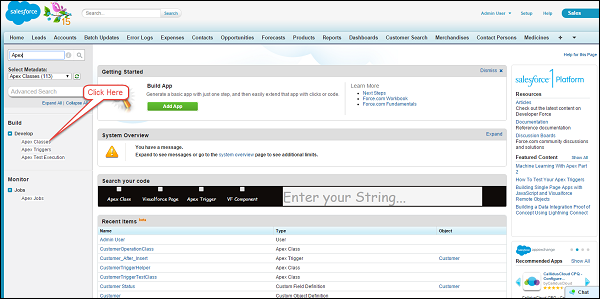
步骤 3 - 点击“新建”,然后为类提供名称,然后点击保存。
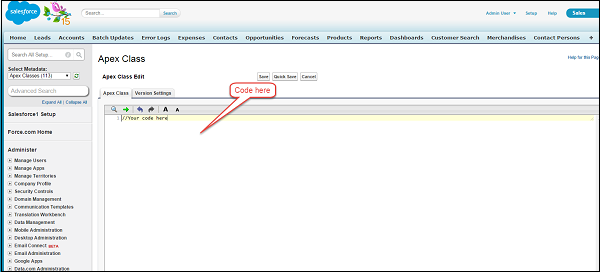
Apex 类结构
以下是 Apex 类定义的示例结构。
语法
private | public | global
[virtual | abstract | with sharing | without sharing]
class ClassName [implements InterfaceNameList] [extends ClassName] {
   // Classs Body
}
此定义结合使用了访问修饰符、共享模式、类名和类体。我们将在后面详细了解所有这些选项。
示例
以下是 Apex 类定义的示例结构:
public class MySampleApexClass {       //Class definition and body
   public static Integer myValue = 0;  //Class Member variable
   public static String myString = ''; //Class Member variable

   public static Integer getCalculatedValue () {
   // Method definition and body
   // do some calculation
      myValue = myValue+10;
      return myValue;
   }
}
访问修饰符
私有
如果将访问修饰符声明为“私有”,则此类仅在本地范围内可见,并且您无法在此特定部分之外访问此类。默认情况下,类具有此修饰符。
公共
如果将类声明为“公共”,则表示此类可供您的组织和您定义的命名空间访问。通常,大多数 Apex 类都使用此关键字定义。
全局
如果将类声明为“全局”,则所有 Apex 代码都将可以访问它,无论您的组织如何。如果您有使用 web service 关键字定义的方法,则必须使用 global 关键字声明包含类。
共享模式
现在让我们讨论不同的共享模式。
使用共享
这是 Salesforce 中 Apex 类的一项特殊功能。当使用“使用共享”关键字指定类时,它具有以下含义:当类执行时,它将尊重用户的访问设置和配置文件权限。假设,用户的操作触发了 30 条记录的记录更新,但用户只能访问 20 条记录,而 10 条记录无法访问。然后,如果类正在执行更新记录的操作,则只会更新用户有权访问的 20 条记录,其余 10 条记录将不会更新。这也被称为用户模式。
不使用共享
即使用户无法访问 30 条记录中的 10 条,所有 30 条记录都将被更新,因为类在系统模式下运行,即它已使用“不使用共享”关键字定义。这称为系统模式。
虚拟
如果您使用“虚拟”关键字,则表示此类可以扩展并且允许覆盖。如果需要覆盖方法,则应使用 virtual 关键字声明类。
抽象
如果将类声明为“抽象”,则它仅包含方法的签名,而不包含实际的实现。
类变量
语法
[public | private | protected | global] [final] [static] data_type
variable_name [= value]
在上述语法中:
- 变量数据类型和变量名称是必须的
- 访问修饰符和值是可选的。
示例
public static final Integer myvalue;
Apex - 方法
类方法
Apex 中类方法有两个修饰符:公共或受保护。方法的返回类型是必须的,如果方法不返回任何内容,则必须将 void 作为返回类型。此外,方法也需要主体。
语法
[public | private | protected | global]
[override]
[static]

return_data_type method_name (input parameters) {
   // Method body goes here
}
语法的解释
方括号中提到的那些参数是可选的。但是,以下组件是必不可少的:
- return_data_type
- method_name
类方法的访问修饰符
使用访问修饰符,您可以指定类方法的访问级别。例如,公共方法可以在类的任何位置以及类外部访问。私有方法只能在类内部访问。全局方法可以被所有 Apex 类访问,并且可以作为其他 Apex 类可以访问的 web service 方法公开。
示例
//Method definition and body
public static Integer getCalculatedValue () {

   //do some calculation
   myValue = myValue+10;
   return myValue;
}
此方法的返回类型为 Integer,并且不带参数。
方法可以带参数,如下例所示:
// Method definition and body, this method takes parameter price which will then be used
// in method.

public static Integer getCalculatedValueViaPrice (Decimal price) {
   // do some calculation
   myValue = myValue+price;
   return myValue;
}
类构造函数
构造函数是在从类蓝图创建对象时调用的代码。它与类名相同。
我们不需要为每个类都定义构造函数,因为默认情况下会调用无参数构造函数。构造函数用于初始化变量或在类初始化时执行某个过程。例如,您可能希望在调用类时将某些 Integer 变量的值分配为 0。
示例
// Class definition and body
public class MySampleApexClass2 {
   public static Double myValue;   // Class Member variable
   public static String myString;  // Class Member variable

   public MySampleApexClass2 () {
      myValue = 100; //initialized variable when class is called
   }

   public static Double getCalculatedValue () { // Method definition and body
      // do some calculation
      myValue = myValue+10;
      return myValue;
   }

   public static Double getCalculatedValueViaPrice (Decimal price) {
      // Method definition and body
      // do some calculation
      myValue = myValue+price; // Final Price would be 100+100=200.00
      return myValue;
   }
}
您也可以通过构造函数调用类的方法。这在为 Visualforce 控制器编写 Apex 代码时可能很有用。当创建类对象时,将调用构造函数,如下所示:
// Class and constructor has been instantiated
MySampleApexClass2 objClass = new MySampleApexClass2();
Double FinalPrice = MySampleApexClass2.getCalculatedValueViaPrice(100);
System.debug('FinalPrice: '+FinalPrice);
构造函数重载
构造函数可以重载,即一个类可以定义多个具有不同参数的构造函数。
示例
public class MySampleApexClass3 {  // Class definition and body
   public static Double myValue;   // Class Member variable
   public static String myString;  // Class Member variable

   public MySampleApexClass3 () {
      myValue = 100; // initialized variable when class is called
      System.debug('myValue variable with no Overaloading'+myValue);
   }

   public MySampleApexClass3 (Integer newPrice) { // Overloaded constructor
      myValue = newPrice; // initialized variable when class is called
      System.debug('myValue variable with Overaloading'+myValue);
   }

      public static Double getCalculatedValue () { // Method definition and body
      // do some calculation
      myValue = myValue+10;
      return myValue;
   }

   public static Double getCalculatedValueViaPrice (Decimal price) {
      // Method definition and body
      // do some calculation
      myValue = myValue+price;
      return myValue;
   }
}
您可以像在前面的示例中执行它一样执行此类。
// Developer Console Code
MySampleApexClass3 objClass = new MySampleApexClass3();
Double FinalPrice = MySampleApexClass3.getCalculatedValueViaPrice(100);
System.debug('FinalPrice: '+FinalPrice);
Apex - 对象
类的实例称为对象。在 Salesforce 方面,对象可以是类,也可以创建 sObject 的对象。
从类创建对象
您可以像在 Java 或其他面向对象编程语言中一样创建类对象。
以下是一个名为 MyClass 的示例类:
// Sample Class Example
public class MyClass {
   Integer myInteger = 10;

   public void myMethod (Integer multiplier) {
      Integer multiplicationResult;
      multiplicationResult = multiplier*myInteger;
      System.debug('Multiplication is '+multiplicationResult);
   }
}
这是一个实例类,即要调用或访问此类的变量或方法,必须创建此类的实例,然后才能执行所有操作。
// Object Creation
// Creating an object of class
MyClass objClass = new MyClass();

// Calling Class method using Class instance
objClass.myMethod(100);
sObject 创建
sObject 是 Salesforce 中存储数据的对象。例如,Account、Contact 等都是自定义对象。您可以创建这些 sObject 的对象实例。
下面是一个 sObject 初始化的示例,并展示了如何使用点表示法访问该特定对象的字段并将值分配给字段。
// Execute the below code in Developer console by simply pasting it
// Standard Object Initialization for Account sObject
Account objAccount = new Account(); // Object initialization
objAccount.Name = 'Testr Account'; // Assigning the value to field Name of Account
objAccount.Description = 'Test Account';
insert objAccount; // Creating record using DML
System.debug('Records Has been created '+objAccount);

// Custom sObject initialization and assignment of values to field
APEX_Customer_c objCustomer = new APEX_Customer_c ();
objCustomer.Name = 'ABC Customer';
objCustomer.APEX_Customer_Decscription_c = 'Test Description';
insert objCustomer;
System.debug('Records Has been created '+objCustomer);
静态初始化
静态方法和变量仅在加载类时初始化一次。静态变量不会作为 Visualforce 页面的视图状态的一部分进行传输。
下面是静态方法和静态变量的示例。
// Sample Class Example with Static Method
public class MyStaticClass {
   Static Integer myInteger = 10;

   public static void myMethod (Integer multiplier) {
      Integer multiplicationResult;
      multiplicationResult = multiplier * myInteger;
      System.debug('Multiplication is '+multiplicationResult);
   }
}

// Calling the Class Method using Class Name and not using the instance object
MyStaticClass.myMethod(100);
静态变量的使用
静态变量仅在加载类时实例化一次,这种现象可以用来避免触发器递归。静态变量值在同一执行上下文中将相同,并且任何正在执行的类、触发器或代码都可以引用它并防止递归。
Apex - 接口
接口就像一个 Apex 类,其中没有一个方法被实现。它只包含方法签名,但每个方法的主体都是空的。要使用接口,另一个类必须通过为接口中包含的所有方法提供主体来实现它。
接口主要用于为您的代码提供抽象层。它们将实现与方法的声明分开。
让我们以我们的化工公司的例子为例。假设我们需要为高级客户和普通客户提供折扣,并且两者的折扣将不同。
我们将创建一个名为 **DiscountProcessor** 的接口。
// Interface
public interface DiscountProcessor {
   Double percentageDiscountTobeApplied(); // method signature only
}

// Premium Customer Class
public class PremiumCustomer implements DiscountProcessor {

   //Method Call
   public Double percentageDiscountTobeApplied () {

      // For Premium customer, discount should be 30%
      return 0.30;
   }
}

// Normal Customer Class
public class NormalCustomer implements DiscountProcessor {

   // Method Call
   public Double percentageDiscountTobeApplied () {

      // For Premium customer, discount should be 10%
      return 0.10;
   }
}
当您实现接口时,必须实现该接口的方法。如果您没有实现接口方法,它将抛出错误。当您希望强制开发人员实现方法时,应该使用接口。
批量 Apex 的标准 Salesforce 接口
SFDC 确实有标准接口,如 Database.Batchable、Schedulable 等。例如,如果您实现了 Database.Batchable 接口,则必须实现接口中定义的三个方法 - Start、Execute 和 Finish。
下面是标准 Salesforce 提供的 Database.Batchable 接口的示例,该接口向用户发送包含批处理状态的电子邮件。此接口有 3 个方法,Start、Execute 和 Finish。使用此接口,我们可以实现 Batchable 功能,它还提供 BatchableContext 变量,我们可以使用它来获取有关正在执行的批处理的更多信息并执行其他功能。
global class CustomerProessingBatch implements Database.Batchable<sobject7>,
Schedulable {
   // Add here your email address
   global String [] email = new String[] {'test@test.com'};

   // Start Method
   global Database.Querylocator start (Database.BatchableContext BC) {

      // This is the Query which will determine the scope of Records and fetching the same
      return Database.getQueryLocator('Select id, Name, APEX_Customer_Status__c,
         APEX_Customer_Decscription__c From APEX_Customer__c WHERE createdDate = today
         && APEX_Active__c = true');
   }

   // Execute method
   global void execute (Database.BatchableContext BC, List<sobject> scope) {
      List<apex_customer__c> customerList = new List<apex_customer__c>();
      List<apex_customer__c> updtaedCustomerList = new List<apex_customer__c>();

      for (sObject objScope: scope) {
         // type casting from generic sOject to APEX_Customer__c
         APEX_Customer__c newObjScope = (APEX_Customer__c)objScope ;
         newObjScope.APEX_Customer_Decscription__c = 'Updated Via Batch Job';
         newObjScope.APEX_Customer_Status__c = 'Processed';

         // Add records to the List
         updtaedCustomerList.add(newObjScope);
      }

      // Check if List is empty or not
      if (updtaedCustomerList != null && updtaedCustomerList.size()>0) {

         // Update the Records
         Database.update(updtaedCustomerList); System.debug('List Size
            '+updtaedCustomerList.size());
      }
   }

   // Finish Method
   global void finish(Database.BatchableContext BC) {
      Messaging.SingleEmailMessage mail = new Messaging.SingleEmailMessage();

      // get the job Id
      AsyncApexJob a = [Select a.TotalJobItems, a.Status, a.NumberOfErrors,
      a.JobType, a.JobItemsProcessed, a.ExtendedStatus, a.CreatedById,
      a.CompletedDate From AsyncApexJob a WHERE id = :BC.getJobId()];
      System.debug('$$$ Jobid is'+BC.getJobId());

      // below code will send an email to User about the status
      mail.setToAddresses(email);

      // Add here your email address
      mail.setReplyTo('test@test.com');
      mail.setSenderDisplayName('Apex Batch Processing Module');
      mail.setSubject('Batch Processing '+a.Status);
      mail.setPlainTextBody('The Batch Apex job processed
         '+a.TotalJobItems+'batches with '+a.NumberOfErrors+'failures'+'Job Item
         processed are'+a.JobItemsProcessed);
      Messaging.sendEmail(new Messaging.Singleemailmessage [] {mail});
   }

   // Scheduler Method to scedule the class
   global void execute(SchedulableContext sc) {
      CustomerProessingBatch conInstance = new CustomerProessingBatch();
      database.executebatch(conInstance,100);
   }
}
要执行此类,您必须在开发人员控制台中运行以下代码。
CustomerProessingBatch objBatch = new CustomerProessingBatch ();
Database.executeBatch(objBatch);
Apex - DML
在本章中,我们将讨论如何在 Salesforce 中执行不同的数据库修改功能。有两种方法可以执行这些功能。
DML 语句
DML 是为了执行插入、更新、删除、Upsert、恢复记录、合并记录或转换潜在客户操作而执行的操作。
DML 是 Apex 中最重要的部分之一,因为几乎每个业务案例都涉及到对数据库的更改和修改。
数据库方法
您可以使用 DML 语句执行的所有操作也可以使用数据库方法执行。数据库方法是您可以用来执行 DML 操作的系统方法。与 DML 语句相比,数据库方法提供了更大的灵活性。
在本章中,我们将首先使用 DML 语句进行探讨。我们将在后续章节中介绍数据库方法。
DML 语句
现在让我们再次考虑化工供应商公司的实例。我们的发票记录具有以下字段:状态、已付金额、剩余金额、下次付款日期和发票编号。今天创建且状态为“待处理”的发票应更新为“已付款”。
插入操作
插入操作用于在数据库中创建新记录。您可以使用 Insert DML 语句创建任何标准或自定义对象的记录。
示例
当每天为新的客户订单生成新发票时,我们可以在 APEX_Invoice__c 对象中创建新记录。我们将首先创建一个客户记录,然后我们可以为该新客户记录创建一个发票记录。
// fetch the invoices created today, Note, you must have at least one invoice
// created today

List<apex_invoice__c> invoiceList = [SELECT id, Name, APEX_Status__c,
   createdDate FROM APEX_Invoice__c WHERE createdDate = today];

// create List to hold the updated invoice records
List<apex_invoice__c> updatedInvoiceList = new List<apex_invoice__c>();
APEX_Customer__c objCust = new APEX_Customer__C();
objCust.Name = 'Test ABC';

//DML for Inserting the new Customer Records
insert objCust;
for (APEX_Invoice__c objInvoice: invoiceList) {
   if (objInvoice.APEX_Status__c == 'Pending') {
      objInvoice.APEX_Status__c = 'Paid';
      updatedInvoiceList.add(objInvoice);
   }
}

// DML Statement to update the invoice status
update updatedInvoiceList;

// Prints the value of updated invoices
System.debug('List has been updated and updated values are' + updatedInvoiceList);

// Inserting the New Records using insert DML statement
APEX_Invoice__c objNewInvoice = new APEX_Invoice__c();
objNewInvoice.APEX_Status__c = 'Pending';
objNewInvoice.APEX_Amount_Paid__c = 1000;
objNewInvoice.APEX_Customer__c = objCust.id;

// DML which is creating the new Invoice record which will be linked with newly
// created Customer record
insert objNewInvoice;
System.debug('New Invoice Id is '+objNewInvoice.id+' and the Invoice Number is'
   + objNewInvoice.Name);
更新操作
更新操作是对现有记录执行更新。在此示例中,我们将更新现有发票记录的状态字段为“已付款”。
示例
// Update Statement Example for updating the invoice status. You have to create
and Invoice records before executing this code. This program is updating the
record which is at index 0th position of the List.

// First, fetch the invoice created today
List<apex_invoice__c> invoiceList = [SELECT id, Name, APEX_Status__c,
createdDate FROM APEX_Invoice__c];
List<apex_invoice__c> updatedInvoiceList = new List<apex_invoice__c>();

// Update the first record in the List
invoiceList[0].APEX_Status__c = 'Pending';
updatedInvoiceList.add(invoiceList[0]);

// DML Statement to update the invoice status
update updatedInvoiceList;

// Prints the value of updated invoices
System.debug('List has been updated and updated values of records are'
   + updatedInvoiceList[0]);
Upsert 操作
Upsert 操作用于执行更新操作,如果要更新的记录不存在于数据库中,则也创建新记录。
示例
假设,需要更新客户对象中的客户记录。如果现有客户记录已存在,我们将更新它,否则创建一个新的。这将基于字段 APEX_External_Id__c 的值。此字段将是我们用于识别记录是否已存在的字段。
**注意** - 在执行此代码之前,请在客户对象中创建一个外部 ID 字段值为“12341”的记录,然后执行以下代码 -
// Example for upserting the Customer records
List<apex_customer__c> CustomerList = new List<apex_customer__c>();
for (Integer i = 0; i < 10; i++) {
   apex_customer__c objcust=new apex_customer__c(name = 'Test' +i,
   apex_external_id__c='1234' +i);
   customerlist.add(objcust);
} //Upserting the Customer Records

upsert CustomerList;

System.debug('Code iterated for 10 times and created 9 records as one record with
   External Id 12341 is already present');

for (APEX_Customer_c objCustomer: CustomerList) {
   if (objCustomer.APEX_External_Id_c == '12341') {
      system.debug('The Record which is already present is '+objCustomer);
   }
}
删除操作
您可以使用 Delete DML 执行删除操作。
示例
在这种情况下,我们将删除为测试目的创建的发票,即名称为“测试”的发票。
您也可以从开发人员控制台中执行此代码段,而无需创建类。
// fetch the invoice created today
List<apex_invoice__c> invoiceList = [SELECT id, Name, APEX_Status__c,
createdDate FROM APEX_Invoice__c WHERE createdDate = today];
List<apex_invoice__c> updatedInvoiceList = new List<apex_invoice__c>();
APEX_Customer__c objCust = new APEX_Customer__C();
objCust.Name = 'Test';

// Inserting the Customer Records
insert objCust;
for (APEX_Invoice__c objInvoice: invoiceList) {
   if (objInvoice.APEX_Status__c == 'Pending') {
      objInvoice.APEX_Status__c = 'Paid';
      updatedInvoiceList.add(objInvoice);
   }
}

// DML Statement to update the invoice status
update updatedInvoiceList;

// Prints the value of updated invoices
System.debug('List has been updated and updated values are' + updatedInvoiceList);

// Inserting the New Records using insert DML statement
APEX_Invoice__c objNewInvoice = new APEX_Invoice__c();
objNewInvoice.APEX_Status__c = 'Pending';
objNewInvoice.APEX_Amount_Paid__c = 1000;
objNewInvoice.APEX_Customer__c = objCust.id;

// DML which is creating the new record
insert objNewInvoice;
System.debug('New Invoice Id is' + objNewInvoice.id);

// Deleting the Test invoices from Database
// fetch the invoices which are created for Testing, Select name which Customer Name
// is Test.
List<apex_invoice__c> invoiceListToDelete = [SELECT id FROM APEX_Invoice__c
   WHERE APEX_Customer__r.Name = 'Test'];

// DML Statement to delete the Invoices
delete invoiceListToDelete;
System.debug('Success, '+invoiceListToDelete.size()+' Records has been deleted');
撤销删除操作
您可以撤销已删除且存在于回收站中的记录。已删除记录具有的所有关系也将被恢复。
示例
假设,需要恢复上一个示例中删除的记录。这可以通过以下示例实现。上一个示例中的代码已为此示例修改。
// fetch the invoice created today
List<apex_invoice__c> invoiceList = [SELECT id, Name, APEX_Status__c,
createdDate FROM APEX_Invoice__c WHERE createdDate = today];
List<apex_invoice__c> updatedInvoiceList = new List<apex_invoice__c>();
APEX_Customer__c objCust = new APEX_Customer__C();
objCust.Name = 'Test';

// Inserting the Customer Records
insert objCust;
for (APEX_Invoice__c objInvoice: invoiceList) {
   if (objInvoice.APEX_Status__c == 'Pending') {
      objInvoice.APEX_Status__c = 'Paid';
      updatedInvoiceList.add(objInvoice);
   }
}

// DML Statement to update the invoice status
update updatedInvoiceList;

// Prints the value of updated invoices
System.debug('List has been updated and updated values are' + updatedInvoiceList);

// Inserting the New Records using insert DML statement
APEX_Invoice__c objNewInvoice = new APEX_Invoice__c();
objNewInvoice.APEX_Status__c = 'Pending';
objNewInvoice.APEX_Amount_Paid__c = 1000;
objNewInvoice.APEX_Customer__c = objCust.id;

// DML which is creating the new record
insert objNewInvoice;
System.debug('New Invoice Id is '+objNewInvoice.id);

// Deleting the Test invoices from Database
// fetch the invoices which are created for Testing, Select name which Customer Name
// is Test.
List<apex_invoice__c> invoiceListToDelete = [SELECT id FROM APEX_Invoice__c
   WHERE APEX_Customer__r.Name = 'Test'];

// DML Statement to delete the Invoices
delete invoiceListToDelete;
system.debug('Deleted Record Count is ' + invoiceListToDelete.size());
System.debug('Success, '+invoiceListToDelete.size() + 'Records has been deleted');

// Restore the deleted records using undelete statement
undelete invoiceListToDelete;
System.debug('Undeleted Record count is '+invoiceListToDelete.size()+'. This should
   be same as Deleted Record count');
Apex - 数据库方法
数据库类方法是使用 DML 语句的另一种方法,它比 DML 语句(如插入、更新等)更灵活。
数据库方法和 DML 语句的区别
| DML 语句 | 数据库方法 |
|---|---|
| 不允许部分更新。例如,如果列表中有 20 条记录,则要么所有记录都将更新,要么都不更新。 | 允许部分更新。您可以在数据库方法中将参数指定为 true 或 false,true 表示允许部分更新,false 表示不允许部分更新。 |
| 您无法获取成功和失败记录的列表。 | 您可以获取成功和失败记录的列表,如我们在示例中所见。 |
| **示例** - insert listName | **示例** - Database.insert(listName, False),其中 false 表示不允许部分更新。 |
插入操作
通过数据库方法插入新记录也非常简单和灵活。让我们考虑之前的场景,我们在其中使用 DML 语句插入了新记录。我们将使用数据库方法插入相同的记录。
示例
// Insert Operation Using Database methods
// Insert Customer Records First using simple DML Statement. This Customer Record will be
// used when we will create Invoice Records
APEX_Customer__c objCust = new APEX_Customer__C();
objCust.Name = 'Test';
insert objCust; // Inserting the Customer Records

// Insert Operation Using Database methods
APEX_Invoice__c objNewInvoice = new APEX_Invoice__c();
List<apex_invoice__c> InvoiceListToInsert = new List<apex_invoice__c>();
objNewInvoice.APEX_Status__c = 'Pending';
objNewInvoice.APEX_Customer__c = objCust.id;
objNewInvoice.APEX_Amount_Paid__c = 1000;
InvoiceListToInsert.add(objNewInvoice);
Database.SaveResult[] srList = Database.insert(InvoiceListToInsert, false);

// Database method to insert the records in List
// Iterate through each returned result by the method

for (Database.SaveResult sr : srList) {
   if (sr.isSuccess()) {
      // This condition will be executed for successful records and will fetch the ids
      // of successful records
      System.debug('Successfully inserted Invoice. Invoice ID: ' + sr.getId());
      // Get the invoice id of inserted Account
   } else {
      // This condition will be executed for failed records
      for(Database.Error objErr : sr.getErrors()) {
         System.debug('The following error has occurred.');

         // Printing error message in Debug log
         System.debug(objErr.getStatusCode() + ': ' + objErr.getMessage());
         System.debug('Invoice oject field which are affected by the error:'
            + objErr.getFields());
      }
   }
}
更新操作
现在让我们使用数据库方法考虑我们的业务案例示例。假设我们需要更新发票对象的状态字段,但同时我们还需要记录状态、失败记录 ID、成功计数等信息。这无法通过使用 DML 语句实现,因此我们必须使用数据库方法来获取操作的状态。
示例
如果发票的状态为“待处理”且创建日期为今天,我们将更新其“状态”字段。
以下代码将帮助使用 Database.update 方法更新发票记录。此外,在执行此代码之前,请创建一个发票记录。
// Code to update the records using the Database methods
List<apex_invoice__c> invoiceList = [SELECT id, Name, APEX_Status__c,
   createdDate FROM APEX_Invoice__c WHERE createdDate = today];

// fetch the invoice created today
List<apex_invoice__c> updatedInvoiceList = new List<apex_invoice__c>();
for (APEX_Invoice__c objInvoice: invoiceList) {
   if (objInvoice.APEX_Status__c == 'Pending') {
      objInvoice.APEX_Status__c = 'Paid';
      updatedInvoiceList.add(objInvoice);    //Adding records to the list
   }
}

Database.SaveResult[] srList = Database.update(updatedInvoiceList, false);
// Database method to update the records in List

// Iterate through each returned result by the method
for (Database.SaveResult sr : srList) {
   if (sr.isSuccess()) {
      // This condition will be executed for successful records and will fetch
      // the ids of successful records
      System.debug('Successfully updated Invoice. Invoice ID is : ' + sr.getId());
   } else {
      // This condition will be executed for failed records
      for(Database.Error objErr : sr.getErrors()) {
         System.debug('The following error has occurred.');

         // Printing error message in Debug log
         System.debug(objErr.getStatusCode() + ': ' + objErr.getMessage());
         System.debug('Invoice oject field which are affected by the error:'
            + objErr.getFields());
      }
   }
}
在本教程中,我们将仅介绍插入和更新操作。其他操作与此操作非常相似,并且与我们在上一章中所做的操作相同。
Apex - SOSL
每个业务或应用程序都将搜索功能作为基本需求之一。为此,Salesforce.com 提供了两种主要方法:使用 SOSL 和 SOQL。让我们在本节中详细讨论 SOSL 方法。
SOSL
使用 SOSL 可以跨对象和跨字段搜索文本字符串。这是 Salesforce 对象搜索语言。它能够跨多个对象搜索特定字符串。
SOSL 语句计算结果为 sObject 列表,其中每个列表包含特定 sObject 类型的搜索结果。结果列表始终按其在 SOSL 查询中指定的顺序返回。
SOSL 查询示例
考虑一个业务案例,我们需要开发一个可以搜索指定字符串的程序。假设我们需要在发票对象的客户名称字段中搜索字符串“ABC”。代码如下所示 -
首先,您必须在发票对象中创建一个单条记录,客户名称为“ABC”,以便在搜索时获得有效结果。
// Program To Search the given string in all Object
// List to hold the returned results of sObject generic type
List<list<SObject>> invoiceSearchList = new List<List<SObject>>();

// SOSL query which will search for 'ABC' string in Customer Name field of Invoice Object
invoiceSearchList = [FIND 'ABC*' IN ALL FIELDS RETURNING APEX_Invoice_c
   (Id,APEX_Customer_r.Name)];

// Returned result will be printed
System.debug('Search Result '+invoiceSearchList);

// Now suppose, you would like to search string 'ABC' in two objects,
// that is Invoice and Account. Then for this query goes like this:

// Program To Search the given string in Invoice and Account object,
// you could specify more objects if you want, create an Account with Name as ABC.

// List to hold the returned results of sObject generic type
List<List<SObject>> invoiceAndSearchList = new List<List<SObject>>();

// SOSL query which will search for 'ABC' string in Invoice and in Account object's fields
invoiceAndSearchList = [FIND 'ABC*' IN ALL FIELDS RETURNING APEX_Invoice__c
   (Id,APEX_Customer__r.Name), Account];

// Returned result will be printed
System.debug('Search Result '+invoiceAndSearchList);

// This list will hold the returned results for Invoice Object
APEX_Invoice__c [] searchedInvoice = ((List<APEX_Invoice_c>)invoiceAndSearchList[0]);

// This list will hold the returned results for Account Object
Account [] searchedAccount = ((List<Account>)invoiceAndSearchList[1]);
System.debug('Value of searchedInvoice'+searchedInvoice+'Value of searchedAccount'
   + searchedAccount);
SOQL
这几乎与 SOQL 相同。您可以使用它一次仅从一个对象中获取对象记录。您可以编写嵌套查询,还可以从您现在正在查询的父对象或子对象中获取记录。
我们将在下一章中探讨 SOQL。
Apex - SOQL
这是 Salesforce 对象查询语言,旨在与 SFDC 数据库配合使用。它只能在单个 sObject 中根据给定条件搜索记录。
与 SOSL 类似,它不能跨多个对象搜索,但它支持嵌套查询。
SOQL 示例
考虑我们正在进行的化工公司示例。假设我们需要今天创建且客户名称不为“测试”的记录列表。在这种情况下,我们将必须使用以下 SOQL 查询 -
// fetching the Records via SOQL
List<apex_invoice__c> InvoiceList = new List<apex_invoice__c>();
InvoiceList = [SELECT Id, Name, APEX_Customer__r.Name, APEX_Status__c FROM
   APEX_Invoice__c WHERE createdDate = today AND APEX_Customer__r.Name != 'Test'];
// SOQL query for given criteria

// Printing the fetched records
System.debug('We have total '+InvoiceList.size()+' Records in List');

for (APEX_Invoice__c objInvoice: InvoiceList) {
   System.debug('Record Value is '+objInvoice);
   // Printing the Record fetched
}
您可以通过开发人员控制台中的查询编辑器运行 SOQL 查询,如下所示。
在开发人员控制台中运行以下查询。搜索今天创建的发票记录。
SELECT Id, Name, APEX_Customer__r.Name, APEX_Status__c FROM APEX_Invoice__c
   WHERE createdDate = today
您必须选择需要值的字段,否则可能会抛出运行时错误。
遍历关系字段
这是 SFDC 中最重要的部分之一,因为很多时候我们需要遍历父子对象关系
此外,您可能需要在数据库中插入两个关联的对象记录。例如,Invoice 对象与 Customer 对象存在关联关系,因此一个客户可以拥有多个发票。
假设您正在创建发票,然后需要将此发票与客户关联。您可以使用以下代码实现此功能:
// Now create the invoice record and relate it with the Customer object
// Before executing this, please create a Customer Records with Name 'Customer
// Creation Test'
APEX_Invoice__c objInvoice = new APEX_Invoice__c();

// Relating Invoice to customer via id field of Customer object
objInvoice.APEX_Customer__c = [SELECT id FROM APEX_Customer__c WHERE Name =
   'Customer Creation Test' LIMIT 1].id;
objInvoice.APEX_Status__c = 'Pending';
insert objInvoice;  //Creating Invoice
System.debug('Newly Created Invoice'+objInvoice);  //Newly created invoice
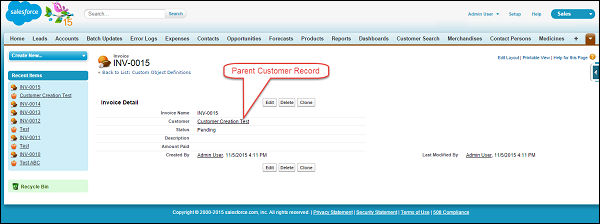
在开发者控制台中执行此代码片段。执行完成后,从开发者控制台中复制发票的 Id,然后在 SFDC 中打开相同的记录,如下所示。您可以看到父记录已分配给发票记录,如下所示。
获取子记录
现在让我们考虑一个示例,其中需要将与特定客户记录相关的所有发票放在一个地方。为此,您必须知道子关系名称。要查看子关系名称,请转到子对象上的字段详细信息页面并检查“子关系”值。在我们的示例中,它是 invoices,后面附加了 __r。
示例
在此示例中,我们需要设置数据,创建一个名为“ABC 客户”的客户记录,然后向该客户添加 3 张发票。
现在,我们将获取客户“ABC 客户”拥有的发票。以下是相应的查询:
// Fetching Child Records using SOQL
List<apex_customer__c> ListCustomers = [SELECT Name, Id,
   (SELECT id, Name FROM Invoices__r) FROM APEX_Customer__c WHERE Name = 'ABC Customer'];

// Query for fetching the Child records along with Parent
System.debug('ListCustomers '+ListCustomers); // Parent Record

List<apex_invoice__c> ListOfInvoices = ListCustomers[0].Invoices__r;
// By this notation, you could fetch the child records and save it in List
System.debug('ListOfInvoices values of Child '+ListOfInvoices);
// Child records
您可以在调试日志中查看记录值。
获取父记录
假设您需要获取创建日期为今天的发票的客户名称,则可以使用以下查询:
示例
获取父记录的值以及子对象。
// Fetching Parent Record Field value using SOQL
List<apex_invoice__c> ListOfInvoicesWithCustomerName = new List<apex_invoice__c>();
ListOfInvoicesWithCustomerName = [SELECT Name, id, APEX_Customer__r.Name
   FROM APEX_Invoice__c LIMIT 10];

// Fetching the Parent record's values
for (APEX_Invoice__c objInv: ListOfInvoicesWithCustomerName) {
   System.debug('Invoice Customer Name is '+objInv.APEX_Customer__r.Name);
   // Will print the values, all the Customer Records will be printed
}
这里我们使用了 APEX_Customer__r.Name 的表示法,其中 APEX_Customer__r 是父关系名称,这里您需要在父字段的末尾附加 __r,然后您可以获取父字段的值。
聚合函数
SOQL 与 SQL 中一样,也具有聚合函数。聚合函数允许我们汇总和概括数据。现在让我们详细了解一下该函数。
假设您想知道从“ABC 客户”那里获得的平均收入是多少,则可以使用此函数来计算平均值。
示例
// Getting Average of all the invoices for a Perticular Customer
AggregateResult[] groupedResults = [SELECT
   AVG(APEX_Amount_Paid__c)averageAmount FROM APEX_Invoice__c WHERE
   APEX_Customer__r.Name = 'ABC Customer'];
Object avgPaidAmount = groupedResults[0].get('averageAmount');
System.debug('Total Average Amount Received From Customer ABC is '+avgPaidAmount);
检查调试日志中的输出。请注意,任何包含聚合函数的查询都会将其结果返回到一个 **AggregateResult** 对象数组中。AggregateResult 是一个只读的 sObject,仅用于查询结果。当我们需要生成大型数据的报表时,它非常有用。
还有其他聚合函数,您可以使用它们来执行数据汇总。
**MIN()** - 这可以用来查找最小值。
**MAX()** - 这可以用来查找最大值。
绑定 Apex 变量
您可以在 SOQL 查询中使用 Apex 变量来获取所需的结果。可以使用冒号 (:) 表示法引用 Apex 变量。
示例
// Apex Variable Reference
String CustomerName = 'ABC Customer';
List<apex_customer__c> ListCustomer = [SELECT Id, Name FROM APEX_Customer__c
   WHERE Name = :CustomerName];

// Query Using Apex variable
System.debug('ListCustomer Name'+ListCustomer); // Customer Name
Apex - 安全性
Apex 安全性是指在运行代码时应用安全设置并强制执行共享规则的过程。Apex 类具有可以通过两个关键字控制的安全设置。
数据安全性和共享规则
Apex 通常在系统上下文中运行,即当前用户的权限。在代码执行期间不会考虑字段级安全性以及共享规则。只有匿名代码块以执行代码的用户的权限执行。
我们的 Apex 代码不应将通过安全和共享设置隐藏的敏感数据公开给用户。因此,Apex 安全性和强制执行共享规则至关重要。
使用 With Sharing 关键字
如果您使用此关键字,则 Apex 代码将对当前用户对 Apex 代码的共享设置进行强制。这不会强制执行配置文件权限,只会强制执行数据级共享设置。
让我们考虑一个示例,其中我们的用户可以访问 5 条记录,但记录总数为 10。因此,当 Apex 类使用“With Sharing”关键字声明时,它将只返回用户可以访问的 5 条记录。
示例
首先,确保您已在 Customer 对象中创建了至少 10 条记录,其中 5 条记录的“名称”为“ABC 客户”,其余 5 条记录为“XYZ 客户”。然后,创建一个共享规则,将“ABC 客户”与所有用户共享。我们还需要确保已将 Customer 对象的 OWD 设置为私有。
将下面给出的代码粘贴到开发者控制台中的匿名代码块中。
// Class With Sharing
public with sharing class MyClassWithSharing {
   // Query To fetch 10 records
   List<apex_customer__c> CustomerList = [SELECT id, Name FROM APEX_Customer__c LIMIT 10];

   public Integer executeQuery () {
      System.debug('List will have only 5 records and the actual records are'
         + CustomerList.size()+' as user has access to'+CustomerList);
      Integer ListSize = CustomerList.size();
      return ListSize;
   }
}

// Save the above class and then execute as below
// Execute class using the object of class
MyClassWithSharing obj = new MyClassWithSharing();
Integer ListSize = obj.executeQuery();
不使用 With Sharing 关键字
顾名思义,使用此关键字声明的类在系统模式下执行,即,无论用户是否可以访问记录,查询都将获取所有记录。
// Class Without Sharing
public without sharing class MyClassWithoutSharing {
   List<apex_customer__c> CustomerList = [SELECT id, Name FROM APEX_Customer__c LIMIT 10];

   // Query To fetch 10 records, this will return all the records
   public Integer executeQuery () {
      System.debug('List will have only 5 records and the actula records are'
         + CustomerList.size()+' as user has access to'+CustomerList);
      Integer ListSize = CustomerList.size();
      return ListSize;
   }
}
// Output will be 10 records.
设置 Apex 类的安全性
您可以为特定配置文件启用或禁用 Apex 类。以下列出了执行此操作的步骤。您可以确定哪个配置文件应该访问哪个类。
从类列表页面设置 Apex 类安全性
**步骤 1** - 在“设置”中,单击“开发”→“Apex 类”。
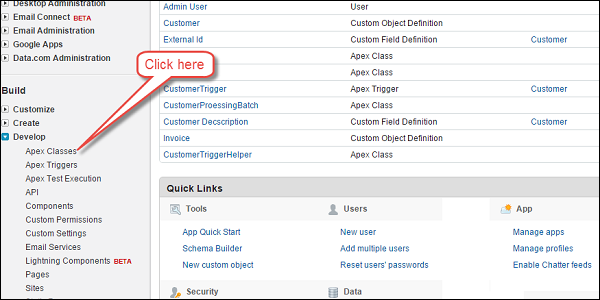
**步骤 2** - 单击要限制的类的名称。我们已单击 CustomerOperationClass。

**步骤 3** - 单击“安全性”。

**步骤 4** - 从“可用配置文件”列表中选择要启用的配置文件并单击“添加”,或从“已启用配置文件”列表中选择要禁用的配置文件并单击“删除”。
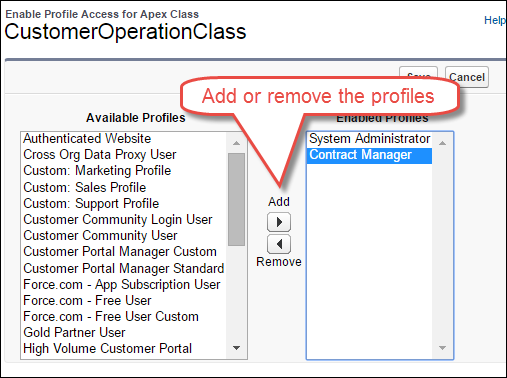
**步骤 5** - 单击“保存”。
从权限集设置 Apex 安全性
**步骤 1** - 在“设置”中,单击“管理用户”→“权限集”。

**步骤 2** - 选择一个权限集。

**步骤 3** - 单击“Apex 类访问”。
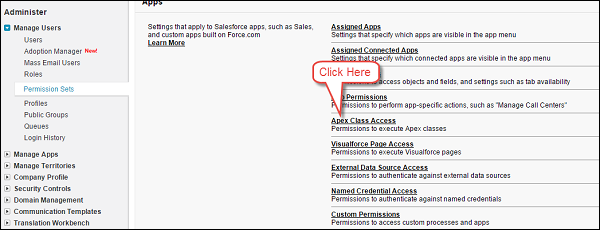
**步骤 4** - 单击“编辑”。

**步骤 5** - 从“可用 Apex 类”列表中选择要启用的 Apex 类并单击“添加”,或从“已启用 Apex 类”列表中选择要禁用的 Apex 类并单击“删除”。
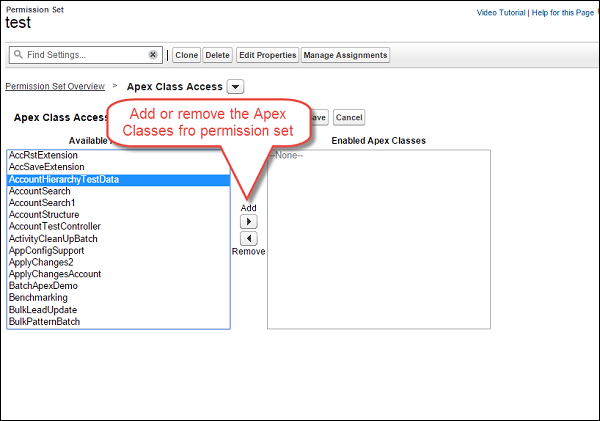
**步骤 6** - 单击“保存”按钮。
Apex - 调用
Apex 调用是指执行 Apex 类的过程。只有通过以下列出的方式之一调用 Apex 类时,才能执行 Apex 类:
触发器和匿名代码块
为指定事件调用的触发器
异步 Apex
计划 Apex 类以指定的时间间隔运行,或运行批处理作业
Web 服务类
Apex 电子邮件服务类
Apex Web 服务,允许通过 SOAP 和 REST Web 服务公开您的方法
Visualforce 控制器
Apex 电子邮件服务来处理传入的电子邮件
使用 JavaScript 调用 Apex
Ajax 工具包来调用在 Apex 中实现的 Web 服务方法
我们现在将了解一些常见的 Apex 调用方法。
从执行匿名代码块
您可以通过在开发者控制台中执行匿名代码来调用 Apex 类,如下所示:
**步骤 1** - 打开开发者控制台。
**步骤 2** - 单击“调试”。
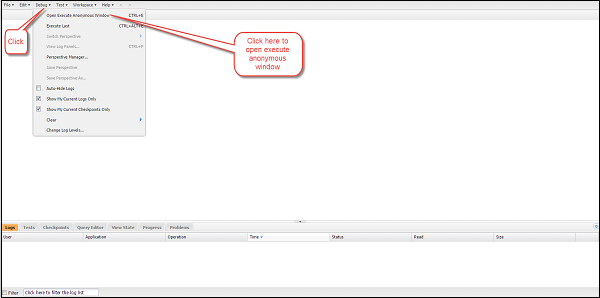
**步骤 3** - 将打开匿名执行窗口,如下所示。现在,单击“执行”按钮:
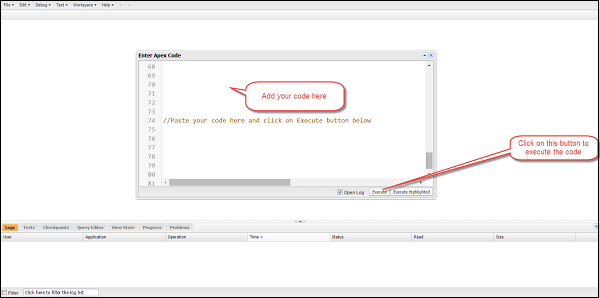
**步骤 4** - 打开调试日志,它将出现在“日志”窗格中。
从触发器
您也可以从触发器调用 Apex 类。当发生指定事件时,将调用触发器,并且触发器可以在执行时调用 Apex 类。
以下示例代码显示了当调用触发器时如何执行类。
示例
// Class which will gets called from trigger
public without sharing class MyClassWithSharingTrigger {

   public static Integer executeQuery (List<apex_customer__c> CustomerList) {
      // perform some logic and operations here
      Integer ListSize = CustomerList.size();
      return ListSize;
   }
}

// Trigger Code
trigger Customer_After_Insert_Example on APEX_Customer__c (after insert) {
   System.debug('Trigger is Called and it will call Apex Class');
   MyClassWithSharingTrigger.executeQuery(Trigger.new);  // Calling Apex class and
                                                         // method of an Apex class
}

// This example is for reference, no need to execute and will have detail look on
// triggers later chapters.
从 Visualforce 页面控制器代码
也可以从 Visualforce 页面调用 Apex 类。我们可以指定控制器或控制器扩展,并调用指定的 Apex 类。
示例
VF 页面代码

Apex 类代码(控制器扩展)

Apex - 触发器
Apex 触发器类似于存储过程,在发生特定事件时执行。触发器在记录上发生事件之前和之后执行。
语法
trigger triggerName on ObjectName (trigger_events) { Trigger_code_block }
执行触发器
以下是可以触发触发器的事件:
- 插入
- 更新
- 删除
- 合并
- Upsert
- 撤销删除
触发器示例 1
假设我们收到一个业务需求,即当客户的“客户状态”字段从“无效”更改为“有效”时,我们需要创建发票记录。为此,我们将通过以下步骤在 APEX_Customer__c 对象上创建触发器:
**步骤 1** - 转到 sObject
**步骤 2** - 单击“客户”
**步骤 3** - 在触发器相关列表中单击“新建”按钮,并添加如下所示的触发器代码。
// Trigger Code
trigger Customer_After_Insert on APEX_Customer__c (after update) {
   List InvoiceList = new List();

   for (APEX_Customer__c objCustomer: Trigger.new) {

      if (objCustomer.APEX_Customer_Status__c == 'Active') {
         APEX_Invoice__c objInvoice = new APEX_Invoice__c();
         objInvoice.APEX_Status__c = 'Pending';
         InvoiceList.add(objInvoice);
      }
   }

   // DML to insert the Invoice List in SFDC
   insert InvoiceList;
}
说明
**Trigger.new** - 这是存储当前在触发器上下文中记录的上下文变量,无论是插入还是更新。在本例中,此变量包含已更新的 Customer 对象的记录。
上下文中还有其他可用的上下文变量 - trigger.old、trigger.newMap、trigger.OldMap。
触发器示例 2
当对客户记录进行更新操作时,上述触发器将执行。假设仅当客户状态从“无效”更改为“有效”时才需要插入发票记录,而不是每次都插入;为此,我们可以使用另一个上下文变量 **trigger.oldMap**,它将存储键作为记录 ID,并将值作为旧记录值。
// Modified Trigger Code
trigger Customer_After_Insert on APEX_Customer__c (after update) {
   List<apex_invoice__c> InvoiceList = new List<apex_invoice__c>();

   for (APEX_Customer__c objCustomer: Trigger.new) {

      // condition to check the old value and new value
      if (objCustomer.APEX_Customer_Status__c == 'Active' &&

      trigger.oldMap.get(objCustomer.id).APEX_Customer_Status__c == 'Inactive') {
         APEX_Invoice__c objInvoice = new APEX_Invoice__c();
         objInvoice.APEX_Status__c = 'Pending';
         InvoiceList.add(objInvoice);
      }
   }

   // DML to insert the Invoice List in SFDC
   insert InvoiceList;
}
说明
我们使用了 Trigger.oldMap 变量,如前所述,它是一个上下文变量,存储正在更新的记录的 ID 和旧值。
Apex - 触发器设计模式
设计模式用于使我们的代码更有效,并避免达到控制限制。开发人员经常可以编写低效的代码,这会导致对象重复实例化。这可能导致低效、性能不佳的代码,并可能违反控制限制。这最常发生在触发器中,因为它们可以针对一组记录进行操作。
我们将在本章中看到一些重要的设计模式策略。
批量触发器设计模式
在实际业务案例中,您可能需要一次处理数千条记录。如果您的触发器没有设计成处理此类情况,则它在处理记录时可能会失败。在实现触发器时,需要遵循一些最佳实践。默认情况下,所有触发器都是批量触发器,并且可以一次处理多条记录。您应该始终计划一次处理多条记录。
考虑一个业务案例,其中您需要处理大量记录,并且您已编写如下所示的触发器。这与我们之前采用的示例相同,即当客户状态从“无效”更改为“有效”时插入发票记录。
// Bad Trigger Example
trigger Customer_After_Insert on APEX_Customer__c (after update) {

   for (APEX_Customer__c objCustomer: Trigger.new) {

      if (objCustomer.APEX_Customer_Status__c == 'Active' &&
         trigger.oldMap.get(objCustomer.id).APEX_Customer_Status__c == 'Inactive') {

         // condition to check the old value and new value
         APEX_Invoice__c objInvoice = new APEX_Invoice__c();
         objInvoice.APEX_Status__c = 'Pending';
         insert objInvoice;   //DML to insert the Invoice List in SFDC
      }
   }
}
您现在可以看到,DML 语句已写入 for 循环块中,这在仅处理少量记录时有效,但是当您处理数百条记录时,它将达到每个事务的 DML 语句限制,即 **控制限制**。我们将在后续章节中详细介绍控制限制。
为了避免这种情况,我们必须使触发器能够高效地一次处理多条记录。
以下示例将帮助您理解这一点 -
// Modified Trigger Code-Bulk Trigger
trigger Customer_After_Insert on APEX_Customer__c (after update) {
   List<apex_invoice__c> InvoiceList = new List<apex_invoice__c>();

   for (APEX_Customer__c objCustomer: Trigger.new) {

      if (objCustomer.APEX_Customer_Status__c == 'Active' &&
         trigger.oldMap.get(objCustomer.id).APEX_Customer_Status__c == 'Inactive') {

         //condition to check the old value and new value
         APEX_Invoice__c objInvoice = new APEX_Invoice__c();
         objInvoice.APEX_Status__c = 'Pending';
         InvoiceList.add(objInvoice);//Adding records to List
      }
   }

   insert InvoiceList;
   // DML to insert the Invoice List in SFDC, this list contains the all records
   // which need to be modified and will fire only one DML
}
此触发器只会触发 1 条 DML 语句,因为它将在列表上操作,并且该列表包含所有需要修改的记录。
通过这种方式,您可以避免 DML 语句的权限限制。
触发器辅助类
在触发器中编写整个代码也不是一个好习惯。因此,您应该调用 Apex 类并将处理从触发器委托给 Apex 类,如下所示。触发器辅助类是为触发器执行所有处理的类。
让我们再次考虑我们的发票记录创建示例。
// Below is the Trigger without Helper class
trigger Customer_After_Insert on APEX_Customer__c (after update) {
   List<apex_invoice__c> InvoiceList = new List<apex_invoice__c>();

   for (APEX_Customer__c objCustomer: Trigger.new) {

      if (objCustomer.APEX_Customer_Status__c == 'Active' &&
         trigger.oldMap.get(objCustomer.id).APEX_Customer_Status__c == 'Inactive') {

         // condition to check the old value and new value
         APEX_Invoice__c objInvoice = new APEX_Invoice__c();
         objInvoice.APEX_Status__c = 'Pending';
         InvoiceList.add(objInvoice);
      }
   }

   insert InvoiceList; // DML to insert the Invoice List in SFDC
}

// Below is the trigger with helper class
// Trigger with Helper Class
trigger Customer_After_Insert on APEX_Customer__c (after update) {
   CustomerTriggerHelper.createInvoiceRecords(Trigger.new, trigger.oldMap);
   // Trigger calls the helper class and does not have any code in Trigger
}
辅助类
public class CustomerTriggerHelper {
   public static void createInvoiceRecords (List<apex_customer__c>

   customerList, Map<id, apex_customer__c> oldMapCustomer) {
      List<apex_invoice__c> InvoiceList = new Listvapex_invoice__c>();

      for (APEX_Customer__c objCustomer: customerList) {

         if (objCustomer.APEX_Customer_Status__c == 'Active' &&
            oldMapCustomer.get(objCustomer.id).APEX_Customer_Status__c == 'Inactive') {

            // condition to check the old value and new value
            APEX_Invoice__c objInvoice = new APEX_Invoice__c();

            // objInvoice.APEX_Status__c = 'Pending';
            InvoiceList.add(objInvoice);
         }
      }

      insert InvoiceList;  // DML to insert the Invoice List in SFDC
   }
}
在此,所有处理都已委托给辅助类,当我们需要新的功能时,我们只需将代码添加到辅助类中,而无需修改触发器。
每个 sObject 上的单个触发器
始终在每个对象上创建一个触发器。如果同一个对象上的多个触发器达到权限限制,可能会导致冲突和错误。
您可以使用上下文变量根据需要从辅助类调用不同的方法。考虑我们之前的示例。假设我们的 createInvoice 方法应该只在记录更新和多个事件时调用。然后我们可以控制执行,如下所示 -
// Trigger with Context variable for controlling the calling flow
trigger Customer_After_Insert on APEX_Customer__c (after update, after insert) {

   if (trigger.isAfter && trigger.isUpdate) {
      // This condition will check for trigger events using isAfter and isUpdate
      // context variable
      CustomerTriggerHelper.createInvoiceRecords(Trigger.new);

      // Trigger calls the helper class and does not have any code in Trigger
      // and this will be called only when trigger ids after update
   }
}

// Helper Class
public class CustomerTriggerHelper {

   //Method To Create Invoice Records
   public static void createInvoiceRecords (List<apex_customer__c> customerList) {

      for (APEX_Customer__c objCustomer: customerList) {

         if (objCustomer.APEX_Customer_Status__c == 'Active' &&
            trigger.oldMap.get(objCustomer.id).APEX_Customer_Status__c == 'Inactive') {

            // condition to check the old value and new value
            APEX_Invoice__c objInvoice = new APEX_Invoice__c();
            objInvoice.APEX_Status__c = 'Pending';
            InvoiceList.add(objInvoice);
         }
      }

      insert InvoiceList; // DML to insert the Invoice List in SFDC
   }
}
Apex - 限制
权限执行限制确保在 Force.com 多租户平台上有效地使用资源。它是 Salesforce.com 为有效处理而指定的代码执行限制。
什么是权限限制?
众所周知,Apex 在多租户环境中运行,即单个资源由所有客户和组织共享。因此,有必要确保没有人垄断资源,因此 Salesforce.com 创建了一组限制来管理和限制代码执行。每当任何权限限制被超过时,它都会抛出错误并停止程序执行。
从开发人员的角度来看,务必确保我们的代码具有可扩展性并且不会触及限制。
所有这些限制都按交易基础应用。单个触发器执行是一次交易。
正如我们所见,触发器设计模式有助于避免限制错误。我们现在将了解其他重要的限制。
避免 SOQL 查询限制
您每次交易只能发出 100 个查询,也就是说,当您的代码发出超过 100 个 SOQL 查询时,它将抛出错误。
示例
此示例显示了如何达到 SOQL 查询限制 -
以下触发器迭代客户列表并使用字符串“Ok to Pay”更新子记录(发票)的描述。
// Helper class:Below code needs o be checked.
public class CustomerTriggerHelper {

  public static void isAfterUpdateCall(Trigger.new) {
      createInvoiceRecords(trigger.new);//Method call
      updateCustomerDescription(trigger.new);
   }

   // Method To Create Invoice Records
   public static void createInvoiceRecords (List<apex_customer__c> customerList) {
      for (APEX_Customer__c objCustomer: customerList) {

         if (objCustomer.APEX_Customer_Status__c == 'Active' &&
            trigger.oldMap.get(objCustomer.id).APEX_Customer_Status__c == 'Inactive') {

            // condition to check the old value and new value
            APEX_Invoice__c objInvoice = new APEX_Invoice__c();
            objInvoice.APEX_Status__c = 'Pending';
            InvoiceList.add(objInvoice);
         }
      }
      insert InvoiceList; // DML to insert the Invoice List in SFDC
   }

   // Method to update the invoice records
   public static updateCustomerDescription (List<apex_customer__c> customerList) {
      for (APEX_Customer__c objCust: customerList) {
         List<apex_customer__c> invList = [SELECT Id, Name,
            APEX_Description__c FROM APEX_Invoice__c WHERE APEX_Customer__c = :objCust.id];

         // This query will fire for the number of records customer list has and will
         // hit the governor limit when records are more than 100
         for (APEX_Invoice__c objInv: invList) {
            objInv.APEX_Description__c = 'OK To Pay';
            update objInv;
            // Update invoice, this will also hit the governor limit for DML if large
            // number(150) of records are there
         }
      }
   }
}
当调用“updateCustomerDescription”方法并且客户记录数超过 100 时,它将触及 SOQL 限制。为避免这种情况,切勿在 For 循环中编写 SOQL 查询。在这种情况下,SOQL 查询已在 For 循环中编写。
以下是一个示例,它将展示如何避免 DML 和 SOQL 限制。我们使用了嵌套关系查询来获取发票记录,并使用上下文变量trigger.newMap获取 ID 和客户记录的映射。
// SOQL-Good Way to Write Query and avoid limit exception
// Helper Class
public class CustomerTriggerHelper {
   public static void isAfterUpdateCall(Trigger.new) {
      createInvoiceRecords(trigger.new);  //Method call
      updateCustomerDescription(trigger.new, trigger.newMap);
   }

   // Method To Create Invoice Records
   public static void createInvoiceRecords (List<apex_customer__c> customerList) {
      for (APEX_Customer__c objCustomer: customerList) {

         if (objCustomer.APEX_Customer_Status__c == 'Active' &&
            trigger.oldMap.get(objCustomer.id).APEX_Customer_Status__c == 'Inactive') {

            // condition to check the old value and new value
            APEX_Invoice__c objInvoice = new APEX_Invoice__c();
            objInvoice.APEX_Status__c = 'Pending';
            InvoiceList.add(objInvoice);
         }
      }
      insert InvoiceList; // DML to insert the Invoice List in SFDC
   }

   // Method to update the invoice records
   public static updateCustomerDescription (List<apex_customer__c>
      customerList, Map<id, apex_customer__c> newMapVariable) {
      List<apex_customer__c> customerListWithInvoice = [SELECT id,
         Name,(SELECT Id, Name, APEX_Description__c FROM APEX_Invoice__r) FROM
         APEX_Customer__c WHERE Id IN :newMapVariable.keySet()];

      // Query will be for only one time and fetches all the records
      List<apex_invoice__c> invoiceToUpdate = new
      List<apex_invoice__c>();

      for (APEX_Customer__c objCust: customerList) {
         for (APEX_Invoice__c objInv: invList) {
            objInv.APEX_Description__c = 'OK To Pay';
            invoiceToUpdate.add(objInv);
            // Add the modified records to List
         }
      }
      update invoiceToUpdate;
   }
}
DML 批量调用
此示例显示了批量触发器以及触发器辅助类模式。您必须先保存辅助类,然后保存触发器。
注意 - 将以下代码粘贴到我们之前创建的“CustomerTriggerHelper”类中。
// Helper Class
public class CustomerTriggerHelper {
   public static void isAfterUpdateCall(List<apex_customer__c> customerList,
      Map<id, apex_customer__c> mapIdToCustomers, Map<id, apex_customer__c>
      mapOldItToCustomers) {
      createInvoiceRecords(customerList, mapOldItToCustomers);   //Method call
      updateCustomerDescription(customerList,mapIdToCustomers,
      mapOldItToCustomers);
   }

   // Method To Create Invoice Records
   public static void createInvoiceRecords (List<apex_customer__c>
      customerList, Map<id, apex_customer__c> mapOldItToCustomers) {
      List<apex_invoice__c> InvoiceList = new List<apex_invoice__c>();
      List<apex_customer__c> customerToInvoice = [SELECT id, Name FROM
         APEX_Customer__c LIMIT 1];

      for (APEX_Customer__c objCustomer: customerList) {
         if (objCustomer.APEX_Customer_Status__c == 'Active' &&
            mapOldItToCustomers.get(objCustomer.id).APEX_Customer_Status__c == 'Inactive') {
            //condition to check the old value and new value
            APEX_Invoice__c objInvoice = new APEX_Invoice__c();
            objInvoice.APEX_Status__c = 'Pending';
            objInvoice.APEX_Customer__c = objCustomer.id;
            InvoiceList.add(objInvoice);
         }
      }
      system.debug('InvoiceList&&&'+InvoiceList);
      insert InvoiceList;
      // DML to insert the Invoice List in SFDC. This also follows the Bulk pattern
   }

   // Method to update the invoice records
   public static void updateCustomerDescription (List<apex_customer__c>
      customerList, Map<id, apex_customer__c> newMapVariable, Map<id,
      apex_customer__c> oldCustomerMap) {
      List<apex_customer__c> customerListWithInvoice = [SELECT id,
      Name,(SELECT Id, Name, APEX_Description__c FROM Invoices__r) FROM
         APEX_Customer__c WHERE Id IN :newMapVariable.keySet()];

      // Query will be for only one time and fetches all the records
      List<apex_invoice__c> invoiceToUpdate = new List<apex_invoice__c>();
      List<apex_invoice__c> invoiceFetched = new List<apex_invoice__c>();
      invoiceFetched = customerListWithInvoice[0].Invoices__r;
      system.debug('invoiceFetched'+invoiceFetched);
      system.debug('customerListWithInvoice****'+customerListWithInvoice);

      for (APEX_Customer__c objCust: customerList) {
         system.debug('objCust.Invoices__r'+objCust.Invoices__r);
         if (objCust.APEX_Active__c == true &&
            oldCustomerMap.get(objCust.id).APEX_Active__c == false) {
            for (APEX_Invoice__c objInv: invoiceFetched) {
               system.debug('I am in For Loop'+objInv);
               objInv.APEX_Description__c = 'OK To Pay';
               invoiceToUpdate.add(objInv);
               // Add the modified records to List
            }
         }
      }
     system.debug('Value of List ***'+invoiceToUpdate);
     update invoiceToUpdate;
      // This statement is Bulk DML which performs the DML on List and avoids
      // the DML Governor limit
   }
}

// Trigger Code for this class: Paste this code in 'Customer_After_Insert'
// trigger on Customer Object
trigger Customer_After_Insert on APEX_Customer__c (after update) {
   CustomerTriggerHelper.isAfterUpdateCall(Trigger.new, trigger.newMap,
      trigger.oldMap);
   // Trigger calls the helper class and does not have any code in Trigger
}
其他 Salesforce 权限限制
下表列出了重要的权限限制。
| 描述 | 限制 |
|---|---|
| 总堆大小 | 6 MB/12 MB |
| 发出的 DML 语句总数 | 150 |
| 单个 SOSL 查询检索的记录总数 | 2000 |
| 发出的 SOSL 查询总数 | 20 |
| 通过 Database.getQueryLocator 检索的记录总数 | 10000 |
| 通过 SOQL 查询检索的记录总数 | 50000 |
Apex - 批处理
在本章中,我们将了解 Apex 中的批处理。考虑以下场景,我们将每天处理大量记录,可能是数据清理或删除一些未使用的记录。
什么是批处理 Apex?
批处理 Apex 是 Apex 代码的异步执行,专为处理大量记录而设计,并且比同步代码具有更大的权限限制灵活性。
何时使用批处理 Apex?
当您想每天或在特定时间间隔处理大量记录时,您可以使用批处理 Apex。
此外,当您希望操作异步执行时,可以实现批处理 Apex。批处理 Apex 作为开发人员必须实现的接口公开。批处理作业可以使用 Apex 以编程方式在运行时调用。批处理 Apex 在少量记录上操作,涵盖您的整个记录集并将处理分解为可管理的数据块。
使用批处理 Apex
当我们使用批处理 Apex 时,必须实现 Salesforce 提供的接口 Database.Batchable,然后以编程方式调用该类。
您可以按照以下步骤监控该类 -
要监控或停止批处理 Apex 批处理作业的执行,请转到设置→监控→Apex 作业或作业→Apex 作业。


Database.Batchable 接口具有以下三个需要实现的方法 -
- 开始
- 执行
- 完成
现在让我们详细了解每个方法。
开始
Start 方法是 Database.Batchable 接口的三个方法之一。
语法
global void execute(Database.BatchableContext BC, list<sobject<) {}
此方法将在批处理作业开始时调用,并收集批处理作业将操作的数据。
请考虑以下几点以了解该方法 -
当您使用简单查询生成批处理作业中使用的对象范围时,请使用Database.QueryLocator对象。在这种情况下,将绕过 SOQL 数据行限制。
当您有复杂条件要处理记录时,请使用可迭代对象。Database.QueryLocator 确定应处理的记录范围。
执行
现在让我们了解 Database.Batchable 接口的 Execute 方法。
语法
global void execute(Database.BatchableContext BC, list<sobject<) {}
其中,list<sObject< 由 Database.QueryLocator 方法返回。
此方法在 Start 方法之后调用,并执行批处理作业所需的所有处理。
完成
我们现在将讨论 Database.Batchable 接口的 Finish 方法。
语法
global void finish(Database.BatchableContext BC) {}
此方法在最后调用,您可以执行一些完成活动,例如发送一封包含有关批处理作业已处理记录和状态的信息的电子邮件。
批处理 Apex 示例
让我们考虑我们现有的化工公司的示例,并假设我们需要更新已标记为活动且创建日期为今天的客户记录的客户状态和客户描述字段。这应该每天执行,并且应向用户发送一封有关批处理状态的电子邮件。将客户状态更新为“已处理”,并将客户描述更新为“通过批处理作业更新”。
// Batch Job for Processing the Records
global class CustomerProessingBatch implements Database.Batchable<sobject> {
   global String [] email = new String[] {'test@test.com'};
   // Add here your email address here

   // Start Method
   global Database.Querylocator start (Database.BatchableContext BC) {
      return Database.getQueryLocator('Select id, Name, APEX_Customer_Status__c,
      APEX_Customer_Decscription__c From APEX_Customer__c WHERE createdDate = today
      AND APEX_Active__c = true');
      // Query which will be determine the scope of Records fetching the same
   }

   // Execute method
   global void execute (Database.BatchableContext BC, List<sobject> scope) {
      List<apex_customer__c> customerList = new List<apex_customer__c>();
      List<apex_customer__c> updtaedCustomerList = new List<apex_customer__c>();

      // List to hold updated customer
      for (sObject objScope: scope) {
         APEX_Customer__c newObjScope = (APEX_Customer__c)objScope ;

         // type casting from generic sOject to APEX_Customer__c
         newObjScope.APEX_Customer_Decscription__c = 'Updated Via Batch Job';
         newObjScope.APEX_Customer_Status__c = 'Processed';
         updtaedCustomerList.add(newObjScope); // Add records to the List
         System.debug('Value of UpdatedCustomerList '+updtaedCustomerList);
      }

      if (updtaedCustomerList != null && updtaedCustomerList.size()>0) {
         // Check if List is empty or not
         Database.update(updtaedCustomerList); System.debug('List Size '
          + updtaedCustomerList.size());
         // Update the Records
      }
   }

   // Finish Method
   global void finish(Database.BatchableContext BC) {
      Messaging.SingleEmailMessage mail = new Messaging.SingleEmailMessage();

      // Below code will fetch the job Id
      AsyncApexJob a = [Select a.TotalJobItems, a.Status, a.NumberOfErrors,
      a.JobType, a.JobItemsProcessed, a.ExtendedStatus, a.CreatedById,
      a.CompletedDate From AsyncApexJob a WHERE id = :BC.getJobId()];

      // get the job Id
      System.debug('$$$ Jobid is'+BC.getJobId());

      // below code will send an email to User about the status
      mail.setToAddresses(email);
      mail.setReplyTo('test@test.com'); // Add here your email address
      mail.setSenderDisplayName('Apex Batch Processing Module');
      mail.setSubject('Batch Processing '+a.Status);
      mail.setPlainTextBody('The Batch Apex job processed'
         + a.TotalJobItems+'batches with '+a.NumberOfErrors+'failures'+'Job Item
      processed are'+a.JobItemsProcessed);
      Messaging.sendEmail(new Messaging.Singleemailmessage [] {mail});
   }
}
要执行此代码,请先保存它,然后将以下代码粘贴到 Execute anonymous 中。这将创建类的对象,并且 Database.execute 方法将执行批处理作业。作业完成后,将向指定的电子邮件地址发送电子邮件。确保您有一个客户记录,其中Active已选中。
// Paste in Developer Console
CustomerProessingBatch objClass = new CustomerProessingBatch();
Database.executeBatch (objClass);
执行此类后,检查您提供的电子邮件地址,您将在其中收到包含信息的电子邮件。此外,您可以通过监控页面和上述步骤检查批处理作业的状态。
如果您检查调试日志,则可以找到指示已处理多少条记录的列表大小。
限制
我们一次最多只能有 5 个批处理作业正在处理。这是批处理 Apex 的限制之一。
使用 Apex 详细信息页面计划 Apex 批处理作业
您可以通过 Apex 详细信息页面计划 Apex 类,如下所示 -
步骤 1 - 转到设置⇒Apex 类,单击 Apex 类。
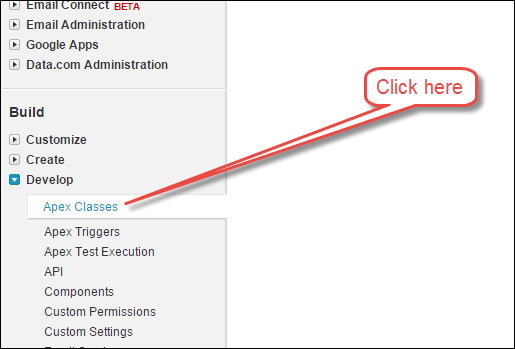
步骤 2 - 单击计划 Apex 按钮。

步骤 3 - 提供详细信息。
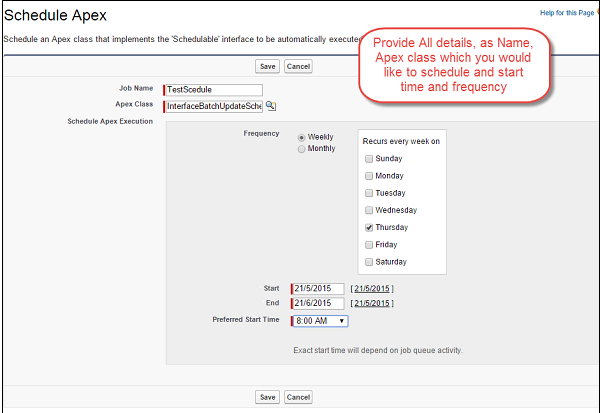
使用 Schedulable 接口计划 Apex 批处理作业
您可以使用 Schedulable 接口计划 Apex 批处理作业,如下所示 -
// Batch Job for Processing the Records
global class CustomerProessingBatch implements Database.Batchable<sobject> {
   global String [] email = new String[] {'test@test.com'};
   // Add here your email address here

   // Start Method
   global Database.Querylocator start (Database.BatchableContext BC) {
      return Database.getQueryLocator('Select id, Name, APEX_Customer_Status__c,
      APEX_Customer_Decscription__c From APEX_Customer__c WHERE createdDate = today
      AND APEX_Active__c = true');
      // Query which will be determine the scope of Records fetching the same
   }

   // Execute method
   global void execute (Database.BatchableContext BC, List<sobject> scope) {
      List<apex_customer__c> customerList = new List<apex_customer__c>();
      List<apex_customer__c> updtaedCustomerList = new
      List<apex_customer__c>();//List to hold updated customer

      for (sObject objScope: scope) {
         APEX_Customer__c newObjScope = (APEX_Customer__c)objScope ;//type
         casting from generic sOject to APEX_Customer__c
         newObjScope.APEX_Customer_Decscription__c = 'Updated Via Batch Job';
         newObjScope.APEX_Customer_Status__c = 'Processed';
         updtaedCustomerList.add(newObjScope);//Add records to the List
         System.debug('Value of UpdatedCustomerList '+updtaedCustomerList);
      }

      if (updtaedCustomerList != null && updtaedCustomerList.size()>0) {
         // Check if List is empty or not
         Database.update(updtaedCustomerList); System.debug('List Size'
            + updtaedCustomerList.size());
         // Update the Records
      }
   }

   // Finish Method
   global void finish(Database.BatchableContext BC) {
      Messaging.SingleEmailMessage mail = new Messaging.SingleEmailMessage();

      // Below code will fetch the job Id
      AsyncApexJob a = [Select a.TotalJobItems, a.Status, a.NumberOfErrors,
      a.JobType, a.JobItemsProcessed, a.ExtendedStatus, a.CreatedById,
      a.CompletedDate From AsyncApexJob a WHERE id = :BC.getJobId()];//get the job Id
      System.debug('$$$ Jobid is'+BC.getJobId());

      // below code will send an email to User about the status
      mail.setToAddresses(email);
      mail.setReplyTo('test@test.com');//Add here your email address
      mail.setSenderDisplayName('Apex Batch Processing Module');
      mail.setSubject('Batch Processing '+a.Status);
      mail.setPlainTextBody('The Batch Apex job processed'
         + a.TotalJobItems+'batches with '+a.NumberOfErrors+'failures'+'Job Item
      processed are'+a.JobItemsProcessed);
      Messaging.sendEmail(new Messaging.Singleemailmessage [] {mail});
   }

   // Scheduler Method to scedule the class
   global void execute(SchedulableContext sc) {
      CustomerProessingBatch conInstance = new CustomerProessingBatch();
      database.executebatch(conInstance,100);
   }
}

// Paste in Developer Console
CustomerProessingBatch objClass = new CustomerProcessingBatch();
Database.executeBatch (objClass);
Apex - 调试
调试是任何编程开发的重要组成部分。在 Apex 中,我们有一些可用于调试的工具。其中之一是 system.debug() 方法,它在调试日志中打印变量的值和输出。
我们可以使用以下两种工具进行调试 -
- 开发者控制台
- 调试日志
通过开发者控制台进行调试
您可以使用开发者控制台并执行匿名功能来调试 Apex,如下所示 -
示例
考虑我们现有的获取今天创建的客户记录的示例。我们只想了解查询是否返回结果,如果是,我们将检查列表的值。
将下面给出的代码粘贴到 Execute anonymous 窗口中,并按照我们打开 Execute anonymous 窗口所执行的步骤操作。
步骤 1 - 打开开发者控制台
步骤 2 - 从“调试”中打开 Execute anonymous,如下所示。
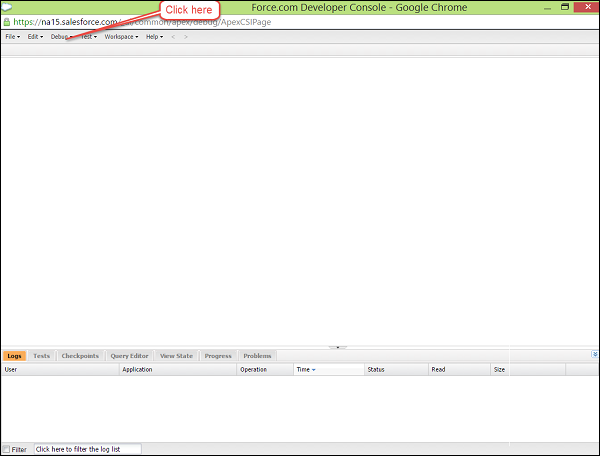
步骤 3 - 打开 Execute Anonymous 窗口,粘贴以下代码并单击执行。
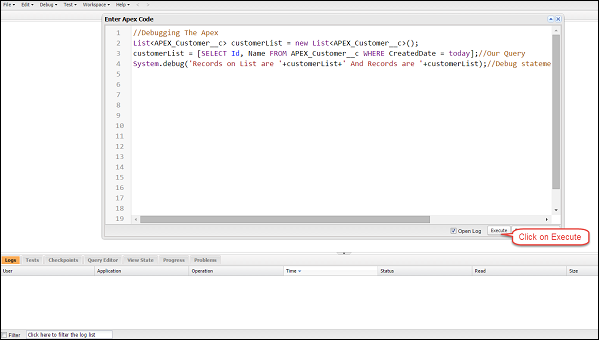
// Debugging The Apex
List<apex_customer__c> customerList = new List<apex_customer__c>();
customerList = [SELECT Id, Name FROM APEX_Customer__c WHERE CreatedDate =
today];
// Our Query
System.debug('Records on List are '+customerList+' And Records are '+customerList);
// Debug statement to check the value of List and Size
步骤 4 - 打开日志,如下所示。
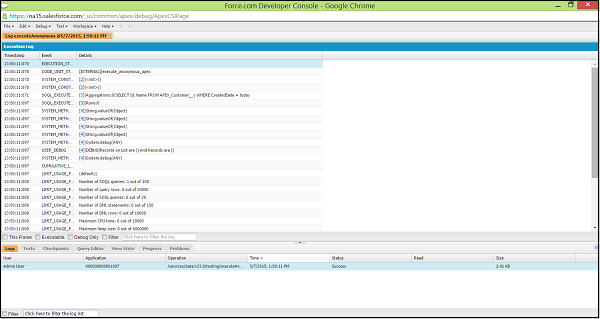
步骤 5 - 在过滤器条件中输入“USER”,如下所示。
步骤 6 - 打开 USER DEBUG 语句,如下所示。
通过调试日志进行调试
您也可以通过调试日志调试相同的类。假设,您在 Customer 对象中有一个触发器,并且需要针对某些变量值进行调试,那么您可以通过调试日志执行此操作,如下所示 -
这是更新 Description 字段(如果修改的客户处于活动状态)的触发器代码,并且您想检查当前作用域中变量和记录的值 -
trigger CustomerTrigger on APEX_Customer__c (before update) {
   List<apex_customer__c> customerList = new List<apex_customer__c>();
   for (APEX_Customer__c objCust: Trigger.new) {
      System.debug('objCust current value is'+objCust);

      if (objCust.APEX_Active__c == true) {
         objCust.APEX_Customer_Description__c = 'updated';
         System.debug('The record which has satisfied the condition '+objCust);
      }
   }
}
按照以下步骤生成调试日志。
步骤 1 - 设置用户的调试日志。转到设置,在搜索设置窗口中输入“调试日志”,然后单击链接。
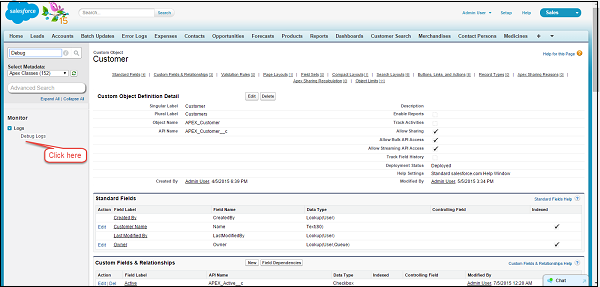
步骤 2 - 设置调试日志,如下所示。
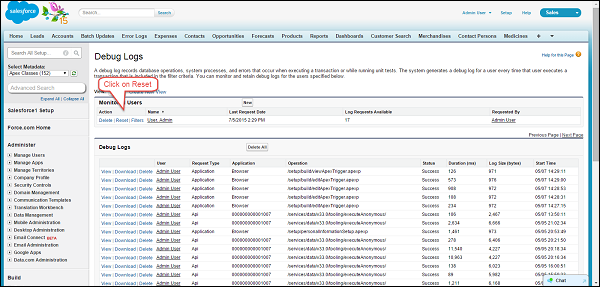
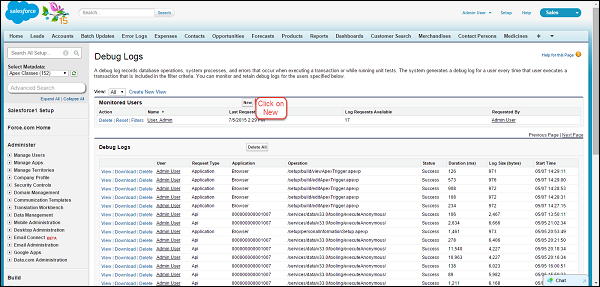
步骤 3 - 输入需要设置的用户名称。在此处输入您的姓名。
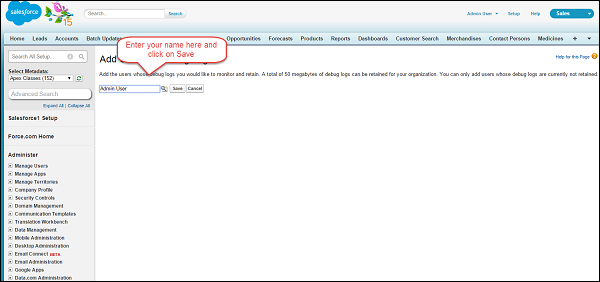
步骤 4 - 修改客户记录,因为事件应该发生以生成调试日志。
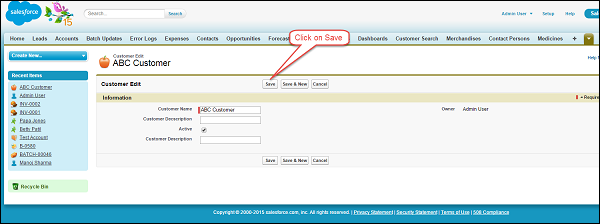
步骤 5 - 现在再次转到调试日志部分。打开调试日志并单击重置。
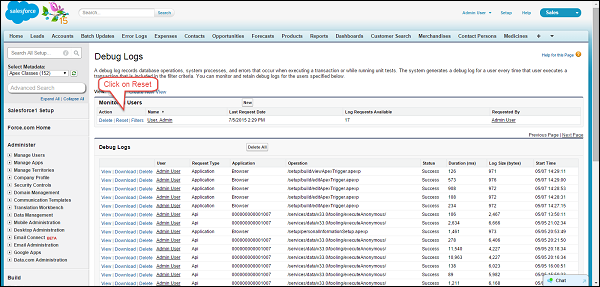
步骤 6 - 单击第一个调试日志的查看链接。
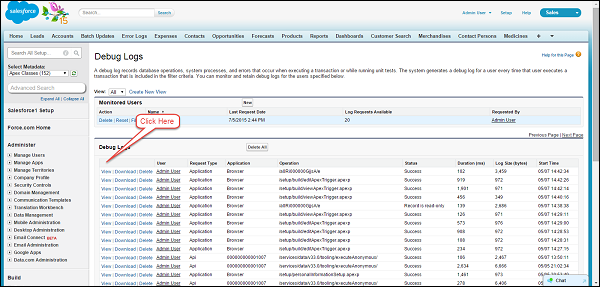
步骤 7 - 使用浏览器搜索,搜索字符串“USER”,如下所示。
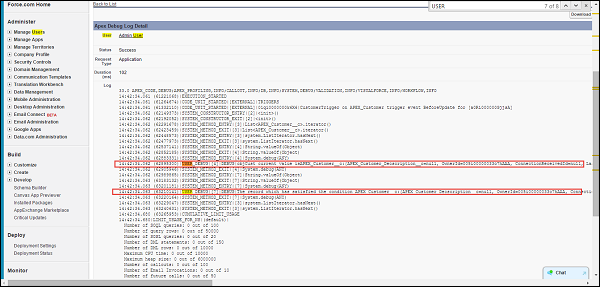
调试语句将显示我们在其中设置断点的字段的值。
Apex - 测试
测试是 Apex 或任何其他应用程序开发的集成部分。在 Apex 中,我们有单独的测试类来开发所有单元测试。
测试类
在 SFDC 中,代码必须具有 75% 的代码覆盖率才能部署到生产环境。此代码覆盖率由测试类执行。测试类是测试其他 Apex 类功能的代码片段。
让我们为我们之前编写的其中一个代码编写一个测试类。我们将编写测试类来覆盖我们的触发器和辅助类代码。以下是需要覆盖的触发器和辅助类。
// Trigger with Helper Class
trigger Customer_After_Insert on APEX_Customer__c (after update) {
   CustomerTriggerHelper.createInvoiceRecords(Trigger.new, trigger.oldMap);
      //Trigger calls the helper class and does not have any code in Trigger
}

// Helper Class:
public class CustomerTriggerHelper {
   public static void createInvoiceRecords (List<apex_customer__c>

      customerList, Map<id, apex_customer__c> oldMapCustomer) {
      List<apex_invoice__c> InvoiceList = new List<apex_invoice__c>();

      for (APEX_Customer__c objCustomer: customerList) {
         if (objCustomer.APEX_Customer_Status__c == 'Active' &&
            oldMapCustomer.get(objCustomer.id).APEX_Customer_Status__c == 'Inactive') {

            // condition to check the old value and new value
            APEX_Invoice__c objInvoice = new APEX_Invoice__c();
            objInvoice.APEX_Status__c = 'Pending';
            objInvoice.APEX_Customer__c = objCustomer.id;
            InvoiceList.add(objInvoice);
         }
      }
      insert InvoiceList;  // DML to insert the Invoice List in SFDC
   }
}
创建测试类
在本节中,我们将了解如何创建测试类。
数据创建
我们需要在测试类本身中为测试类创建数据。测试类默认情况下无法访问组织数据,但如果您设置 @isTest(seeAllData = true),则它也将能够访问组织的数据。
@isTest 注解
使用此注解,您声明这是一个测试类,并且它不会计入组织的代码总数限制。
testMethod 关键字
单元测试方法是不接受参数、不向数据库提交数据、不发送电子邮件,并且在方法定义中使用 testMethod 关键字或 isTest 注解声明的方法。此外,测试方法必须定义在测试类中,即使用 isTest 注解的类。
在我们的示例中,我们使用了 'myUnitTest' 测试方法。
Test.startTest() 和 Test.stopTest()
这些是测试类可用的标准测试方法。这些方法包含我们将模拟测试的事件或操作。例如,在这个示例中,我们将测试我们的触发器和辅助类,以通过更新记录来模拟触发器触发,就像我们在启动和停止块中所做的那样。这还为启动和停止块中的代码提供了单独的权限限制。
System.assert()
此方法检查期望输出与实际输出是否一致。在这种情况下,我们期望插入一个发票记录,因此我们添加了断言来检查这一点。
示例
/**
* This class contains unit tests for validating the behavior of Apex classes
* and triggers.
*
* Unit tests are class methods that verify whether a particular piece
* of code is working properly. Unit test methods take no arguments,
* commit no data to the database, and are flagged with the testMethod
* keyword in the method definition.
*
* All test methods in an organization are executed whenever Apex code is deployed
* to a production organization to confirm correctness, ensure code
* coverage, and prevent regressions. All Apex classes are
* required to have at least 75% code coverage in order to be deployed
* to a production organization. In addition, all triggers must have some code coverage.
*
* The @isTest class annotation indicates this class only contains test
* methods. Classes defined with the @isTest annotation do not count against
* the organization size limit for all Apex scripts.
*
* See the Apex Language Reference for more information about Testing and Code Coverage.
*/

@isTest
private class CustomerTriggerTestClass {
   static testMethod void myUnitTest() {
      //Create Data for Customer Objet
      APEX_Customer__c objCust = new APEX_Customer__c();
      objCust.Name = 'Test Customer';
      objCust.APEX_Customer_Status__c = 'Inactive';
      insert objCust;

      // Now, our trigger will fire on After update event so update the Records
      Test.startTest();    // Starts the scope of test
      objCust.APEX_Customer_Status__c = 'Active';
      update objCust;
      Test.stopTest();     // Ends the scope of test

      // Now check if it is giving desired results using system.assert
      // Statement.New invoice should be created
      List<apex_invoice__c> invList = [SELECT Id, APEX_Customer__c FROM
         APEX_Invoice__c WHERE APEX_Customer__c = :objCust.id];
      system.assertEquals(1,invList.size());
      // Check if one record is created in Invoivce sObject
   }
}
运行测试类
按照以下步骤运行测试类:
步骤 1 - 转到 Apex 类 ⇒ 点击类名称 'CustomerTriggerTestClass'。
步骤 2 - 点击“运行测试”按钮,如图所示。
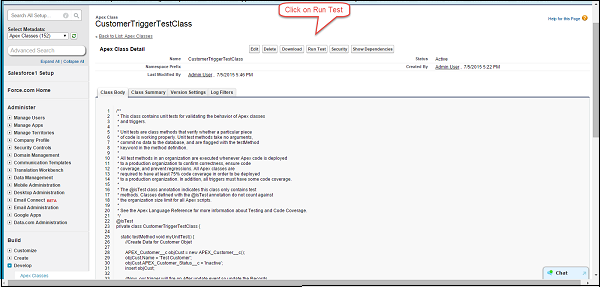
步骤 3 - 检查状态
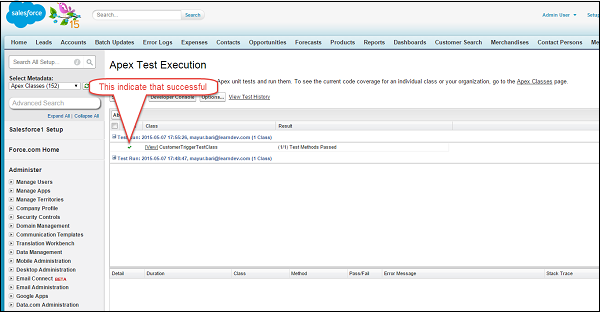
步骤 4 - 现在检查我们为其编写测试的类和触发器
类
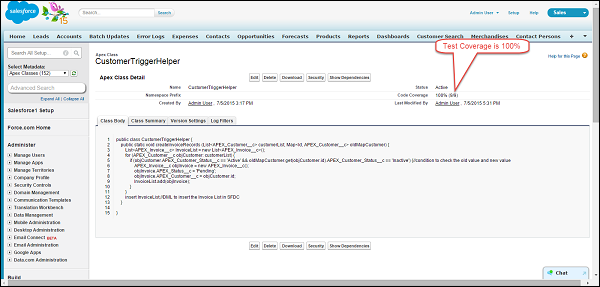
触发器
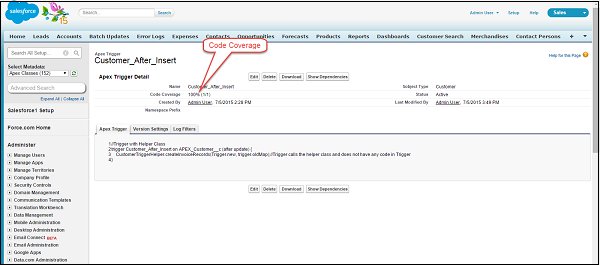
我们的测试已成功完成。
Apex - 部署
什么是 SFDC 中的部署?
到目前为止,我们已在开发人员版本中开发了代码,但在现实场景中,您需要在沙盒中进行此开发,然后您可能需要将其部署到另一个沙盒或生产环境,这称为部署。简而言之,这是元数据从一个组织到另一个组织的移动。这样做的原因是您无法在 Salesforce 生产组织中开发 Apex。当您在开发时,实时用户访问系统可能会导致数据不稳定或应用程序损坏。

可用于部署的工具:
- Force.com IDE
- 更改集
- SOAP API
- Force.com 迁移工具
由于我们使用开发人员版本进行开发和学习,因此我们无法使用需要 SFDC 企业版或其他付费版本的更改集或其他工具。因此,在本教程中,我们将详细说明 Force.com IDE 部署方法。
Force.com Eclipse IDE
步骤 1 - 打开 Eclipse 并打开需要部署的类触发器。
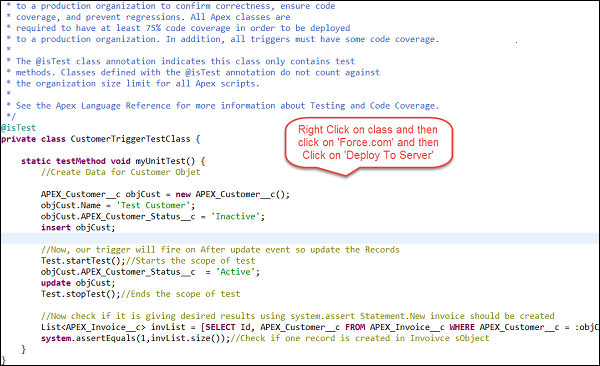
步骤 2 - 单击“部署到服务器”后,输入需要部署组件的组织的用户名和密码。
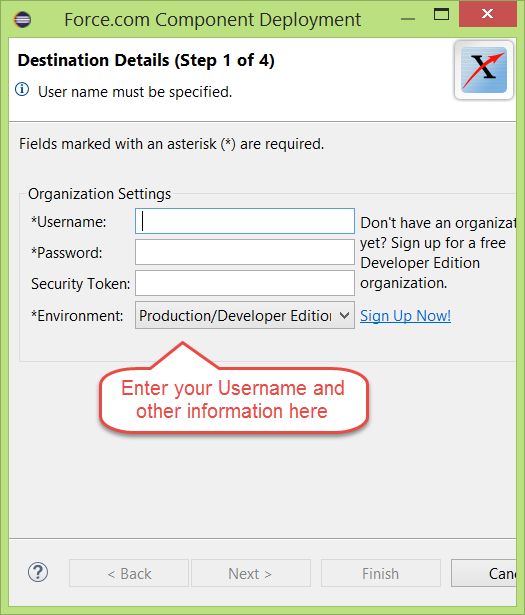
通过执行上述步骤,您的 Apex 组件将部署到目标组织。
使用更改集进行部署
您可以通过连接组织来通过部署设置将验证规则、工作流规则、Apex 类和触发器从一个组织部署到另一个组织。在这种情况下,必须连接组织。
要打开部署设置,请按照以下步骤操作。请记住,开发人员版本中不提供此功能:
步骤 1 - 转到设置并搜索“部署”。
步骤 2 - 点击“出站更改集”以创建要部署的更改集。
步骤 3 - 使用“添加”按钮将组件添加到更改集,然后保存并点击“上传”。
步骤 4 - 转到目标组织,点击入站更改集,最后点击“部署”。
部署的 SOAP API 调用
我们只对这种方法进行简要概述,因为它不是常用方法。
您可以使用以下方法调用来部署您的元数据。
- compileAndTest()
- compileClasses()
- compileTriggers()
Force.com 迁移工具
此工具用于脚本部署。您必须下载 Force.com 迁移工具,然后才能执行基于文件的部署。您可以下载 Force.com 迁移工具,然后进行脚本部署。