使用 Python OpenCV 中的 Harris 角点检测器检测角点
在 OpenCV 中,Harris 角点检测器使用函数cv2.cornerHarris()实现。它接受四个参数:img、blockSize、ksize和 k。其中 img 是灰度输入图像,数据类型为 float32,blockSize是用于角点检测的邻域大小,ksize是所用 Sobel 导数的孔径参数,k 是公式中的 Harris 检测器自由参数。
步骤
要使用 Harris 角点检测器在图像中检测角点,您可以按照以下步骤操作
导入所需的库OpenCV和NumPy。确保您已安装它们。
使用cv2.imread()方法读取输入图像。指定图像的完整路径。使用cv2.cvtColor()方法将输入图像转换为灰度图像。将灰度图像的数据类型转换为np.float32。
在灰度图像(float32)上应用cv2.cornerHarris()方法。将合适的blockSize、ksize和 k 作为参数传递给该方法。
膨胀结果以标记角点,并对最佳值应用阈值。
显示检测到角点的图像。
让我们看看使用 Harris 角点检测器在图像中检测角点的示例。
输入图像
我们在下面的示例中使用此图像作为输入文件。

示例
此程序演示如何使用 Harris 角点检测器算法在图像中检测角点 -
# import required libraries
import cv2
import numpy as np

# load the input image
img = cv2.imread('sudoku.jpg')

# convert the input image into grayscale
gray = cv2.cvtColor(img, cv2.COLOR_BGR2GRAY)

# modify the data type setting to 32-bit floating point
gray = np.float32(gray)

# apply the cv2.cornerHarris method to detect the corners
corners = cv2.cornerHarris(gray, 2, 3, 0.05)

#result is dilated for marking the corners
corners = cv2.dilate(corners, None)

# Threshold for an optimal value.
img[corners > 0.01 * corners.max()]=[0, 0, 255]

# the window showing output image with corners
cv2.imshow('Image with Corners', img)
cv2.waitKey(0)
cv2.destroyAllWindows()
输出
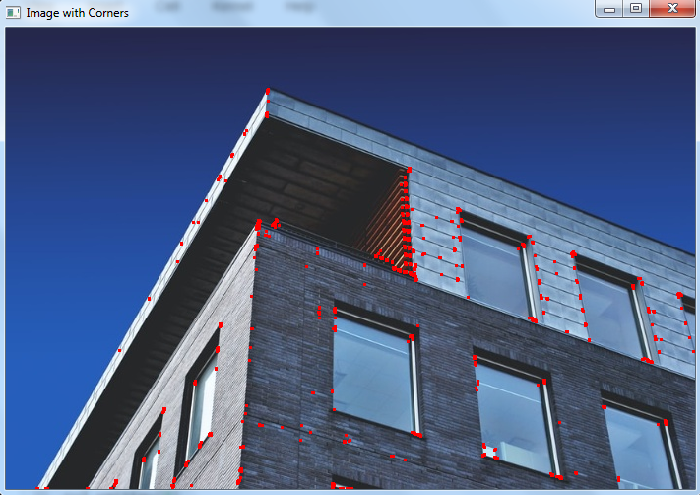
当我们执行以上代码时,它将生成以下输出窗口 -

以上输出图像显示了使用 Harris 角点检测器检测到的角点。角点以红色显示。

广告

 数据结构
数据结构 网络
网络 关系型数据库管理系统
 操作系统
操作系统 Java
Java iOS
iOS HTML
HTML CSS
CSS Android
 Python
 C 语言编程
 C++
C++ C#
C# MongoDB
 MySQL
MySQL Javascript
 PHP
PHP