
 数据结构
数据结构 网络
网络 关系数据库管理系统 (RDBMS)
 操作系统
操作系统 Java
Java iOS
iOS HTML
HTML CSS
CSS Android
 Python
 C 编程
C 编程 C++
C++ C#
C# MongoDB
 MySQL
MySQL Javascript
 PHP
PHP使用 Python 中的 Arcade 绘制弧线
Python 是一种广泛使用的编程语言。它拥有大量的库和工具,使其成为一种流行的语言。Arcade 是 Python 的一个库。这个库是一个多媒体库,提供图形工具来创建二维游戏、图形应用程序中使用的对象等等。在本文中,我们将使用 Python 中的 Arcade 库绘制弧线。我们将使用两种不同的方法来完成任务。让我们从了解 Arcade 库的基础知识开始。
Arcade 库
Arcade 库是为了为游戏和其他图形应用程序创建更吸引人的图形而开发的。较少的选项导致了一个不同的库,它成为一个现代的 Python 模块。由于它构建在 Pyglet(一个多媒体库)之上,因此该库提供了广泛的功能,为开发人员创建新系列的游戏和其他应用程序提供了简单的界面。
Arcade 库的功能
以下是 Arcade 库的主要功能:
该库提供了各种形状,例如线条、圆形、矩形等,可以使用不同的效果修改这些形状,并为普通形状增添美感。
您可以使用此库中的不同函数创建游戏并添加逼真的视图。
此库可以在多个平台上运行,即它具有跨平台兼容性。
由于存在精灵,此库简化了创建动画对象的路径。精灵是可以移动和交互的对象。
使用 Arcade 库绘制弧线
使用 Arcade 库绘制弧线有两种方法。让我们使用这两种方法来完成任务。由于 Arcade 是一个内置库,因此不需要安装在系统中。您只需在代码中导入它即可。
使用 draw_arc_filled() 方法
使用此方法绘制的弧线将是填充的。
我们必须从导入 Arcade 库开始代码。通过导入库,用户可以访问它的函数和方法。如果没有导入库,它将显示“NameError”,这意味着库未定义。
导入库后,我们将屏幕的尺寸定义为“SCR_WIDTH”和“SCR_HEIGHT”。使用“arcade.open_window()”函数创建一个窗口,并设置背景颜色。
要绘制弧线,我们需要定义某些点,例如中心点 (center_x, center_y)、半径、角度(起始角和结束角)和宽度。每个点都在代码中使用不同的函数定义。
定义完绘制弧线的所有参数后,下一步是使用这些参数绘制弧线。这是通过使用“on_draw()”函数完成的。这是 Arcade 库中一个预定义的函数,它由 arcade.run() 函数自动调用。
这里的 delta_time 参数表示自上次调用 on_draw() 函数以来经过的时间。此 delta_time 参数在用户之间生成一致性。这就是使用 Arcade 库绘制弧线的方法。
示例
让我们来看一个例子:
import arcade
# give dimensions of the screen
SCR_WIDTH = 640
SCR_HEIGHT = 480
# for creating window
window = arcade.open_window(SCR_WIDTH, SCR_HEIGHT, "Drawing an Arc")
arcade.set_background_color(arcade.color.WHITE)
# Define the center point of the arc
center_x = SCR_WIDTH // 2
center_y = SCR_HEIGHT // 2

# Define the radius of the arc
radius = 400
# Define the start and end angles of the arc in degrees
start_angle = 60
end_angle = 150
def on_draw(delta_time):
    # Clear the screen
    arcade.start_render()

    # Draw the arc
    arcade.draw_arc_filled(center_x, center_y, radius, radius, arcade.color.BLUE, start_angle, end_angle)

# Run the game loop
arcade.schedule(on_draw, 1 / 60)
arcade.run()
输出
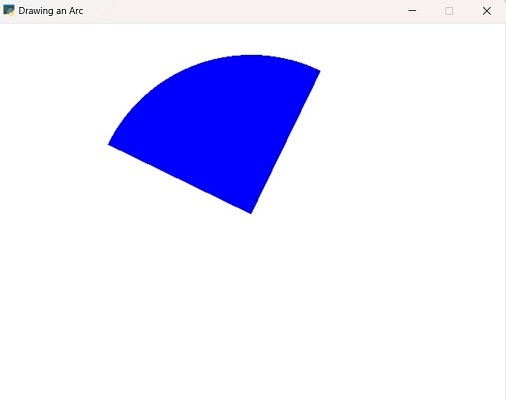
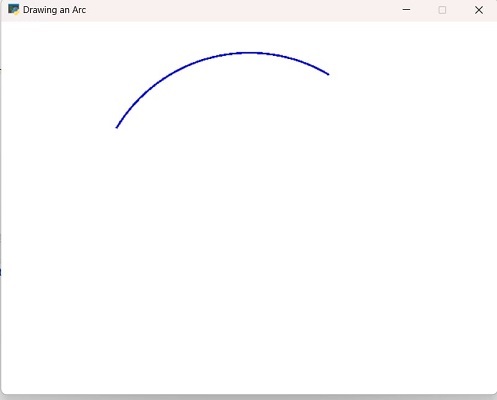
使用 draw_arc_outline() 方法
在此方法中,绘制的弧线将是轮廓弧线。前面方法中使用的所有参数在此方法中都相同,但例外在于弧线的 line_width。
示例
import arcade
# give dimensions of the screen
SCR_WIDTH = 640
SCR_HEIGHT = 480
# for creating window
window = arcade.open_window(SCR_WIDTH, SCR_HEIGHT, "Drawing an Arc")
arcade.set_background_color(arcade.color.WHITE)

# Define the center point of the arc
center_x = SCR_WIDTH // 2
center_y = SCR_HEIGHT // 2

# Define the radius of the arc
radius = 400

# Define the start and end angles of the arc in degrees
start_angle = 60
end_angle = 150

# Set the width of the arc
line_width = 5
def on_draw(delta_time):
    # Clear the screen
    arcade.start_render()

    # Draw the arc
    arcade.draw_arc_outline(center_x, center_y, radius, radius, arcade.color.BLUE, start_angle, end_angle, line_width)

# Run the game loop
arcade.schedule(on_draw, 1 / 60)
arcade.run()
输出
这两种方法都提供了创建弧线的不同方式。您可以通过探索 Arcade 库中存在的其他函数来为弧线添加更多功能。
绘制弧线时,您可能会遇到一些常见的错误。当您使用 **arcade.draw_arc()** 函数时,您会在其下传递多个参数。确保参数不错误且顺序正确。接下来,坐标在绘制任何对象时都起着重要作用。有时,库的过时版本可能会导致错误。
结论
在本文中,我们从 Arcade 库的基础知识开始。首先也是最重要的事情是了解库的基本概念。这有助于正确使用函数,因为每个函数都采用一些对创建对象很重要的参数。Arcade 库简化了创建二维对象的过程,并提供不同的方法和函数来完成任务。

浏览量 134 次
