
 数据结构
数据结构 网络
网络 关系型数据库管理系统
 操作系统
操作系统 Java
Java iOS
iOS HTML
HTML CSS
CSS Android
 Python
 C 编程
C 编程 C++
C++ C#
C# MongoDB
 MySQL
MySQL Javascript
 PHP
PHP如何在 Android WebView 中使用 Kotlin 通过 JavaScript 检测 HTML 按钮点击事件?
本示例演示了如何在 Android WebView 中使用 Kotlin 通过 JavaScript 检测 HTML 按钮点击事件。本示例演示了如何在 Android WebView 中使用 Kotlin 通过 JavaScript 检测 HTML 按钮点击事件。
步骤 1 − 在 Android Studio 中创建一个新项目,转到文件 ⇒ 新建项目,并填写所有必需的详细信息以创建新项目。
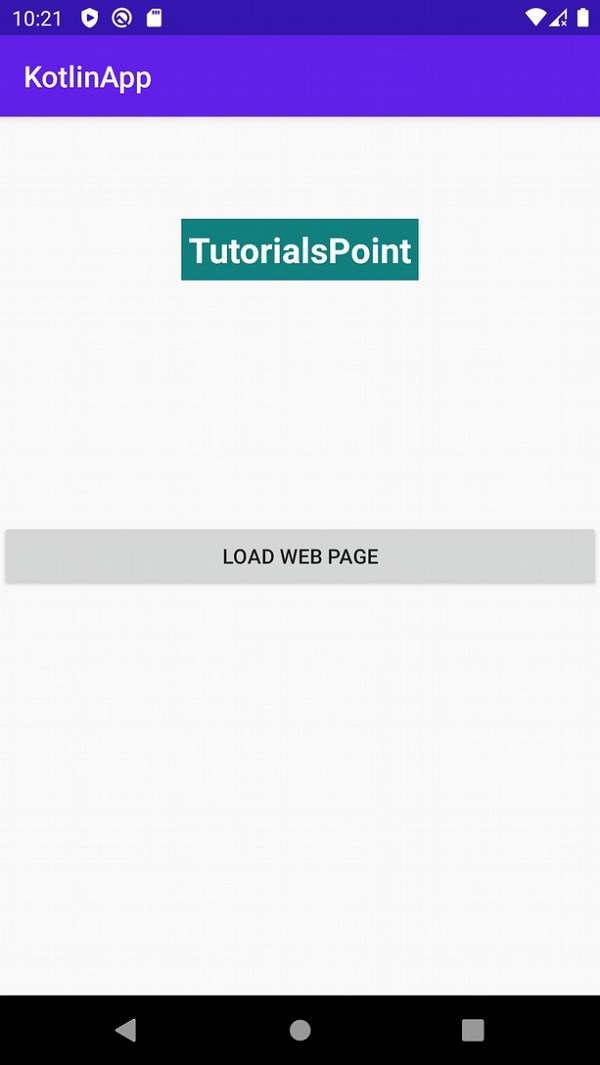
步骤 2 − 将以下代码添加到 res/layout/activity_main.xml 中。
<?xml version="1.0" encoding="utf-8"?>
<RelativeLayout xmlns:android="http://schemas.android.com/apk/res/android"
   xmlns:tools="http://schemas.android.com/tools"
   android:layout_width="match_parent"
   android:layout_height="match_parent"
   tools:context=".MainActivity">
   <TextView
      android:id="@+id/textView"
      android:layout_width="wrap_content"
      android:layout_height="wrap_content"
      android:layout_centerHorizontal="true"
      android:layout_marginTop="70dp"
      android:background="#008080"
      android:padding="5dp"
      android:text="TutorialsPoint"
      android:textColor="#fff"
      android:textSize="24sp"
      android:textStyle="bold" />
   <Button
      android:layout_width="match_parent"
      android:layout_height="wrap_content"
      android:layout_centerInParent="true"
      android:onClick="loadPage"
      android:text="Load web Page" />
</RelativeLayout>
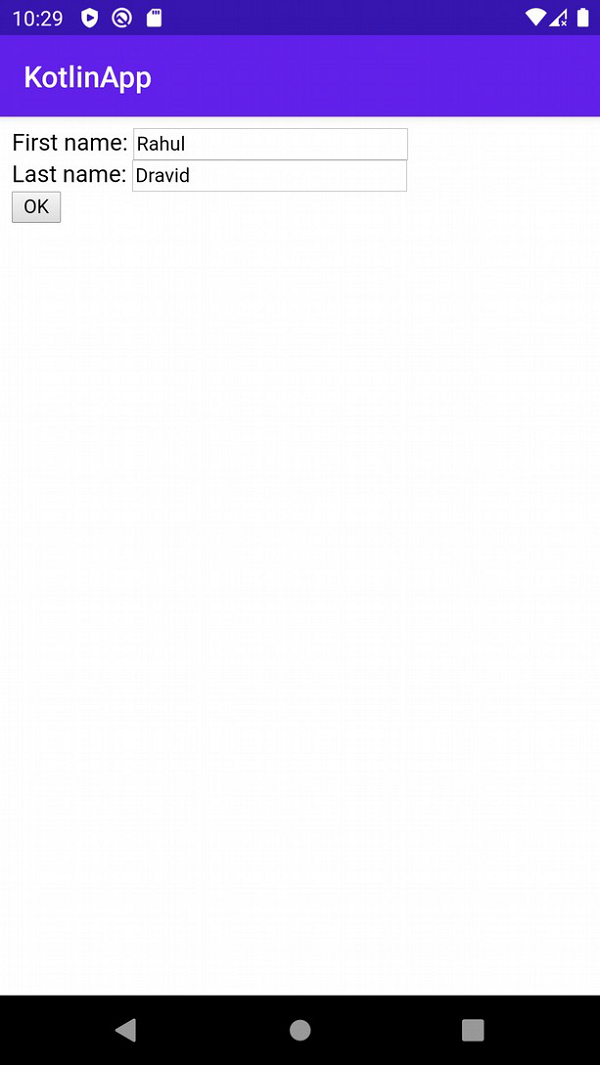
步骤 3 − 创建一个 assets 文件夹并创建一个名为 file.htm 的文件,然后添加以下代码 −
<html>
<body>
First name: <input type="text" name="firstName" id="txtFirstName"><br>
Last name: <input type="text" name="lastName" id="txtLastName"><br>
<script>
   function getValues() {
      document.getElementById("btnOK").value =
      document.getElementById("txtFirstName").value+"
      "+document.getElementById("txtLastName").value;
   }
</script>
<button type="button" value="" id="btnOK" onclick=" getValues();ok.performClick(this.value); "> OK
</button>
</body>
</html>
步骤 4 − 将以下代码添加到 src/MainActivity.kt 中
import android.annotation.SuppressLint
import android.os.Bundle
import android.view.View
import android.webkit.JavascriptInterface
import android.webkit.WebView
import android.widget.Toast
import androidx.appcompat.app.AppCompatActivity
class MainActivity : AppCompatActivity() {
   override fun onCreate(savedInstanceState: Bundle?) {
      super.onCreate(savedInstanceState)
      setContentView(R.layout.activity_main)
      title = "KotlinApp"
   }
   @SuppressLint("JavascriptInterface")
   fun loadPage(view: View) {
      val browser = WebView(this)
      browser.settings.javaScriptEnabled = true
      browser.loadUrl("file:///android_asset/page.html")
      setContentView(browser)
      val ws = browser.settings
      ws.javaScriptEnabled = true
      browser.addJavascriptInterface(object:Any() {
         @JavascriptInterface // For API 17+
         fun performClick(string:String) {
            Toast.makeText(this@MainActivity, string, Toast.LENGTH_SHORT).show()
         }
      }, "ok")
   }
}
步骤 5 − 将以下代码添加到 androidManifest.xml 中
<?xml version="1.0" encoding="utf-8"?>
<manifest xmlns:android="http://schemas.android.com/apk/res/android"
   package="com.example.q11">
   <application
      android:allowBackup="true"
      android:icon="@mipmap/ic_launcher"
      android:label="@string/app_name"
      android:roundIcon="@mipmap/ic_launcher_round"
      android:supportsRtl="true"
      android:theme="@style/AppTheme">
      <activity android:name=".MainActivity">
         <intent-filter>
            <action android:name="android.intent.action.MAIN" />
            <category android:name="android.intent.category.LAUNCHER" />
         </intent-filter>
      </activity>
   </application>
</manifest>
让我们尝试运行您的应用程序。我假设您已将您的实际 Android 移动设备连接到您的计算机。要从 Android Studio 运行应用程序,请打开您的项目中的某个 Activity 文件,然后单击工具栏中的运行图标![]() 。选择您的移动设备作为选项,然后检查您的移动设备,它将显示您的默认屏幕。
。选择您的移动设备作为选项,然后检查您的移动设备,它将显示您的默认屏幕。

更新于: 2020-11-30
1K+ 次浏览

广告