如何在Python中使用OpenCV进行图像平移?
将图像位置沿特定方向移动称为图像平移。要执行图像平移,我们首先需要了解什么是平移矩阵以及如何使用OpenCV和NumPy定义它。
如果我们想要在(x, y)方向上进行平移,设其为(tx, ty)。tx是水平方向上的位移,ty是垂直方向上的位移。使用(tx, ty),我们可以定义平移矩阵M如下:
M = np.float32([[1,0,tx],[0,1,ty]])
平移矩阵M是一个类型为np.float32的NumPy数组。我们将M作为参数传递给cv2.warpAffine()函数。请参见下面的语法:
语法
cv2.warpAffine(img, M, (w, h))
此处:
img - 要移动的图像。
M - 上面定义的平移矩阵。
(w, h) - 平移后图像的宽度和高度。
注意 - tx的正值将图像向右移动,而tx的负值将图像向左移动。同样,ty的正值将图像向下移动,而ty的负值将图像向上移动。
步骤
要执行图像平移,您可以按照以下步骤操作:
导入所需的库。在以下所有Python示例中,所需的Python库是OpenCV和NumPy。确保您已经安装了它们。
import cv2
import numpy as np
使用cv2.imread()函数读取输入图像。传递输入图像的完整路径。
img = cv2.imread('interior.jpg')
定义平移矩阵M。这里我们取(tx, ty) = (100, 50),即向右平移100像素,向下平移50像素。
M = np.float32([[1,0,100],[0,1,50]])
使用上面定义的平移矩阵对输入图像进行平移。
img = cv2.warpAffine(img,M,(w,h))
显示平移后的图像。
cv2.imshow('Image Translation', img)
cv2.waitKey(0)
cv2.destroyAllWindows()
示例1
在这个程序中,我们将输入图像在水平方向上向右平移100像素,在垂直方向上向下平移50像素。
# import required libraries
import cv2
import numpy as np

# read the input image
img = cv2.imread('interior.jpg')

# access the height and width of image
height,width, _ = img.shape

# define the translation matrix
M = np.float32([[1,0,100],[0,1,50]])

# perform the translation
img = cv2.warpAffine(img,M,(width,height))

# display the translated image
cv2.imshow('Image Translation', img)
cv2.waitKey(0)
cv2.destroyAllWindows()
输出
运行上述程序后,将生成以下输出窗口。

示例2
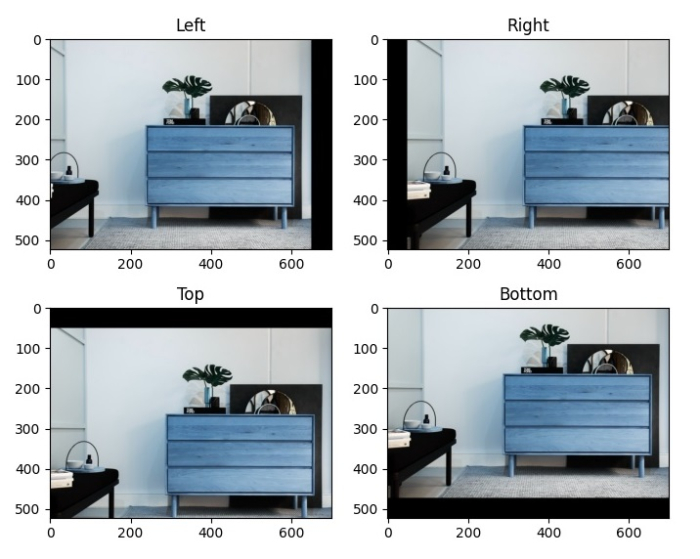
在这个程序中,我们执行四种不同的平移。
import cv2
import numpy as np
import matplotlib.pyplot as plt

img = cv2.imread('interior.jpg')
rows,cols,_ = img.shape

M_left = np.float32([[1,0,-50],[0,1,0]])
M_right = np.float32([[1,0,50],[0,1,0]])
M_top = np.float32([[1,0,0],[0,1,50]])
M_bottom = np.float32([[1,0,0],[0,1,-50]])

img_left = cv2.warpAffine(img,M_left,(cols,rows))
img_right = cv2.warpAffine(img,M_right,(cols,rows))
img_top = cv2.warpAffine(img,M_top,(cols,rows))
img_bottom = cv2.warpAffine(img,M_bottom,(cols,rows))

plt.subplot(221), plt.imshow(img_left), plt.title('Left')
plt.subplot(222), plt.imshow(img_right), plt.title('Right')
plt.subplot(223), plt.imshow(img_top), plt.title('Top')
plt.subplot(224), plt.imshow(img_bottom), plt.title('Bottom')
plt.show()
输出
运行上述程序后,将生成以下输出窗口。

请注意,第一张图像显示图像向左移动了50像素,第二张图像显示图像向右移动了50像素,第三张图像显示图像向上移动了50像素,最后一张图像显示图像向下移动了50像素。

广告

 数据结构
数据结构 网络
网络 关系数据库管理系统(RDBMS)
 操作系统
操作系统 Java
Java iOS
iOS HTML
HTML CSS
CSS Android
 Python
 C语言编程
C语言编程 C++
C++ C#
C# MongoDB
 MySQL
MySQL Javascript
 PHP
PHP