如何使用 Python OpenCV 对图像执行不同的简单阈值化?
在**简单阈值化**中,我们定义一个阈值,如果像素值大于阈值,则将其分配一个值(例如 255),否则将其分配另一个值(例如 0)。
可以使用函数 cv2.threshold()应用简单阈值化。它接受四个参数 - 源图像、阈值、maxVal 和阈值类型。
**OpenCV** 提供以下不同类型的阈值化 -
cv2.THRESH_BINARY - 在此阈值化中,大于阈值的像素值分配为 255,否则分配为 0。
cv2.THRESH_BINARY_INV - 它是 cv2.THRESH_BINARY 的反例。
cv2.THRESH_TRUNC - 在此阈值化中,大于阈值的像素值分配为阈值,其他像素保持不变。
cv2.THRESH_TOZERO - 在此阈值化中,小于阈值的像素值分配为零,其他像素保持不变。
cv2.THRESH_TOZERO_INV - cv2.THRESH_TOZERO 的反例。
语法
cv2.threshold(img, thresh_val, max_val, thresh_type)
参数
img - 输入灰度图像。它是一个numpy.ndarray。
thresh_val - 用于对像素值进行分类的阈值。如果像素值高于阈值,则分配一个值,否则分配另一个值。
max_val - 如果像素值大于(有时小于)阈值,则要分配给像素的最大值。
thresh_type - 要应用的阈值类型。
它返回全局阈值和阈值图像。
让我们借助一些 Python 示例来了解不同的简单阈值化。
输入图像
我们将在以下示例中使用此图像作为输入文件。

示例 1
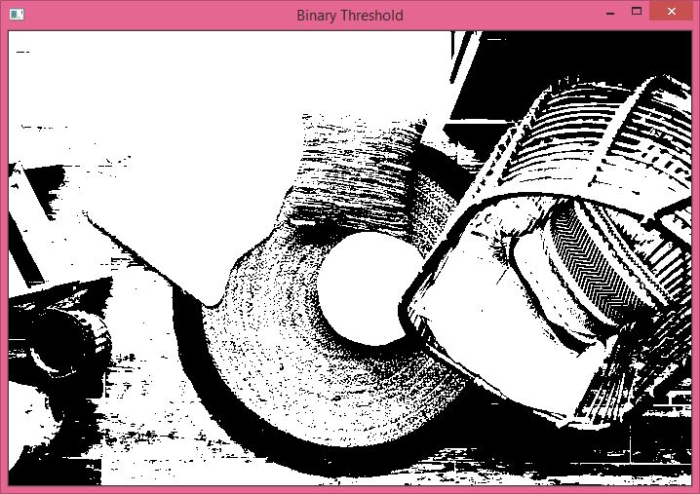
在此程序中,我们对输入图像应用二值阈值化。
# Python program to illustrate
# a simple thresholding type on an image
# import required libraries
import cv2

# read the input image as a gray image
img = cv2.imread('floor.jpg', 0)

# applying binary thresholding technique on the input image
# all pixels value above 127 will be set to 255
_, thresh = cv2.threshold(img, 127, 255, cv2.THRESH_BINARY)

# display the image after applying binary thresholding
cv2.imshow('Binary Threshold', thresh)
cv2.waitKey(0)
cv2.destroyAllWindows()
输出
运行上述程序时,将产生以下输出 -

以上输出显示了应用**二值阈值化**后的阈值图像。
示例 2
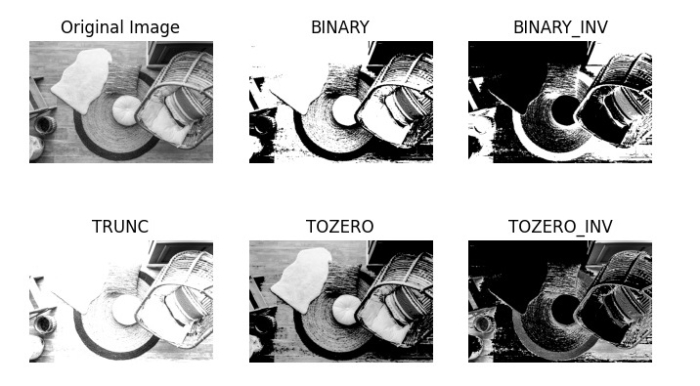
在此程序中,我们将对输入图像应用不同的**简单阈值化**。
# Python program to illustrate # simple thresholding type on an image # import required libraries import cv2 import matplotlib.pyplot as plt # read the input image as a gray image img = cv2.imread('floor.jpg',0)# applying different thresholding techniques on the input image ret1, thresh1 = cv2.threshold(img, 127, 255, cv2.THRESH_BINARY) ret2, thresh2 = cv2.threshold(img, 127, 255, cv2.THRESH_BINARY_INV) ret3, thresh3 = cv2.threshold(img, 127, 255, cv2.THRESH_TRUNC) ret4, thresh4 = cv2.threshold(img, 127, 255, cv2.THRESH_TOZERO) ret5, thresh5 = cv2.threshold(img, 127, 255, cv2.THRESH_TOZERO_INV) titles = ['Original Image','BINARY','BINARY_INV','TRUNC','TOZERO','TOZERO_INV'] images = [img,thresh1,thresh2,thresh3,thresh4,thresh5] for i in range(6): plt.subplot(2,3,i+1) plt.imshow(images[i], 'gray') plt.title(titles[i]) plt.axis("off") plt.show()
输出
运行上述 Python 程序时,将产生以下输出 -

以上输出显示了应用不同简单阈值化后的不同图像。

广告

 数据结构
数据结构 网络
网络 关系型数据库管理系统
 操作系统
操作系统 Java
Java iOS
iOS HTML
HTML CSS
CSS Android
 Python
 C 语言编程
 C++
C++ C#
C# MongoDB
 MySQL
MySQL Javascript
 PHP
PHP