- Laravel 教程
- Laravel - 首页
- Laravel - 概述
- Laravel - 安装
- Laravel - 应用结构
- Laravel - 配置
- Laravel - 路由
- Laravel - 中间件
- Laravel - 命名空间
- Laravel - 控制器
- Laravel - 请求
- Laravel - Cookie
- Laravel - 响应
- Laravel - 视图
- Laravel - Blade 模板
- Laravel - 重定向
- Laravel - 数据库操作
- Laravel - 错误与日志
- Laravel - 表单
- Laravel - 本地化
- Laravel - 会话
- Laravel - 验证
- Laravel - 文件上传
- Laravel - 发送邮件
- Laravel - Ajax
- Laravel - 错误处理
- Laravel - 事件处理
- Laravel - 门面
- Laravel - 合同
- Laravel - CSRF 保护
- Laravel - 身份验证
- Laravel - 授权
- Laravel - Artisan 控制台
- Laravel - 加密
- Laravel - 哈希
- 理解发布流程
- Laravel - 客人用户权限
- Laravel - Artisan 命令
- Laravel - 分页自定义
- Laravel - Dump Server
- Laravel - 操作 URL
- Laravel 有用资源
- Laravel - 快速指南
- Laravel - 有用资源
- Laravel - 讨论
Laravel - 路由
在 Laravel 中,所有请求都通过路由进行映射。基本路由将请求路由到关联的控制器。本章讨论 Laravel 中的路由。
Laravel 中的路由包括以下类别:
- 基本路由
- 路由参数
- 命名路由
基本路由
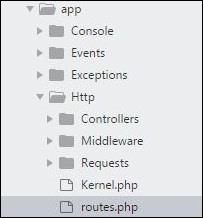
所有应用程序路由都在 **app/routes.php** 文件中注册。此文件告诉 Laravel 它应该响应的 URI,以及关联的控制器将对其进行特定调用。欢迎页面的示例路由可以在下面给出的屏幕截图中看到:

Route::get ('/', function () {
   return view('welcome');});
示例
观察以下示例以更深入地了解路由:
app/Http/routes.php
<?php
Route::get('/', function () {
   return view('welcome');
});
resources/view/welcome.blade.php
<!DOCTYPE html>
<html>
   <head>
      <title>Laravel</title>
      <link href = "https://fonts.googleapis.com/css?family=Lato:100" rel = "stylesheet"
         type = "text/css">

      <style>
         html, body {
            height: 100%;
         }
         body {
            margin: 0;
            padding: 0;
            width: 100%;
            display: table;
            font-weight: 100;
            font-family: 'Lato';
         }
         .container {
            text-align: center;
            display: table-cell;
            vertical-align: middle;
         }
         .content {
            text-align: center;
            display: inline-block;
         }
         .title {
            font-size: 96px;
         }
      </style>
   </head>

   <body>
      <div class = "container">

         <div class = "content">
            <div class = "title">Laravel 5.1</div>
         </div>

      </div>
   </body>
</html>
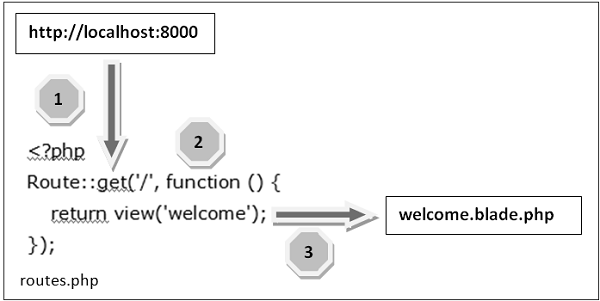
路由机制如下图所示:

现在让我们详细了解路由机制中涉及的步骤:
**步骤 1** - 最初,我们应该执行应用程序的根 URL。
**步骤 2** - 现在,执行的 URL 应该与 **route.php** 文件中的相应方法匹配。在本例中,它应该匹配方法和根 ('/') URL。这将执行相关的函数。
**步骤 3** - 该函数调用模板文件 **resources/views/welcome.blade.php**。接下来,该函数调用 **view()** 函数,参数为 **'welcome'**,不使用 **blade.php**。
这将生成如下所示的 HTML 输出:

路由参数
有时在 Web 应用程序中,您可能需要捕获传递给 URL 的参数。为此,您应该修改 **routes.php** 文件中的代码。
您可以通过两种方式在 **routes.php** 文件中捕获参数,如下所述:
必填参数
这些参数是 Web 应用程序路由必须强制捕获的参数。例如,从 URL 中捕获用户的识别号非常重要。这可以通过定义如下所示的路由参数来实现:
Route::get('ID/{id}',function($id) {
   echo 'ID: '.$id;
});
可选参数
有时开发人员可以将参数设置为可选,这可以通过在 URL 中的参数名称后添加 **?** 来实现。必须将默认值作为参数名称提及。请查看以下示例,该示例显示了如何定义可选参数:
Route::get('user/{name?}', function ($name = 'TutorialsPoint') { return $name;});
上面的示例检查值是否与 **TutorialsPoint** 匹配,并相应地路由到定义的 URL。
命名路由
命名路由允许以一种方便的方式创建路由。可以使用 name 方法链接到路由定义中来指定路由链。以下代码显示了使用控制器创建命名路由的示例:
Route::get('user/profile', 'UserController@showProfile')->name('profile');
用户控制器将调用参数为 **profile** 的 **showProfile** 函数。参数使用 name 方法链接到路由定义中。