- MapReduce 教程
- MapReduce - 首页
- MapReduce - 简介
- MapReduce - 算法
- MapReduce - 安装
- MapReduce - API
- MapReduce - Hadoop 实现
- MapReduce - 分区器
- MapReduce - 组合器
- MapReduce - Hadoop 管理
- MapReduce 资源
- MapReduce 快速指南
- MapReduce - 有用资源
- MapReduce - 讨论
MapReduce 快速指南
MapReduce - 简介
MapReduce 是一种编程模型,用于编写可以在多个节点上并行处理大数据的应用程序。MapReduce 提供了分析海量复杂数据的能力。
什么是大数据?
大数据是指无法使用传统计算技术处理的大型数据集的集合。例如,Facebook 或 YouTube 每天需要收集和管理的数据量就属于大数据的范畴。然而,大数据不仅仅是规模和体积,它还涉及以下一个或多个方面:速度、多样性、体积和复杂性。
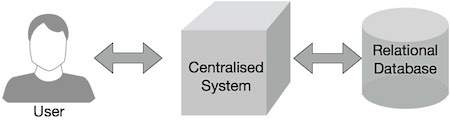
为什么选择 MapReduce?
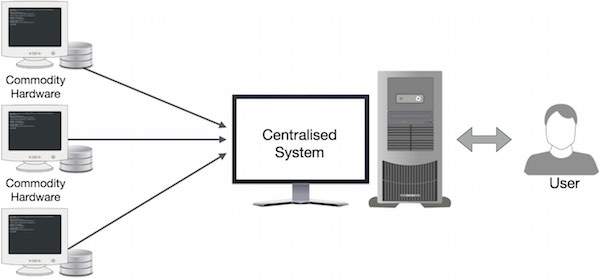
传统的企业系统通常拥有一个中心服务器来存储和处理数据。下图描述了传统企业系统的示意图。传统模型当然不适合处理海量可扩展数据,并且无法被标准数据库服务器容纳。此外,集中式系统在同时处理多个文件时会造成大量的瓶颈。
Google 使用名为 MapReduce 的算法解决了这个瓶颈问题。MapReduce 将任务分成小部分,并将它们分配给许多计算机。之后,结果在一个地方收集并集成以形成结果数据集。
MapReduce 如何工作?
MapReduce 算法包含两个重要的任务,即 Map 和 Reduce。
Map 任务接收一组数据并将其转换为另一组数据,其中各个元素被分解成元组(键值对)。
Reduce 任务接收 Map 的输出作为输入,并将这些数据元组(键值对)组合成更小的元组集。
Reduce 任务总是在 Map 作业之后执行。
现在让我们仔细看看每个阶段,并尝试了解它们的意义。
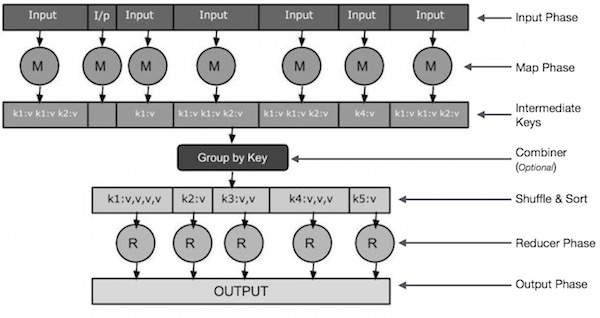
输入阶段 - 在这里,我们有一个 Record Reader,它转换输入文件中的每个记录,并将解析后的数据以键值对的形式发送到 Mapper。
Map - Map 是一个用户定义的函数,它接收一系列键值对,并处理其中的每一个以生成零个或多个键值对。
中间键 - Mapper 生成的键值对被称为中间键。
组合器 - 组合器是一种本地 Reducer,它将 Map 阶段的相似数据分组到可识别的集合中。它接收来自 Mapper 的中间键作为输入,并应用用户定义的代码在一个 Mapper 的小范围内聚合值。它不是 MapReduce 算法的主要部分;它是可选的。
混洗和排序 - Reducer 任务从混洗和排序步骤开始。它将分组的键值对下载到本地机器,Reducer 在该机器上运行。各个键值对按键排序到一个更大的数据列表中。数据列表将等效的键分组在一起,以便可以轻松地在 Reducer 任务中迭代它们的值。
Reducer - Reducer 将分组的键值对数据作为输入,并在每个键值对上运行 Reducer 函数。在这里,数据可以以多种方式进行聚合、过滤和组合,并且需要广泛的处理。执行完成后,它会向最后一步提供零个或多个键值对。
输出阶段 - 在输出阶段,我们有一个输出格式化程序,它转换 Reducer 函数的最终键值对,并使用记录写入器将它们写入文件。
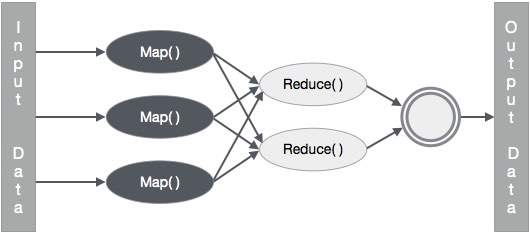
让我们尝试借助一个小图表来了解 Map & Reduce 这两个任务 -
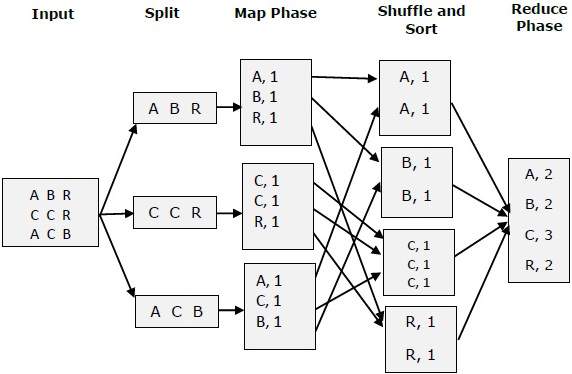
MapReduce 示例
让我们来看一个现实世界的例子,以理解 MapReduce 的强大功能。Twitter 每天接收大约 5 亿条推文,即每秒近 3000 条推文。下图显示了 Tweeter 如何借助 MapReduce 管理其推文。
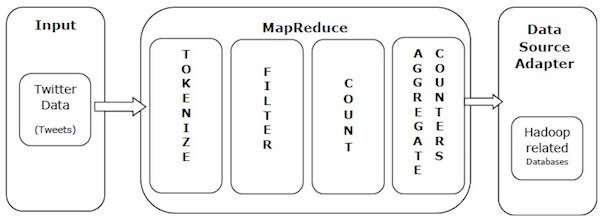
如图所示,MapReduce 算法执行以下操作:
标记化 - 将推文标记化为标记映射,并将它们写为键值对。
过滤 - 从标记映射中过滤不需要的单词,并将过滤后的映射写为键值对。
计数 - 为每个单词生成一个标记计数器。
聚合计数器 - 将相似的计数器值聚合为小的可管理单元。
MapReduce - 算法
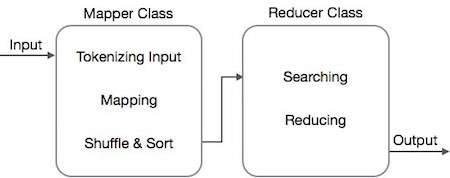
MapReduce 算法包含两个重要的任务,即 Map 和 Reduce。
- Map 任务通过 Mapper 类完成
- Reduce 任务通过 Reducer 类完成。
Mapper 类接收输入,对其进行标记化、映射和排序。Mapper 类的输出被用作 Reducer 类的输入,后者反过来搜索匹配对并对其进行归约。
MapReduce 实现各种数学算法,将任务分成小部分并将其分配给多个系统。从技术角度来看,MapReduce 算法有助于将 Map & Reduce 任务发送到集群中的适当服务器。
这些数学算法可能包括:
- 排序
- 搜索
- 索引
- TF-IDF
排序
排序是处理和分析数据的基本 MapReduce 算法之一。MapReduce 实现排序算法以按其键自动对来自 Mapper 的输出键值对进行排序。
排序方法在 Mapper 类本身中实现。
在混洗和排序阶段,在对 Mapper 类中的值进行标记化后,Context 类(用户定义类)将匹配的值键作为集合收集。
为了收集相似的键值对(中间键),Mapper 类借助RawComparator 类对键值对进行排序。
在将给定 Reducer 的中间键值对集合呈现给 Reducer 之前,Hadoop 会自动对其进行排序以形成键值 (K2, {V2, V2, …})。
搜索
搜索在 MapReduce 算法中扮演着重要的角色。它有助于组合器阶段(可选)和 Reducer 阶段。让我们尝试通过一个例子来了解搜索是如何工作的。
示例
以下示例显示了 MapReduce 如何使用搜索算法在一个给定的员工数据集中找出薪水最高的员工的详细信息。
让我们假设我们在四个不同的文件中(A、B、C 和 D)拥有员工数据。让我们还假设由于重复从所有数据库表导入员工数据,所有四个文件中都有重复的员工记录。请参见下图。
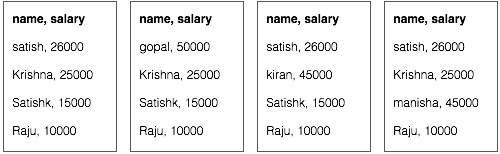
Map 阶段处理每个输入文件,并以键值对的形式提供员工数据(<k, v> : <员工姓名, 工资>)。请参见下图。
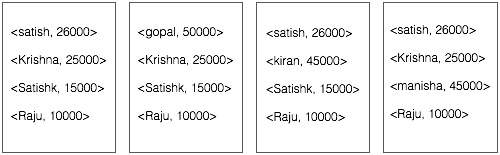
组合器阶段(搜索技术)将接收来自 Map 阶段的输入作为键值对,其中包含员工姓名和工资。使用搜索技术,组合器将检查所有员工的工资,以查找每个文件中薪水最高的员工。请参见以下代码片段。
<k: employee name, v: salary>
Max= the salary of an first employee. Treated as max salary

if(v(second employee).salary > Max){
   Max = v(salary);
}

else{
   Continue checking;
}
预期结果如下:
|
Reducer 阶段 - 从每个文件中,你将找到薪水最高的员工。为了避免冗余,请检查所有 <k, v> 对并消除任何重复项。相同的算法用于四个 <k, v> 对之间,这四个 <k, v> 对来自四个输入文件。最终输出应如下所示:
<gopal, 50000>
索引
通常使用索引来指向特定数据及其地址。它对特定 Mapper 的输入文件执行批量索引。
MapReduce 中通常使用的索引技术称为倒排索引。像 Google 和 Bing 这样的搜索引擎使用倒排索引技术。让我们尝试通过一个简单的例子来了解索引是如何工作的。
示例
以下文本是倒排索引的输入。这里 T[0]、T[1] 和 t[2] 是文件名,它们的内容用双引号括起来。
T[0] = "it is what it is"
T[1] = "what is it"
T[2] = "it is a banana"
应用索引算法后,我们得到以下输出:
"a": {2}
"banana": {2}
"is": {0, 1, 2}
"it": {0, 1, 2}
"what": {0, 1}
这里 "a": {2} 表示术语 "a" 出现在 T[2] 文件中。类似地,"is": {0, 1, 2} 表示术语 "is" 出现在 T[0]、T[1] 和 T[2] 文件中。
TF-IDF
TF-IDF 是一种文本处理算法,它是术语频率 - 逆文档频率的缩写。它是常见的 Web 分析算法之一。在这里,“频率”一词指的是术语在文档中出现的次数。
词频 (TF)
它衡量特定术语在文档中出现的频率。它是通过文档中单词出现的次数除以该文档中单词的总数来计算的。
TF(the) = (Number of times term the ‘the’ appears in a document) / (Total number of terms in the document)
逆文档频率 (IDF)
它衡量术语的重要性。它是通过文本数据库中的文档数量除以特定术语出现的文档数量来计算的。
在计算 TF 时,所有术语都被认为同等重要。这意味着 TF 计算正常单词(如“is”、“a”、“what”等)的词频。因此,我们需要知道频繁出现的术语,同时通过计算以下内容来扩展稀有术语:
IDF(the) = log_e(Total number of documents / Number of documents with term ‘the’ in it).
以下是通过一个小例子来解释该算法。
示例
考虑一个包含 1000 个单词的文档,其中单词hive 出现了 50 次。那么hive 的 TF 为 (50 / 1000) = 0.05。
现在,假设我们有 1000 万个文档,其中单词hive 出现在其中的 1000 个文档中。然后,IDF 计算为 log(10,000,000 / 1,000) = 4。
TF-IDF 权重是这些数量的乘积 - 0.05 × 4 = 0.20。
MapReduce - 安装
MapReduce 仅适用于 Linux 风格的操作系统,并且它与 Hadoop 框架内置在一起。我们需要执行以下步骤才能安装 Hadoop 框架。
验证 JAVA 安装
安装 Hadoop 之前,必须在系统上安装 Java。 使用以下命令检查系统上是否已安装 Java。
$ java –version
如果系统上已安装 Java,则会看到以下响应:
java version "1.7.0_71"
Java(TM) SE Runtime Environment (build 1.7.0_71-b13)
Java HotSpot(TM) Client VM (build 25.0-b02, mixed mode)
如果系统上未安装 Java,请按照以下步骤操作。
安装 Java
步骤 1
从以下链接下载最新版本的 Java:此链接。
下载后,您可以在“下载”文件夹中找到文件 **jdk-7u71-linux-x64.tar.gz**。
步骤 2
使用以下命令解压 jdk-7u71-linux-x64.gz 的内容。
$ cd Downloads/
$ ls
jdk-7u71-linux-x64.gz
$ tar zxf jdk-7u71-linux-x64.gz
$ ls
jdk1.7.0_71 jdk-7u71-linux-x64.gz
步骤 3
要使所有用户都能使用 Java,必须将其移动到“/usr/local/”位置。 切换到 root 用户并输入以下命令:
$ su
password:
# mv jdk1.7.0_71 /usr/local/java
# exit
步骤 4
要设置 PATH 和 JAVA_HOME 变量,请将以下命令添加到 ~/.bashrc 文件中。
export JAVA_HOME=/usr/local/java
export PATH=$PATH:$JAVA_HOME/bin
将所有更改应用于当前运行的系统。
$ source ~/.bashrc
步骤 5
使用以下命令配置 Java 备选方案:
# alternatives --install /usr/bin/java java usr/local/java/bin/java 2

# alternatives --install /usr/bin/javac javac usr/local/java/bin/javac 2

# alternatives --install /usr/bin/jar jar usr/local/java/bin/jar 2

# alternatives --set java usr/local/java/bin/java

# alternatives --set javac usr/local/java/bin/javac

# alternatives --set jar usr/local/java/bin/jar
现在,使用终端中的命令 **java -version** 验证安装。
验证 Hadoop 安装
安装 MapReduce 之前,必须在系统上安装 Hadoop。 让我们使用以下命令验证 Hadoop 安装:
$ hadoop version
如果系统上已安装 Hadoop,则会收到以下响应:
Hadoop 2.4.1
--
Subversion https://svn.apache.org/repos/asf/hadoop/common -r 1529768
Compiled by hortonmu on 2013-10-07T06:28Z
Compiled with protoc 2.5.0
From source with checksum 79e53ce7994d1628b240f09af91e1af4
如果系统上未安装 Hadoop,请继续执行以下步骤。
下载 Hadoop
从 Apache 软件基金会下载 Hadoop 2.4.1,并使用以下命令解压其内容。
$ su
password:
# cd /usr/local
# wget http://apache.claz.org/hadoop/common/hadoop-2.4.1/
hadoop-2.4.1.tar.gz
# tar xzf hadoop-2.4.1.tar.gz
# mv hadoop-2.4.1/* to hadoop/
# exit
以伪分布式模式安装 Hadoop
以下步骤用于以伪分布式模式安装 Hadoop 2.4.1。
步骤 1 - 设置 Hadoop
您可以通过将以下命令添加到 ~/.bashrc 文件来设置 Hadoop 环境变量。
export HADOOP_HOME=/usr/local/hadoop
export HADOOP_MAPRED_HOME=$HADOOP_HOME
export HADOOP_COMMON_HOME=$HADOOP_HOME
export HADOOP_HDFS_HOME=$HADOOP_HOME
export YARN_HOME=$HADOOP_HOME
export HADOOP_COMMON_LIB_NATIVE_DIR=$HADOOP_HOME/lib/native
export PATH=$PATH:$HADOOP_HOME/sbin:$HADOOP_HOME/bin
将所有更改应用于当前运行的系统。
$ source ~/.bashrc
步骤 2 - Hadoop 配置
您可以在“$HADOOP_HOME/etc/hadoop”位置找到所有 Hadoop 配置文件。 您需要根据您的 Hadoop 基础架构对这些配置文件进行适当的更改。
$ cd $HADOOP_HOME/etc/hadoop
为了使用 Java 开发 Hadoop 程序,您必须在 **hadoop-env.sh** 文件中重置 Java 环境变量,方法是用系统中 Java 的位置替换 JAVA_HOME 值。
export JAVA_HOME=/usr/local/java
您必须编辑以下文件以配置 Hadoop:
- core-site.xml
- hdfs-site.xml
- yarn-site.xml
- mapred-site.xml
core-site.xml
core-site.xml 包含以下信息:
- Hadoop 实例使用的端口号
- 为文件系统分配的内存
- 存储数据的内存限制
- 读/写缓冲区的大小
打开 core-site.xml 并将以下属性添加到
<configuration>
   <property>
      <name>fs.default.name</name>
      <value>hdfs://:9000 </value>
   </property>
</configuration>
hdfs-site.xml
hdfs-site.xml 包含以下信息:
- 复制数据的数值
- NameNode 路径
- 本地文件系统的 DataNode 路径(您要存储 Hadoop 基础架构的位置)
让我们假设以下数据。
dfs.replication (data replication value) = 1

(In the following path /hadoop/ is the user name.
hadoopinfra/hdfs/namenode is the directory created by hdfs file system.)
namenode path = //home/hadoop/hadoopinfra/hdfs/namenode

(hadoopinfra/hdfs/datanode is the directory created by hdfs file system.)
datanode path = //home/hadoop/hadoopinfra/hdfs/datanode
打开此文件,并将以下属性添加到
<configuration>

   <property>
      <name>dfs.replication</name>
      <value>1</value>
   </property>

   <property>
      <name>dfs.name.dir</name>
      <value>file:///home/hadoop/hadoopinfra/hdfs/namenode</value>
   </property>

   <property>
      <name>dfs.data.dir</name>
      <value>file:///home/hadoop/hadoopinfra/hdfs/datanode </value>
   </property>

</configuration>
**注意** - 在上面的文件中,所有属性值都是用户定义的,您可以根据您的 Hadoop 基础架构进行更改。
yarn-site.xml
此文件用于将 Yarn 配置到 Hadoop 中。 打开 yarn-site.xml 文件,并将以下属性添加到
<configuration>
   <property>
      <name>yarn.nodemanager.aux-services</name>
      <value>mapreduce_shuffle</value>
   </property>
</configuration>
mapred-site.xml
此文件用于指定我们使用的 MapReduce 框架。 默认情况下,Hadoop 包含 yarn-site.xml 的模板。 首先,您需要使用以下命令将文件从 mapred-site.xml.template 复制到 mapred-site.xml 文件。
$ cp mapred-site.xml.template mapred-site.xml
打开 mapred-site.xml 文件,并将以下属性添加到
<configuration>
   <property>
      <name>mapreduce.framework.name</name>
      <value>yarn</value>
   </property>
</configuration>
验证 Hadoop 安装
以下步骤用于验证 Hadoop 安装。
步骤 1 - NameNode 设置
使用命令“hdfs namenode -format”设置 namenode,如下所示:
$ cd ~
$ hdfs namenode -format
预期结果如下:
10/24/14 21:30:55 INFO namenode.NameNode: STARTUP_MSG:
/************************************************************
STARTUP_MSG: Starting NameNode
STARTUP_MSG: host = localhost/192.168.1.11
STARTUP_MSG: args = [-format]
STARTUP_MSG: version = 2.4.1
...
...
10/24/14 21:30:56 INFO common.Storage: Storage directory
/home/hadoop/hadoopinfra/hdfs/namenode has been successfully formatted.
10/24/14 21:30:56 INFO namenode.NNStorageRetentionManager: Going to
retain 1 images with txid >= 0
10/24/14 21:30:56 INFO util.ExitUtil: Exiting with status 0
10/24/14 21:30:56 INFO namenode.NameNode: SHUTDOWN_MSG:

/************************************************************
SHUTDOWN_MSG: Shutting down NameNode at localhost/192.168.1.11
************************************************************/
步骤 2 - 验证 Hadoop dfs
执行以下命令以启动 Hadoop 文件系统。
$ start-dfs.sh
预期输出如下:
10/24/14 21:37:56
Starting namenodes on [localhost]
localhost: starting namenode, logging to /home/hadoop/hadoop-
2.4.1/logs/hadoop-hadoop-namenode-localhost.out
localhost: starting datanode, logging to /home/hadoop/hadoop-
2.4.1/logs/hadoop-hadoop-datanode-localhost.out
Starting secondary namenodes [0.0.0.0]
步骤 3 - 验证 Yarn 脚本
以下命令用于启动 Yarn 脚本。 执行此命令将启动您的 Yarn 守护程序。
$ start-yarn.sh
预期输出如下:
starting yarn daemons
starting resourcemanager, logging to /home/hadoop/hadoop-
2.4.1/logs/yarn-hadoop-resourcemanager-localhost.out
localhost: starting node manager, logging to /home/hadoop/hadoop-
2.4.1/logs/yarn-hadoop-nodemanager-localhost.out
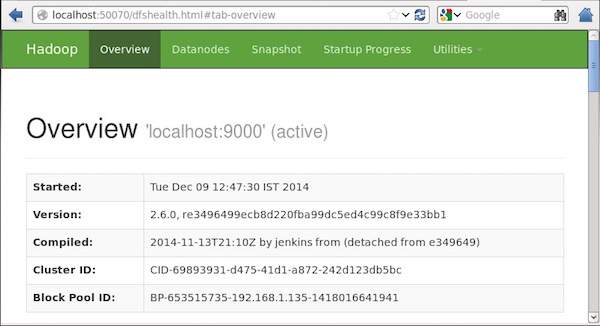
步骤 4 - 在浏览器上访问 Hadoop
访问 Hadoop 的默认端口号为 50070。 使用以下 URL 在浏览器上获取 Hadoop 服务。
https://:50070/
以下屏幕截图显示了 Hadoop 浏览器。
步骤 5 - 验证集群的所有应用程序
访问集群所有应用程序的默认端口号为 8088。 使用以下 URL 使用此服务。
https://:8088/
以下屏幕截图显示了 Hadoop 集群浏览器。

MapReduce - API
在本章中,我们将仔细研究参与 MapReduce 编程操作的类及其方法。 我们将主要关注以下内容:
- JobContext 接口
- Job 类
- Mapper 类
- Reducer 类
JobContext 接口
JobContext 接口是所有类的超接口,它定义了 MapReduce 中的不同作业。 它提供作业的只读视图,在任务运行时提供给任务。
以下是 JobContext 接口的子接口。
| 序号 | 子接口描述 |
|---|---|
| 1. | MapContext<KEYIN, VALUEIN, KEYOUT, VALUEOUT>
定义提供给 Mapper 的上下文。 |
| 2. | ReduceContext<KEYIN, VALUEIN, KEYOUT, VALUEOUT>
定义传递给 Reducer 的上下文。 |
Job 类是实现 JobContext 接口的主要类。
Job 类
Job 类是 MapReduce API 中最重要的类。 它允许用户配置作业、提交作业、控制作业执行以及查询状态。 set 方法仅在作业提交之前有效,之后它们将抛出 IllegalStateException 异常。
通常,用户创建应用程序,描述作业的各个方面,然后提交作业并监控其进度。
以下是提交作业的示例:
// Create a new Job
Job job = new Job(new Configuration());
job.setJarByClass(MyJob.class);

// Specify various job-specific parameters
job.setJobName("myjob");
job.setInputPath(new Path("in"));
job.setOutputPath(new Path("out"));

job.setMapperClass(MyJob.MyMapper.class);
job.setReducerClass(MyJob.MyReducer.class);

// Submit the job, then poll for progress until the job is complete
job.waitForCompletion(true);
构造函数
以下是 Job 类的构造函数摘要。
| 序号 | 构造函数摘要 |
|---|---|
| 1 | Job() |
| 2 | **Job**(Configuration conf) |
| 3 | **Job**(Configuration conf, String jobName) |
方法
Job 类的一些重要方法如下:
| 序号 | 方法描述 |
|---|---|
| 1 | getJobName()
用户指定的作业名称。 |
| 2 | getJobState() 返回作业的当前状态。 |
| 3 | isComplete() 检查作业是否已完成。 |
| 4 | setInputFormatClass() 设置作业的 InputFormat。 |
| 5 | setJobName(String name) 设置用户指定的作业名称。 |
| 6 | setOutputFormatClass() 设置作业的 OutputFormat。 |
| 7 | setMapperClass(Class) 设置作业的 Mapper。 |
| 8 | setReducerClass(Class) 设置作业的 Reducer。 |
| 9 | setPartitionerClass(Class) 设置作业的 Partitioner。 |
| 10 | setCombinerClass(Class) 设置作业的 Combiner。 |
Mapper 类
Mapper 类定义 Map 作业。 将输入键值对映射到一组中间键值对。 Mapper 是将输入记录转换为中间记录的单个任务。 变换后的中间记录的类型不必与输入记录相同。 给定的输入对可以映射到零个或多个输出对。
方法
**map** 是 Mapper 类中最突出的方法。 语法定义如下:
map(KEYIN key, VALUEIN value, org.apache.hadoop.mapreduce.Mapper.Context context)
此方法针对输入分片中的每个键值对调用一次。
Reducer 类
Reducer 类定义 MapReduce 中的 Reduce 作业。 它将共享一个键的一组中间值减少到较小的一组值。 Reducer 实现可以通过 JobContext.getConfiguration() 方法访问作业的 Configuration。 Reducer 有三个主要阶段:Shuffle、Sort 和 Reduce。
**Shuffle** - Reducer 使用 HTTP 通过网络复制来自每个 Mapper 的已排序输出。
**Sort** - 框架按键合并排序 Reducer 输入(因为不同的 Mapper 可能会输出相同的键)。 Shuffle 和 Sort 阶段同时发生,即在获取输出时,它们会合并。
**Reduce** - 在此阶段,reduce(Object, Iterable, Context) 方法针对已排序输入中的每个
方法
**reduce** 是 Reducer 类中最突出的方法。 语法定义如下:
reduce(KEYIN key, Iterable<VALUEIN> values, org.apache.hadoop.mapreduce.Reducer.Context context)
此方法针对键值对集合中的每个键调用一次。
MapReduce - Hadoop 实现
MapReduce 是一个框架,用于编写应用程序以可靠的方式处理大型商品硬件集群上大量数据。 本章将引导您使用 Java 在 Hadoop 框架中操作 MapReduce。
MapReduce 算法
通常,MapReduce 范例基于将 map-reduce 程序发送到实际数据所在的计算机。
在 MapReduce 作业期间,Hadoop 将 Map 和 Reduce 任务发送到集群中的相应服务器。
框架管理所有数据传递细节,例如发出任务、验证任务完成以及在节点之间复制集群周围的数据。
大部分计算发生在具有本地磁盘数据的节点上,从而减少了网络流量。
完成给定任务后,集群将收集并减少数据以形成适当的结果,并将其发送回 Hadoop 服务器。
输入和输出(Java 视角)
MapReduce 框架操作键值对,也就是说,框架将作业的输入视为一组键值对,并产生一组键值对作为作业的输出,这些键值对可能类型不同。
键和值类必须由框架序列化,因此需要实现 Writable 接口。 此外,键类必须实现 WritableComparable 接口以方便框架排序。
MapReduce 作业的输入和输出格式都是键值对的形式:
(输入) <k1, v1> -> map -> <k2, v2> -> reduce -> <k3, v3> (输出)。
| 输入 | 输出 | |
|---|---|---|
| Map | <k1, v1> | 列表 (<k2, v2>) |
| Reduce | <k2, 列表(v2)> | 列表 (<k3, v3>) |
MapReduce 实现
下表显示了有关组织电力消耗的数据。 该表包括连续五年的月度电力消耗和年度平均值。
| 一月 | 二月 | 三月 | 四月 | 五月 | 六月 | 七月 | 八月 | 九月 | 十月 | 十一月 | 十二月 | 平均 | |
|---|---|---|---|---|---|---|---|---|---|---|---|---|---|
| 1979 | 23 | 23 | 2 | 43 | 24 | 25 | 26 | 26 | 26 | 26 | 25 | 26 | 25 |
| 1980 | 26 | 27 | 28 | 28 | 28 | 30 | 31 | 31 | 31 | 30 | 30 | 30 | 29 |
| 1981 | 31 | 32 | 32 | 32 | 33 | 34 | 35 | 36 | 36 | 34 | 34 | 34 | 34 |
| 1984 | 39 | 38 | 39 | 39 | 39 | 41 | 42 | 43 | 40 | 39 | 38 | 38 | 40 |
| 1985 | 38 | 39 | 39 | 39 | 39 | 41 | 41 | 41 | 00 | 40 | 39 | 39 | 45 |
我们需要编写应用程序来处理给定表中的输入数据,以查找最大使用量年份、最小使用量年份等等。对于具有有限记录数量的程序员来说,此任务很容易,因为他们只需编写逻辑以生成所需的输出,并将数据传递到已编写的应用程序。
现在让我们提高输入数据规模。假设我们需要分析某个州所有大型工业的电力消耗。当我们编写应用程序来处理如此大量的数据时,
它们将花费大量时间执行。
当我们将数据从源移动到网络服务器时,网络流量将会非常大。
为了解决这些问题,我们有MapReduce框架。
输入数据
以上数据保存为sample.txt文件,并作为输入提供。输入文件如下所示。
| 1979 | 23 | 23 | 2 | 43 | 24 | 25 | 26 | 26 | 26 | 26 | 25 | 26 | 25 |
| 1980 | 26 | 27 | 28 | 28 | 28 | 30 | 31 | 31 | 31 | 30 | 30 | 30 | 29 |
| 1981 | 31 | 32 | 32 | 32 | 33 | 34 | 35 | 36 | 36 | 34 | 34 | 34 | 34 |
| 1984 | 39 | 38 | 39 | 39 | 39 | 41 | 42 | 43 | 40 | 39 | 38 | 38 | 40 |
| 1985 | 38 | 39 | 39 | 39 | 39 | 41 | 41 | 41 | 00 | 40 | 39 | 39 | 45 |
示例程序
以下程序使用MapReduce框架处理示例数据。
package hadoop;

import java.util.*;
import java.io.IOException;
import java.io.IOException;

import org.apache.hadoop.fs.Path;
import org.apache.hadoop.conf.*;
import org.apache.hadoop.io.*;
import org.apache.hadoop.mapred.*;
import org.apache.hadoop.util.*;

public class ProcessUnits
{
   //Mapper class
   public static class E_EMapper extends MapReduceBase implements
   Mapper<LongWritable,  /*Input key Type */
   Text,                   /*Input value Type*/
   Text,                   /*Output key Type*/
   IntWritable>            /*Output value Type*/
   {
      //Map function
      public void map(LongWritable key, Text value, OutputCollector<Text, IntWritable> output, Reporter reporter) throws IOException
      {
         String line = value.toString();
         String lasttoken = null;
         StringTokenizer s = new StringTokenizer(line,"\t");
         String year = s.nextToken();

         while(s.hasMoreTokens()){
            lasttoken=s.nextToken();
         }

         int avgprice = Integer.parseInt(lasttoken);
         output.collect(new Text(year), new IntWritable(avgprice));
      }
   }

   //Reducer class

   public static class E_EReduce extends MapReduceBase implements
   Reducer< Text, IntWritable, Text, IntWritable >
   {
      //Reduce function
      public void reduce(Text key, Iterator <IntWritable> values, OutputCollector>Text, IntWritable> output, Reporter reporter) throws IOException
      {
         int maxavg=30;
         int val=Integer.MIN_VALUE;
         while (values.hasNext())
         {
            if((val=values.next().get())>maxavg)
            {
               output.collect(key, new IntWritable(val));
            }
         }
      }
   }

   //Main function

   public static void main(String args[])throws Exception
   {
      JobConf conf = new JobConf(Eleunits.class);

      conf.setJobName("max_eletricityunits");

      conf.setOutputKeyClass(Text.class);
      conf.setOutputValueClass(IntWritable.class);

      conf.setMapperClass(E_EMapper.class);
      conf.setCombinerClass(E_EReduce.class);
      conf.setReducerClass(E_EReduce.class);

      conf.setInputFormat(TextInputFormat.class);
      conf.setOutputFormat(TextOutputFormat.class);

      FileInputFormat.setInputPaths(conf, new Path(args[0]));
      FileOutputFormat.setOutputPath(conf, new Path(args[1]));

      JobClient.runJob(conf);
   }
}
将上述程序保存为ProcessUnits.java。程序的编译和执行如下所示。
ProcessUnits程序的编译和执行
假设我们在Hadoop用户的家目录中(例如,/home/hadoop)。
请按照以下步骤编译和执行上述程序。
步骤1 − 使用以下命令创建一个目录来存储编译后的Java类。
$ mkdir units
步骤2 − 下载Hadoop-core-1.2.1.jar,该文件用于编译和执行MapReduce程序。从mvnrepository.com下载jar包。假设下载文件夹为/home/hadoop/。
步骤3 − 使用以下命令编译ProcessUnits.java程序并为程序创建一个jar包。
$ javac -classpath hadoop-core-1.2.1.jar -d units ProcessUnits.java
$ jar -cvf units.jar -C units/ .
步骤4 − 使用以下命令在HDFS中创建一个输入目录。
$HADOOP_HOME/bin/hadoop fs -mkdir input_dir
步骤5 − 使用以下命令将名为sample.txt的输入文件复制到HDFS的输入目录中。
$HADOOP_HOME/bin/hadoop fs -put /home/hadoop/sample.txt input_dir
步骤6 − 使用以下命令验证输入目录中的文件。
$HADOOP_HOME/bin/hadoop fs -ls input_dir/
步骤7 − 使用以下命令运行Eleunit_max应用程序,并从输入目录中获取输入文件。
$HADOOP_HOME/bin/hadoop jar units.jar hadoop.ProcessUnits input_dir output_dir
等待一段时间直到文件执行完毕。执行后,输出包含许多输入分片、Map任务、Reduce任务等。
INFO mapreduce.Job: Job job_1414748220717_0002
completed successfully
14/10/31 06:02:52
INFO mapreduce.Job: Counters: 49

File System Counters

   FILE: Number of bytes read=61
   FILE: Number of bytes written=279400
   FILE: Number of read operations=0
   FILE: Number of large read operations=0
   FILE: Number of write operations=0

   HDFS: Number of bytes read=546
   HDFS: Number of bytes written=40
   HDFS: Number of read operations=9
   HDFS: Number of large read operations=0
   HDFS: Number of write operations=2 Job Counters

   Launched map tasks=2
   Launched reduce tasks=1
   Data-local map tasks=2

   Total time spent by all maps in occupied slots (ms)=146137
   Total time spent by all reduces in occupied slots (ms)=441
   Total time spent by all map tasks (ms)=14613
   Total time spent by all reduce tasks (ms)=44120

   Total vcore-seconds taken by all map tasks=146137
   Total vcore-seconds taken by all reduce tasks=44120

   Total megabyte-seconds taken by all map tasks=149644288
   Total megabyte-seconds taken by all reduce tasks=45178880

Map-Reduce Framework

   Map input records=5

   Map output records=5
   Map output bytes=45
   Map output materialized bytes=67

   Input split bytes=208
   Combine input records=5
   Combine output records=5

   Reduce input groups=5
   Reduce shuffle bytes=6
   Reduce input records=5
   Reduce output records=5

   Spilled Records=10
   Shuffled Maps =2
   Failed Shuffles=0
   Merged Map outputs=2

   GC time elapsed (ms)=948
   CPU time spent (ms)=5160

   Physical memory (bytes) snapshot=47749120
   Virtual memory (bytes) snapshot=2899349504

   Total committed heap usage (bytes)=277684224

File Output Format Counters

   Bytes Written=40
步骤8 − 使用以下命令验证输出文件夹中的结果文件。
$HADOOP_HOME/bin/hadoop fs -ls output_dir/
步骤9 − 使用以下命令查看Part-00000文件中的输出。此文件由HDFS生成。
$HADOOP_HOME/bin/hadoop fs -cat output_dir/part-00000
以下是MapReduce程序生成的输出:
| 1981 | 34 |
| 1984 | 40 |
| 1985 | 45 |
步骤10 − 使用以下命令将输出文件夹从HDFS复制到本地文件系统。
$HADOOP_HOME/bin/hadoop fs -cat output_dir/part-00000/bin/hadoop dfs -get output_dir /home/hadoop
MapReduce - 分区器
分区器在处理输入数据集时就像一个条件。分区阶段发生在Map阶段之后,Reduce阶段之前。
分区器的数量等于Reducer的数量。这意味着分区器将根据Reducer的数量划分数据。因此,从单个分区器传递的数据由单个Reducer处理。
分区器
分区器对中间Map输出的键值对进行分区。它使用用户定义的条件(类似于哈希函数)对数据进行分区。分区的总数与作业的Reducer任务数相同。让我们来看一个例子来理解分区器是如何工作的。
MapReduce分区器实现
为方便起见,让我们假设我们有一个名为Employee的小表,包含以下数据。我们将使用此示例数据作为我们的输入数据集来演示分区器的工作方式。
| Id | Name | Age | Gender | Salary |
|---|---|---|---|---|
| 1201 | gopal | 45 | Male | 50,000 |
| 1202 | manisha | 40 | Female | 50,000 |
| 1203 | khalil | 34 | Male | 30,000 |
| 1204 | prasanth | 30 | Male | 30,000 |
| 1205 | kiran | 20 | Male | 40,000 |
| 1206 | laxmi | 25 | Female | 35,000 |
| 1207 | bhavya | 20 | Female | 15,000 |
| 1208 | reshma | 19 | Female | 15,000 |
| 1209 | kranthi | 22 | Male | 22,000 |
| 1210 | Satish | 24 | Male | 25,000 |
| 1211 | Krishna | 25 | Male | 25,000 |
| 1212 | Arshad | 28 | Male | 20,000 |
| 1213 | lavanya | 18 | Female | 8,000 |
我们需要编写一个应用程序来处理输入数据集,以查找不同年龄组(例如,20岁以下、21岁到30岁、30岁以上)中按性别划分的最高薪员工。
输入数据
以上数据保存在“/home/hadoop/hadoopPartitioner”目录下的input.txt文件中,并作为输入提供。
| 1201 | gopal | 45 | Male | 50000 |
| 1202 | manisha | 40 | Female | 51000 |
| 1203 | khaleel | 34 | Male | 30000 |
| 1204 | prasanth | 30 | Male | 31000 |
| 1205 | kiran | 20 | Male | 40000 |
| 1206 | laxmi | 25 | Female | 35000 |
| 1207 | bhavya | 20 | Female | 15000 |
| 1208 | reshma | 19 | Female | 14000 |
| 1209 | kranthi | 22 | Male | 22000 |
| 1210 | Satish | 24 | Male | 25000 |
| 1211 | Krishna | 25 | Male | 26000 |
| 1212 | Arshad | 28 | Male | 20000 |
| 1213 | lavanya | 18 | Female | 8000 |
基于给定的输入,以下是程序的算法解释。
Map任务
Map任务接受键值对作为输入,而我们有文本文件中的文本数据。此Map任务的输入如下:
输入 − 键将是类似于“任何特殊键 + 文件名 + 行号”的模式(例如:key = @input1),值将是该行中的数据(例如:value = 1201 \t gopal \t 45 \t Male \t 50000)。
方法 − 此Map任务的操作如下:
读取value(记录数据),它作为输入值从参数列表中的字符串传入。
使用split函数,分离性别并存储到字符串变量中。
String[] str = value.toString().split("\t", -3);
String gender=str[3];
将性别信息和记录数据value作为键值对从Map任务输出到分区任务。
context.write(new Text(gender), new Text(value));
对文本文件中的所有记录重复以上所有步骤。
输出 − 您将获得性别数据和记录数据值作为键值对。
分区器任务
分区器任务接受来自Map任务的键值对作为其输入。分区意味着将数据分成多个段。根据给定的分区条件标准,输入键值对数据可以根据年龄标准分为三部分。
输入 − 键值对集合中的所有数据。
key = 记录中的性别字段值。
value = 该性别的整个记录数据值。
方法 − 分区逻辑过程如下。
- 从输入键值对中读取年龄字段值。
String[] str = value.toString().split("\t");
int age = Integer.parseInt(str[2]);
使用以下条件检查年龄值。
- 年龄小于或等于20
- 年龄大于20且小于或等于30。
- 年龄大于30。
if(age<=20)
{
   return 0;
}
else if(age>20 && age<=30)
{
   return 1 % numReduceTasks;
}
else
{
   return 2 % numReduceTasks;
}
输出 − 键值对的所有数据被分成三个键值对集合。Reducer将分别对每个集合进行处理。
Reduce任务
分区器任务的数量等于Reducer任务的数量。这里我们有三个分区器任务,因此我们需要执行三个Reducer任务。
输入 − Reducer将使用不同的键值对集合执行三次。
key = 记录中的性别字段值。
value = 该性别的整个记录数据。
方法 − 以下逻辑将应用于每个集合。
- 读取每个记录的薪资字段值。
String [] str = val.toString().split("\t", -3);
Note: str[4] have the salary field value.
将薪资与max变量进行比较。如果str[4]是最高薪资,则将str[4]赋值给max,否则跳过此步骤。
if(Integer.parseInt(str[4])>max)
{
   max=Integer.parseInt(str[4]);
}
对每个键集合(Male & Female是键集合)重复步骤1和2。执行这三个步骤后,您将找到Male键集合中的最高薪资和Female键集合中的最高薪资。
context.write(new Text(key), new IntWritable(max));
输出 − 最后,您将获得三个不同年龄组的键值对数据集合。它分别包含每个年龄组中Male集合和Female集合中的最高薪资。
执行Map、分区器和Reduce任务后,三个键值对数据集合将作为输出存储在三个不同的文件中。
所有三个任务都被视为MapReduce作业。这些作业的以下要求和规范应在配置中指定:
- 作业名称
- 键和值的输入和输出格式
- Map、Reduce和分区器任务的各个类
Configuration conf = getConf();

//Create Job
Job job = new Job(conf, "topsal");
job.setJarByClass(PartitionerExample.class);

// File Input and Output paths
FileInputFormat.setInputPaths(job, new Path(arg[0]));
FileOutputFormat.setOutputPath(job,new Path(arg[1]));

//Set Mapper class and Output format for key-value pair.
job.setMapperClass(MapClass.class);
job.setMapOutputKeyClass(Text.class);
job.setMapOutputValueClass(Text.class);

//set partitioner statement
job.setPartitionerClass(CaderPartitioner.class);

//Set Reducer class and Input/Output format for key-value pair.
job.setReducerClass(ReduceClass.class);

//Number of Reducer tasks.
job.setNumReduceTasks(3);

//Input and Output format for data
job.setInputFormatClass(TextInputFormat.class);
job.setOutputFormatClass(TextOutputFormat.class);
job.setOutputKeyClass(Text.class);
job.setOutputValueClass(Text.class);
示例程序
以下程序展示了如何在MapReduce程序中为给定条件实现分区器。
package partitionerexample;

import java.io.*;

import org.apache.hadoop.io.*;
import org.apache.hadoop.mapreduce.*;
import org.apache.hadoop.conf.*;
import org.apache.hadoop.conf.*;
import org.apache.hadoop.fs.*;

import org.apache.hadoop.mapreduce.lib.input.*;
import org.apache.hadoop.mapreduce.lib.output.*;

import org.apache.hadoop.util.*;

public class PartitionerExample extends Configured implements Tool
{
   //Map class

   public static class MapClass extends Mapper<LongWritable,Text,Text,Text>
   {
      public void map(LongWritable key, Text value, Context context)
      {
         try{
            String[] str = value.toString().split("\t", -3);
            String gender=str[3];
            context.write(new Text(gender), new Text(value));
         }
         catch(Exception e)
         {
            System.out.println(e.getMessage());
         }
      }
   }

   //Reducer class

   public static class ReduceClass extends Reducer<Text,Text,Text,IntWritable>
   {
      public int max = -1;
      public void reduce(Text key, Iterable <Text> values, Context context) throws IOException, InterruptedException
      {
         max = -1;

         for (Text val : values)
         {
            String [] str = val.toString().split("\t", -3);
            if(Integer.parseInt(str[4])>max)
            max=Integer.parseInt(str[4]);
         }

         context.write(new Text(key), new IntWritable(max));
      }
   }

   //Partitioner class

   public static class CaderPartitioner extends
   Partitioner < Text, Text >
   {
      @Override
      public int getPartition(Text key, Text value, int numReduceTasks)
      {
         String[] str = value.toString().split("\t");
         int age = Integer.parseInt(str[2]);

         if(numReduceTasks == 0)
         {
            return 0;
         }

         if(age<=20)
         {
            return 0;
         }
         else if(age>20 && age<=30)
         {
            return 1 % numReduceTasks;
         }
         else
         {
            return 2 % numReduceTasks;
         }
      }
   }

   @Override
   public int run(String[] arg) throws Exception
   {
      Configuration conf = getConf();

      Job job = new Job(conf, "topsal");
      job.setJarByClass(PartitionerExample.class);

      FileInputFormat.setInputPaths(job, new Path(arg[0]));
      FileOutputFormat.setOutputPath(job,new Path(arg[1]));

      job.setMapperClass(MapClass.class);

      job.setMapOutputKeyClass(Text.class);
      job.setMapOutputValueClass(Text.class);

      //set partitioner statement

      job.setPartitionerClass(CaderPartitioner.class);
      job.setReducerClass(ReduceClass.class);
      job.setNumReduceTasks(3);
      job.setInputFormatClass(TextInputFormat.class);

      job.setOutputFormatClass(TextOutputFormat.class);
      job.setOutputKeyClass(Text.class);
      job.setOutputValueClass(Text.class);

      System.exit(job.waitForCompletion(true)? 0 : 1);
      return 0;
   }

   public static void main(String ar[]) throws Exception
   {
      int res = ToolRunner.run(new Configuration(), new PartitionerExample(),ar);
      System.exit(0);
   }
}
将上述代码保存为PartitionerExample.java,文件路径为“/home/hadoop/hadoopPartitioner”。程序的编译和执行如下所示。
编译和执行
假设我们在Hadoop用户的家目录中(例如,/home/hadoop)。
请按照以下步骤编译和执行上述程序。
步骤1 − 下载Hadoop-core-1.2.1.jar,该文件用于编译和执行MapReduce程序。您可以从mvnrepository.com下载jar包。
假设下载文件夹为“/home/hadoop/hadoopPartitioner”
步骤2 − 使用以下命令编译程序PartitionerExample.java并为程序创建一个jar包。
$ javac -classpath hadoop-core-1.2.1.jar -d ProcessUnits.java
$ jar -cvf PartitionerExample.jar -C .
步骤3 − 使用以下命令在HDFS中创建一个输入目录。
$HADOOP_HOME/bin/hadoop fs -mkdir input_dir
步骤4 − 使用以下命令将名为input.txt的输入文件复制到HDFS的输入目录中。
$HADOOP_HOME/bin/hadoop fs -put /home/hadoop/hadoopPartitioner/input.txt input_dir
步骤5 − 使用以下命令验证输入目录中的文件。
$HADOOP_HOME/bin/hadoop fs -ls input_dir/
步骤6 − 使用以下命令运行Top salary应用程序,并从输入目录中获取输入文件。
$HADOOP_HOME/bin/hadoop jar PartitionerExample.jar partitionerexample.PartitionerExample input_dir/input.txt output_dir
等待一段时间直到文件执行完毕。执行后,输出包含许多输入分片、Map任务和Reducer任务。
15/02/04 15:19:51 INFO mapreduce.Job: Job job_1423027269044_0021 completed successfully
15/02/04 15:19:52 INFO mapreduce.Job: Counters: 49

File System Counters

   FILE: Number of bytes read=467
   FILE: Number of bytes written=426777
   FILE: Number of read operations=0
   FILE: Number of large read operations=0
   FILE: Number of write operations=0

   HDFS: Number of bytes read=480
   HDFS: Number of bytes written=72
   HDFS: Number of read operations=12
   HDFS: Number of large read operations=0
   HDFS: Number of write operations=6

Job Counters

   Launched map tasks=1
   Launched reduce tasks=3

   Data-local map tasks=1

   Total time spent by all maps in occupied slots (ms)=8212
   Total time spent by all reduces in occupied slots (ms)=59858
   Total time spent by all map tasks (ms)=8212
   Total time spent by all reduce tasks (ms)=59858

   Total vcore-seconds taken by all map tasks=8212
   Total vcore-seconds taken by all reduce tasks=59858

   Total megabyte-seconds taken by all map tasks=8409088
   Total megabyte-seconds taken by all reduce tasks=61294592

Map-Reduce Framework

   Map input records=13
   Map output records=13
   Map output bytes=423
   Map output materialized bytes=467

   Input split bytes=119

   Combine input records=0
   Combine output records=0

   Reduce input groups=6
   Reduce shuffle bytes=467
   Reduce input records=13
   Reduce output records=6

   Spilled Records=26
   Shuffled Maps =3
   Failed Shuffles=0
   Merged Map outputs=3
   GC time elapsed (ms)=224
   CPU time spent (ms)=3690

   Physical memory (bytes) snapshot=553816064
   Virtual memory (bytes) snapshot=3441266688

   Total committed heap usage (bytes)=334102528

Shuffle Errors

   BAD_ID=0
   CONNECTION=0
   IO_ERROR=0

   WRONG_LENGTH=0
   WRONG_MAP=0
   WRONG_REDUCE=0

File Input Format Counters

   Bytes Read=361

File Output Format Counters

   Bytes Written=72
步骤7 − 使用以下命令验证输出文件夹中的结果文件。
$HADOOP_HOME/bin/hadoop fs -ls output_dir/
您将在三个文件中找到输出,因为您在程序中使用了三个分区器和三个Reducer。
步骤8 − 使用以下命令查看Part-00000文件中的输出。此文件由HDFS生成。
$HADOOP_HOME/bin/hadoop fs -cat output_dir/part-00000
Part-00000中的输出
Female   15000
Male     40000
使用以下命令查看Part-00001文件中的输出。
$HADOOP_HOME/bin/hadoop fs -cat output_dir/part-00001
Part-00001中的输出
Female   35000
Male    31000
使用以下命令查看Part-00002文件中的输出。
$HADOOP_HOME/bin/hadoop fs -cat output_dir/part-00002
Part-00002中的输出
Female  51000
Male   50000
MapReduce - 组合器
Combiner,也称为半归约器,是一个可选的类,它通过接受来自Map类的输入,然后将输出键值对传递给Reducer类来运行。
Combiner 的主要功能是汇总具有相同键的 Map 输出记录。Combiner 的输出(键值对集合)将通过网络发送到实际的 Reducer 任务作为输入。
Combiner
Combiner 类用于 Map 类和 Reduce 类之间,以减少 Map 和 Reduce 之间的数据传输量。通常情况下,Map 任务的输出量很大,传输到 Reduce 任务的数据量也很高。
下面的 MapReduce 任务图显示了 COMBINER 阶段。
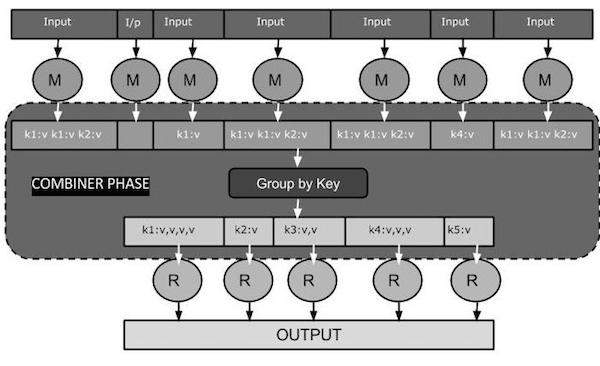
Combiner 如何工作?
以下是关于 MapReduce Combiner 如何工作的简要总结:
Combiner 没有预定义的接口,它必须实现 Reducer 接口的 reduce() 方法。
Combiner 对每个 Map 输出键进行操作。它必须与 Reducer 类具有相同的输出键值类型。
Combiner 可以从大型数据集中生成汇总信息,因为它替换了原始的 Map 输出。
虽然 Combiner 是可选的,但它有助于将数据分成多个组以便进行 Reduce 阶段处理,从而简化处理过程。
MapReduce Combiner 实现
下面的示例提供了一个关于 Combiner 的理论概念。让我们假设我们有以下名为 **input.txt** 的 MapReduce 输入文本文件。
What do you mean by Object
What do you know about Java
What is Java Virtual Machine
How Java enabled High Performance
下面讨论了包含 Combiner 的 MapReduce 程序的重要阶段。
记录读取器 (Record Reader)
这是 MapReduce 的第一个阶段,记录读取器从输入文本文件中逐行读取文本,并以键值对的形式输出。
**输入** - 来自输入文件的逐行文本。
**输出** - 形成键值对。以下是预期的键值对集合。
<1, What do you mean by Object>
<2, What do you know about Java>
<3, What is Java Virtual Machine>
<4, How Java enabled High Performance>
Map 阶段
Map 阶段从记录读取器接收输入,对其进行处理,并产生另一组键值对作为输出。
**输入** - 从记录读取器接收到的以下键值对是输入。
<1, What do you mean by Object>
<2, What do you know about Java>
<3, What is Java Virtual Machine>
<4, How Java enabled High Performance>
Map 阶段读取每个键值对,使用 StringTokenizer 将值中的每个单词分开,将每个单词作为键,并将该单词的计数作为值。以下代码片段显示了 Mapper 类和 map 函数。
public static class TokenizerMapper extends Mapper<Object, Text, Text, IntWritable>
{
   private final static IntWritable one = new IntWritable(1);
   private Text word = new Text();

   public void map(Object key, Text value, Context context) throws IOException, InterruptedException
   {
      StringTokenizer itr = new StringTokenizer(value.toString());
      while (itr.hasMoreTokens())
      {
         word.set(itr.nextToken());
         context.write(word, one);
      }
   }
}
**输出** - 预期输出如下:
<What,1> <do,1> <you,1> <mean,1> <by,1> <Object,1>
<What,1> <do,1> <you,1> <know,1> <about,1> <Java,1>
<What,1> <is,1> <Java,1> <Virtual,1> <Machine,1>
<How,1> <Java,1> <enabled,1> <High,1> <Performance,1>
Combiner 阶段
Combiner 阶段接收来自 Map 阶段的每个键值对,对其进行处理,并产生 **键值对集合** 作为输出。
**输入** - 从 Map 阶段接收到的以下键值对是输入。
<What,1> <do,1> <you,1> <mean,1> <by,1> <Object,1>
<What,1> <do,1> <you,1> <know,1> <about,1> <Java,1>
<What,1> <is,1> <Java,1> <Virtual,1> <Machine,1>
<How,1> <Java,1> <enabled,1> <High,1> <Performance,1>
Combiner 阶段读取每个键值对,将公共单词组合为键,将值组合为集合。通常,Combiner 的代码和操作类似于 Reducer。以下是 Mapper、Combiner 和 Reducer 类声明的代码片段。
job.setMapperClass(TokenizerMapper.class);
job.setCombinerClass(IntSumReducer.class);
job.setReducerClass(IntSumReducer.class);
**输出** - 预期输出如下:
<What,1,1,1> <do,1,1> <you,1,1> <mean,1> <by,1> <Object,1>
<know,1> <about,1> <Java,1,1,1>
<is,1> <Virtual,1> <Machine,1>
<How,1> <enabled,1> <High,1> <Performance,1>
Reducer 阶段
Reducer 阶段接收来自 Combiner 阶段的每个键值对集合,对其进行处理,并将输出作为键值对传递。请注意,Combiner 的功能与 Reducer 相同。
**输入** - 从 Combiner 阶段接收到的以下键值对是输入。
<What,1,1,1> <do,1,1> <you,1,1> <mean,1> <by,1> <Object,1>
<know,1> <about,1> <Java,1,1,1>
<is,1> <Virtual,1> <Machine,1>
<How,1> <enabled,1> <High,1> <Performance,1>
Reducer 阶段读取每个键值对。以下是 Combiner 的代码片段。
public static class IntSumReducer extends Reducer<Text,IntWritable,Text,IntWritable>
{
   private IntWritable result = new IntWritable();

   public void reduce(Text key, Iterable<IntWritable> values,Context context) throws IOException, InterruptedException
   {
      int sum = 0;
      for (IntWritable val : values)
      {
         sum += val.get();
      }
      result.set(sum);
      context.write(key, result);
   }
}
**输出** - Reducer 阶段的预期输出如下:
<What,3> <do,2> <you,2> <mean,1> <by,1> <Object,1>
<know,1> <about,1> <Java,3>
<is,1> <Virtual,1> <Machine,1>
<How,1> <enabled,1> <High,1> <Performance,1>
记录写入器 (Record Writer)
这是 MapReduce 的最后阶段,记录写入器写入 Reducer 阶段的每个键值对,并将输出作为文本发送。
**输入** - 来自 Reducer 阶段的每个键值对以及输出格式。
**输出** - 它以文本格式提供键值对。以下是预期输出。
What           3
do             2
you            2
mean           1
by             1
Object         1
know           1
about          1
Java           3
is             1
Virtual        1
Machine        1
How            1
enabled        1
High           1
Performance    1
示例程序
下面的代码块计算程序中单词的数量。
import java.io.IOException;
import java.util.StringTokenizer;

import org.apache.hadoop.conf.Configuration;
import org.apache.hadoop.fs.Path;

import org.apache.hadoop.io.IntWritable;
import org.apache.hadoop.io.Text;

import org.apache.hadoop.mapreduce.Job;
import org.apache.hadoop.mapreduce.Mapper;
import org.apache.hadoop.mapreduce.Reducer;
import org.apache.hadoop.mapreduce.lib.input.FileInputFormat;
import org.apache.hadoop.mapreduce.lib.output.FileOutputFormat;

public class WordCount {
   public static class TokenizerMapper extends Mapper<Object, Text, Text, IntWritable>
   {
      private final static IntWritable one = new IntWritable(1);
      private Text word = new Text();

      public void map(Object key, Text value, Context context) throws IOException, InterruptedException
      {
         StringTokenizer itr = new StringTokenizer(value.toString());
         while (itr.hasMoreTokens())
         {
            word.set(itr.nextToken());
            context.write(word, one);
         }
      }
   }

   public static class IntSumReducer extends Reducer<Text,IntWritable,Text,IntWritable>
   {
      private IntWritable result = new IntWritable();
      public void reduce(Text key, Iterable<IntWritable> values, Context context) throws IOException, InterruptedException
      {
         int sum = 0;
         for (IntWritable val : values)
         {
            sum += val.get();
         }
         result.set(sum);
         context.write(key, result);
      }
   }

   public static void main(String[] args) throws Exception
   {
      Configuration conf = new Configuration();
      Job job = Job.getInstance(conf, "word count");

      job.setJarByClass(WordCount.class);
      job.setMapperClass(TokenizerMapper.class);
      job.setCombinerClass(IntSumReducer.class);
      job.setReducerClass(IntSumReducer.class);

      job.setOutputKeyClass(Text.class);
      job.setOutputValueClass(IntWritable.class);

      FileInputFormat.addInputPath(job, new Path(args[0]));
      FileOutputFormat.setOutputPath(job, new Path(args[1]));

      System.exit(job.waitForCompletion(true) ? 0 : 1);
   }
}
将上述程序保存为 **WordCount.java**。程序的编译和执行如下所示。
编译和执行
让我们假设我们在 Hadoop 用户的主目录中(例如,/home/hadoop)。
请按照以下步骤编译和执行上述程序。
步骤1 − 使用以下命令创建一个目录来存储编译后的Java类。
$ mkdir units
**步骤 2** - 下载 Hadoop-core-1.2.1.jar,用于编译和执行 MapReduce 程序。您可以从 mvnrepository.com 下载该 jar 包。
让我们假设下载的文件夹是 /home/hadoop/。
**步骤 3** - 使用以下命令编译 **WordCount.java** 程序并为该程序创建一个 jar 包。
$ javac -classpath hadoop-core-1.2.1.jar -d units WordCount.java
$ jar -cvf units.jar -C units/ .
**步骤 4** - 使用以下命令在 HDFS 中创建一个输入目录。
$HADOOP_HOME/bin/hadoop fs -mkdir input_dir
**步骤 5** - 使用以下命令将名为 **input.txt** 的输入文件复制到 HDFS 的输入目录中。
$HADOOP_HOME/bin/hadoop fs -put /home/hadoop/input.txt input_dir
**步骤 6** - 使用以下命令验证输入目录中的文件。
$HADOOP_HOME/bin/hadoop fs -ls input_dir/
**步骤 7** - 使用以下命令运行 Word count 应用程序,从输入目录获取输入文件。
$HADOOP_HOME/bin/hadoop jar units.jar hadoop.ProcessUnits input_dir output_dir
等待一段时间直到文件执行完毕。执行后,输出包含许多输入分片、Map 任务和 Reducer 任务。
**步骤 8** - 使用以下命令验证输出文件夹中的结果文件。
$HADOOP_HOME/bin/hadoop fs -ls output_dir/
**步骤 9** - 使用以下命令查看 **Part-00000** 文件中的输出。此文件由 HDFS 生成。
$HADOOP_HOME/bin/hadoop fs -cat output_dir/part-00000
以下是 MapReduce 程序生成的输出。
What           3
do             2
you            2
mean           1
by             1
Object         1
know           1
about          1
Java           3
is             1
Virtual        1
Machine        1
How            1
enabled        1
High           1
Performance    1
MapReduce - Hadoop 管理
本章解释 Hadoop 管理,包括 HDFS 和 MapReduce 管理。
HDFS 管理包括监控 HDFS 文件结构、位置和更新的文件。
MapReduce 管理包括监控应用程序列表、节点配置、应用程序状态等。
HDFS 监控
HDFS(Hadoop 分布式文件系统)包含用户目录、输入文件和输出文件。使用 MapReduce 命令 **put** 和 **get** 进行存储和检索。
通过在“/$HADOOP_HOME/sbin”上执行命令“start-all.sh”启动 Hadoop 框架(守护进程)后,将以下 URL 传递到浏览器“https://:50070”。您应该在浏览器上看到以下屏幕。
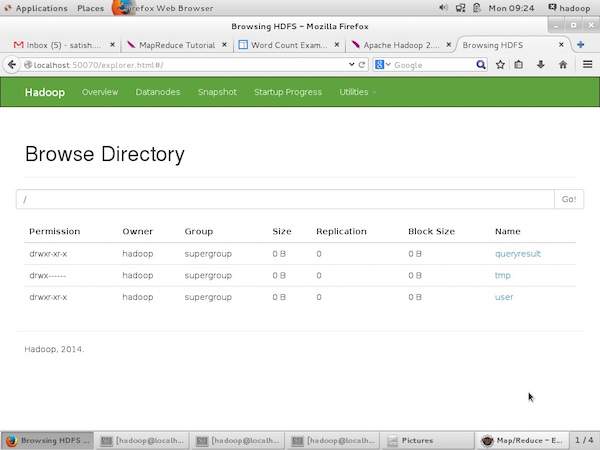
以下屏幕截图显示了如何浏览 HDFS。
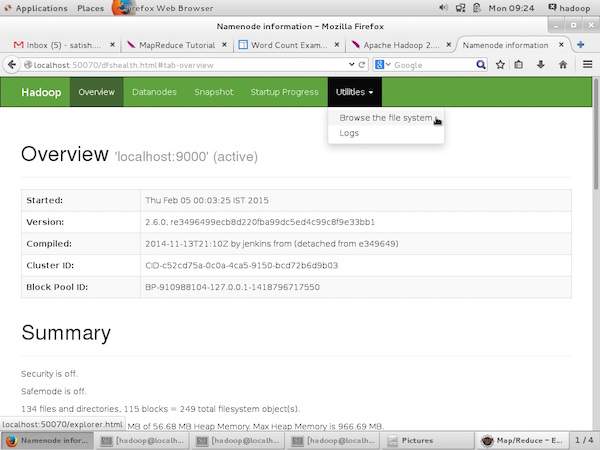
以下屏幕截图显示了 HDFS 的文件结构。它显示了“/user/hadoop”目录中的文件。
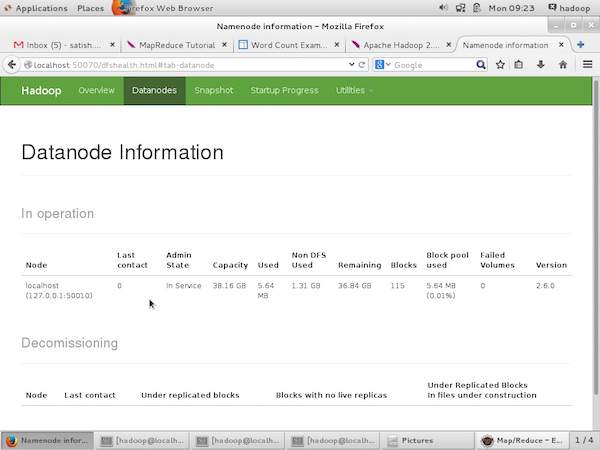
以下屏幕截图显示了集群中的 DataNode 信息。在这里您可以找到一个节点及其配置和容量。
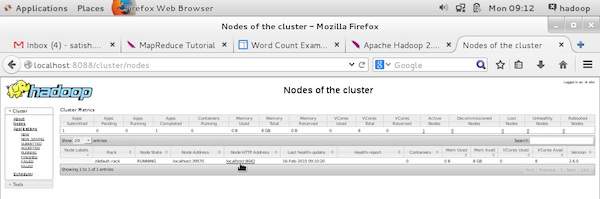
MapReduce 作业监控
MapReduce 应用程序是作业的集合(Map 作业、Combiner、Partitioner 和 Reduce 作业)。必须监控和维护以下内容:
- 适合应用程序的 datanode 配置。
- 每个应用程序使用的 datanode 数量和资源。
为了监控所有这些内容,我们必须拥有一个用户界面。通过在“/$HADOOP_HOME/sbin”上执行命令“start-all.sh”启动 Hadoop 框架后,将以下 URL 传递到浏览器“https://:8080”。您应该在浏览器上看到以下屏幕。
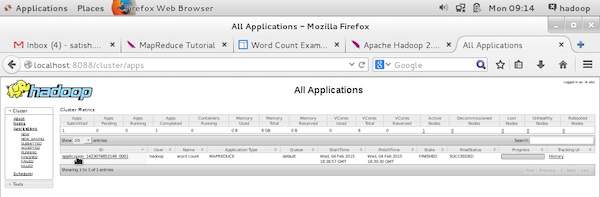
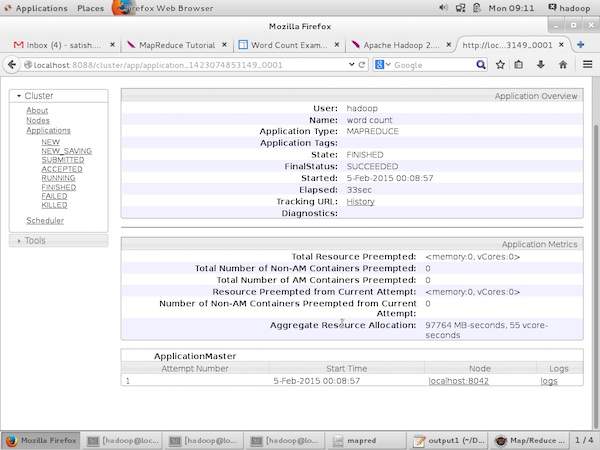
在上图中,鼠标指针位于应用程序 ID 上。只需单击它即可在浏览器上找到以下屏幕。它描述了以下内容:
当前应用程序在哪个用户下运行
应用程序名称
该应用程序的类型
当前状态、最终状态
应用程序启动时间、经过时间(完成时间),如果在监控时已完成
此应用程序的历史记录,即日志信息
最后,节点信息,即参与运行应用程序的节点。
以下屏幕截图显示了特定应用程序的详细信息:
以下屏幕截图描述了当前正在运行的节点信息。此处,屏幕截图仅包含一个节点。鼠标指针显示正在运行的节点的本地主机地址。