- RichFaces 教程
- RichFaces - 首页
- RichFaces - 概述
- RichFaces - 环境设置
- RichFaces - 架构
- RichFaces - 基本概念
- RichFaces - 富皮肤
- RichFaces - 输入组件
- RichFaces - 输出组件
- RichFaces - 迭代组件
- RichFaces - 选择组件
- RichFaces - 菜单组件
- RichFaces - 富树
- RichFaces - 错误处理
- RichFaces 有用资源
- RichFaces - 快速指南
- RichFaces - 有用资源
- RichFaces - 讨论
RichFaces - 富皮肤
RichFaces 带有一个新的功能,可以集中控制网站的外观和感觉,称为 Rich Skin(富皮肤)。皮肤是对旧 CSS 文件的高级实现,对于后端开发人员来说,它更方便地控制网站的外观和感觉。有一些内置的皮肤可用,可以根据您的选择进行自定义。
内置皮肤
RichFaces 组件 jar 文件中提供许多内置皮肤。以下是可用的部分内置富皮肤。
- 默认
- 朴素
- 翡翠镇
- 蓝天
- 酒红
- 日本樱花
- 红宝石
- 经典
- 深海蓝
- 空值
在下面的示例中,我们将实现“经典”皮肤。实现上述任何皮肤都非常容易。在继续之前,请使用下面给出的代码行在“web.xml”文件中添加皮肤。我们可以从上面的列表中添加任何我们选择的皮肤。我们只需要使用适当的皮肤名称修改`
<context-param>
   <param-name>org.richfaces.skin</param-name>
   <param-value>classic</param-value>
</context-param>
添加此内容后,请创建一个“SkinExample.xhtml”文件并将以下代码行添加到其中。
<?xml version = '1.0' encoding = 'UTF-8' ?>
<ui:composition xmlns = "http://www.w3.org/1999/xhtml"
   xmlns:h = "http://java.sun.com/jsf/html"
   xmlns:f = "http://java.sun.com/jsf/core"
   xmlns:ui = "http://java.sun.com/jsf/facelets"
   xmlns:a4j = "http://richfaces.org/a4j"
   xmlns:rich = "http://richfaces.org/rich">

   <f:view>
      <h:head>
         <title>Rich Faces Built in Skin</title>
      </h:head>

      <h:body>
         <h:form>
            <rich:panel style = "width:60%">
               <rich:tabPanel switchType = "AJAX">
                  <rich:tab header = "Name">
                     Tutorials Point
                  </rich:tab>

                  <rich:tab header = "Features">
                     Best Place to learn
                  </rich:tab>
               </rich:tabPanel>
            </rich:panel>
         </h:form>
      </h:body>

   </f:view>
</ui:composition>
运行此页面后,浏览器中将显示以下输出,其中每个选项卡都会动态地传播以生成不同的输出。点击下一个选项卡后,它将显示不同的输出。

在上面的示例中,`
创建/修改皮肤
皮肤只不过是 CSS 设计的扩展版本,它将在运行时应用于网页。在上一节中,我们学习了皮肤的一些基本的内置功能。在本节中,我们将创建自己的皮肤或修改现有皮肤。RichFaces 中的皮肤可以在以下三个级别进行自定义。
皮肤属性文件 - 所有皮肤都是通过“rechfaces-a4j-4.5.17.Final”jar 文件下提到的不同属性文件生成的。我们所需要做的就是创建一个相同的属性文件,将其保存在我们的源文件夹下并编辑其属性。我们需要相应地更改我们的“web.xml”以反映我们网站上的新皮肤属性。
组件样式表 - 实现新的 CSS 文件并将其用于应用程序。
覆盖样式类 - 可以通过直接在 xhtml 文件中提及样式属性来覆盖样式。
让我们来看一个例子。我们将自定义我们之前的“经典”皮肤。在“source”包内创建一个属性文件,并将其命名为“custom.skin.properties”。以下是此属性文件的条目,这些条目是从上面提到的 jar 文件中其他属性文件复制的。
#Colors
headerBackgroundColor = #black
headerGradientColor = #DF5858
headerTextColor = #FFFFFF
headerWeightFont = bold

generalBackgroundColor = #f1f1f1
generalTextColor = #000000
generalSizeFont = 10px
generalFamilyFont = Arial, Verdana, sans-serif

controlTextColor = #000000
controlBackgroundColor = #ffffff
additionalBackgroundColor = #F9E4E4

shadowBackgroundColor = #000000
shadowOpacity = 1
panelBorderColor = #C0C0C0
subBorderColor = #ffffff

tabBackgroundColor = #EDAEAE
tabDisabledTextColor = #C47979
trimColor = #F7C4C4
tipBackgroundColor = #FAE6B0
tipBorderColor = #E5973E

selectControlColor = #FF9409
generalLinkColor = #CF0000
hoverLinkColor = #FF0000
visitedLinkColor = #CF0000

# Fonts
headerSizeFont = 11px
headerFamilyFont = Arial, Verdana, sans-serif
tabSizeFont = 11
tabFamilyFont = Arial, Verdana, sans-serif
buttonSizeFont = 11
CHAPTER 11 ■ SKINS 223
buttonFamilyFont = Arial, Verdana, sans-serif

tableBackgroundColor = #FFFFFF
tableFooterBackgroundColor = #cccccc
tableSubfooterBackgroundColor = #f1f1f1
tableBorderColor = #C0C0C0
tableBorderWidth = 1px

#Calendar colors
calendarWeekBackgroundColor = #f5f5f5
calendarHolidaysBackgroundColor = #FFF1F1
calendarHolidaysTextColor = #980808
calendarCurrentBackgroundColor = #808080
calendarCurrentTextColor = #ffffff
calendarSpecBackgroundColor = #f1f1f1
calendarSpecTextColor = #000000

warningColor = #FFE6E6
warningBackgroundColor = #FF0000
editorBackgroundColor = #F1F1F1
editBackgroundColor = #FEFFDA

#Gradients
Gradient Type = plain
根据技能水平,我们可以更改此属性文件中的任何属性。我们可以添加新的样式类或编辑现有的样式类。完成新属性文件的创建后,是时候将其添加到“web.xml”文件中了。以下是“web.xml”的条目,它应该指向我们的皮肤。
<context-param>
   <param-name>org.richfaces.skin</param-name>
   <param-value>custom</param-value>
</context-param>
注意 - 确保新的属性文件位于源目录中,否则它将抛出一个“NoClassFoundException”运行时错误。
继续运行之前名为“SkinExample.xhtml”的文件。浏览器中将显示以下输出,我们将能够看到整个网站的外观和感觉已更改为“Ruby”,因为从 ruby.properties 文件复制了一个新的属性文件。

运行时更改皮肤
在这个例子中,我们将运行时更改皮肤。创建一个如下所示的皮肤类。
import javax.faces.bean.ManagedBean;
import javax.faces.bean.RequestScoped;

@ManagedBean
@RequestScoped

public class skinBean {
   private String skin;
   public skinBean() {
      this.skin="plane";
   }
   public String getSkin() {
      return skin;
   }
   public void setSkin(String skin) {
      this.skin = skin;
   }
}
然后更改“web.xml”文件,如下所示,以便在运行时填充皮肤名称。
<context-param>
   <param-name>org.richfaces.skin</param-name>
   <param-value>#{skinBean.skin}</param-value>
</context-param>
完成此操作后,我们需要更改 JSF 应用程序的配置文件。这些文件可以位于 web-INF 文件夹下。向其中添加以下 bean 属性。
<managed-bean>
   <managed-bean-name>skinBean</managed-bean-name>
   <managed-bean-class>SkinBean</managed-bean-class>>
   <managed-bean-scope>session</managed-bean-scope>

   <managed-property>
      <property-name>skin</property-name>
      <value>plain</value>
   </managed-property>
</managed-bean>
以下是 xhtml 文件代码。
<?xml version = "1.0" encoding = "UTF-8"?>
<!DOCTYPE html>
<html xmlns = "http://www.w3.org/1999/xhtml"
   xmlns:h = "http://java.sun.com/jsf/html"
   xmlns:a4j = "http://richfaces.org/a4j"
   xmlns:f = "http://java.sun.com/jsf/core"
   xmlns:rich = "http://richfaces.org/rich">

   <h:head>
      <title>TODO supply a title</title>
   </h:head>

   <h:body>
      <h:form>
         <div style = "display: block; float: left">
            <h:selectOneRadio value = "#{skinBean.skin}" border = "0"
               layout = "pageDirection" title = "Changing skin" style = "font-size: 8;
               font-family: comic" onchange = "submit()">
               <f:selectItem itemLabel = "plain" itemValue = "plain" />
               <f:selectItem itemLabel = "emeraldTown" itemValue = "emeraldTown" />
               <f:selectItem itemLabel = "blueSky" itemValue = "blueSky" />
               <f:selectItem itemLabel = "wine" itemValue = "wine" />
               <f:selectItem itemLabel = "japanCherry" itemValue = "japanCherry" />
               <f:selectItem itemLabel = "ruby" itemValue = "ruby" />
               <f:selectItem itemLabel = "deepMarine" itemValue = "deepMarine" />
            </h:selectOneRadio>
         </div>

         <div style = "display: block; float: left">
            <rich:panel >
               <rich:panelMenu style = "font-family: monospace; font-size: 12;">
                  Changing skin in runtime
               </rich:panelMenu>

               <rich:panelMenu  style = "font-family: monospace; font-size: 12;">
                  This is a result of the modification "blueSky" skin
               </rich:panelMenu>
            </rich:panel>
         </div>
      </h:form>
   </h:body>

</html>
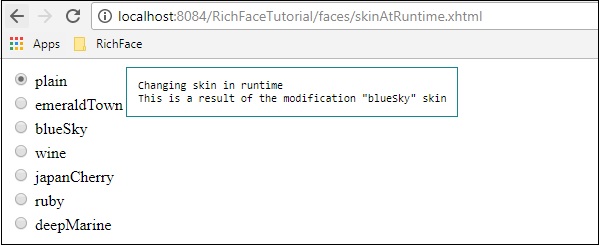
以上代码段将在浏览器中产生以下输出。

在上面的例子中,我们最初选择“朴素”,因此它指向“朴素”。一旦您通过单选按钮传播,它将相应地更改颜色。