使用 MATLAB App Designer 创建应用程序
MATLAB 是一种强大且高级的编程语言,广泛应用于工程和科学领域,用于系统设计。MATLAB 最重要的特点是它提供了一个易于使用的图形用户界面 (GUI)。MATLAB 具有内置的 App Designer 工具,允许用户开发各种应用程序,将他们的概念无缝地转换为用户友好的 GUI。总的来说,MATLAB 是一款非常有价值的工具,可以以简化和易于访问的方式传达复杂的信息。
在本教程中,我们将探讨**如何使用 MATLAB 中的 App Designer 创建 GUI 应用程序**。
如何使用 MATLAB App Designer 创建应用程序?
下面解释了使用 MATLAB 中的 App Designer 创建应用程序的分步过程
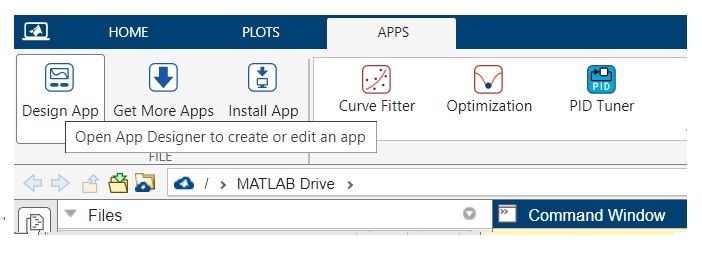
**步骤 (1)** – 打开 MATLAB 并启动 App Designer。有两种方法可以做到这一点
在 MATLAB 命令窗口中输入“appdesigner”命令并按 Enter 键。
单击“应用程序”选项卡并选择“App Designer”选项。
**步骤 (2)** – 创建一个空白应用程序。
**步骤 (3)** – 使用按钮、文本字段、绘图等组件设计用户界面。
**步骤 (4)** – 使用右侧显示的属性编辑器工具自定义每个组件的属性。
**步骤 (5)** – 通过编写 MATLAB 代码为应用程序的组件添加功能。
**步骤 (6)** – 单击 App Designer 功能区中的“运行”按钮运行应用程序,并检查其工作方式。
**步骤 (7)** – 如果应用程序的 UI 或功能存在任何错误,请使用 MATLAB 提供的调试工具调试应用程序。
**步骤 (8)** – 单击 App Designer 窗口中的“保存”按钮保存应用程序。在 MATLAB 中,我们可以将应用程序保存为“.mlapp”文件或作为独立应用程序,该应用程序无需 MATLAB 即可运行。
这就是在 MATLAB 中设计 GUI 应用程序所涉及的步骤。
现在,为了更多地了解 MATLAB App Designer 中的应用程序设计,让我们设计一个简单的计算器应用程序,该应用程序可以计算电路中的电阻、电功率和电能。
示例:使用 MATLAB App Designer 创建应用程序
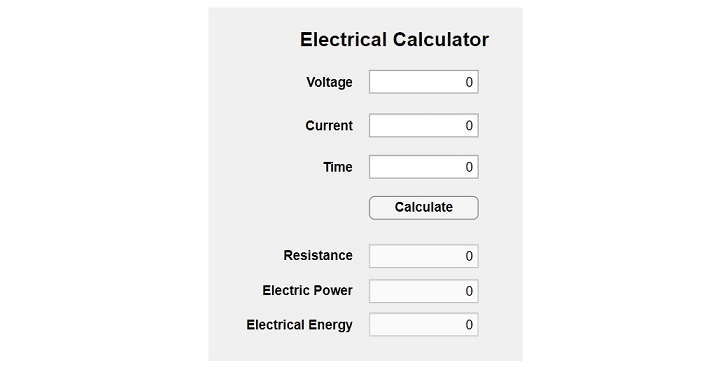
设计一个计算器应用程序以计算电阻、电功率和电能,需要六个数字编辑字段,其中三个可编辑,用于接受电压 (V)、电流 (I) 和时间 (t),而三个不可编辑,用于保存电阻 (R)、电功率 (P) 和电能 (E) 的值。
它还将有一个按钮来计算并显示结果。我们还可以为应用程序添加一个标签以获得更好的外观。
因此,让我们开始开发应用程序。
**步骤 (1)** – 打开 MATLAB App Designer 并创建一个黑色应用程序。

**步骤 (2)** – 从左侧显示的组件库中拖放六个数字字段、六个文本编辑字段、一个标签和一个按钮到应用程序画布上。根据您希望应用程序中显示的方式排列这些组件。

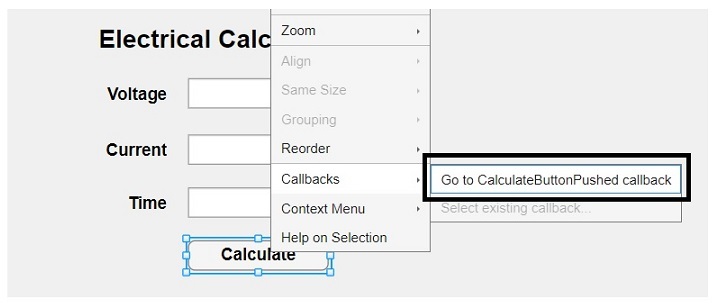
**步骤 (3)** – 编写 MATLAB 代码以在单击“计算”按钮时执行电阻、电功率、电能的计算。

单击突出显示的选项后,您将获得一个空间来粘贴以下代码。
% Button pushed function: CalculateButton
function CalculateButtonPushed(app, event)
    % Get values from the editable fields
    V = app.VoltageEditField.Value;
    I = app.CurrentEditField.Value;
    t = app.TimeEditField.Value;

    % Calculate resistance, power, and energy
    R = V / I;
    P = V * I;
    E = P * t;

    % Update non-editable fields with calculated values
    app.ResistanceEditField.Value = R;
    app.ElectricPowerEditField.Value = P;
    app.ElectricalEnergyEditField.Value = E;
end
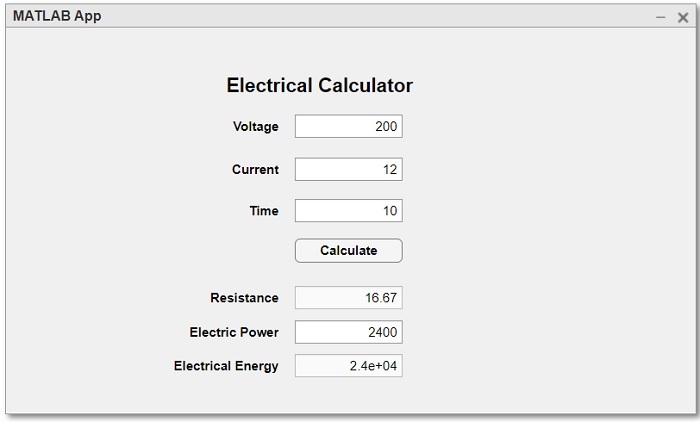
**步骤 (4)** – 运行并测试应用程序的功能。

MATLAB 应用程序代码
以下是上述应用程序的完整 MATLAB 代码。
classdef app1 < matlab.apps.AppBase

    % Properties that correspond to app components
    properties (Access = public)
        UIFigure                        matlab.ui.Figure
        ElectricalCalculatorLabel       matlab.ui.control.Label
        CalculateButton                 matlab.ui.control.Button
        ElectricPowerEditField          matlab.ui.control.NumericEditField
        ElectricPowerEditFieldLabel     matlab.ui.control.Label
        ElectricalEnergyEditField       matlab.ui.control.NumericEditField
        ElectricalEnergyEditFieldLabel  matlab.ui.control.Label
        CurrentEditField                matlab.ui.control.NumericEditField
        CurrentEditFieldLabel           matlab.ui.control.Label
        TimeEditField                   matlab.ui.control.NumericEditField
        TimeEditFieldLabel              matlab.ui.control.Label
        ResistanceEditField             matlab.ui.control.NumericEditField
        ResistanceEditFieldLabel        matlab.ui.control.Label
        VoltageEditField                matlab.ui.control.NumericEditField
        VoltageEditFieldLabel           matlab.ui.control.Label
    end

    % Callbacks that handle component events
    methods (Access = private)

        % Button pushed function: CalculateButton
        function CalculateButtonPushed(app, event)
            % Get values from the editable fields
            V = app.VoltageEditField.Value;
            I = app.CurrentEditField.Value;
            t = app.TimeEditField.Value;

            % Calculate resistance, power, and energy
            R = V / I;
            P = V * I;
            E = P * t;

            % Update non-editable fields with calculated values
            app.ResistanceEditField.Value = R;
            app.ElectricPowerEditField.Value = P;
            app.ElectricalEnergyEditField.Value = E;
        end
    end

    % Component initialization
    methods (Access = private)

        % Create UIFigure and components
        function createComponents(app)

            % Create UIFigure and hide until all components are created
            app.UIFigure = uifigure('Visible', 'off');
            app.UIFigure.Position = [100 100 640 480];
            app.UIFigure.Name = 'MATLAB App';

            % Create VoltageEditFieldLabel
            app.VoltageEditFieldLabel = uilabel(app.UIFigure);
            app.VoltageEditFieldLabel.HorizontalAlignment = 'right';
            app.VoltageEditFieldLabel.FontWeight = 'bold';
            app.VoltageEditFieldLabel.Position = [207 378 47 22];
            app.VoltageEditFieldLabel.Text = 'Voltage';

            % Create VoltageEditField
            app.VoltageEditField = uieditfield(app.UIFigure, 'numeric');
            app.VoltageEditField.Position = [269 378 100 22];

            % Create ResistanceEditFieldLabel
            app.ResistanceEditFieldLabel = uilabel(app.UIFigure);
            app.ResistanceEditFieldLabel.HorizontalAlignment = 'right';
            app.ResistanceEditFieldLabel.FontWeight = 'bold';
            app.ResistanceEditFieldLabel.Position = [186 219 68 22];
            app.ResistanceEditFieldLabel.Text = 'Resistance';

            % Create ResistanceEditField
            app.ResistanceEditField = uieditfield(app.UIFigure, 'numeric');
            app.ResistanceEditField.Editable = 'off';
            app.ResistanceEditField.Position = [269 219 100 22];

            % Create TimeEditFieldLabel
            app.TimeEditFieldLabel = uilabel(app.UIFigure);
            app.TimeEditFieldLabel.HorizontalAlignment = 'right';
            app.TimeEditFieldLabel.FontWeight = 'bold';
            app.TimeEditFieldLabel.Position = [221 300 33 22];
            app.TimeEditFieldLabel.Text = 'Time';

            % Create TimeEditField
            app.TimeEditField = uieditfield(app.UIFigure, 'numeric');
            app.TimeEditField.Position = [269 300 100 22];

            % Create CurrentEditFieldLabel
            app.CurrentEditFieldLabel = uilabel(app.UIFigure);
            app.CurrentEditFieldLabel.HorizontalAlignment = 'right';
            app.CurrentEditFieldLabel.FontWeight = 'bold';
            app.CurrentEditFieldLabel.Position = [206 338 48 22];
            app.CurrentEditFieldLabel.Text = 'Current';

            % Create CurrentEditField
            app.CurrentEditField = uieditfield(app.UIFigure, 'numeric');
            app.CurrentEditField.Position = [269 338 100 22];

            % Create ElectricalEnergyEditFieldLabel
            app.ElectricalEnergyEditFieldLabel = uilabel(app.UIFigure);
            app.ElectricalEnergyEditFieldLabel.HorizontalAlignment = 'right';
            app.ElectricalEnergyEditFieldLabel.FontWeight = 'bold';
            app.ElectricalEnergyEditFieldLabel.Position = [152 156 102 22];
            app.ElectricalEnergyEditFieldLabel.Text = 'Electrical Energy';

            % Create ElectricalEnergyEditField
            app.ElectricalEnergyEditField = uieditfield(app.UIFigure, 'numeric');
            app.ElectricalEnergyEditField.Editable = 'off';
            app.ElectricalEnergyEditField.Position = [269 156 100 22];

            % Create ElectricPowerEditFieldLabel
            app.ElectricPowerEditFieldLabel = uilabel(app.UIFigure);
            app.ElectricPowerEditFieldLabel.HorizontalAlignment = 'right';
            app.ElectricPowerEditFieldLabel.FontWeight = 'bold';
            app.ElectricPowerEditFieldLabel.Position = [166 187 88 22];
            app.ElectricPowerEditFieldLabel.Text = 'Electric Power';

            % Create ElectricPowerEditField
            app.ElectricPowerEditField = uieditfield(app.UIFigure, 'numeric');
            app.ElectricPowerEditField.Position = [269 187 100 22];

            % Create CalculateButton
            app.CalculateButton = uibutton(app.UIFigure, 'push');
            app.CalculateButton.ButtonPushedFcn = createCallbackFcn(app, @CalculateButtonPushed, true);
            app.CalculateButton.FontWeight = 'bold';
            app.CalculateButton.Position = [269 263 100 22];
            app.CalculateButton.Text = 'Calculate';

            % Create ElectricalCalculatorLabel
            app.ElectricalCalculatorLabel = uilabel(app.UIFigure);
            app.ElectricalCalculatorLabel.HorizontalAlignment = 'center';
            app.ElectricalCalculatorLabel.FontSize = 18;
            app.ElectricalCalculatorLabel.FontWeight = 'bold';
            app.ElectricalCalculatorLabel.Position = [199 416 186 23];
            app.ElectricalCalculatorLabel.Text = 'Electrical Calculator';

            % Show the figure after all components are created
            app.UIFigure.Visible = 'on';
        end
    end

    % App creation and deletion
    methods (Access = public)

        % Construct app
        function app = app1

            % Create UIFigure and components
            createComponents(app)

            % Register the app with App Designer
            registerApp(app, app.UIFigure)

            if nargout == 0
                clear app
            end
        end

        % Code that executes before app deletion
        function delete(app)

            % Delete UIFigure when app is deleted
            delete(app.UIFigure)
        end
    end
end
结论
在本教程中,我们通过一个示例解释了在 MATLAB 中创建应用程序的分步过程。您可以按照相同的步骤使用 MATLAB App Designer 创建任何类型的 GUI 应用程序。


 数据结构
数据结构 网络
网络 RDBMS
RDBMS 操作系统
操作系统 Java
Java iOS
iOS HTML
HTML CSS
CSS Android
 Python
 C 编程
C 编程 C++
C++ C#
C# MongoDB
 MySQL
MySQL Javascript
 PHP
PHP