Android 中的嵌套碎片
简介
在构建 Android 应用程序时,我们经常会遇到需要在一个碎片中显示另一个碎片的情况。例如,我们在应用程序中使用选项卡布局和碎片,并且希望在按钮点击时打开另一个碎片,则必须在当前碎片中调用另一个碎片。本文将介绍如何在 Android 中在一个碎片中调用另一个碎片。
实现
我们将创建一个简单的应用程序,在这个应用程序中,我们将在父活动中显示一个 TextView。在这个父活动中,我们将调用我们的父碎片并在其中显示一条文本消息。然后,我们将在父碎片中调用我们的子碎片,并在该碎片中也显示一条文本消息。
步骤 1:在 Android Studio 中创建新项目
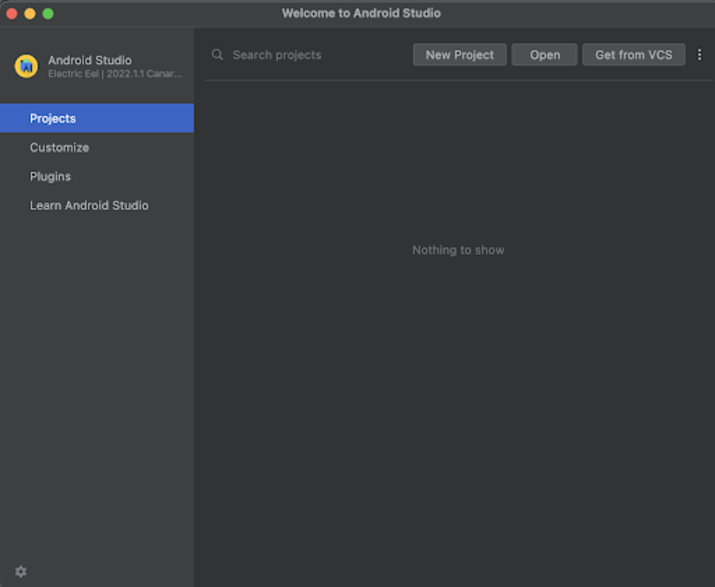
导航到 Android Studio,如下面的屏幕所示。在下面的屏幕中,单击“新建项目”以创建一个新的 Android Studio 项目。

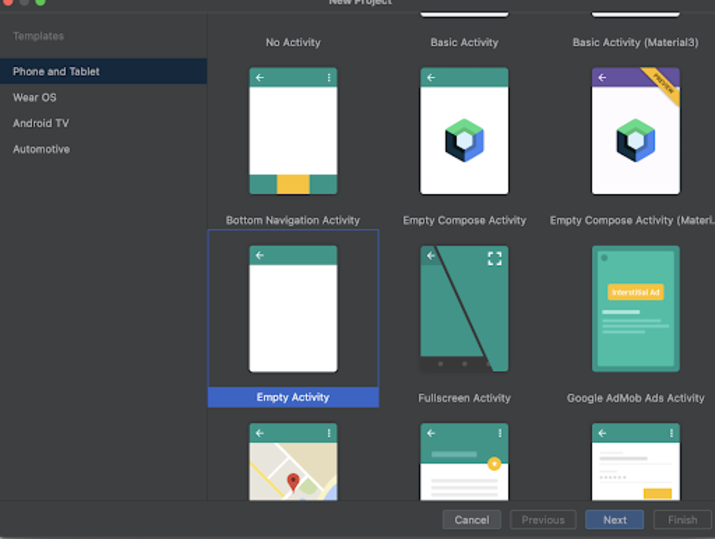
单击“新建项目”后,您将看到下面的屏幕。

在此屏幕中,我们只需选择“空活动”并单击“下一步”。单击“下一步”后,您将看到下面的屏幕。

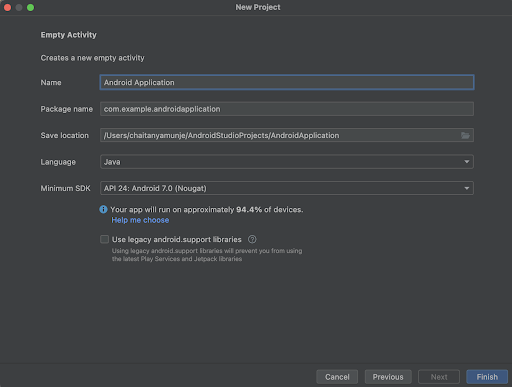
在此屏幕中,我们只需指定项目名称。然后包名称将自动生成。
注意 - 确保选择 Java 作为语言。
指定完所有详细信息后,单击“完成”以创建一个新的 Android Studio 项目。
项目创建完成后,我们将看到两个打开的文件,即 activity_main.xml 和 MainActivity.java 文件。
步骤 3:使用 activity_main.xml
导航到 activity_main.xml。如果此文件不可见,要打开此文件,请在左侧窗格中导航到 app>res>layout>activity_main.xml 以打开此文件。打开此文件后,向其中添加以下代码。代码中添加了注释以便详细了解。
<?xml version="1.0" encoding="utf-8"?>
<RelativeLayout xmlns:android="http://schemas.android.com/apk/res/android"
   xmlns:app="http://schemas.android.com/apk/res-auto"
   xmlns:tools="http://schemas.android.com/tools"
   android:id="@+id/idCLayout"
   android:layout_width="match_parent"
   android:layout_height="match_parent"
   android:orientation="vertical"
   tools:context=".MainActivity">

   <!-- creating a text view for displaying the text for parent activity-->
   <TextView
      android:id="@+id/idTVHeading"
      android:layout_width="match_parent"
      android:layout_height="wrap_content"
      android:padding="4dp"
      android:text="Parent Activity"
      android:textAlignment="center"
      android:textColor="@color/black"
      android:textSize="20sp"
      android:textStyle="bold" />

   <!-- creating a frame layout for displaying a parent fragment -->
   <FrameLayout
      android:id="@+id/parentContainer"
      android:layout_width="match_parent"
      android:layout_height="match_parent"
      android:layout_below="@id/idTVHeading" />

</RelativeLayout>
说明 - 在上面的代码中,我们创建了一个 RelativeLayout 作为根布局,并在其中创建了一个 TextView 用于显示当前活动的标题“父活动”,然后我们创建了一个 FrameLayout,我们将在其中显示我们的父碎片(其中包含一个 TextView)和我们的子碎片。
步骤 4:创建两个新的碎片
现在我们将创建两个碎片,一个是我们的父碎片,另一个是我们的子碎片。要创建一个新的碎片,请导航到 app>java>您的应用程序包名称>右键单击它>新建>碎片并选择“空碎片”,并将其命名为 ParentFragment。类似地,创建另一个名为 ChildFragment 的碎片。这两个碎片的 xml 和 java 文件将被创建。
步骤 5:使用 fragment_parent.xml 文件
导航到 fragment_one.xml。如果此文件不可见,要打开此文件,请在左侧窗格中导航到 app>res>layout>fragment_parent.xml 以打开此文件。打开此文件后,向其中添加以下代码。代码中添加了注释以便详细了解。
<?xml version="1.0" encoding="utf-8"?>
<RelativeLayout xmlns:android="http://schemas.android.com/apk/res/android"
   xmlns:tools="http://schemas.android.com/tools"
   android:layout_width="match_parent"
   android:layout_height="match_parent"
   tools:context=".ParentFragment">

   <!-- creating a text view for displaying the text for parent activity-->
   <TextView
      android:id="@+id/idTVHeading"
      android:layout_width="match_parent"
      android:layout_height="wrap_content"
      android:padding="5dp"
      android:text="Parent fragment"
      android:textAlignment="center"
      android:textColor="@color/black"
      android:textSize="20sp"
      android:textStyle="bold" />
   <!-- creating a frame layout for displaying a child fragment -->
   <FrameLayout
      android:id="@+id/childFragmentContainer"
      android:layout_width="match_parent"
      android:layout_height="match_parent"
      android:layout_below="@id/idTVHeading">
   </FrameLayout>
</RelativeLayout>
说明 - 在上面的代码中,我们创建了一个 RelativeLayout 作为根布局。在此 RelativeLayout 中,我们创建了一个 TextView 用于显示当前碎片的标题“父碎片”,然后我们为子碎片创建了一个 FrameLayout 用于显示我们的子碎片。
步骤 6:使用 fragment_child.xml 文件
导航到 fragment_one.xml。如果此文件不可见,要打开此文件,请在左侧窗格中导航到 app>res>layout>fragment_child.xml 以打开此文件。打开此文件后,向其中添加以下代码。代码中添加了注释以便详细了解。
<?xml version="1.0" encoding="utf-8"?>
<RelativeLayout xmlns:android="http://schemas.android.com/apk/res/android"
   xmlns:tools="http://schemas.android.com/tools"
   android:layout_width="match_parent"
   android:layout_height="match_parent"
   tools:context=".ChildFragment">

   <!-- creating a text view for displaying a text-->
   <TextView
      android:id="@+id/idTVHeading"
      android:layout_width="match_parent"
      android:layout_height="wrap_content"
      android:layout_centerInParent="true"
      android:padding="5dp"
      android:text="Child fragment"
      android:textAlignment="center"
      android:textColor="@color/black"
      android:textSize="20sp"
      android:textStyle="bold" />

</RelativeLayout>
说明:在上面的代码中,我们创建了一个 RelativeLayout 作为根布局。在此 RelativeLayout 中,我们创建了一个 TextView 用于显示当前碎片的标题“子碎片”。
步骤 7 - 使用 ParentFragment.java 文件
导航到 ParentFragment.java。如果此文件不可见,要打开此文件,请在左侧窗格中导航到 app>java>您的应用程序包名称>ParentFragment.java 以打开此文件。打开此文件后,向其中添加以下代码。代码中添加了注释以便详细了解。
package com.example.androidjavaapp;

import android.os.Bundle;
import androidx.fragment.app.Fragment;
import androidx.fragment.app.FragmentTransaction;
import android.view.LayoutInflater;
import android.view.View;
import android.view.ViewGroup;

public class ParentFragment extends Fragment {
   @Override
   public View onCreateView(LayoutInflater inflater, ViewGroup container,
   Bundle savedInstanceState) {
      // Inflate the layout for this fragment
      View view = inflater.inflate(R.layout.fragment_parent, container, false);

      // on below line creating a child fragment
      Fragment childFragment = new ChildFragment();

      // on below line creating a fragment transaction and initializing it.
      FragmentTransaction transaction = getChildFragmentManager().beginTransaction();

      // on below line replacing the fragment in child container with child fragment.
      transaction.replace(R.id.childFragmentContainer, childFragment).commit();
      return view;
   }
}
说明 - 在上面的代码中,我们可以看到 onCreateView 方法,在该方法中,我们正在为 fragment_parent.xml 文件膨胀布局。在此 onCreateView 方法中,我们首先为子碎片创建变量,然后调用并初始化碎片事务。使用此碎片事务变量,我们正在容器中替换碎片。
步骤 8:使用 MainActivity.java 文件。
导航到 MainActivity.java。如果此文件不可见,要打开此文件,请在左侧窗格中导航到 app>java>您的应用程序包名称>MainActivity.java 以打开此文件。打开此文件后,向其中添加以下代码。代码中添加了注释以便详细了解。
package com.example.androidjavaapp;

import android.os.Bundle;
import androidx.appcompat.app.AppCompatActivity;
import androidx.fragment.app.FragmentTransaction;

public class MainActivity extends AppCompatActivity {
   @Override
   protected void onCreate(Bundle savedInstanceState) {
      super.onCreate(savedInstanceState);
      setContentView(R.layout.activity_main);

      // creating and initializing variable for fragment transaction.
      FragmentTransaction ft = getSupportFragmentManager().beginTransaction();

      // replacing the parent container with parent fragment.
      ft.replace(R.id.parentContainer, new ParentFragment());

      // committing the transaction.
      ft.commit();

   }
}
说明 - 在上面的代码中,我们可以看到 onCreate 方法,在该方法中,我们正在为 activity_main.xml 膨胀布局。在此 onCreate 方法中,我们使用 FragmentTransaction 加载 ParentFragment。然后,我们用 ParentFragment 替换父容器中的碎片。
添加上述代码后,我们只需单击顶部的绿色图标即可在移动设备上运行我们的应用程序。
注意 - 确保您已连接到您的真实设备或模拟器。
输出

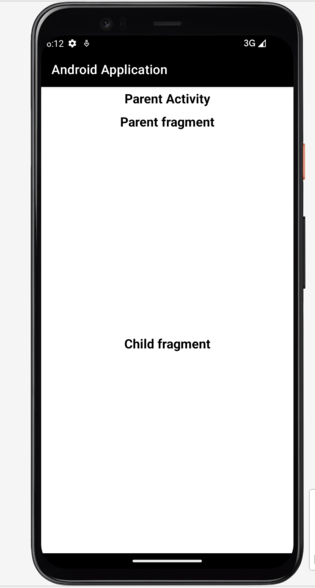
在上面的输出屏幕截图中,我们可以看到三个 TextView,第一个是我们的父活动,我们在其中加载了我们的父碎片。因此,我们可以看到父碎片的文本,然后我们可以看到另一个 TextView 作为子碎片,我们在其中加载了我们的子碎片。
结论
在本教程中,我们了解了如何在 Android 应用程序中获取当前显示的碎片实例。


 数据结构
数据结构 网络
网络 关系型数据库管理系统
 操作系统
操作系统 Java
Java iOS
iOS HTML
HTML CSS
CSS Android
 Python
 C 编程
C 编程 C++
C++ C#
C# MongoDB
 MySQL
MySQL Javascript
 PHP
PHP