
 数据结构
数据结构 网络
网络 RDBMS
RDBMS 操作系统
操作系统 Java
Java iOS
iOS HTML
HTML CSS
CSS Android
 Python
 C编程
C编程 C++
C++ C#
C# MongoDB
 MySQL
MySQL Javascript
 PHP
PHP如何在Android活动间传递数据?
本例演示了如何在Android活动间传递数据。
步骤1 − 在Android Studio中创建一个新项目,轉到文件 ⇒ 新项目并填写所有必需的详细信息以创建新项目。
步骤2 − 向res/layout/activity_main.xml添加以下代码。
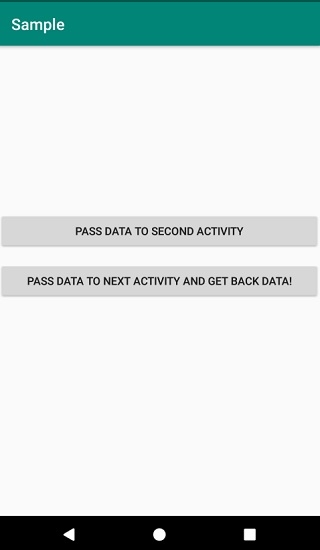
<?xml version="1.0" encoding="utf-8"?>
<RelativeLayout
   xmlns:android="http://schemas.android.com/apk/res/android"
   xmlns:tools="http://schemas.android.com/tools"
   android:layout_width="match_parent"
   android:layout_height="match_parent"
   tools:context=".MainActivity">
   <Button
      android:id="@+id/btnPassData"
      android:layout_width="match_parent"
      android:layout_height="wrap_content"
      android:layout_above="@id/btnReturnData"
      android:layout_marginBottom="16dp"
      android:text="Pass Data To Second Activity" />
   <Button
      android:id="@+id/btnReturnData"
      android:layout_width="match_parent"
      android:layout_height="wrap_content"
      android:layout_centerInParent="true"
      android:text="Pass Data To Next Activity And Get back data!"/>
   <TextView
      android:id="@+id/resultDataTextView"
      android:layout_width="match_parent"
      android:layout_height="wrap_content"
      android:layout_below="@id/btnReturnData"
      android:layout_marginTop="16dp"
      android:textSize="20sp"/>
</RelativeLayout>
步骤3 − 向src/MainActivity.java添加以下代码
import android.content.Intent;
import android.support.v7.app.AppCompatActivity;
import android.os.Bundle;
import android.view.View;
import android.widget.Button;
import android.widget.TextView;
public class MainActivity extends AppCompatActivity {
private final static int REQUEST_CODE_1 = 1;
@Override
protected void onCreate(Bundle savedInstanceState) {
super.onCreate(savedInstanceState);
setContentView(R.layout.activity_main);
Button button = findViewById(R.id.btnPassData);
button.setOnClickListener(new View.OnClickListener() {
@Override
public void onClick(View v) {
Intent intent = new Intent(MainActivity.this, SecondActivity.class);
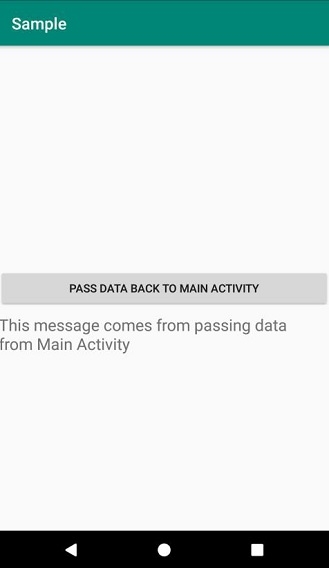
intent.putExtra("message", "This message comes from passing data from Main " + "Activity");
startActivity(intent);
}
});
Button passDataReturnResultSourceButton = findViewById(R.id.btnReturnData);
passDataReturnResultSourceButton.setOnClickListener(new View.OnClickListener() {
@Override
public void onClick(View view) {
Intent intent = new Intent(MainActivity.this, SecondActivity.class);
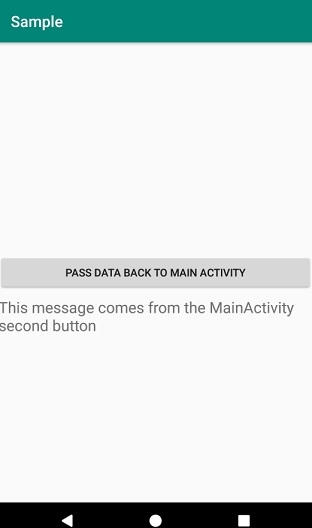
intent.putExtra("message", "This message comes from the MainActivity second button");
startActivityForResult(intent, REQUEST_CODE_1);
}
});
}
@Override
protected void onActivityResult(int requestCode, int resultCode, Intent dataIntent) {
super.onActivityResult(requestCode, resultCode, dataIntent);
switch (requestCode) {
case REQUEST_CODE_1: TextView textView = findViewById(R.id.resultDataTextView);
if (resultCode == RESULT_OK) {
String messageReturn = dataIntent.getStringExtra("message_return");
textView.setText(messageReturn);
}
}
}
}步骤4 − 向res/layout/activity_second.xml添加以下代码。
<?xml version="1.0" encoding="utf-8"?>
<RelativeLayout
   xmlns:android="http://schemas.android.com/apk/res/android"
   xmlns:tools="http://schemas.android.com/tools"
   android:layout_width="match_parent"
   android:layout_height="match_parent"
   tools:context=".SecondActivity">
   <Button
      android:id="@+id/btnReturnData"
      android:layout_width="match_parent"
      android:layout_height="wrap_content"
      android:layout_centerInParent="true"
      android:text="Pass Data Back To Main Activity"/>
   <TextView
      android:layout_below="@id/btnReturnData"
      android:layout_marginTop="8dp"
      android:id="@+id/tvReturnData"
      android:layout_width="match_parent"
      android:layout_height="wrap_content"
      android:textSize="20dp"/>
</RelativeLayout>
步骤5 − 向src/SecondActivity.java添加以下代码
import android.content.Intent;
import android.support.v7.app.AppCompatActivity;
import android.os.Bundle;
import android.view.View;
import android.widget.Button;
import android.widget.TextView;
public class SecondActivity extends AppCompatActivity {
@Override
protected void onCreate(Bundle savedInstanceState) {
super.onCreate(savedInstanceState);
setContentView(R.layout.activity_second);
Intent intent = getIntent();
String message = intent.getStringExtra("message");
TextView textView = findViewById(R.id.tvReturnData);
textView.setText(message);
Button passDataTargetReturnDataButton = findViewById(R.id.btnReturnData);
passDataTargetReturnDataButton.setOnClickListener(new View.OnClickListener() {
@Override
public void onClick(View view) {
Intent intent = new Intent();
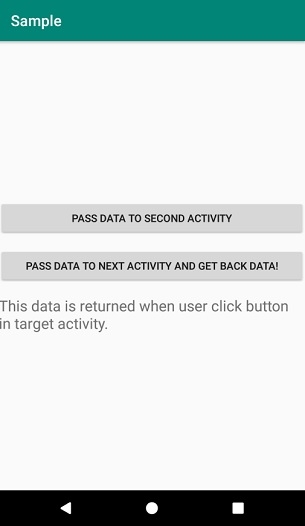
intent.putExtra("message_return", "This data is returned when user click button in target activity.");
setResult(RESULT_OK, intent);
finish();
}
});
}
@Override
public void onBackPressed() {
Intent intent = new Intent();
intent.putExtra("message_return", "This data is returned when user click back menu in target activity.");
setResult(RESULT_OK, intent);
finish();
}
}步骤6 − 向androidManifest.xml添加以下代码
<?xml version="1.0" encoding="utf-8"?>
<manifest xmlns:android="http://schemas.android.com/apk/res/android" package="app.com.sample">
   <application
      android:allowBackup="true"
      android:icon="@mipmap/ic_launcher"
      android:label="@string/app_name"
      android:roundIcon="@mipmap/ic_launcher_round"
      android:supportsRtl="true"
      android:theme="@style/AppTheme">
      <activity android:name=".SecondActivity"></activity>
      <activity android:name=".MainActivity">
         <intent-filter>
            <action android:name="android.intent.action.MAIN" />
            <category android:name="android.intent.category.LAUNCHER" />
         </intent-filter>
      </activity>
   </application>
</manifest>
我们来试着运行您的應用程式。我假設您已將真正的Android行動裝置與您的電腦連接起來。要從Android Studio執行應用程式,請開啟專案中的任一個活動檔案,然後按一下工具列中的執行![]() 圖示。選擇任一行動裝置,然後查看會顯示預設畫面的行動裝置 −
圖示。選擇任一行動裝置,然後查看會顯示預設畫面的行動裝置 −
按一下此处以下载该项目代码。

更新日期:2019-08-05
2K+ 浏览

广告