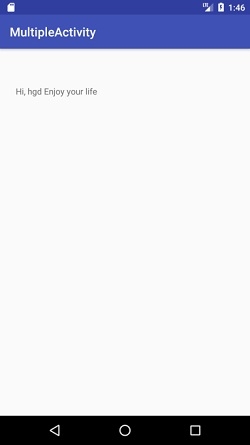
如何在Android应用程序中Activity之间传递数据?
本例演示如何在Android应用程序中Activity之间传递数据。
步骤 1 − 在Android Studio中创建一个新项目,转到文件 ⇒ 新建项目,并填写所有必需的详细信息以创建新项目。
步骤 2 − 将以下代码添加到res/layout/activity_main.xml。
<?xml version="1.0" encoding="utf-8"?>
<RelativeLayout
   xmlns:android="http://schemas.android.com/apk/res/android"
   xmlns:tools="http://schemas.android.com/tools"
   android:layout_width="match_parent"
   android:layout_height="match_parent"
   android:id="@+id/activity_first"
   android:paddingTop="60dp"
   tools:context=".FirstActivity">
   <LinearLayout
      android:layout_width="fill_parent"
      android:layout_height="wrap_content"
      android:orientation="vertical">
      <LinearLayout
         android:layout_width="fill_parent"
         android:layout_height="wrap_content"
         android:orientation="horizontal"
         android:paddingLeft="10sp">
         <TextView
            android:layout_width="0dp"
            android:layout_height="wrap_content"
            android:layout_weight="0.25"/>
         <EditText
            android:id="@+id/editTxtName"
            android:layout_width="0dp"
            android:layout_height="wrap_content"
            android:layout_weight="0.75"
            android:ems="10" />
      </LinearLayout>
      <LinearLayout
         android:layout_width="fill_parent"
         android:layout_height="wrap_content"
         android:orientation="horizontal"
         android:paddingLeft="10sp"
         android:paddingTop="16dp">
         <TextView
            android:layout_width="0dp"
            android:layout_height="wrap_content"
            android:layout_weight="0.25" />
         <Spinner
            android:id="@+id/ageGroupSpinner"
            android:layout_width="0dp"
            android:layout_height="wrap_content"
            android:layout_gravity="center_vertical"
            android:layout_weight="0.75"/>
      </LinearLayout>
      <LinearLayout
         android:layout_width="fill_parent"
         android:layout_height="wrap_content"
         android:orientation="horizontal"
         android:paddingTop="16dp">
         <View
            android:layout_width="0dp"
            android:layout_height="match_parent"
            android:layout_weight="0.50" />
         <Button
            android:id="@+id/btnSubmit"
            android:layout_width="wrap_content"
            android:layout_height="wrap_content"
            android:layout_weight="0.20"/>
      </LinearLayout>
   </LinearLayout>
</RelativeLayout>
步骤 3 − 将以下代码添加到res/layout/activity_second.xml
<?xml version="1.0" encoding="utf-8"?>
<RelativeLayout
   xmlns:android="http://schemas.android.com/apk/res/android"
   android:layout_width="match_parent"
   android:layout_height="match_parent"
   android:id="@+id/activity_second"
   android:paddingTop="60dp">
   <LinearLayout
      android:layout_width="fill_parent"
      android:layout_height="wrap_content"
      android:orientation="vertical">
      <LinearLayout
         android:layout_width="fill_parent"
         android:layout_height="wrap_content"
         android:orientation="horizontal"
         android:paddingLeft="10sp">
         <TextView
            android:id="@+id/displayMsg"
            android:layout_width="0dp"
            android:layout_height="wrap_content"
            android:layout_weight="0.25" />
      </LinearLayout>
   </LinearLayout>
</RelativeLayout>
步骤 4 − 将以下代码添加到src/MainActivity.java
package com.example.sample;
import android.support.v7.app.AppCompatActivity;
import android.os.Bundle;
import android.content.Intent;
import android.view.View;
import android.widget.AdapterView;
import android.widget.Button;
import android.widget.EditText;
import android.widget.Spinner;
import android.widget.Toast;
public class FirstActivity extends AppCompatActivity {
   Button btnSubmit = null;
   EditText editTxtName = null;
   private static final String STING_EMPTY = "";
   private static int ageGroup = 0;
   @Override
   protected void onCreate(Bundle savedInstanceState) {
      super.onCreate(savedInstanceState);
      setContentView(R.layout.activity_first);
      btnSubmit = (Button) findViewById(R.id.btnSubmit);
      btnSubmit.setOnClickListener(new View.OnClickListener() {
         @Override
         public void onClick(View view) {
            editTxtName = (EditText) findViewById(R.id.editTxtName);
            if (STING_EMPTY.equals(editTxtName.getText().toString())) {
               Toast.makeText(FirstActivity.this, "Name Cannot be empty!",
               Toast.LENGTH_LONG).show();
            } else {
               Spinner ageGroupSpinner = (Spinner)findViewById(R.id.ageGroupSpinner);
               ageGroupSpinner.setOnItemSelectedListener(
               new AdapterView.OnItemSelectedListener() {
                  @Override
                  public void onItemSelected(AdapterView<?> adapterView, View view,
                  int i, long l) {
                     //set the corresponding age group when the user changes
                     // the age group from dropdown
                     ageGroup = i;
                  }
                  @Override
                  public void onNothingSelected(AdapterView<?> adapterView) {
                  }
               });
               //Create a new intent for the SecondActivity
               Intent i = new Intent(FirstActivity.this,SecondActivity.class);
               //Populate the input values in a bundle and pass it to SecondActivity
               Bundle b = new Bundle();
               b.putString("name",editTxtName.getText().toString());
               b.putInt("ageGroup",ageGroup);
               //Set the userBundle to the intent
               i.putExtra("userBundle",b);
               startActivity(i);
            }
         }
      });
   }
}
步骤 5 − 将以下代码添加到src/SecondActivity.java
package com.example.sample;
import android.content.Intent;
import android.os.Bundle;
import android.support.annotation.Nullable;
import android.support.v7.app.AppCompatActivity;
import android.widget.TextView;
public class SecondActivity extends AppCompatActivity {
   @Override
   protected void onCreate(@Nullable Bundle savedInstanceState) {
      super.onCreate(savedInstanceState);
      setContentView(R.layout.activity_second);
      //get the passed intent
      Intent i = getIntent();
      //get the bundle stored inside the intent
      Bundle b = i.getBundleExtra("userBundle");
      TextView displayMsg = (TextView) findViewById(R.id.displayMsg);
      String message = "Hi, " + b.getString("name") + " ";
      int ageGroup = b.getInt("ageGroup");
      switch (ageGroup){
         case 0: message = message + "Enjoy your life";
         break;
         case 1: message = message + "Don't take life too seriously.. Have fun!";
         break;
         case 2: message = message + "Celebrate your life with old memories!";
         break;
      }
      displayMsg.setText(message);
   }
}
步骤 6 − 将以下代码添加到Manifests/AndroidManifest.xml
<?xml version="1.0" encoding="utf-8"?>
<manifest xmlns:android="http://schemas.android.com/apk/res/android"
   package="com.example.sample">
   <application
      android:allowBackup="true"
      android:icon="@mipmap/ic_launcher"
      android:label="@string/app_name"
      android:roundIcon="@mipmap/ic_launcher_round"
      android:supportsRtl="true"
      android:theme="@style/AppTheme">
      <activity android:name=".FirstActivity">
         <intent-filter>
            <action android:name="android.intent.action.MAIN" />
            <category android:name="android.intent.category.LAUNCHER" />
         </intent-filter>
      </activity>
      <activity android:name=".SecondActivity"></activity>
   </application>
</manifest>
让我们尝试运行您的应用程序。我假设您已将实际的Android移动设备连接到计算机。要从Android Studio运行应用程序,请打开项目的一个Activity文件,然后单击运行 ![]() 工具栏中的图标。选择您的移动设备作为选项,然后检查您的移动设备,它将显示您的默认屏幕 –
工具栏中的图标。选择您的移动设备作为选项,然后检查您的移动设备,它将显示您的默认屏幕 –


点击 这里 下载项目代码。

广告

 数据结构
数据结构 网络
网络 关系数据库管理系统(RDBMS)
 操作系统
操作系统 Java
Java iOS
iOS HTML
HTML CSS
CSS Android
 Python
 C语言编程
C语言编程 C++
C++ C#
C# MongoDB
 MySQL
MySQL Javascript
 PHP
PHP