- OpenCV Python 教程
- OpenCV Python - 首页
- OpenCV Python - 概述
- OpenCV Python - 环境配置
- OpenCV Python - 读取图像
- OpenCV Python - 写入图像
- OpenCV Python - 使用 Matplotlib
- OpenCV Python - 图像属性
- OpenCV Python - 按位运算
- OpenCV Python - 形状和文本
- OpenCV Python - 鼠标事件
- OpenCV Python - 添加轨迹条
- OpenCV Python - 调整大小和旋转
- OpenCV Python - 图像阈值化
- OpenCV Python - 图像滤波
- OpenCV Python - 边缘检测
- OpenCV Python - 直方图
- OpenCV Python - 颜色空间
- OpenCV Python - 图像变换
- OpenCV Python - 图像轮廓
- OpenCV Python - 模板匹配
- OpenCV Python - 图像金字塔
- OpenCV Python - 图像加法
- OpenCV Python - 图像融合
- OpenCV Python - 傅里叶变换
- OpenCV Python - 捕捉视频
- OpenCV Python - 播放视频
- OpenCV Python - 从视频中提取图像
- OpenCV Python - 从图像生成视频
- OpenCV Python - 人脸检测
- OpenCV Python - 均值漂移/CamShift
- OpenCV Python - 特征检测
- OpenCV Python - 特征匹配
- OpenCV Python - 数字识别
- OpenCV Python 资源
- OpenCV Python - 快速指南
- OpenCV Python - 资源
- OpenCV Python - 讨论
OpenCV Python - 图像阈值化
在数字图像处理中,阈值化是一个基于像素强度阈值创建二值图像的过程。阈值化过程将前景像素与背景像素分离。
OpenCV 提供了执行**简单、自适应**和**Otsu**阈值化的函数。
在简单阈值化中,所有值小于阈值的像素都设置为零,其余像素设置为最大像素值。这是最简单的阈值化形式。
cv2.threshold() 函数具有以下定义。
cv2.threshold((src, thresh, maxval, type, dst)
参数
图像阈值化的参数如下:
- Src: 输入数组。
- Dst: 输出数组,大小相同。
- Thresh: 阈值。
- Maxval: 最大值。
- Type: 阈值类型。
阈值类型
其他阈值类型列举如下:
| 序号 | 类型 & 函数 |
|---|---|
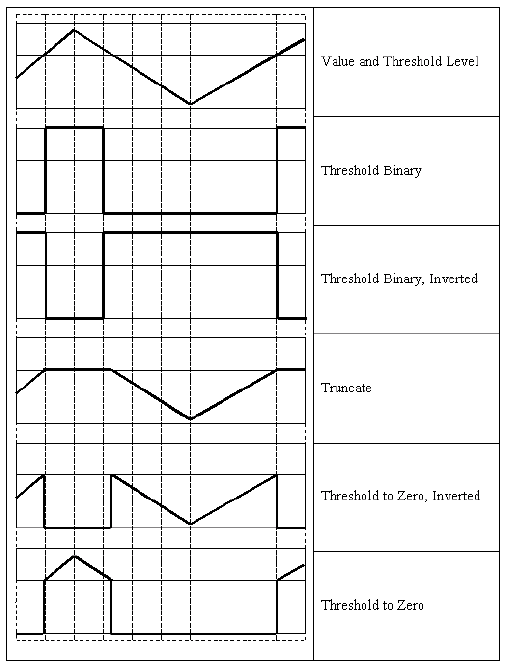
| 1 | cv.THRESH_BINARY dst(x,y) = maxval if src(x,y)>thresh 0 otherwise |
| 2 | cv.THRESH_BINARY_INV dst(x,y)=0 if src(x,y)>thresh maxval otherwise |
| 3 | cv.THRESH_TRUNC dst(x,y)=threshold if src(x,y)>thresh src(x,y) otherwise |
| 4 | cv.THRESH_TOZERO dst(x,y)=src(x,y) if src(x,y)>thresh 0 otherwise |
| 5 | cv.THRESH_TOZERO_INV dst(x,y)=0 if src(x,y)>thresh src(x,y)otherwise |
这些阈值类型根据以下图表对输入图像进行操作:

threshold() 函数返回使用的阈值和阈值图像。
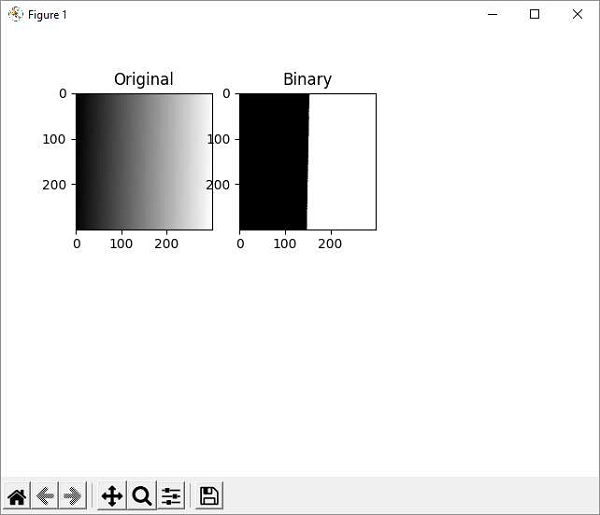
以下程序通过将阈值设置为 127,从原始图像(灰度值从 255 到 0 的渐变)生成二值图像。
示例
使用 Matplotlib 库将原始图像和生成的阈值二值图像并排绘制。
import cv2 as cv
import numpy as np
from matplotlib import pyplot as plt
img = cv.imread('gradient.png',0)
ret,img1 = cv.threshold(img,127,255,cv.THRESH_BINARY)

plt.subplot(2,3,1),plt.imshow(img,'gray',vmin=0,vmax=255)
plt.title('Original')
plt.subplot(2,3,2),plt.imshow(img1,'gray',vmin=0,vmax=255)
plt.title('Binary')
plt.show()
输出

自适应阈值化根据像素周围的小区域确定像素的阈值。因此,可以为同一图像的不同区域获得不同的阈值。这对于照明变化的图像提供了更好的结果。
cv2.adaptiveThreshold() 方法采用以下输入参数:
cv.adaptiveThreshold( src, maxValue, adaptiveMethod, thresholdType, blockSize, C[, dst] )
adaptiveMethod 具有以下枚举值:
cv.ADAPTIVE_THRESH_MEAN_C - 阈值是邻域区域的平均值减去常数 C。
cv.ADAPTIVE_THRESH_GAUSSIAN_C - 阈值是邻域值的加权高斯和减去常数 C。
示例
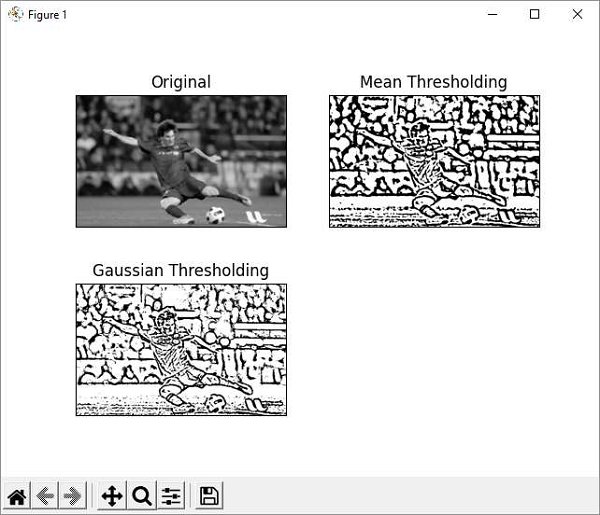
在下面的示例中,原始图像(messi.jpg)应用了均值和高斯自适应阈值化。
import cv2 as cv
import numpy as np
from matplotlib import pyplot as plt
img = cv.imread('messi.jpg',0)
img = cv.medianBlur(img,5)
th1 = cv.adaptiveThreshold(img,255,cv.ADAPTIVE_THRESH_MEAN_C,\
   cv.THRESH_BINARY,11,2)
th2 = cv.adaptiveThreshold(img,255,cv.ADAPTIVE_THRESH_GAUSSIAN_C,\
   cv.THRESH_BINARY,11,2)
titles = ['Original', 'Mean Thresholding', 'Gaussian Thresholding']
images = [img, th1, th2]
for i in range(3):
   plt.subplot(2,2,i+1),plt.imshow(images[i],'gray')
   plt.title(titles[i])
   plt.xticks([]),plt.yticks([])
plt.show()
输出
使用 matplotlib 绘制原始图像和自适应阈值二值图像,如下所示:

示例
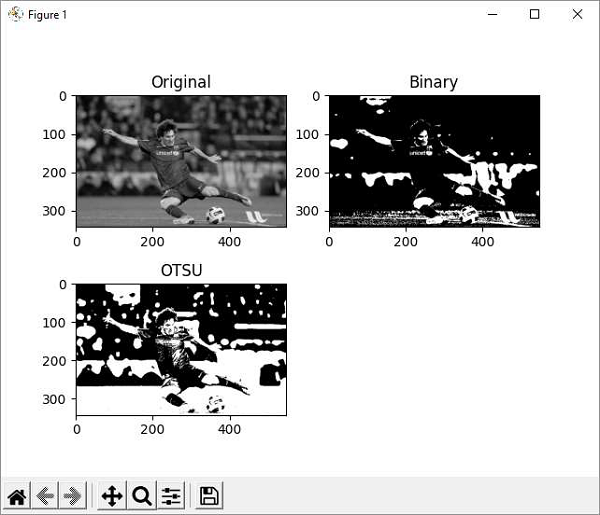
OTSU 算法从图像直方图自动确定阈值。我们需要除了 THRESH-BINARY 标志外,还要传递 cv.THRES_OTSU 标志。
import cv2 as cv
import numpy as np
from matplotlib import pyplot as plt
img = cv.imread('messi.jpg',0)
# global thresholding
ret1,img1 = cv.threshold(img,127,255,cv.THRESH_BINARY)
# Otsu's thresholding
ret2,img2 = cv.threshold(img,0,255,cv.THRESH_BINARY+cv.THRESH_OTSU)
plt.subplot(2,2,1),plt.imshow(img,'gray',vmin=0,vmax=255)
plt.title('Original')
plt.subplot(2,2,2),plt.imshow(img1,'gray')

plt.title('Binary')
plt.subplot(2,2,3),plt.imshow(img2,'gray')
plt.title('OTSU')
plt.show()
输出
matplotlib 的绘图结果如下:
