- Python Pyramid 教程
- Python Pyramid - 首页
- Python Pyramid - 概述
- Pyramid - 环境设置
- Python Pyramid - Hello World
- Pyramid - 应用程序配置
- Python Pyramid - URL 路由
- Python Pyramid - 视图配置
- Python Pyramid - 路由前缀
- Python Pyramid - 模板
- Pyramid - HTML 表单模板
- Python Pyramid - 静态资源
- Python Pyramid - 请求对象
- Python Pyramid - 响应对象
- Python Pyramid - 会话
- Python Pyramid - 事件
- Python Pyramid - 消息闪现
- Pyramid - 使用 SQLAlchemy
- Python Pyramid - Cookiecutter
- Python Pyramid - 创建项目
- Python Pyramid - 项目结构
- Python Pyramid - 包结构
- 手动创建项目
- 命令行 Pyramid
- Python Pyramid - 测试
- Python Pyramid - 日志记录
- Python Pyramid - 安全性
- Python Pyramid - 部署
- Python Pyramid 有用资源
- Python Pyramid - 快速指南
- Python Pyramid - 有用资源
- Python Pyramid - 讨论
Python Pyramid - 快速指南
Python Pyramid - 概述
Pyramid 是一个用 Python 编写的开源、符合 WSGI 的 Web 框架。最初该项目名为 Pylons,但后来以新名称 Pyramid 发布。
Pyramid 是一个极简主义的 Web 框架。它没有打包任何模板库,也没有支持任何特定的数据库包。
但是,它可以通过 SQLAlchemy 与 SQL 数据库和 Zope 对象数据库集成,以及其他 NoSQL 数据库,如 CouchDB。
Pyramid 还可以配置为与 Mako、Jinja2 或 Chameleon 等模板库一起工作。
Pyramid 由 **Chris McDonough** 开发。Pyramid 的第一个版本于 2011 年 1 月发布。最新版本 Pyramid 2.0 于 2021 年 3 月发布。
与其他 Python 框架的比较
Pyramid Web 应用程序框架受到 Zope 和 Django 框架的启发。因此,它结合了这两者的最佳规定。
Pyramid 主要基于 **repose.bfg** 框架。在与 Pylons 项目合并后,它于 2010 年更名为 Pyramid。
扩展 Pyramid 应用程序的能力借鉴自 Zope 库。无需修改应用程序代码,即可重用、修改或扩展应用程序。诸如声明式安全层和路由遍历等功能继承自 Zope。
与 Pylons 1.0 一样,Pyramid 也不强制执行任何策略。它还允许用户选择任何数据库或模板系统。URL 调度方法也受到 Pylons 的启发。
**视图**的概念基于 Django 的类似方法。广泛的文档也是 Pyramid 借鉴的 Django 特性。
虽然定义并不完全吻合,但可以认为 Pyramid 遵循 MVC(模型-视图-控制器)方法。
Python Pyramid - 环境设置
建议在安装了 Python 3.6 或更高版本的系统上安装 Pyramid 包。Pyramid 可以安装在 Linux、MacOS 和 Windows 平台上。最简单的安装方法是使用 PIP 安装程序,最好是在 Python 虚拟环境下。
pip3 install pyramid
虽然 Pyramid Web 应用程序可以使用内置的 WSGI 开发服务器(它是 **wsgiref** 模块的一部分)运行,但不建议在生产环境中使用它。因此,我们还安装 Waitress,一个生产级的纯 Python WSGI 服务器(也是 Pylons 项目的一部分)。
pip3 install waitress
这将安装 Pyramid(版本 2.0)、Waitress(版本 2.1.2)以及 Pylon 项目的其他依赖项,如 WebOb、PasteDeploy 等。要检查安装了哪些内容,请运行 pip freeze 命令。
pip3 freeze
hupper==1.10.3
PasteDeploy==2.1.1
plaster==1.0
plaster-pastedeploy==0.7
pyramid==2.0
translationstring==1.4
venusian==3.0.0
waitress==2.1.2
WebOb==1.8.7
zope.deprecation==4.4.0
zope.interface==5.4.0
Python Pyramid - Hello World
示例
要检查 Pyramid 及其依赖项是否已正确安装,请输入以下代码并将其保存为 **hello.py**,使用任何 Python 感知编辑器。
from wsgiref.simple_server import make_server
from pyramid.config import Configurator
from pyramid.response import Response

def hello_world(request):
   return Response('Hello World!')

if __name__ == '__main__':
   with Configurator() as config:
      config.add_route('hello', '/')
      config.add_view(hello_world, route_name='hello')
      app = config.make_wsgi_app()
   server = make_server('0.0.0.0', 6543, app)
   server.serve_forever()
**Configurator** 对象需要定义 URL 路由并将视图函数绑定到它。从该配置对象获得的 WSGI 应用程序对象是 **make_server()** 函数的参数,以及 localhost 的 IP 地址和端口。当调用 **serve_forever()** 方法时,服务器对象进入监听循环。
从命令终端运行此程序,如下所示。
Python hello.py
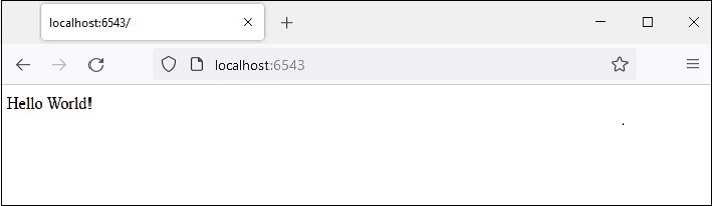
输出
WSGI 服务器开始运行。打开浏览器并在地址栏中输入 http://loccalhost:6543/。当请求被接受时,**hello_world()** 视图函数将被执行。它返回 Hello world 消息。Hello world 消息将在浏览器窗口中显示。
如前所述,**wsgiref** 模块中 make_server() 函数创建的开发服务器不适用于生产环境。相反,我们将使用 Waitress 服务器。根据以下代码修改 hello.py -
from pyramid.config import Configurator
from pyramid.response import Response
from waitress import serve

def hello_world(request):
   return Response('Hello World!')

if __name__ == '__main__':
   with Configurator() as config:
      config.add_route('hello', '/')
      config.add_view(hello_world, route_name='hello')
      app = config.make_wsgi_app()
      serve(app, host='0.0.0.0', port=6543)
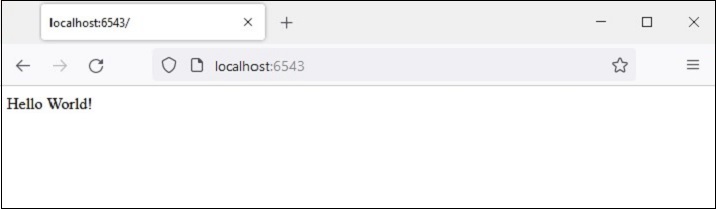
所有其他功能都相同,除了我们使用 **waitress** 模块的 **serve()** 函数启动 WSGI 服务器。在运行程序后访问浏览器中的“/”路由时,将像以前一样显示 Hello world 消息。
除了函数之外,还可以使用可调用类作为视图。可调用类是覆盖 **__call__()** 方法的类。
from pyramid.response import Response
class MyView(object):
   def __init__(self, request):
      self.request = request
   def __call__(self):
      return Response('hello world')
Python Pyramid - 应用程序配置
Pyramid 应用程序对象具有一个应用程序注册表,该注册表存储视图函数到路由的映射以及其他特定于应用程序的组件注册。Configurator 类用于构建应用程序注册表。
Configurator 生命周期由上下文管理器管理,该管理器返回应用程序对象。
with Configurator(settings=settings) as config:
   #configuration methods
   app = config.make_wsgi_app()
Configurator 类定义了以下重要方法来自定义应用程序 -
add_route()
此方法为 URL 调度注册路由。使用以下参数 -
**name** - 第一个必需的位置参数必须是路由的唯一名称。该名称用于在注册视图或生成 URL 时识别路由。
**pattern** - 第二个必需的位置参数是表示 URL 路径的字符串,可选地包含用于从 URL 解析可变数据的变量占位符。占位符用花括号括起来。例如,“/students/{id}”。
**request_method** - 值可以是“GET”、“POST”、“HEAD”、“DELETE”、“PUT”之一。只有此类型的请求将与路由匹配。
add_view()
此方法将视图配置添加到应用程序注册表。它将视图函数绑定到配置中存在的 **route_name**。所需参数为 -
**view** - 视图函数的名称。
**route_name** - 一个字符串,必须与路由配置声明的名称匹配。
**request_method** - 或者表示 HTTP REQUEST_METHOD 的字符串(如“GET”、“POST”、“PUT”、“DELETE”、“HEAD”或“OPTIONS”),或者包含一个或多个这些字符串的元组。
add_static_view()
此方法添加用于呈现静态资源(如图像和 CSS 文件)的 **view**,并使用以下参数 -
**name** - 此参数是表示应用程序相对本地 URL 前缀或完整 URL 的字符串。
**Path** - 此参数表示磁盘上静态文件所在的位置。其值可以是绝对路径或包相对路径。
此方法依次调用 Configurator 对象的 **add_route()** 方法。
add_notfound_view()
此方法添加一个视图,当找不到与当前请求匹配的视图时执行该视图。以下代码显示了一个示例 -
from pyramid.config import Configurator
from pyramid.response import Response

def notfound(request):
   return Response('Not Found', status='404 Not Found')

config.add_notfound_view(notfound)
add_forbidden_view()
配置应用程序注册表以定义一个视图,当引发 HTTPForbidden 异常时执行该视图。参数列表包含对返回 403 状态响应的函数的引用。如果没有提供参数,注册表将添加 **default_exceptionresponse_view()**。
add_exception_view()
此方法导致将异常视图函数添加到配置中,用于指定的异常。
make_wsgi_app()
此方法返回 Pyramid WSGI 应用程序对象。
scan()
这是注册视图的包装器。它导入所有应用程序模块,查找 @view_config 装饰器。
对于每一个,它都使用相同的关键字参数调用 config.add_view(view)。对 scan() 函数的调用执行对包及其所有子包的所有装饰器的扫描。
执行应用程序注册表配置的典型语句序列如下面的代码片段所示 -
from pyramid.config import Configurator

with Configurator() as config:
   config.add_route('hello', '/')
   config.add_view(hello_world, route_name='hello')
   app = config.make_wsgi_app()
这种应用程序配置方法称为命令式配置。Pyramid 提供了另一种配置方法,称为声明式配置。
声明式配置
有时,使用命令式代码进行配置变得很困难,尤其是在应用程序代码分布在许多文件中时。声明式配置是一种便捷的方法。**pyramid.view** 模型定义了 **view_config** - 一个函数、类或方法装饰器 - 它允许视图注册非常接近视图函数本身的定义。
向 **@view_config()** 装饰器提供了两个重要的参数。它们是 **route_name** 和 **request_method**。它们与 Configurator 类的 **add_route()** 方法中的解释相同。正下方的函数被装饰,以便将其绑定到添加到应用程序对象注册表中的路由。
下面是 **hello_world()** 视图函数的声明式配置示例 -
from pyramid.response import Response
from pyramid.view import view_config

@view_config(route_name='hello', request_method='GET')
def hello_world(request):
   return Response('Hello World!')
view_config 装饰器向 hello_world() 函数添加了一个属性,使其可供以后的扫描找到它。
示例
配置装饰和扫描调用的组合统称为声明式配置。以下代码使用声明式方法配置应用程序注册表。
scan() 函数发现路由及其映射的视图,因此无需添加命令式配置语句。
from wsgiref.simple_server import make_server
from pyramid.config import Configurator
from pyramid.response import Response
from pyramid.view import view_config

@view_config(route_name='hello', request_method='GET')
def hello_world(request):
   return Response('Hello World!')

if __name__ == '__main__':
   with Configurator() as config:
      config.add_route('hello', '/')
      config.scan()
      app = config.make_wsgi_app()
   server = make_server('0.0.0.0', 6543, app)
   server.serve_forever()
扫描器将 `view_config` 中的参数转换为对 `pyramid.config.Configurator.add_view()` 方法的调用,因此该操作等效于以下语句:
config.add_view(hello_world, route_name='hello', request_method='GET')
输出
运行以上程序后,WSGI 服务器启动。当浏览器访问链接 https://:6543/ 时,"Hello World" 消息将像以前一样呈现。
Python Pyramid - URL 路由
在 MVC 架构出现之前,Web 应用程序使用将用户在浏览器中输入的 URL 映射到程序文件(其输出作为 HTML 呈现,作为响应返回到浏览器)的机制。Pyramid 框架使用路由机制,其中 URL 的端点与应用程序注册表中注册的不同 URL 模式匹配,调用其映射的视图并呈现响应。
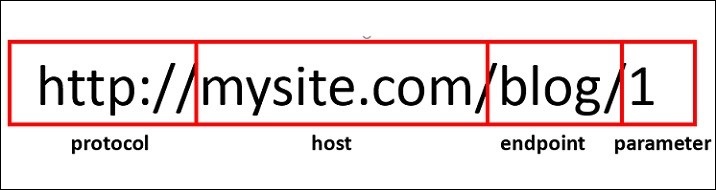
一个典型的 URL 包含三个部分:协议(例如 http:// 或 https://),后跟 IP 地址或主机名。主机名之后第一个 / 之后的 URL 的剩余部分称为路径或端点。
端点后跟一个或多个可变部分构成路由。可变部分标识符用花括号括起来。例如,对于上述 URL,路由为 /blog/{id}
WSGI 应用程序充当路由器。它根据路由映射中存在的 URL 模式检查传入的请求。如果找到匹配项,则执行其关联的视图可调用对象并返回响应。
路由配置
通过调用 Configurator 对象的 `add_route()` 方法,可以向应用程序添加新的路由。路由有一个名称,用作标识符,用于 URL 生成,以及一个模式,用于匹配 URL 的 PATH_INFO 部分(方案和端口之后的部分,例如 URL http://example.com/blog/1 中的 /blog/1)。
如前所述,`add_route()` 方法的 `pattern` 参数可以有一个或多个用花括号括起来并用 / 分隔的占位符标识符。以下语句将 'index' 作为 '/{name}/{age}' 模式的路由名称。
config.add_route('index', '/{name}/{age}')
要将视图可调用对象与该路由关联,我们使用 `add_view()` 函数,如下所示:
config.add_view(index, route_name='index')
为了使路由与之匹配,`index()` 函数必须可用。
def index(request):
   return Response('Root Configuration Example')
示例
我们将这些语句放在下面的程序中:
from wsgiref.simple_server import make_server
from pyramid.config import Configurator
from pyramid.response import Response

def index(request):
   return Response('Root Configuration Example')

if __name__ == '__main__':
   with Configurator() as config:
      config.add_route('index', '/{name}/{age}')
      config.add_view(index, route_name='index')
      app = config.make_wsgi_app()
server = make_server('0.0.0.0', 6543, app)
server.serve_forever()
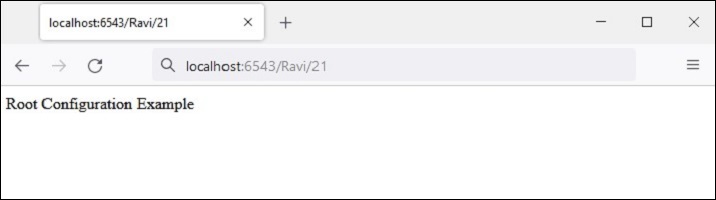
输出
运行以上代码并在浏览器中访问 https://:6543/Ravi/21。由于 URL 的 PATH_INFO 与 index 路由匹配,因此显示以下输出:
路由配置中使用的模式通常以正斜杠 (/) 字符开头。模式段(模式中 / 字符之间单个项目)可以是文字字符串,也可以是占位符标记(例如,{name}),或者两者的某种组合。替换标记不需要以 / 字符开头。
以下是一些路由模式示例
/student/{name}/{marks}
/{id}/student/{name}/{marks}
/customer/{id}/item/{itemno}
/{name}/{age}
占位符标识符必须是有效的 Python 标识符。因此,它必须以大写或小写 ASCII 字母或下划线开头,并且只能包含大写或小写 ASCII 字母、下划线和数字。
路由匹配
当传入的请求与特定路由配置关联的 URL 模式匹配时,名为 matchdict 的字典对象将作为请求对象的属性添加。
request.matchdict 包含与模式元素中的替换模式匹配的值。matchdict 中的键是字符串,而它们的值是 Unicode 对象。
在前面的示例中,将 `index()` 视图函数更改为以下内容:
def index(request):
   return Response(str(request.matchdict))
浏览器以 dict 对象的形式显示路径参数。
当请求与路由模式匹配时,传递给视图函数的请求对象还包含一个 matched_route 属性。匹配路由的名称可以从其名称属性中获取。
示例
在以下示例中,我们使用 `@view.config()` 装饰器定义了两个视图函数 `student_view()` 和 `book_view()`。
应用程序的注册表配置为具有两个相应的路由 - 'student' 映射到 '/student/{name}/{age}' 模式,'book' 映射到 '/book/{title}/{price}' 模式。我们调用 configurator 对象的 `scan()` 方法来添加视图。
from wsgiref.simple_server import make_server
from pyramid.config import Configurator
from pyramid.response import Response
from pyramid.view import view_config

@view_config(route_name='student')
def student_view(request):
   return Response(str(request.matchdict))
@view_config(route_name='book')
def book_view(request):
   title=request.matchdict['title']
   price=request.matchdict['price']
   return Response('Title: {}, Price: {}'.format(title,price))
if __name__ == '__main__':
   with Configurator() as config:
      config.add_route('student', '/student/{name}/{age}')
      config.add_route('book', '/book/{title}/{price}')
      config.scan()
      app = config.make_wsgi_app()
   server = make_server('0.0.0.0', 6543, app)
   server.serve_forever()
输出
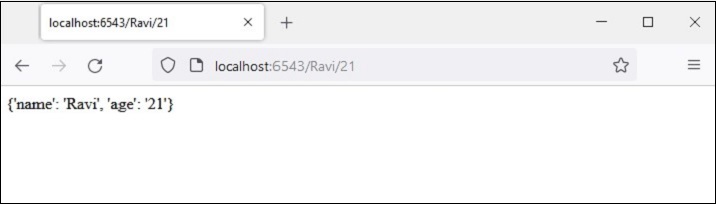
当浏览器给出 https://:6543/student/Ravi/21 URL 时,输出为
{'name': 'Ravi', 'age': '21'}
如果输入的 URL 为 https://:6543/book/Python/300,则输出为
Title: Python, Price: 300
Python Pyramid - 视图配置
"视图配置"一词是指将视图可调用对象(函数、方法或类)与路由配置信息关联的机制。Pyramid 找到给定 URL 模式的最佳可调用对象。
有三种方法可以配置 视图:
使用 `add_view()` 方法
使用 `@view_config()` 装饰器
使用 `@view_defaults()` 类装饰器
使用 `add_view()` 方法
这是通过调用 Configurator 对象的 add_view() 方法以命令方式配置视图的最简单方法。
此方法使用以下参数:
name - 匹配此视图可调用对象所需的视图名称。如果未提供名称,则使用空字符串(表示默认视图)。
context - 为了找到并调用此视图,此资源必须是 Python 类的一个对象。如果未提供上下文,则使用值 None,它匹配任何资源。
route_name - 此值必须与路由配置声明的名称匹配,在调用此视图之前必须匹配。如果提供了 `route_name`,则只有在命名路由匹配时才会调用视图可调用对象。
request_type - 请求为了找到并调用此视图必须提供的接口。
request_method - 表示 HTTP REQUEST_METHOD 的字符串(例如 "GET"、"POST"、"PUT"、"DELETE"、"HEAD" 或 "OPTIONS")或包含这些字符串中一个或多个的元组。只有当请求的 `method` 属性与提供的值匹配时,才会调用视图。
request_param - 此参数可以是任何字符串或字符串序列。只有当 `request.params` 字典具有与提供的值匹配的键时,才会调用视图。
示例
在以下示例中,定义了两个函数 getview() 和 postview(),并将其与两个相同名称的路由关联。这些函数仅返回调用它们的 HTTP 方法的名称。
当使用 GET 方法请求 URL /get 时,调用 `getview()` 函数。类似地,当通过 POST 方法请求 /post 路径时,执行 `postview()` 函数。
from wsgiref.simple_server import make_server
from pyramid.config import Configurator
from pyramid.response import Response
def getview(request):
   ret=request.method
   return Response('Method: {}'.format(ret))
def postview(request):
   ret=request.method
   return Response('Method: {}'.format(ret))

if __name__ == '__main__':
   with Configurator() as config:
      config.add_route('getview', '/get')
      config.add_route('postview', '/post')
      config.add_view(getview, route_name='getview',request_method='GET')
      config.add_view(postview,route_name='postview', request_method='POST')
      app = config.make_wsgi_app()
      server = make_server('0.0.0.0', 6543, app)
      server.serve_forever()
虽然可以使用 Web 浏览器作为 HTTP 客户端发送 GET 请求,但无法将其用于 POST 请求。因此,我们使用 CURL 命令行实用程序。
C:\Users\Acer>curl localhost:6543/get
Method: GET
C:\Users\Acer>curl -d "param1=value1" -H "Content-Type: application/json" -X POST https://:6543/post
Method: POST
如前所述,`request_method` 参数可以是 HTTP 方法的一个或多个列表。让我们修改上面的程序并定义一个 `oneview()` 函数,该函数标识导致其执行的 HTTP 方法。
def oneview(request):
   ret=request.method
   return Response('Method: {}'.format(ret))
此函数在应用程序的配置中为所有 HTTP 方法注册。
config.add_route('oneview', '/view')
config.add_view(oneview, route_name='oneview',
   request_method=['GET','POST', 'PUT', 'DELETE'])
输出
CURL 输出如下所示:
C:\Users\Acer>curl localhost:6543/view
Method: GET
C:\Users\Acer>curl -d "param1=value1" -H "Content-Type: application/json" -X POST https://:6543/view
Method: POST
C:\Users\Acer>curl -d "param1=value1" -H "Content-Type: application/json" -X PUT https://:6543/view
Method: PUT
C:\Users\Acer>curl -X DELETE https://:6543/view
Method: DELETE
使用 `@view_config()` 装饰器
与其以命令方式添加视图,不如使用 `@view_config` 装饰器将配置的路由与函数、方法甚至可调用类关联。
示例
如“声明式配置”部分所述,注册的路由可以与函数关联,如以下示例所示:
from wsgiref.simple_server import make_server
from pyramid.config import Configurator
from pyramid.response import Response
from pyramid.view import view_config
@view_config(route_name='hello')
def hello_world(request):
   return Response('Hello World!')
if __name__ == '__main__':
   with Configurator() as config:
      config.add_route('hello', '/')
      config.scan()
      app = config.make_wsgi_app()
   server = make_server('0.0.0.0', 6543, app)
   server.serve_forever()
请注意,只有在调用 `scan()` 方法后,视图才会添加到应用程序配置中。虽然消除了以命令方式添加视图的需要,但性能可能会稍慢一些。
输出
`view_config()` 装饰器还可以使用与 `add_view()` 方法相同的参数。所有参数都可以省略。
@view_config()
def hello_world(request):
   return Response('Hello World!')
在这种情况下,该函数将使用任何路由名称、任何请求方法或参数进行注册。
`view_config` 装饰器放置在可调用视图函数定义之前,如上例所示。如果要将其用作视图可调用对象,它也可以放在类的顶部。这样的类必须具有 `__call__()` 方法。
在以下 Pyramid 应用程序代码中,MyView 类用作可调用对象,并由 @view_config 装饰器修饰。
from wsgiref.simple_server import make_server
from pyramid.config import Configurator
from pyramid.response import Response
from pyramid.view import view_config

@view_config(route_name='hello')
class MyView(object):
   def __init__(self, request):
      self.request = request

   def __call__(self):
      return Response('hello World')

if __name__ == '__main__':
   with Configurator() as config:
      config.add_route('hello', '/')
      #config.add_view(MyView, route_name='hello')
      config.scan()
      app = config.make_wsgi_app()
   server = make_server('0.0.0.0', 6543, app)
   server.serve_forever()
请注意,我们可以通过显式调用 `add_view()` 方法来添加视图,而不是扫描视图配置。
示例
如果类中的方法必须与不同的路由关联,则应在每个方法的顶部使用单独的 `@view_config()`,如以下示例所示。在这里,我们有两个方法绑定到两个单独的路由。
from wsgiref.simple_server import make_server
from pyramid.config import Configurator
from pyramid.response import Response
from pyramid.view import

class MyView(object):
   def __init__(self, request):
      self.request = request

   @view_config(route_name='getview', request_method='GET')
   def getview(self):
      return Response('hello GET')
   @view_config(route_name='postview', request_method='POST')
   def postview(self):
      return Response('hello POST')

if __name__ == '__main__':
   with Configurator() as config:
      config.add_route('getview', '/get')
      config.add_route('postview', '/post')
      config.scan()
      app = config.make_wsgi_app()
   server = make_server('0.0.0.0', 6543, app)
   server.serve_forever()
输出
以下是 CURL 命令的输出:
C:\Users\Acer>curl localhost:6543/get
hello GET
C:\Users\Acer>curl -d "param1=value1" -H "Content-Type: application/json" -X POST https://:6543/post
hello POST
使用 `@view_defaults()` 装饰器
view_defaults() 是一个类装饰器。如果您必须将类中的方法作为视图添加,并带有一些公共参数和一些特定参数,则可以在类的顶部指定 view_defaults() 装饰器中的公共参数,并在每个方法之前使用单独的 view_config() 执行每个方法的配置。
示例
在以下代码中,我们有不同的方法响应相同的路由,但使用不同的 request_method。因此,我们将路由名称定义为默认值,并在每个视图配置中指定 request_method。
from wsgiref.simple_server import make_server
from pyramid.config import Configurator
from pyramid.response import Response
from pyramid.view import view_config
from pyramid.view import view_defaults

@view_defaults(route_name='myview')
class MyView(object):
   def __init__(self, request):
      self.request = request

   @view_config( request_method='GET')
   def getview(self):
      return Response('hello GET')
   @view_config(request_method='POST')
   def postview(self):
      return Response('hello POST')
   @view_config(request_method='PUT')
   def putview(self):
      return Response('hello PUT')
   @view_config(request_method='DELETE')
   def delview(self):
      return Response('hello DELETE')

if __name__ == '__main__':
   with Configurator() as config:
      config.add_route('myview', '/view')
      config.scan()
      app = config.make_wsgi_app()
   server = make_server('0.0.0.0', 6543, app)
   server.serve_forever()
输出
使用不同 HTTP 请求向服务器发送 CURL 命令如下所示:
C:\Users\Acer>curl localhost:6543/view
hello GET
C:\Users\Acer>curl -d "param1=value1" -H "Content-Type: application/json" -X POST https://:6543/view
hello POST
C:\Users\Acer>curl -d "param1=value1" -H "Content-Type: application/json" -X PUT https://:6543/view
hello PUT
C:\Users\Acer>curl -X DELETE https://:6543/view
hello DELETE
Python Pyramid - 路由前缀
很多时候,类似的 URL 模式在多个 Python 代码模块中使用不同的路由注册。例如,我们有一个 student_routes.py,其中 /list 和 /add URL 模式分别与 'list' 和 'add' 路由注册。与这些路由关联的视图函数分别为 list() 和 add()。
#student_routes.py
from pyramid.config import Configurator
from pyramid.response import Response
from pyramid.view import view_config

@view_config( route_name='add')
def add(request):
   return Response('add student')
@view_config(route_name='list')
def list(request):
   return Response('Student list')

def students(config):
   config.add_route('list', '/list')
   config.add_route('add', '/add')
   config.scan()
当调用 students() 函数时,这些路由最终将被注册。
同时,还有一个 book_routes.py,其中相同的 URL /list 和 add/ 分别注册到 'show' 和 'new' 路由。它们关联的视图分别为 list() 和 add()。该模块具有添加路由的 books() 函数。
#book_routes.py
from pyramid.config import Configurator
from pyramid.response import Response
from pyramid.view import view_config

@view_config( route_name='new')
def add(request):
   return Response('add book')
@view_config(route_name='show')
def list(request):
   return Response('Book list')
def books(config):
   config.add_route('show', '/list')
   config.add_route('new', '/add')
   config.scan()
显然,URL 模式之间存在冲突,因为 '/list' 和 '/add' 分别指向两个路由,并且必须解决此冲突。这是通过使用 config.include() 方法的 route_prefix 参数来完成的。
传递给 `config.include()` 的第一个参数是添加路由的函数,第二个参数是将附加到包含函数中使用的 URL 模式的 `route_prefix` 字符串。
因此,语句
config.include(students, route_prefix='/student')
将导致 '/list' URL 模式更改为 '/student/list',而 '/add' 则变为 'student/add'。类似地,我们可以在 `books()` 函数中为这些 URL 模式添加前缀。
config.include(books, route_prefix='/books')
示例
启动服务器的代码如下所示:
from wsgiref.simple_server import make_server
from pyramid.config import Configurator
from pyramid.response import Response
from student_routes import students
from book_routes import books

if __name__ == '__main__':
   with Configurator() as config:
      config.include(students, route_prefix='/student')
      config.include(books, route_prefix='/book')
      app = config.make_wsgi_app()
   server = make_server('0.0.0.0', 6543, app)
   server.serve_forever()
输出
让我们运行以上代码并通过以下 CURL 命令测试路由。
C:\Users\Acer>curl localhost:6543/student/list
Student list
C:\Users\Acer>curl localhost:6543/student/add
add student
C:\Users\Acer>curl localhost:6543/book/add
add book
C:\Users\Acer>curl localhost:6543/book/list
Book list
Python Pyramid - 模板
默认情况下,视图函数响应的 `content-type` 为纯文本。为了呈现 HTML,响应正文的文本可以包含 HTML 标签,如以下示例所示:
示例
from wsgiref.simple_server import make_server
from pyramid.config import Configurator
from pyramid.response import Response
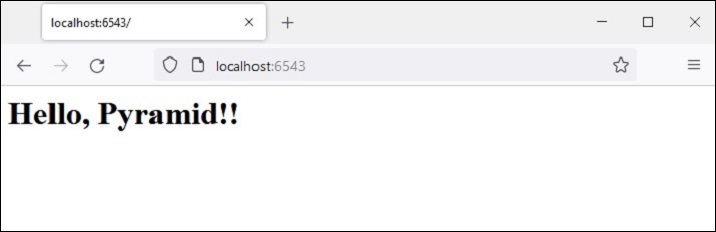
def hello_world(request):
return Response('<h1 style="text-align:center;">Hello World!</h1>')
if __name__ == '__main__':
with Configurator() as config:
config.add_route('hello', '/')
config.add_view(hello_world, route_name='hello')
app = config.make_wsgi_app()
server = make_server('0.0.0.0', 6543, app)
server.serve_forever()
输出
启动服务器(通过运行以上代码)后,访问 https://:6543/,浏览器呈现以下输出:

但是,这种呈现 HTML 的方法,尤其是在可能包含某些可变数据的情况下,极其繁琐。为此,Web 框架使用模板库。模板库将可变数据与其他静态 HTML 代码合并,以动态生成和呈现网页。
模板绑定
Pyramid 通过绑定到流行的模板库(如 jinja2、Mako 和 Chameleon)来提供模板支持。
| 模板语言 | Pyramid 绑定 | 默认扩展名 |
|---|---|---|
| Chameleon | pyramid_chameleon | .pt, .txt |
| Jinja2 | pyramid_jinja2 | .jinja2 |
| Mako | pyramid_mako | .mak, .mako |
首先,我们需要安装使用所需模板库的相应 Python 库。例如,要使用 jinja2 模板,请使用 PIP 安装程序安装 pyramid_jinja2。
pip3 install pyramid_jinja2
然后我们需要将其包含在应用程序配置中。
config.include('pyramid_jinja2')
`pyramid.renderers` 模块定义了 `render_to_response()` 函数。它与以下参数一起使用:
render_to_response(renderer_name, value, request)
renderer_name 是模板网页,通常保存在应用程序目录的 templates 子文件夹中,value 参数是一个字典,作为上下文传递给模板,以及从 WSGI 环境中获取的请求对象。
将以下 HTML 脚本另存为 templates 文件夹中的 hello.jinja2。
<html>
   <body>
      <h1>Hello, {{ name }}!</h1>
   </body>
</html>
Jinja2 模板库
这里,'name' 是一个 jinja2 模板变量。jinja2 模板语言使用以下语法在 HTML 脚本中插入变量和编程结构:
表达式
{{ ... }} 用于将表达式打印到模板输出。
{% ... %} 用于语句。
{# ... #} 用于不包含在模板输出中的注释。
条件语句
{% if expr %}
{% else %}
{% endif %}
循环
{% for var in iterable %}
{% endfor %}
在 hello.jinja2 {{ name }} 中,'name' 上下文变量的值在视图响应中动态呈现。
渲染模板
hello_world() 视图函数通过调用 render_to_response() 函数直接渲染此模板。它还向模板发送上下文值。
from pyramid.renderers import render_to_response

def hello_world(request):
   return render_to_response('templates/hello.jinja2',{'name':'Tutorialspoint'},
request=request)
示例
像往常一样,此视图添加到 hello 路由,指向 / URL。完整的应用程序代码如下:
from wsgiref.simple_server import make_server
from pyramid.config import Configurator
from pyramid.response import Response
from pyramid.renderers import render_to_response
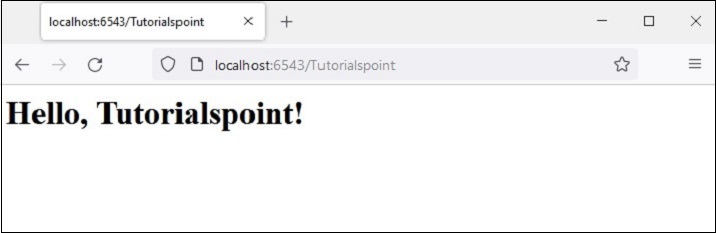
def hello_world(request):
return render_to_response('templates/hello.jinja2', {'name':'Tutorialspoint'}, request=request)
if __name__ == '__main__':
with Configurator() as config:
config.add_route('hello', '/')
config.include('pyramid_jinja2')
config.add_view(hello_world, route_name='hello')
app = config.make_wsgi_app()
server = make_server('0.0.0.0', 6543, app)
server.serve_forever()
输出
运行服务器并访问 https://:6543/。浏览器显示以下结果:

每个视图都必须返回一个响应对象。render_to_response() 函数是一个快捷函数,实际上返回一个响应对象。这允许上面的 hello_world 视图直接返回其对 render_to_response() 的调用的结果。
另一方面,pyramid.renderers.render() 函数将模板渲染为字符串。我们可以直接生成一个响应对象,并使用该字符串作为响应的主体。
让我们将 hello_world() 视图函数更改如下:
from pyramid.renderers import render

def hello_world(request):
   retval = render('templates/hello.jinja2',
   {'name':'Tutorialspoint'}, request=request)
   return Response(retval)
其余代码保持不变,浏览器也显示与上面相同的输出。
通过配置进行渲染
如前所述,Pyramid 的视图可调用返回的 HTTP 响应的 content_type 为 text/plain。但是,如果 @view_config 装饰器的 renderer 参数被分配了这些值中的任何一个,它可以更改为字符串、JSON 或 JSONP。因此,Pyramid 具有以下内置渲染器:
JSON
字符串
JSONP
示例
在以下示例中,hello_world() 视图函数配置为渲染 JSON 响应。
from pyramid.view import view_config
@view_config(route_name='hello',renderer='json')
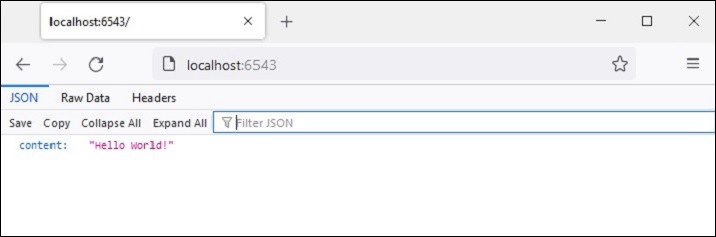
def hello_world(request):
return {'content':'Hello World!'}
输出
将渲染器类型设置为 JSON 还会将 HTTP 响应的 content_type 标头设置为 application/json。浏览器显示 JSON 响应,如下所示:
@view_config() 装饰器的 renderer 参数可以设置为模板网页(必须存在于 templates 文件夹中)。先决条件是必须安装模板库的相应 Python 绑定,并且应用程序配置必须包含该绑定。
我们已经安装了 python_jinja2 包,这样我们就可以使用 jinja2 模板由 hello_world() 视图函数渲染,该函数由 @view_config() 装饰,并带有 renderer 参数。
hello.jinja2 模板 HTML 代码如下:
<html>
   <body>
      <h1>Hello, {{ name }}!</h1>
   </body>
</html>
装饰的 hello_world() 函数写为:
from pyramid.view import view_config

@view_config(route_name='hello', renderer='templates/hello.jinja2')
def hello_world(request):
   return {'name':'Pyramid!'}
示例
在这种情况下,视图函数返回一个字典对象。它作为上下文数据提供给模板,可以使用模板语言语法元素插入 HTML 文本中。
渲染 jinja2 模板的完整代码如下:
from wsgiref.simple_server import make_server
from pyramid.config import Configurator
from pyramid.response import Response
from pyramid.view import view_config

@view_config(route_name='hello', renderer='templates/hello.jinja2')
def hello_world(request):
   return {'name':'Pyramid!'}

if __name__ == '__main__':
   with Configurator() as config:
      config.include('pyramid_jinja2')
      config.add_route('hello', '/')
      config.scan()
      app = config.make_wsgi_app()
   server = make_server('0.0.0.0', 6543, app)
   server.serve_forever()
输出
由 view 函数提供的变量数据的模板网页如下所示:
添加/更改渲染器
模板只不过是散布着模板语言语法的网页。即使 Pyramid 使用 .jinja2 作为 jinja2 模板的默认扩展名,但既定的做法是使用网页的 .html 扩展名。
我们可以更改应用程序配置以允许除了 .jinja2 之外还使用 .html 扩展名。这是通过 add_jinja2_renderer 完成的。
config.add_jinja2_renderer(".html")
hello.jinja2 模板现在重命名为 hello.html。为了能够使用此模板,让我们将视图函数定义更改为以下代码:
from pyramid.view import view_config

@view_config(route_name='hello', renderer='templates/hello.html')
def hello_world(request):
   return {'name':'Pyramid!'}
同时,我们通过添加 .html 渲染器修改 Configurator 对象的属性。
if __name__ == '__main__':
   with Configurator() as config:
      config.include('pyramid_jinja2')
      config.add_jinja2_renderer(".html")
      config.add_route(hello, '/')
      config.scan()
      app = config.make_wsgi_app()
   server = make_server('0.0.0.0', 6543, app)
   server.serve_forever()
来自 matchdict 的模板上下文
如前所述,如果路由配置中的 URL 模式包含一个或多个占位符参数,则来自请求 URL 的其值与请求一起作为 matchdict 对象传递,该对象又可以作为上下文数据传递给要渲染的模板。
在我们的下一个示例中,hello.html - jinja2 模板保持不变。
<html>
   <body>
      <h1>Hello, {{ name }}!</h1>
   </body>
</html>
我们知道上下文变量 'name' 的值由视图函数传递。但是,与其传递硬编码值(如前面的示例中),不如从 matchict 对象中获取其值。此对象由 URL 字符串中的路径参数填充。
from pyramid.view import view_config

@view_config(route_name='index', renderer='templates/hello.html')
def index(request):
   return {'name':request.matchdict['name']}
示例
修改后的应用程序代码如下:
from wsgiref.simple_server import make_server
from pyramid.config import Configurator
from pyramid.response import Response
from pyramid.view import view_config

@view_config(route_name='index', renderer='templates/hello.html')
def index(request):
   return {'name':request.matchdict['name']}
if __name__ == '__main__':
   with Configurator() as config:
      config.include('pyramid_jinja2')
      config.add_jinja2_renderer(".html")
      config.add_route('index', '/{name}')
      config.scan()
      app = config.make_wsgi_app()
   server = make_server('0.0.0.0', 6543, app)
   server.serve_forever()
输出
启动服务器,打开浏览器并输入 URL https://:6543/Tutorialspoint。尾随字符串成为 matchdict 中 'name' 键的值。它被 jinja2 模板利用,并呈现以下输出。
模板中的条件语句和循环
jinja2 模板语言允许在 HTML 脚本中包含条件语句和循环结构。这些编程元素的 jinja2 语法如下:
条件语句
{% if expr %}
HTML
{% else %}
HTML
{% endif %}
循环
{% for var in iterable %}
HTML
{% endfor %}
可以看出,jinja2 语法与 Python 的 if 和 for 语句非常相似。除了 jinja2 不使用缩进标记块之外。相反,对于每个 if 都必须有一个 endif 语句。类似地,对于每个 for 语句,都必须有一个 endfor 语句。
示例
以下示例演示了模板条件语句和循环语句的使用。首先,Pyramid 代码使用 students 作为字典对象的列表,每个字典都包含学生的 id、name 和百分比。此列表对象作为上下文传递给 marklist.html 模板
from wsgiref.simple_server import make_server
from pyramid.config import Configurator
from pyramid.response import Response
from pyramid.view import view_config

students = [
   {"id": 1, "name": "Ravi", "percent": 75},
   {"id": 2, "name": "Mona", "percent": 80},
   {"id": 3, "name": "Mathews", "percent": 45},
]

@view_config(route_name='index', renderer='templates/marklist.html')

def index(request):
   return {'students':students}
if __name__ == '__main__':
   with Configurator() as config:
      config.include('pyramid_jinja2')
      config.add_jinja2_renderer(".html")
      config.add_route('index', '/')
      config.scan()
   app = config.make_wsgi_app()
   server = make_server('0.0.0.0', 6543, app)
   server.serve_forever()
将此程序另存为 marklist.py。现在,以下 HTML 脚本必须另存为 marklist.html。它遍历从视图函数接收到的 students 列表对象,并以 HTML 表格的形式呈现学生数据。第四列显示通过/失败结果,使用 jinja2 if 语句语法。
<html>
<body>
   <table border=1>
      <thead>
         <tr>
            <th>Student ID</th> <th>Student Name</th>
            <th>percentage</th>
            <th>Result</th>
         </tr>
      </thead>
      <tbody>
         {% for Student in students %}
            <tr>
               <td>{{ Student.id }}</td>
               <td>{{ Student.name }</td>
               <td>{{ Student.percent }}</td>
               <td>
                  {% if Student.percent>=50 %}
                  Pass
                  {% else %}
                  Fail
                  {% endif %}
               </td>
            </tr>
         {% endfor %}
      </tbody>
   </table>
</body>
</html>
输出
运行 marklist.py 代码。https://:6543/ 链接呈现以下表格结果:

Python Pyramid - HTML 表单模板
在本章中,我们将了解 Pyramid 如何从 HTML 表单读取数据。让我们将以下 HTML 脚本另存为 myform.html。我们将使用它来获取 Template 对象并渲染它。
<html>
<body>
   <form method="POST" action="https://:6543/students">
   <p>Student Id: <input type="text" name="id"/> </p>
   <p>student Name: <input type="text" name="name"/> </p>
   <p>Percentage: <input type="text" name="percent"/> </p>
   <p><input type="submit" value="Submit"> </p>
</body>
</html>
Pyramid 对象配置中添加的“index”路由映射到以下 index() 函数,该函数呈现上述 HTML 表单:
@view_config(route_name='index', renderer='templates/myform.html')
def index(request):
   return {}
我们可以看到,用户输入的数据通过 POST 请求传递到 /students URL。因此,我们将添加一个 'students' 路由以匹配 /students 模式,并将其与 add() 视图函数关联,如下所示:
@view_config(route_name='students', renderer='templates/marklist.html')
def add(request):
   student={'id':request.params['id'],
      'name':request.params['name'],
      'percent':int(request.params['percent'])} 9. Pyramid – HTML Form Template
   students.append(student)
   return {'students':students}
POST 请求发送的数据以 request.params 对象的形式在 HTTP 请求对象中可用。它是 HTML 表单属性及其值的字典,由用户输入。此数据被解析并追加到 students 字典对象的列表中。更新后的 students 对象作为上下文数据传递给 marklist.html 模板。
marklist.html 网页模板与上一示例中使用的相同。它显示学生数据的表格以及计算结果列。
<html>
<body>
   <table border=1>
      <thead>
         <tr>
            <th>Student ID</th> <th>Student Name</th>
            <th>percentage</th>
            <th>Result</th>
         </tr>
      </thead>
      <tbody>
         {% for Student in students %}
            <tr>
               <td>{{ Student.id }}</td>
               <td>{{ Student.name }}</td>
               <td>{{ Student.percent }}</td>
               <td>
                  {% if Student.percent>=50 %}
                  Pass
                  {% else %}
                  Fail
                  {% endif %}
               </td>
            </tr>
         {% endfor %}
      </tbody>
   </table>
</body>
</html>
示例
包含用于渲染 HTML 表单、解析表单数据和生成显示学生成绩单表格的页面的视图的完整代码如下:
from wsgiref.simple_server import make_server
from pyramid.config import Configurator
from pyramid.response import Response
from pyramid.view import view_config

students = [
   {"id": 1, "name": "Ravi", "percent": 75},
   {"id": 2, "name": "Mona", "percent": 80},
   {"id": 3, "name": "Mathews", "percent": 45},
]

@view_config(route_name='index', renderer='templates/myform.html')
def index(request):
   return {}
@view_config(route_name='students', renderer='templates/marklist.html')
def add(request):
   student={'id':request.params['id'], 'name':request.params['name'],
'percent':int(request.params['percent'])}
   students.append(student)
   return {'students':students}

if __name__ == '__main__':
   with Configurator() as config:
      config.include('pyramid_jinja2')
      config.add_jinja2_renderer(".html")
      config.add_route('index', '/')
      config.add_route('students','/students')
      config.scan()
      app = config.make_wsgi_app()
   server = make_server('0.0.0.0', 6543, app)
   server.serve_forever()
输出
要启动服务器,请从命令行运行上述 Python 代码。在您的浏览器中,访问 https://:6543/ 以获取如下所示的表单:

输入样本数据(如所示)并按提交按钮。浏览器将定向到 /students URL,该 URL 又会调用 add() 视图。结果是一个成绩单表格,显示新输入的新学生的数据。

Python Pyramid - 静态资源
通常需要在模板响应中包含一些即使存在某些动态数据也不会更改的资源。此类资源称为静态资产。媒体文件(.png、.jpg 等)、用于执行某些前端代码的 JavaScript 文件或用于格式化 HTML 的样式表(.css 文件)是静态文件的示例。
Pyramid 将这些静态资产从服务器文件系统中的指定目录提供给客户端的浏览器。Configurator 对象的 add_static_view() 方法定义了路由的名称和包含静态文件(如图像、JavaScript 和 CSS 文件)的文件夹的路径。
按照惯例,'static' 目录用于存储静态资产,并且 add_static_view() 的用法如下:
config.add_static_view(name='static', path='static')
定义静态路由后,可以在 HTML 脚本中使用时通过 request.static_url() 方法获取静态资产的路径。
静态图像
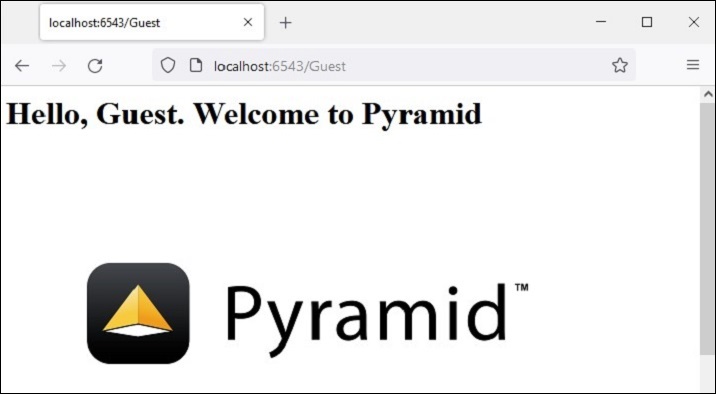
在以下示例中,Pyramid 徽标将在 logo.html 模板中呈现。因此,“pyramid.png”文件首先放置在 static 文件夹中。现在可以作为 HTML 代码中 <img> 标记的 src 属性使用。
<html>
<body>
   <h1>Hello, {{ name }}. Welcome to Pyramid</h1>
   <img src="{{request.static_url('app:static/pyramid.png')}}">
</body>
</html>
示例
应用程序代码使用 add_static_view() 更新配置器,并定义 index() 视图渲染上述模板。
from wsgiref.simple_server import make_server
from pyramid.config import Configurator
from pyramid.response import Response
from pyramid.view import view_config

@view_config(route_name='index', renderer='templates/logo.html')

def index(request):
   return {'name':request.matchdict['name']}

if __name__ == '__main__':
   with Configurator() as config:
      config.include('pyramid_jinja2')
      config.add_jinja2_renderer(".html")
      config.add_route('index', '/{name}')
      config.add_static_view(name='static', path='app:static')
      config.scan()
      app = config.make_wsgi_app()
   server = make_server('0.0.0.0', 6543, app)
   server.serve_forever()
输出
运行上述代码以启动服务器。使用 https://:6543/Guest 作为浏览器中的 URL。这里 'Guest' 是视图函数在 matchdict 对象中获取的路径参数,并作为上下文传递给 logo.html 模板。浏览器现在显示 Pyramid 徽标。
Javascript 作为静态资产
这是另一个静态文件的示例。一个 JavaScript 代码 hello.js 包含 myfunction() 的定义,该函数将在以下 HTML 脚本(templates\hello.html)中的 onload 事件上执行
<html>
<head>
   <script src="{{request.static_url('app:static/hello.js')}}"></script>
</head>
<body onload="myFunction()">
   <div id="time" style="text-align:right; width="100%"></div>
   <h1><div id="ttl">{{ name }}</div></h1>
</body>
</html>
示例
保存在 static 文件夹中的 hello.js 代码如下:
function myFunction() {
   var today = new Date();
   var h = today.getHours();
   var m = today.getMinutes();
   var s = today.getSeconds();
   var msg="";
   if (h<12)
   {
      msg="Good Morning, ";
   }
   if (h>=12 && h<18)
   {
      msg="Good Afternoon, ";
   }
   if (h>=18)
   {
      msg="Good Evening, ";
   }
   var x=document.getElementById('ttl').innerHTML;
   document.getElementById('ttl').innerHTML = msg+x;
   document.getElementById('time').innerHTML = h + ":" + m + ":" + s;
}
输出
该函数检测当前时间的值,并根据一天中的时间为 msg 变量分配相应的值(早上好、下午好或晚上好)。
将 hello.js 保存到 static 文件夹中,将 hello.html 保存到 templates 文件夹中,然后重新启动服务器。浏览器应显示当前时间及其下方的相应消息。

Python Pyramid - 请求对象
视图可调用的功能包括从 WSGI 环境获取请求数据,并在处理后将某个 HTTP 响应返回给客户端。
通常,此对象不是由用户实例化的。相反,它封装了 WSGI environ 字典。此 request 对象表示“pyramid.request.Request 类”。它拥有许多属性和方法,视图函数使用这些属性和方法来处理请求数据。
以下是一些属性:
request.method - 客户端用于发送数据的 HTTP 请求方法,例如 GET、POST
request.GET - 此属性是一个 multidict,包含查询字符串中的所有变量。
request.POST - 此属性仅在请求为 POST 且为表单提交时可用。它是一个 multidict,包含请求正文中的所有变量。
request.params - request.GET 和 request.POST 中所有内容的组合 multidict。
request.body - 此属性包含整个请求正文作为字符串。当请求为非表单提交的 POST 或 PUT 等请求时,这很有用。
request.cookies - 包含所有 cookie。
request.headers - 所有 HTTP 标头的区分大小写的字典。
除了上述 HTTP 特定的环境属性之外,Pyramid 还添加了一些特殊的属性。
request.url − 返回包含查询字符串的完整请求 URL,例如:https://:6543/app?name=Ravi
request.host − URL 中的主机信息,例如:localhost
request.host_url − 此属性返回包含主机的 URL,例如:https://:6543/
request.application_url − 应用程序的 URL(不包含 PATH_INFO),例如:https://:6543/app
request.path_url − 包含应用程序的 URL,包括 PATH_INFO,例如:https://:66543/app
request.path − 返回包含 PATH_INFO 的 URL,不包含主机,例如:"/app"
request.path_qs − URL 中的查询字符串,包括 PATH_INFO,例如:"/app?name=Ravi"
request.query_string − 仅 URL 中的查询字符串,例如:"name=Ravi"
Python Pyramid - 响应对象
Response 类定义在 pyramid.response 模块中。此类的对象由视图可调用对象返回。
from pyramid.response import Response
def hell(request):
   return Response("Hello World")
响应对象包含状态代码(默认为 200 OK)、响应头列表和响应正文。大多数 HTTP 响应头都可以作为属性使用。以下属性可用于 Response 对象 -
response.content_type − 内容类型是一个字符串,例如 - response.content_type = 'text/html'。
response.charset − 它还告知 response.text 中的编码。
response.set_cookie − 此属性用于设置 Cookie。需要提供的参数是名称、值和 max_age。
response.delete_cookie − 从客户端删除 Cookie。实际上,它将 max_age 设置为 0,并将 Cookie 值设置为 ''。
pyramid.httpexceptions 模块定义了用于处理错误响应(例如 404 未找到)的类。这些类实际上是 Response 类的子类。其中一个类是 "pyramid.httpexceptions.HTTPNotFound"。其典型用法如下 -
from pyramid.httpexceptions import HTTPNotFound
from pyramid.config import view_config
@view_config(route='Hello')
def hello(request):
   response = HTTPNotFound("There is no such route defined")
   return response
我们可以使用 Response 类的 location 属性将客户端重定向到另一个路由。例如 -
view_config(route_name='add', request_method='POST')
def add(request):
   #add a new object
   return HTTPFound(location='https://:6543/')
Python Pyramid - 会话
会话是指客户端登录服务器到注销服务器之间的时间间隔。会话对象也是一个字典对象,包含会话变量及其关联值的键值对。在 Pyramid 中,它作为请求对象的属性可用。
为了处理会话机制,Pyramid 应用程序对象必须配置为使用会话工厂来返回会话对象。Pyramid 核心提供了一个基本的会话工厂,它使用 Cookie 来存储会话信息。
默认会话工厂
pyramid.session 模块定义了 SignedCookieSessionFactory 类。它的对象需要一个用于对会话 Cookie 信息进行数字签名的密钥。
from pyramid.session import SignedCookieSessionFactory
my_session_factory = SignedCookieSessionFactory('abcQWE123!@#')
Configurator 类的 set_session_factory() 方法使用此工厂对象来设置会话。
config.set_session_factory(my_session_factory)
完成此操作后,会话对象现在可用于实现,作为 request.session 属性。要添加会话变量,请使用 -
request.session['user'] = 'Admin'
要检索会话变量,请使用 -
user=request.session['user']
要删除会话变量,请使用 pop() 方法。
request.session.pop('user')
会话示例
下面描述了在 Pyramid 应用程序中使用会话变量的方法。首先,登录路由(与 login() 视图函数关联)在浏览器上显示登录表单。
@view_config(route_name='login')
def login(request):
   html="""
   <html>
   <body>
      <form action='/add'> Enter User name :
         <input type='text' name='user'>
         <input type='submit' value='submit'>
      </form>
   </body>
   </html>
   """
return Response(html)
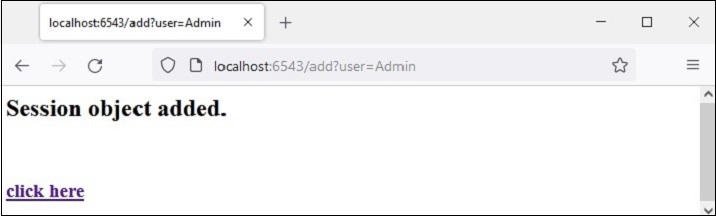
add() 函数读取“user”表单属性,并使用其值添加会话变量。
@view_config(route_name='addsession')
def add(request):
   request.session['user']=request.params['user']
   return Response("<h2>Session object added.</h2><br><h3><a href='/read'>click here</a></h3>")
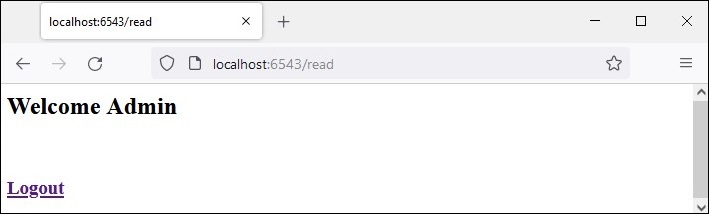
read() 视图读回会话变量数据并显示欢迎消息。
@view_config(route_name='readsession')
def read(request):
   user=request.session['user']
   response="<h2>Welcome {} </h2>".format(user)+"<br><h3><a href='/logout'>Logout</a></h3>"
   return Response(response)
这些视图以及会话工厂都添加到应用程序配置中。
config.set_session_factory(my_session_factory)
config.add_route('login','/')
config.add_route('logout','/logout')
config.add_route('addsession', '/add')
config.add_route('readsession', '/read')
config.scan('session')
示例
完整的代码如下 -
from wsgiref.simple_server import make_server
from pyramid.config import Configurator
from pyramid.response import Response
from pyramid.view import view_config
from pyramid.session import SignedCookieSessionFactory
my_session_factory = SignedCookieSessionFactory('abcQWE123!@#')

@view_config(route_name='login')
def login(request):
   html="""
   <html>
   <body>
   <form action='/add'>
      Enter User name :
      <input type='text' name='user'>
      <input type='submit' value='submit'>
   </form>
   </body>
   </html>
"""
   return Response(html)
@view_config(route_name='addsession')
def add(request):
   request.session['user']=request.params['user']
   return Response("<h2>Session object added.</h2><br><h3><a href='/read'>click here</a></h3>")

@view_config(route_name='readsession')
def read(request):
   user=request.session['user']
   response="<h2>Welcome {} </h2>".format(user)+"<br><h3><a href='/logout'>Logout</a>>/<h3>"
   return Response(response)

@view_config(route_name='logout')
def logout(request):
   request.session.pop('user')
   response="<h2>You have been logged out </h2><br><h3><a href='/'>Login</a></h3>"
   return Response(response)

if __name__ == '__main__':
   with Configurator() as config:
      config.set_session_factory(my_session_factory)
      config.add_route('login','/')
      config.add_route('logout','/logout')
      config.add_route('addsession', '/add')
      config.add_route('readsession', '/read')
      config.scan('session')
      app = config.make_wsgi_app()
   server = make_server('0.0.0.0', 6543, app)
   server.serve_forever()
将此脚本另存为 Pyramid 虚拟环境文件夹中的子文件夹(称为“session”)中的 main.py。请注意,此子文件夹必须有一个空的 __init__.py 文件才能被视为包。
输出
运行 main.py 并输入 https://:6543/ 以在浏览器中打开登录表单。
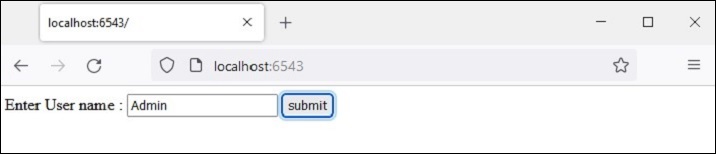
输入用户名并按下“提交”按钮。给定的名称将保存为“user”会话变量。
“点击此处”链接读回 session 变量并显示欢迎消息。
注销链接弹出 session 变量并将浏览器带回登录页面。
Python Pyramid - 事件
Pyramid 应用程序在其生命周期过程中会发出各种事件。尽管通常不需要使用这些事件,但可以通过正确处理这些事件来执行稍微高级的操作。
只有当您将其与订阅者函数注册时,Pyramid 框架广播的事件才能使用。发出的事件必须用作 subscriber 函数的参数。
def mysubscriber(event):
   print("new request")
但是,只有当订阅者函数使用 add_subscriber() 方法添加到应用程序的配置中时,它才会生效,如下所示 -
在以下代码段中,应用程序配置为在发出 NewRequest 对象时调用订阅者函数。
from pyramid.events import NewRequest
config.add_subscriber(mysubscriber, NewRequest)
还有一个 @subscriber() 装饰器用于配置事件。
from pyramid.events import NewRequest
from pyramid.events import subscriber

@subscriber(NewRequest)
def mysubscriber(event):
   print ("new request")
与装饰视图配置一样,此处也必须执行 config.scan() 才能使装饰器生效。
如前所述,Pyramid 应用程序会发出各种事件类型。这些事件类在 pyramid.event 模块中可用。它们列在下面 -
ApplicationCreated − 此事件在调用 Configurator 类的 config.make_wsgi_app() 方法返回 WSGI 应用程序对象时传输。
NewRequest − 每次 Pyramid 应用程序开始处理传入请求时,都会发出此事件类的对象。此对象具有一个 request 属性,该属性是 WSGI 环境字典提供的请求对象。
ContextFound − 应用程序的路由器遍历所有路由,并找到与 URL 模式的匹配项。此时会实例化 ContextFound 类对象。
BeforeTraversal − 在 Pyramid 路由器尝试查找路由对象但尚未执行任何遍历或视图代码之前,会将此类的实例作为事件发出。
NewResponse − 顾名思义,每当任何 Pyramid 视图可调用对象返回响应时,都会引发此事件。此对象具有 request 和 response 属性。
BeforeRender − 在调用渲染器之前,会将此类型的对象作为事件传输。此事件的订阅者函数可以访问应用程序的全局数据(以 dict 对象的形式存在),并且可以修改一个或多个键的值。
Python Pyramid - 消息闪现
消息闪现机制由 Web 应用程序框架使用,以向用户提供有关其与应用程序交互的某些反馈。闪现的消息由会话对象保存在队列中。
闪现消息机制使得可以在一个视图中创建消息,并在下一个调用的视图函数中渲染它。与上一节一样,我们必须首先启用会话工厂才能处理会话。要在消息队列中添加消息,请使用会话对象的 flash() 方法。
request.session.flash('Hello World')
会话具有 pop_flash() 和 peek_flash() 方法。pop_flash() 方法从队列中删除最后添加的消息。peek_flash() 方法如果队列中有消息则返回 true,如果队列为空则返回 false。
这两种方法都用于模板网页中,从队列中获取一条或多条消息,并将其渲染为响应的一部分。
消息闪现示例
下面的示例演示了消息闪现机制。在这里,login() 视图代码检查它是否是由 POST 或 GET 方法调用的。如果方法是 GET,则它会使用用户名和密码字段呈现登录表单。提交的表单将使用 POST 方法提交到相同的 URL。
检测到 POST 方法后,视图进一步检查输入的有效性,并将相应的闪现消息发送到会话队列。这些错误闪现消息由登录模板本身提取,而在闪现成功闪现消息后,客户端将被重定向到 index() 视图以呈现 index 模板。
应用程序代码中的两个视图为 -
@view_config(route_name='login', renderer='templates/login.html')
def login(request):
   if request.method == 'POST':
   if request.POST['password']=='' or request.POST['username']=='':
      request.session.flash('User name and password is required')
      return HTTPFound(location=request.route_url('login'))
   if len(request.POST['password'])in range(1,9):
      request.session.flash('Weak password!')
   if request.POST['username']not in ['admin', 'manager', 'supervisor']:
      request.session.flash('successfully logged in!')
      return HTTPFound(location=request.route_url('index'))
   else:
      request.session.flash('Reserved user ID Forbidden!')
      return HTTPFound(location=request.route_url('login'))
   return {}

@view_config(route_name='index', renderer='templates/index.html')
def index(request):
   return {}
login.html 模板具有以下代码 -
<!doctype html>
<html>
<head>
   <style>
      p {background-color:grey; font-size: 150%}
   </style>
</head>
<body>
   <h1>Pyramid Message Flashing Example</h1>
   {% if request.session.peek_flash()%}
      <div id="flash">
         {% for message in request.session.pop_flash() %}
         <p>{{ message }}</p>
         {% endfor %}
      </div>
   {% endif %}
   <h3>Login Form</h3>
   <form action="" method="POST">
      <dl>
         <dt>Username:
            <dd><input type="text" name="username">
         <dt>Password:
         <dd><input type="password" name="password">
      </dl>
      <input type="submit" value="Login">
   </form>
</body>
</html>
在显示登录表单之前,jinja2 模板代码遍历消息队列,在 <div id='flash'> 部分弹出每条消息。
以下是 index.html 的脚本,它闪现由 login() 视图插入的成功消息 -
<!doctype html>
<html>
<head>
<style>
p {background-color:grey; font-size: 150%}
</style>
</head>
<body>
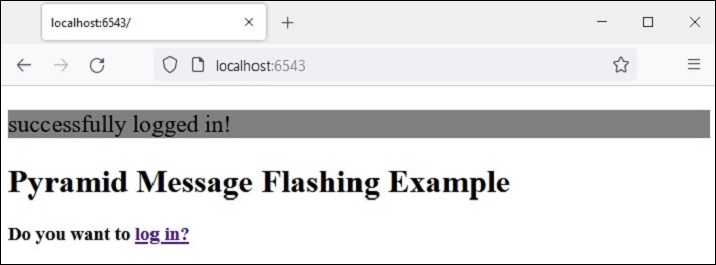
{% if request.session.peek_flash()%}
<div id="flash">
{% for message in request.session.pop_flash() %}
<p>{{ message }}</p>
{% endfor %}
{% endif %}
<h1>Pyramid Message Flashing Example</h1>
<h3>Do you want to <a href = "/login">
<b>log in?</b></a></h3>
</body>
</html>
示例
此示例的应用程序代码为 main.py
from wsgiref.simple_server import make_server
from pyramid.config import Configurator
from pyramid.response import Response
from pyramid.view import view_config
from pyramid.session import SignedCookieSessionFactory
from pyramid.httpexceptions import HTTPFound

my_session_factory = SignedCookieSessionFactory(' abcQWE123!@#')
@view_config(route_name='login', renderer='templates/login.html')
def login(request):
   if request.method == 'POST':
      if request.POST['password']=='' or  request.POST['username']=='':
      request.session.flash('User name and password is required')
      return HTTPFound(location=request.route_url('login'))
   if len(request.POST['password'])in range(1,9):
      request.session.flash('Weak password!')
   if request.POST['username']not in ['admin', 'manager', 'supervisor']:
      request.session.flash('successfully logged in!')
      return HTTPFound(location=request.route_url('index'))
   else:
      request.session.flash('Reserved user ID Forbidden!')
      return HTTPFound(location=request.route_url('login'))
   return {}

@view_config(route_name='index', renderer='templates/index.html')
def index(request):
   return {}

if __name__ == '__main__':
   with Configurator() as config:
      config.set_session_factory(my_session_factory)
      config.include('pyramid_jinja2')
      config.add_jinja2_renderer(".html")
      config.add_route('login','/login')
      config.add_route('index','/')
      config.scan('flash')
      app = config.make_wsgi_app()
   server = make_server('0.0.0.0', 6543, app)
   server.serve_forever()
将此程序代码另存为 Pyramid 虚拟环境中的 flash 子文件夹中的 app.py,并在其中放置一个空白的 __init__.py。将两个模板(“index.html”和“login.html”)存储在 flush\templates 文件夹中。
输出
运行 main.py 并通过单击 https://:6543/login 链接在浏览器中打开登录表单。

尝试输入预留用户名之一“admin”、“manager”或“supervisor”。错误消息将按如下所示闪现 -

这次,输入可接受的凭据并查看结果 -
Python Pyramid - 使用 SQLAlchemy
在本章中,我们将学习如何使用关系数据库作为 Pyramid Web 应用程序的后端。Python 可以使用相应的与 DB-API 兼容的连接器模块或驱动程序与几乎所有关系数据库进行交互。但是,我们将使用 SQLAlchemy 库作为 Python 代码和数据库之间的接口(我们将使用 SQLite 数据库,因为 Python 对其具有内置支持)。SQLAlchemy 是一个流行的 SQL 工具包和对象关系映射器。
对象关系映射是一种编程技术,用于在面向对象编程语言中转换不兼容类型系统之间的数据。通常,面向对象语言(如 Python)中使用的类型系统包含非标量类型。但是,大多数数据库产品(如 Oracle、MySQL 等)中的数据类型都是基本类型,例如整数和字符串。
在 ORM 系统中,每个类都映射到基础数据库中的一个表。ORM 会为您处理这些问题,而您无需自己编写繁琐的数据库接口代码,这样您就可以专注于系统逻辑的编程。
为了使用 SQLALchemy,我们需要首先使用 PIP 安装程序安装库。
pip install sqlalchemy
SQLAlchemy 旨在与为特定数据库构建的 DBAPI 实现一起使用。它使用方言系统与各种类型的 DBAPI 实现和数据库进行通信。所有方言都需要安装相应的 DBAPI 驱动程序。
以下列出了包含的方言:
Firebird
Microsoft SQL Server
MySQL
Oracle
PostgreSQL
SQLite
Sybase
数据库引擎
由于我们将使用 SQLite 数据库,因此需要为名为test.db的数据库创建一个数据库引擎。从sqlalchemy模块导入create_engine()函数。
from sqlalchemy import create_engine
from sqlalchemy.dialects.sqlite import *
SQLALCHEMY_DATABASE_URL = "sqlite:///./test.db"
engine = create_engine(SQLALCHEMY_DATABASE_URL, connect_args = {"check_same_thread": False})
为了与数据库交互,我们需要获取其句柄。会话对象是数据库的句柄。Session 类使用sessionmaker()定义 - 一个可配置的会话工厂方法,它绑定到引擎对象。
from sqlalchemy.orm import sessionmaker, Session
session = sessionmaker(autocommit=False, autoflush=False, bind=engine)
接下来,我们需要一个声明性基类,用于在声明性系统中存储类的目录和映射的表。
from sqlalchemy.ext.declarative import declarative_base
Base = declarative_base()
模型类
Students(Base的子类)映射到数据库中的students表。Students类中的属性对应于目标表中列的数据类型。请注意,id 属性对应于 book 表中的主键。
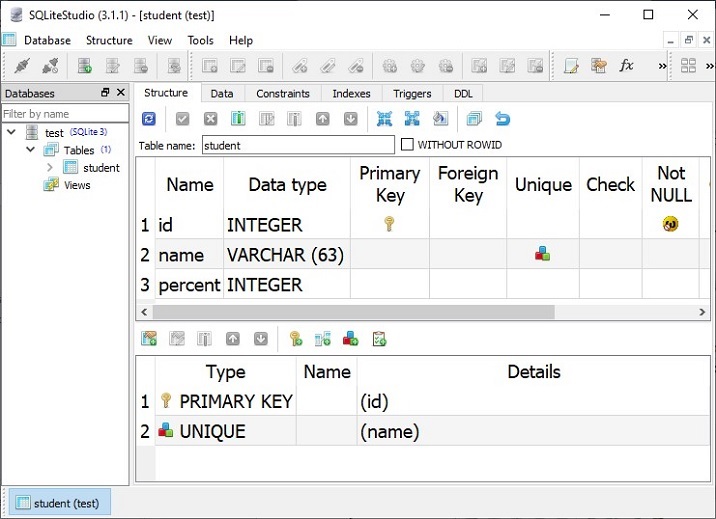
class Students(Base):
   __tablename__ = 'student'
   id = Column(Integer, primary_key=True, nullable=False)
   name = Column(String(63), unique=True)
   marks = Column(Integer)
Base.metadata.create_all(bind=engine)
create_all()方法在数据库中创建相应的表。可以使用 SQLite 可视化工具(例如SQLiteStudio)进行确认。
现在我们将定义视图函数,用于对上述数据库中的学生表执行 CRUD 操作(即添加、显示、修改和删除行)。
添加新的学生记录
首先,我们将创建一个 HTML 表单模板,供用户输入学生数据,并定义一个渲染该模板的视图。以下是myform.html模板
示例
<html>
<body>
   <form method="POST" action="https://:6543/add">
   <p>Student Id: <input type="text" name="id"/> </p>
   <p>student Name: <input type="text" name="name"/> </p>
   <p>Percentage: <input type="text" name="percent"/> </p>
   <p><input type="submit" value="Submit"> </p>
</body>
</html>
在 Pyramid 应用程序代码中,定义 index() 视图函数以渲染上述表单。
from wsgiref.simple_server import make_server
from pyramid.config import Configurator
from pyramid.response import Response
from pyramid.view import view_config

@view_config(route_name='index', renderer='templates/myform.html')
def index(request):
   return {}
在应用程序配置中,为该视图注册与“/new”模式匹配的路由,如下所示:
if __name__ == '__main__':
   with Configurator() as config:
      config.include('pyramid_jinja2')
      config.add_jinja2_renderer(".html")
      config.add_route('index', '/new')
      config.scan()
      app = config.make_wsgi_app()
   server = make_server('0.0.0.0', 6543, app)
   server.serve_forever()
由于上述模板中的 HTML 表单以 POST 动作提交到/add URL,因此我们需要将此 URL 映射到 add 路由,并注册 add() 视图,该视图将表单数据解析为 Students 类的对象。此对象被添加到数据库会话中,并且通过调用其 commit() 方法完成操作。
@view_config(route_name='add', request_method='POST')
def add(request):
   id=request.POST['id']
   name=request.POST['name']
   percent=int(request.POST['percent'])
   student=Students(id=id, name=name, percent=percent)
   session.add(student)
   session.commit()
   return HTTPFound(location='https://:6543/')
确保在配置中添加了 add 路由,并将其映射到 /add URL 模式。
config.add_route('add','/add')
输出
如果我们启动服务器并在浏览器中打开https://:6543/new,则将显示如下所示的输入表单:

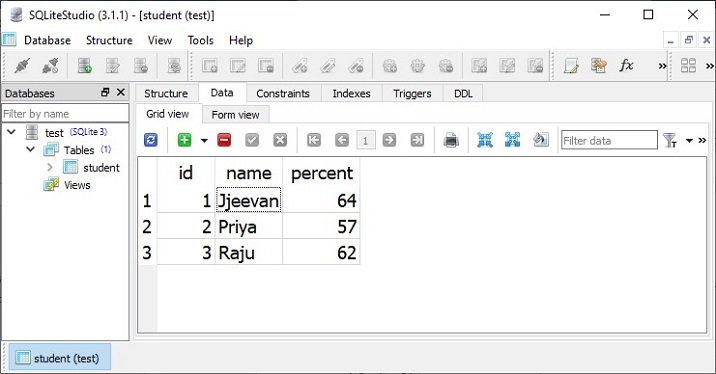
填写表单并按下“提交”按钮。将调用 add() 视图,并在 students 表中添加新记录。重复此过程几次以添加一些记录。以下是一个示例数据:
显示所有记录的列表
通过查询模型获取 Students 模型的所有对象(对应于 students 表中的行)。
rows = session.query(Students).all()
将每一行转换为 dict 对象,将所有这些对象追加到 dict 对象列表中,并将其作为上下文返回到 list.html 模板,以便以 HTML 模板的形式显示。此过程由与 list 路由关联的 showall() 视图函数执行。
@view_config(route_name='list', renderer='templates/marklist.html')
def showall(request):
   rows = session.query(Students).all()
   students=[]
   for row in rows:
      students.append({"id":row.id, "name":row.name, "percent":row.percent})
   return{'students':students}
示例
marklist.html模板将 Students 列表呈现为 HTML 表格。其 HTML/jinja2 脚本如下所示:
<html>
<body>
<table border=1>
   <thead>
      <tr>
         <th>Student ID</th>
         <th>Student Name</th>
         <th>percentage</th>
         <th>Edit</th>
         <th>Delete</th>
      </tr>
   </thead>
   <tbody>
      {% for Student in students %}
         <tr>
         <td>{{ Student.id }}</td> <td>{{ Student.name }}</td>
         <td>{{ Student.percent }}</td>
         <td><a href="/show/{{ Student.id }}">edit</a></td>
         <td><a href="/delete/{{ Student.id }}">delete</a></td>
         </tr>
      {% endfor %}
   </tbody>
</table>
<h3><a href="https://:6543/new">Add new</a></h3>
   </body>
</html>
在配置中添加 list 路由,并将其注册到“/”URL。
config.add_route('list', '/')
输出
启动服务器后,在浏览器中打开https://:6543/。将显示 students 表中现有记录的列表。
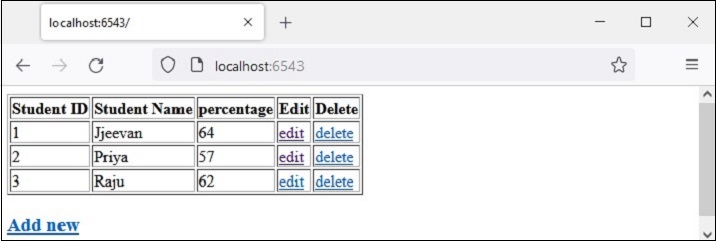
请注意最后两列中的超链接。例如,"id=1"之前的“编辑”链接指向https://:6543/show/1。这些链接旨在执行更新和删除操作。
更新现有记录
在 /show/1 URL 中,有一个尾随路径参数。它在配置中映射到“show”路由。
config.add_route('show', '/show/{id}')
此路由调用 show() 函数。它获取与给定 id 参数对应的记录,使用其内容填充 HTML 表单,并允许用户更新 name 和/或 percent 字段的值。
@view_config(route_name='show', renderer='templates/showform.html')
def show(request):
   id=request.matchdict['id']
   row = session.query(Students).filter(Students.id == id).first()
   student={'id':row.id, 'name':row.name, 'percent':row.percent}
   return {'student':student}
示例
showform.html 模板的 HTML/jinja2 代码如下所示:
<html>
<body>
   <form method="POST" action="https://:6543/update">
   <p>Student Id: <input type="text" name="id" value="{{ student.id }} " readonly/> </p>
   <p>student Name: <input type="text" name="name" value="{{ student.name }}"/> </p>
   <p>Percentage: <input type="text" name="percent" value="{{ student.percent }}"/> </p>
   <p><input type="submit" value="Submit"> </p>
</body>
</html>
输出
让我们更新 id=3 的记录。单击相应的“编辑”链接导航到https://:6543/show/3

更改 marks 文本字段中的值并按下提交。表单将重定向到 /update URL,并调用 update() 视图。它获取提交的数据并更新相应的对象,从而也更新 students 表中的底层行。
@view_config(route_name='update', request_method='POST')
def update(request):
   id=int(request.POST['id'])
   student = session.query(Students).filter(Students.id == id).first()
   student.percent=int(request.POST['percent'])
   session.commit()
   return HTTPFound(location='https://:6543/')
return 语句将浏览器重定向回“/”URL,该 URL 指向 list() 函数并显示更新后的 marklist。

在运行之前,请确保已将 update 路由添加到配置中。
config.add_route('update', '/update')
删除记录
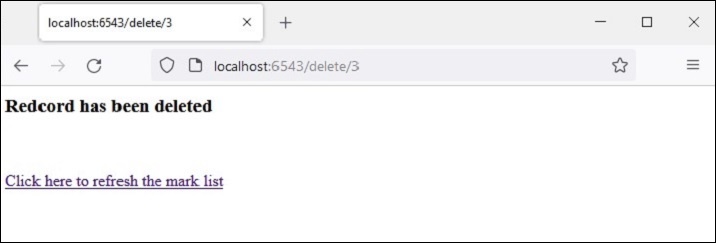
要删除与 marklist 表中某一行对应的记录,请遵循最后一列中的“删除”链接。例如,单击第 3 行中的“删除”会发出https://:6543/delete/3 URL 并调用以下视图函数:
@view_config(route_name='delete', renderer='templates/deleted.html')
def delete(request):
   id=request.matchdict['id']
   row = session.query(Students).filter(Students.id == id).delete()
   return {'message':'Redcord has been deleted'}
示例
删除与从 URL 解析的路径参数对应的对象,并由以下模板- deleted.html呈现相应的消息:
<html>
<body>
   <h3>{{ message}}</h3>
   <br><br>
   <a href="https://:6543/">Click here to refresh the mark list</a>
</body>
</html>
显然,必须在应用程序配置注册表中添加 delete 路由。
config.add_route('delete', '/delete/{id}')
输出
记录删除操作的结果如下所示:
执行上述说明的活动,请执行以下步骤:
在 Pyramid 虚拟环境中创建一个名为testapp的文件夹
在testapp内部,创建templates文件夹。
在 testapp 内部创建一个空白的__init__.py,使其成为一个包。
将 marklist.html、myform.html、showform.html 和 deleted.html 文件放入“testapp\templates”文件夹中。这些文件的代码已在上面给出。
将以下代码另存为testapp中的models.py。
from sqlalchemy.dialects.sqlite import *
from sqlalchemy.ext.declarative import declarative_base
from sqlalchemy import create_engine
from sqlalchemy.orm import sessionmaker
from sqlalchemy.orm import Session
from sqlalchemy import Column, Integer, String
SQLALCHEMY_DATABASE_URL = "sqlite:///./test.db"

Base = declarative_base()

class Students(Base):
      __tablename__ = 'student'
   id = Column(Integer, primary_key=True, nullable=False)
   name = Column(String(63), unique=True)
   percent = Column(Integer)

def getsession():
   engine = create_engine(
      SQLALCHEMY_DATABASE_URL, connect_args={"check_same_thread": False}
   )
   Base.metadata.create_all(bind=engine)
   Session = sessionmaker(bind = engine)
   session = Session()
   return session
将以下代码另存为testapp文件夹中的views.py。
from pyramid.response import Response
from pyramid.view import view_config
from pyramid.httpexceptions import HTTPFound
from models import Students
from main import session

@view_config(route_name='list', renderer='templates/marklist.html')
def showall(request):
   rows = session.query(Students).all()
   students=[]
   for row in rows:
      students.append({"id":row.id, "name":row.name, "percent":row.percent})
      return{'students':students}

@view_config(route_name='index', renderer='templates/myform.html')
def index(request):
   return {}

@view_config(route_name='add', request_method='POST')
def add(request):
   id=request.POST['id']
   name=request.POST['name']
   percent=int(request.POST['percent'])
   student=Students(id=id, name=name, percent=percent)
   session.add(student)
   session.commit()
   return HTTPFound(location='https://:6543/')

@view_config(route_name='update', request_method='POST')
def update(request):
   id=int(request.POST['id'])
   student = session.query(Students).filter(Students.id == id).first()
   student.percent=int(request.POST['percent'])
   session.commit()
   return HTTPFound(location='https://:6543/')

@view_config(route_name='show', renderer='templates/showform.html')
def show(request):
   id=request.matchdict['id']
   row = session.query(Students).filter(Students.id == id).first()
   student={'id':row.id, 'name':row.name, 'percent':row.percent}
   return {'student':student}

@view_config(route_name='delete', renderer='templates/deleted.html')
def delete(request):
   id=request.matchdict['id']
   row = session.query(Students).filter(Students.id == id).delete()
   return {'message':'Redcord has been deleted'}
将以下代码另存为 testapp 文件夹中的 main.py。
from wsgiref.simple_server import make_server
from pyramid.config import Configurator
from models import getsession
session=getsession()

if __name__ == '__main__':
   with Configurator() as config:
      config.include('pyramid_jinja2')
      config.add_jinja2_renderer(".html")
      config.add_route('list', '/')
      config.add_route('index', '/new')
      config.add_route('add','/add')
      config.add_route('show', '/show/{id}')
      config.add_route('update', '/update')
      config.add_route('delete', '/delete/{id}')
      config.scan('testapp')
      app = config.make_wsgi_app()
   server = make_server('0.0.0.0', 6543, app)
   server.serve_forever()
从命令提示符运行main.py。
Python main.py
在浏览器窗口中使用https://:6543/ URL。将显示一个只有标题且没有记录的表格。
按照表格下方的“添加新”链接添加记录。
单击表格中的“编辑”链接更新记录。
单击表格中的“删除”链接删除选定的记录。
Python Pyramid - Cookiecutter
到目前为止,我们已经通过手动执行路由配置、添加视图和使用模板构建了 Pyramid 应用程序。Cookiecutter提供了一种便捷的替代方案来生成 Pyramid 项目结构。它是一个命令行实用程序,使用某些预定义的项目模板。然后可以微调项目以适应用户可能具有的特定需求。
Cookiecutter 创建的 Python 项目是一个 Python 包。可以进一步自定义默认应用程序逻辑。如此创建的项目结构具有极强的可扩展性,并且易于分发。
Cookiecutter 实用程序由Audrey Feldroy开发。它适用于 Python 版本 >=3.7。可以使用 Python、JavaScript、Ruby、CoffeeScript、语言或 RST、Markdown、CSS、HTML 脚本中的项目模板生成项目。Github 托管了许多预构建的项目模板,任何一个都可以使用。
从 cookiecutter 模板构建的项目是一个跨平台包。Cookiecutter 项目生成是完全自动化的,您无需为此编写任何代码。一旦调用 cookiecutter 命令,它就会读取正在使用的模板,并提示用户为设置参数选择适当的值。首先,使用 PIP 安装程序安装 Cookiecutter。
pip install cookiecutter
要验证 Cookiecutter 是否已正确安装,请运行
>>> import cookiecutter
>>> cookiecutter.__version__
'1.7.3'
Python Pyramid - 创建项目
假设 Pyramid 虚拟环境正在运行,并且 Cookiecutter 已安装在其中。创建 Cookiecutter 项目最简单的方法是使用预构建的启动模板,如下面的命令所示:
cookiecutter gh:Pylons/pyramid-cookiecutter-starter --checkout 2.0-branch
模板将被下载,并询问用户选择的项目名称:
project_name [Pyramid Scaffold]: testproj
repo_name [testproj]:
然后选择模板语言。
选择template_language:
1 - jinja2
2 - chameleon
3 - mako
Choose from 1, 2, 3 [1]: 1
由于我们熟悉 jinja2,因此选择 1。接下来,使用 SQLALchemy 作为后端。
Select backend:
1 - none
2 - sqlalchemy
3 - zodb
Choose from 1, 2, 3 [1]: 2
在testproj文件夹内部,将创建以下文件结构:
│ development.ini
│ MANIFEST.in
│ production.ini
│ pytest.ini
│ README.txt
│ setup.py
│ testing.ini
│
├───testproj
│ │ pshell.py
│ │ routes.py
│ │ __init__.py
│ │
│ ├───alembic
│ │ │ env.py
│ │ │ script.py.mako
│ │ │
│ │ └───versions
│ │ README.txt
│ │
│ ├───models
│ │ meta.py
│ │ mymodel.py
│ │ __init__.py
│ │
│ ├───scripts
│ │ initialize_db.py
│ │ __init__.py
│ │
│ ├───static
│ │ pyramid-16x16.png
│ │ pyramid.png
│ │ theme.css
│ │
│ ├───templates
│ │ 404.jinja2
│ │ layout.jinja2
│ │ mytemplate.jinja2
│ │
│ └───views
│ default.py
│ notfound.py
│ __init__.py
│
└───tests
    conftest.py
    test_functional.py
    test_views.py
    __init__.py
外部testproj文件夹有一个内部testproj包子文件夹和 tests 包。内部testproj子文件夹是一个包,包含 models 和 scripts、子包以及 static 和 templates 文件夹。
接下来,使用 Alembic 初始化和升级数据库。
# Generate your first revision.
alembic -c development.ini revision --autogenerate -m "init"
# Upgrade to that revision.
alembic -c development.ini upgrade head
Alembic 是一个轻量级的数据库迁移工具,用于与 Python 的 SQLAlchemy 数据库工具包一起使用。外部项目文件夹现在将显示一个testproj.sqlite数据库。
development.ini 文件为数据库提供默认数据。通过以下命令填充数据库:
initialize_testproj_db development.ini
Cookiecutter 实用程序还在 tests 包中生成测试套件。它们基于PyTest包。继续检查测试是否通过。
Pytest
================ test session starts ======================
platform win32 -- Python 3.10.1, pytest-7.1.2, pluggy-1.0.0
rootdir: F:\pyram-env\testproj, configfile: pytest.ini, testpaths: testproj, tests
plugins: cov-3.0.0
collected 5 items

tests\test_functional.py .. [ 40%]
tests\test_views.py ... [100%]
=============== 5 passed, 20 warnings in 6.66s ===============
Cookiecutter 使用 Waitress 服务器。Pyramid 应用程序通过以下命令在 localhost 的端口 6543 上提供服务:
pserve development.ini
Starting server in PID 67700.
2022-06-19 23:43:51,308 INFO [waitress:485][MainThread] Serving on http://[::1]:6543
2022-06-19 23:43:51,308 INFO [waitress:485][MainThread] Serving on http://127.0.0.1:6543
打开浏览器并在其中访问https://:6543/。将显示新创建项目的首页,如下所示:

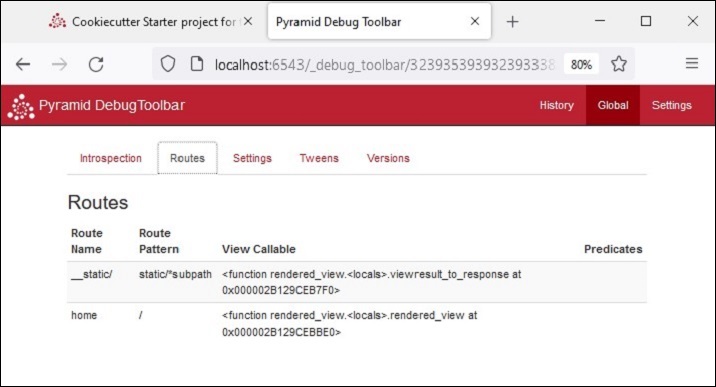
调试工具栏
您可以在主页的右上方找到一个较小的 Pyramid 徽标。单击它以打开一个新标签页和一个调试工具栏,该工具栏提供有关该项目的许多有用信息。
例如,历史记录标题下的 SQLAlchemy 选项卡显示 SQLAlchemy 查询,显示从development.ini中的默认数据创建的模型的结构。
全局标题再次显示诸如 Introspection、Routes 等选项卡,如下所示。单击“Routes”选项卡以查看应用程序配置中定义的路由及其匹配模式。
Python Pyramid - 项目结构
如前所述,外部 testproj 文件夹包含 testproj 和 test 包。此外,它还包含其他用于描述、运行和测试应用程序的文件。这些文件是:
MANIFEST.in包含要包含在包源分发中的文件列表。
development.ini 是一个 PasteDeploy 配置文件,可用于在开发过程中执行您的应用程序。
production.ini 是一个 PasteDeploy 配置文件,可用于在生产环境中执行您的应用程序。
pytest.ini 是一个用于运行测试的配置文件。
setup.py 是标准的 Setuptools setup.py 文件,用于测试和分发应用程序。
testing.ini 是一个用于执行应用程序测试的配置文件。
“.ini” 文件是由 Cookiecutter 工具用于生成 Pyramid 应用程序结构的配置文件。这些文件使用一个名为 PasteDeploy 的系统,该系统由 Ian Bicking 开发。此库会与 Pyramid 一起自动安装。
虽然可以在没有 PasteDeploy 支持的情况下开发 Pyramid 应用程序,但它提供了一种标准化的方式来启动、调试和测试应用程序。
预定义的设置从配置文件(扩展名为 .ini)中读取。这些文件主要包含应用程序配置设置、服务器设置和日志设置。
development.ini
如前所述,使用 Cookiecutter 构建的 Pyramid 应用程序可以通过以下命令调用:
pserve development.ini
development.ini 包含应用程序的 PasteDeploy 配置规范。此文件中的配置规范具有各种部分,例如 [app:main]、[server:main]、[loggers] 等。
最重要的部分是 [app:main]。它指定应用程序的起点。
[app:main]
use = egg:testproj

pyramid.reload_templates = true
pyramid.debug_authorization = false
pyramid.debug_notfound = false
pyramid.debug_routematch = false
pyramid.default_locale_name = en
pyramid.includes = pyramid_debugtoolbar

sqlalchemy.url = sqlite:///%(here)s/testproj.sqlite

retry.attempts = 3
第一项条目“use = egg:testproj”指示 Pyramid WSGI 应用程序对象 main 的名称。它在 textproj 包的 __init__.py 文件(在 testproj 项目文件夹内)中声明。此部分包含其他启动时配置设置。
例如,“pyramid.includes” 设置指定要在运行时包含的包。在上面的示例中,包含了 debugtoolbar 包,以便在单击 Pyramid 徽标时激活调试面板。我们在前面的部分中看到了它的功能。
我们还看到,此应用程序中要使用的数据库的 URL 也已指定。
[server:main] 部分指定侦听 TCP 端口 6543 的 WSGI 服务器的配置。它配置为仅侦听本地主机 (127.0.0.1)。
[server:main]
use = egg:waitress#main
listen = localhost:6543
其他各种与日志相关的部分使用 Python 的日志记录库。这些“.ini” 文件部分传递到日志记录模块的配置文件配置引擎。
production.ini
当应用程序在生产模式下部署时,此文件用于服务应用程序,而不是“development.ini”。这两个文件类似。但是,在“production.ini”中,调试工具栏被禁用,重新加载选项被禁用,并关闭调试选项。
以下是典型“production.ini”文件的简化版本:
[app:main]
use = egg:testproj
pyramid.reload_templates = false
pyramid.debug_authorization = false
pyramid.debug_notfound = false
pyramid.debug_routematch = false
pyramid.default_locale_name = en
sqlalchemy.url = sqlite:///%(here)s/testproj.sqlite
retry.attempts = 3
[pshell]
setup = testproj.pshell.setup
[alembic]
script_location = testproj/alembic
file_template = %%(year)d%%(month).2d%%(day).2d_%%(rev)s
[server:main]
use = egg:waitress#main
listen = *:6543
[loggers]
keys = root, testproj, sqlalchemy, alembic
[handlers]
keys = console
[formatters]
keys = generic
[logger_root]
level = WARN
handlers = console
[logger_testproj]
level = WARN
handlers =
qualname = testproj
[logger_sqlalchemy]
level = WARN
handlers =
qualname = sqlalchemy.engine
[logger_alembic]
level = WARN
handlers =
qualname = alembic
[handler_console]
class = StreamHandler
args = (sys.stderr,)
level = NOTSET
formatter = generic
[formatter_generic]
format = %(asctime)s %(levelname)-5.5s [%(name)s:%(lineno)s][%(threadName)s] %(message)s
Python Pyramid - 包结构
Cookiecutter 工具会在父项目文件夹内自动创建一个同名的包文件夹。包文件夹包含以下文件和子文件夹。
__init__.py
一个文件夹需要 __init__.py 文件才能被视为 Python 包。testproj 包也具有此文件,它实际上声明了 Pyramid WSGI 应用程序项目,以便 development.ini 使用它作为入口点。
应用程序对象由 main() 函数返回。它通过包含在运行 cookiecutter 时选择的模板库、包含 routes 模块以及通过扫描现有包将视图添加到配置器来配置应用程序注册表。以下 Python 代码作为 __init__.py 文件自动生成。
from pyramid.config import Configurator
def main(global_config, **settings):
   """ This function returns a Pyramid WSGI application.
   """
   with Configurator(settings=settings) as config:
      config.include('pyramid_jinja2')
      config.include('.routes')
      config.include('.models')
      config.scan()
   return config.make_wsgi_app()
routes.py
Cookiecutter 工具会自动生成一个 Python 脚本,其中包含一个名为 includeme() 的函数。它添加了一个静态路由和一个指向“/”URL 模式的首页路由。
def includeme(config):
   config.add_static_view('static', 'static', cache_max_age=3600)
   config.add_route('home', '/')
这些路由由上面解释的 __init__.py 文件中的 main() 函数添加到应用程序配置中。
视图包
项目包(在我们的例子中是 testproj 包)包含此视图子包 - 一个包含空白 __init__.py 的文件夹,一个名为 default.py 的 Python 模块,其中包含名为 my_view() 的视图函数的定义。它将项目的名称作为上下文发送到预构建的模板 mytemplate.jinja2
from pyramid.view import view_config
from pyramid.response import Response
from sqlalchemy.exc import SQLAlchemyError
from .. import models

@view_config(route_name='home', renderer='testproj:templates/mytemplate.jinja2')
def my_view(request):
   try:
      query = request.dbsession.query(models.MyModel)
      one = query.filter(models.MyModel.name == 'one').one()
   except SQLAlchemyError:
      return Response(db_err_msg, content_type='text/plain', status=500)
   return {'one': one, 'project': 'testproj'}

db_err_msg = """\
Pyramid is having a problem using your SQL database.
....
"""
default.py 脚本还导入 models 子包中 mymodel 的定义。此视图包还在 notfound.py 文件中定义了一个 notfound 视图。
from pyramid.view import notfound_view_config
@notfound_view_config(renderer='testproj:templates/404.jinja2')
def notfound_view(request):
   request.response.status = 404
   return {}
静态文件夹
testproj 包文件夹下的此文件夹包含 Pyramid 徽标文件和主页的 theme.CSS。
模板文件夹
我们知道 Web 模板需要存储在 templates 文件夹中。此子文件夹包含 jinja2 模板。这里我们有一个名为 layout.jinja2 的基本模板,它被 mytemplate.jinja2 继承以由 my_view() 视图函数呈现。
{% extends "layout.jinja2" %}

{% block content %}
<div class="content">
   <h1><span class="font-semi-bold">Pyramid</span> <span class="smaller">Starter project</span></h1>
   <p class="lead">Welcome to <span class="font-normal">{{project}}</span>, a Pyramid application generated by<br><span class="font-normal">Cookiecutter</span>.</p>
</div>
{% endblock content %}
模型包
tesptproj 包文件夹下的此子包包含 mymodel.py,其中包含名为 MyModel 的 SQLAlchemy 模型的定义。
from sqlalchemy import (
   Column,
   Index,
   Integer,
   Text,
)

from .meta import Base
class MyModel(Base):
   __tablename__ = 'models'
   id = Column(Integer, primary_key=True)
   name = Column(Text)
   value = Column(Integer)
Index('my_index', MyModel.name, unique=True, mysql_length=255)
meta.py 在 SQLAlchemy 中声明了 Declarative Base 类的对象。
from sqlalchemy.ext.declarative import declarative_base
from sqlalchemy.schema import MetaData

NAMING_CONVENTION = {
   "ix": "ix_%(column_0_label)s",
   "uq": "uq_%(table_name)s_%(column_0_name)s",
   "ck": "ck_%(table_name)s_%(constraint_name)s",
   "fk": "fk_%(table_name)s_%(column_0_name)s_%(referred_table_name)s",
   "pk": "pk_%(table_name)s"
}
metadata = MetaData(naming_convention=NAMING_CONVENTION)
Base = declarative_base(metadata=metadata)
Python Pyramid - 手动创建项目
Cookiecutter 工具使用预定义的项目模板来自动生成项目和包结构。对于复杂项目,它可以节省大量手动努力来正确组织各种项目组件。
但是,可以手动构建 Pyramid 项目,而无需使用 Cookiecutter。在本节中,我们将了解如何在以下简单步骤中构建一个名为 Hello 的 Pyramid 项目。
setup.py
在 Pyramid 虚拟环境中创建项目目录。
md hello
cd hello
并将以下脚本保存为 setup.py
from setuptools import setup

requires = [
   'pyramid',
   'waitress',
]
setup(
   name='hello',
   install_requires=requires,
   entry_points={
      'paste.app_factory': [
         'main = hello:main'
      ],
   },
)
如前所述,这是一个 Setuptools 设置文件,它定义了安装包依赖项的要求。
运行以下命令以安装项目并在名称为 hello.egg-info 的情况下生成“egg”。
pip3 install -e.
development.ini
Pyramid 使用 PasteDeploy 配置文件主要用于指定主应用程序对象和服务器配置。我们将使用 hello 包的 egg 信息中的应用程序对象,以及侦听本地主机 5643 端口的 Waitress 服务器。因此,将以下代码段保存为 development.ini 文件。
[app:main]
use = egg:hello

[server:main]
use = egg:waitress#main
listen = localhost:6543
__init__.py
最后,应用程序代码驻留在此文件中,这对于将 hello 文件夹识别为包也至关重要。
代码是一个基本的 Hello World Pyramid 应用程序代码,具有 hello_world() 视图。main() 函数将此视图注册到具有“/”URL 模式的 hello 路由,并返回由 Configurator 的 make_wsgi_app() 方法给出的应用程序对象。
from pyramid.config import Configurator
from pyramid.response import Response
def hello_world(request):
   return Response('<body><h1>Hello World!</h1></body>')
def main(global_config, **settings):
   config = Configurator(settings=settings)
   config.add_route('hello', '/')
   config.add_view(hello_world, route_name='hello')
   return config.make_wsgi_app()
最后,借助 pserve 命令为应用程序提供服务。
pserve development.ini --reload
Python Pyramid - 命令行 Pyramid
Pyramid 库有一个 scripts 子包,它包含许多可用于控制和检查 Pyramid 应用程序的 Python 脚本。这些模块既可以作为可导入的模块使用,也可以从命令提示符使用。因此,它们通常被称为命令行脚本。
这些命令行脚本是:
pserve - 为使用 PasteDeploy 配置文件的 Web 应用程序提供服务。
pviews - 显示给定 URL 的匹配视图。
pshell - 交互式 Shell。
proutes - 显示所有应用程序路由。
ptweens - 显示“Tweens”。
prequest - 调用请求。
pdistreport - 显示所有已安装的发行版及其版本。
所有这些命令行脚本都使用 PasteDeploy 配置文件 (development.ini)。
pserve
这是最重要的脚本。使用选定的服务器 (Waitress) 和提到的主机和端口 (localhost:6543) 为“development.ini” [app:main] 部分中配置的 Pyramid 应用程序提供服务。
假设 Pyramid 项目 (testproj) 在 Pyramid 虚拟环境中同名文件夹中创建,则以下命令开始侦听传入的浏览器请求:
Env>..\scripts\pserve development.ini
pserve 模块(以及其他 Pyramid 命令行脚本)可以在命令提示符下作为 Python 解释器的参数运行。
Env>python -m pyramid.scripts.pserve development.ini
Starting server in PID 1716.
2022-06-23 14:13:51,492 INFO [waitress:485][MainThread] Serving on http://[::1]:6543
2022-06-23 14:13:51,492 INFO [waitress:485][MainThread] Serving on http://127.0.0.1:6543
为了使 pserve 实用程序更灵活,可以使用以下命令行参数:
config_uri - 配置文件的 URI。
-n <name> - 加载命名的应用程序(默认值为 main)。
-s <server_type> - 使用命名的服务器。
--server-name <section_name> - 使用配置文件中定义的命名服务器(默认值:main)
--reload - 使用自动重启文件监视器。
-b - 在 Web 浏览器中打开服务器 URL。
应用程序在 https://:6543 上提供服务,在这种情况下,访问受到限制,因此只有在同一台机器上运行的浏览器才能访问。如果要让同一网络上的其他机器访问,则编辑“development.ini”文件,并将 [server:main] 部分中的侦听值替换为如下所示:
[server:main]
use = egg:waitress#main
listen = *:6543
设置 *:6543 等效于 0.0.0.0:6543 [::]:6543,因此,应用程序响应系统拥有的所有 IP 地址上的请求,而不仅仅是本地主机的请求。
pserve 命令行中的 --reload 选项会导致应用程序在修改正在运行的代码时自动重新加载。
使用 --reload 选项启动应用程序。
pserve development.ini --reload
Starting monitor for PID 36224.
Starting server in PID 36224.
Serving on https://:6543
Serving on https://:6543
如果对项目的 .py 文件或 .ini 文件进行了任何更改,服务器将自动重新启动:
testproj/development.ini changed; reloading ...
Gracefully killing the server.
Starting monitor for PID 36286.
Starting server in PID 36286.
Serving on https://:6543
Serving on https://:6543
pviews
pviews 命令行脚本用于在命令终端窗口中打印给定 URL 的匹配路由和视图的摘要。pviews 命令接受两个参数。第一个参数是应用程序的“.ini”文件和其中包含的部分名称的路径。这应该采用 config_file#section_name 的格式(默认值为 main)。第二个参数是要测试匹配视图的 URL。
让我们使用之前使用 Cookiecutter 构建的 testproj 项目中的 development.ini 文件运行 pviews 命令。
Env>..\scripts\pviews development.ini /
URL = /
   context: <pyramid.traversal.DefaultRootFactory object at 0x000001DD39BF1DE0>
   view name:
   Route:
   ------
   route name: home
   route pattern: /
   route path: /
   subpath:

      View:
      -----
      testproj.views.default.my_view
输出显示顶部的请求 URL,并在其下方显示所有匹配的视图及其视图配置详细信息。在此示例中,只有一个视图匹配,因此只有一个 View 部分。
pshell
pshell 脚本使能够从 Python 提示符与 Pyramid 应用程序的环境进行交互。此 Shell 使用 PasteDeploy 配置文件,即 development.ini 作为命令行参数(如其他 Pyramid 脚本),并打开 Python 交互式 Shell。
Env>..\scripts\pshell development.ini
Python 3.10.1 (tags/v3.10.1:2cd268a, Dec 6 2021, 19:10:37) [MSC v.1929 64 bit (AMD64)] on win32
Type "help" for more information.

Environment:
   app                    The WSGI application.
   dbsession              <sqlalchemy.orm.session.Session object at 0x0000020E9F1452D0>
   models                 <module 'testproj.models' from 'f:\\pyram-env\\testproj\\testproj\\models\\__init__.py'>
   registry               Active Pyramid registry.
   request                Active request object.
   root                   Root of the default resource tree.
   root_factory           Default root factory used to create `root`.
   tm                     Single-thread implementation of `~transaction.interfaces.ITransactionManager`.

>>>
脚本读取配置,并在其中声明的对象作为 Python 对象提供,以进行交互。我们可以从 Python 提示符检查它们的行为。
>>> root
<pyramid.traversal.DefaultRootFactory object at 0x0000020E9E2507F0>
>>> registry
<Registry testproj>
注册表设置从“development.ini”读取到字典中。我们可以使用 for 循环遍历其内容:
>>> for k,v in registry.settings.items():
... print (k,":",v)
...
pyramid.reload_templates : True
pyramid.debug_authorization : False
pyramid.debug_notfound : False
pyramid.debug_routematch : False
pyramid.default_locale_name : en
pyramid.includes :
pyramid_debugtoolbar
sqlalchemy.url : sqlite:///…\testproj/testproj.sqlite
retry.attempts : 3
tm.manager_hook : <function explicit_manager at 0x000001D9E64E4550>
甚至可以使用在 models.py 中声明的 SQLAlchemy 模型与数据库进行交互。
当我们第一次完成 cookiecutter 步骤时,应用程序数据库会在开始时初始化。我们在“testproj.sqlite”数据库中找到一个 models 表,其中包含一条记录。
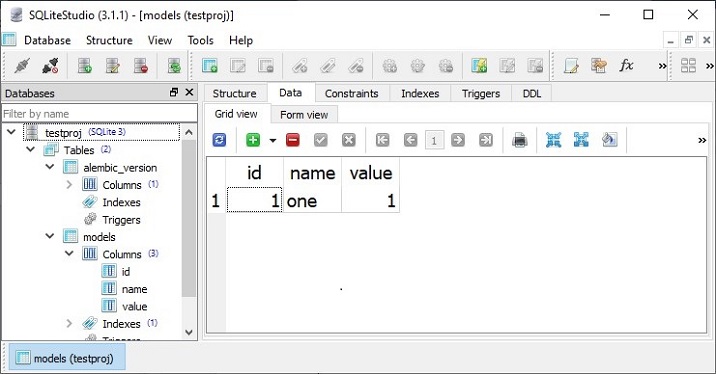
我们现在从 Python 提示符访问此表,如下所示:
>>> m=models.MyModel

>>> obj=dbsession.query(m).get(1)
>>> obj
<testproj.models.mymodel.MyModel object at 0x0000020E9FD96DA0>
>>> obj.name
'one'
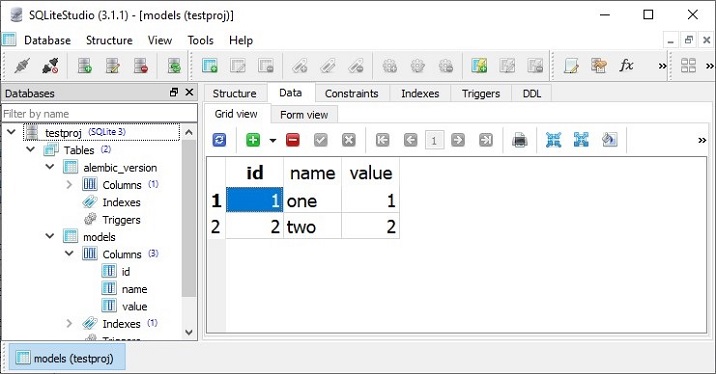
让我们在 models 表中添加一行。首先声明 MyModel 类的对象,并将其添加到 dbsession 中。
>>> tm.begin()
>>> obj=models.MyModel(id=2, name='two', value=2)
>>> dbsession.add(obj)
>>> tm.commit()
Pyramid 使用事务管理器对象 tm,该对象在 pyramid_tm 包中声明。为了确认添加了新记录,请将其取回。
>>> obj=dbsession.query(models.MyModel).get(2)
>>> obj.name
'two'
也可以通过在 SQLite GUI 工具中实际查看数据库的 models 表来确认这一点。
prequest
prerequisite 工具允许您测试 URL 模式的响应,而无需实际启动服务器。该命令需要配置文件和 URL 路径作为命令行参数。例如 -
Env>prequest development.ini /
该命令会生成我们之前见过的 Cookiecutter 首页的原始 HTML 响应。
可以使用一些命令行开关。-d 选项显示服务器返回的状态和标头。要覆盖默认的 GET 请求方法,可以使用 -m 选项。
proutes
此命令行 Pyramid 脚本显示添加到应用程序注册表中的所有路由。它只接受一个参数,即配置文件 (development.ini)
proutes 命令显示以下 testproj 包的路由配置 -
Env>proutes development.ini
Name                       Pattern                                                        View
----                       -------                                                        ----
__static/                  /static/*subpath                                               testproj:static/
home                       /                                                              testproj.views.default.my_view
debugtoolbar               /_debug_toolbar/*subpath                                       <unknown>
__/_debug_toolbar/static/  /_debug_toolbar/static/*subpath pyramid_debugtoolbar:static/
Python Pyramid - 测试
编写测试脚本以确保您的代码正常工作被认为是一种良好的编程实践。Python 生态系统有许多测试框架,包括标准库中捆绑的 **unittest**。**Pytest** 是一个流行的测试库。它是 Pyramid 项目的首选库。
我们将使用之前在演示 **PasteDeploy** 配置时开发的 hello 包。
首先,确保 Pyramid 环境已安装 **PyTest** 包。
pip3 install pytest
在 hello 包中打开 **setup.py** 文件,并通过添加粗体显示的行对其进行修改。
from setuptools import setup

requires = [
   'pyramid',
   'waitress',
]
dev_requires = ['pytest',]
setup(
   name='hello',
   install_requires=requires,
   extras_require={
      'dev': dev_requires,
   },
   entry_points={
      'paste.app_factory': [
         'main = hello:main'
      ],
   },
)
在这里,每当使用以下命令安装(或重新安装)时,Pytest 都会作为项目依赖项添加 -
pip3 install -e ".[dev]
将以下 Python 代码存储为 hello 包中的 testing.py。
import unittest
from pyramid import testing
class HelloTests(unittest.TestCase):
   def test_hello_world(self):
      from . import hello_world
      request = testing.DummyRequest()
      response = hello_world(request)
      self.assertEqual(response.status_code, 200)
要运行测试,请使用以下 Pytest 命令。测试输出如下所示 -
Env\hello>pytest tests.py
========================== test session starts ==========================
platform win32 -- Python 3.10.1, pytest-7.1.2, pluggy-1.0.0
rootdir: E:\tp-pyramid\hello
collected 1 item

tests.py.
   [100%]

=========================== 1 passed in 1.12s ===========================
要检查测试是否失败,请在测试函数中引入错误并再次运行。
(tp-pyramid) E:\tp-pyramid\hello>pytest tests.py
========================== test session starts ==========================
collected 1 item

tests.py F
[100%]
=============================== FAILURES ================================
______________________ HelloTests.test_hello_world ______________________
self = <hello.tests.HelloTests testMethod=test_hello_world>
   def test_hello_world(self):
      from . import hello_world
      request = testing.DummyRequest()
      response = hello_world(request)
>     self.assertEqual(response.status_code, 404)
E     AssertionError: 200 != 404

tests.py:13: AssertionError
======================== short test summary info ========================
FAILED tests.py::HelloTests::test_hello_world - AssertionError: 200 != 404
=========================== 1 failed in 1.53s ===========================
功能测试
尽管单元测试在测试驱动开发 (TDD) 方法中得到了广泛使用,但对于 Web 应用程序,**WebTest** 是一个执行功能测试的 Python 包。我们可以模拟针对 WSGI 应用程序的完整 HTTP 请求,然后测试响应中的信息。
示例
让我们使用我们在前面示例中使用的 hello 项目。打开 setup.py 并将 WebTest 添加为项目依赖项。
from setuptools import setup

requires = [
   'pyramid',
   'waitress',
]
dev_requires = ['pytest','webtest',]
setup(
   name='hello',
   install_requires=requires,
   extras_require={
      'dev': dev_requires,
   },
   entry_points={
      'paste.app_factory': [
         'main = hello:main'
      ],
   },
)
重新安装 hello 包及其用于开发模式的新依赖项。
Env\hello>..\scripts\pip3 install -e ".[dev]"
在 **tests.py** 文件中包含功能测试
import unittest
from pyramid import testing

class HelloTests(unittest.TestCase):

   def test_hello_world(self):
      from . import hello_world
      request = testing.DummyRequest()
      response = hello_world(request)
      self.assertEqual(response.status_code, 200)
class HelloFunctionalTests(unittest.TestCase):
   def setUp(self):
      from . import main
      app = main({})
      from webtest import TestApp
      self.testapp = TestApp(app)
   def test_hello_world(self):
      res = self.testapp.get('/', status=200)
      self.assertIn(b'<h1>Hello World!</h1>', res.body)
输出
最后,根据以下命令运行 Pytest -
Env\hello>pytest tests.py
========================== test session starts ==========================
platform win32 -- Python 3.10.1, pytest-7.1.2, pluggy-1.0.0
rootdir: E:\tp-pyramid\hello
collected 2 items
tests.py .. [100%]

=========================== 2 passed in 2.37s ===========================
Cookiecutter 项目中的测试
CookieCutter 实用程序自动生成包含功能测试和单元测试的 tests 包。我们之前使用 Cookiecutter 构建了一个名为 testproj 的 Pyramid 项目。在这个项目中,我们找到了 tests 文件夹。
示例
test_functional.py 包含以下测试函数 -
from testproj import models

def test_my_view_success(testapp, dbsession):
   model = models.MyModel(name='one', value=55)
   dbsession.add(model)
   dbsession.flush()
   res = testapp.get('/', status=200)
   assert res.body

def test_notfound(testapp):
   res = testapp.get('/badurl', status=404)
   assert res.status_code == 404
test_views.py 定义以下测试函数来测试视图 -
from testproj import models
from testproj.views.default import my_view
from testproj.views.notfound import notfound_view

def test_my_view_failure(app_request):
info = my_view(app_request)
assert info.status_int == 500

def test_my_view_success(app_request, dbsession):
   model = models.MyModel(name='one', value=55)
   dbsession.add(model)
   dbsession.flush()
   info = my_view(app_request)
   assert app_request.response.status_int == 200
   assert info['one'].name == 'one'
   assert info['project'] == 'testproj'
def test_notfound_view(app_request):
   info = notfound_view(app_request)
   assert app_request.response.status_int == 404
   assert info == {}
输出
这些测试由以下命令运行 -
Env\testproj>Pytest
========================== test session starts ==========================
platform win32 -- Python 3.10.1, pytest-7.1.2, pluggy-1.0.0
rootdir: Env\testproj, configfile: pytest.ini, testpaths: testproj, tests
plugins: cov-3.0.0
collected 5 items

tests\test_functional.py .. [ 40%]
tests\test_views.py ... [100%]
=============== 5 passed, 20 warnings in 6.66s ===============
Python Pyramid - 日志记录
为了收集有关应用程序的有用信息,Pyramid 使用 Python 标准库中的 **logging** 模块。它在开发和生产模式下都非常有用,可以在应用程序运行期间检测任何问题。应用程序日志可以包含您自己的消息以及来自第三方模块的消息。
记录的消息具有以下预定义类型(按严重性降序排列) -
- CRITICAL
- ERROR
- WARNING
- INFO
- DEBUG
- NOTSET
默认情况下,日志消息被重定向到 sys.stderr 流。要开始收集日志消息,我们需要声明一个 Logger 对象。
import logging
log = logging.getLogger(__name__)
现在可以使用与所需日志级别相对应的 logger 方法生成日志消息。要生成一条对调试应用程序有用的消息,请使用带有适当消息字符串的 **log.debug()** 消息。
基于 PasteDeploy 配置的 Pyramid 应用程序使启用日志支持变得非常容易。PasteDEploy 文件(development.ini 和 production.ini)使用日志模块配置参数中使用的 **ConfigParser** 格式。development.ini 中与日志相关的部分在 pserve 命令调用时传递给日志模块的配置过程。
配置文件中的各种 logger 部分指定应用程序对象的键、格式和 logger 级别。
在典型的“development.ini”文件中声明了以下与日志相关的部分 -
# Begin logging configuration
[loggers]
keys = root, hello
[logger_hello]
level = DEBUG
handlers =
qualname = hello
[handlers]
keys = console
[formatters]
keys = generic
[logger_root]

#level = INFO
level=DEBUG
handlers = console
[handler_console]
class = StreamHandler
args = (sys.stderr,)
level = NOTSET
formatter = generic
[formatter_generic]
format = %(asctime)s %(levelname)-5.5s [%(name)s][%(threadName)s] %(message)s

# End logging configuration
让我们将这些部分添加到上一章中 Hello 应用程序的 **development.ini** 文件中。
示例
接下来,声明 Logger 对象并在 **hello_world()** 函数中放置一条调试消息。这是 **__init__.py** 代码 -
from pyramid.config import Configurator
from pyramid.response import Response
from pyramid.view import view_config
import logging

log = logging.getLogger(__name__)

from pyramid.renderers import render_to_response

def hello_world(request):
   log.debug('In hello view')
   return render_to_response('templates/hello.html',
{'name':request.matchdict['name']},request=request)

def main(global_config, **settings):
   config = Configurator(settings=settings)
   config.include('pyramid_jinja2')
   config.add_jinja2_renderer(".html")
   config.add_route('hello', '/{name}')
   config.add_view(hello_world, route_name='hello')
   return config.make_wsgi_app()
hello_world() 视图呈现以下 hello.html 模板 -
<html>
   <body>
      <h1>Hello, {{ name }}!</h1>
   </body>
</html>
照常运行应用程序 -
pserve development.ini
当在浏览器中输入 **https://:6543/Tutorialpoint** URL 时,命令窗口会回显以下调试消息 -
Starting monitor for PID 11176.
Starting server in PID 8472.
2022-06-26 01:22:47,032 INFO [waitress][MainThread] Serving on http://[::1]:6543
2022-06-26 01:22:47,032 INFO [waitress][MainThread] Serving on http://127.0.0.1:6543
2022-06-26 01:22:47,418 DEBUG [hello][waitress-1] In hello view
输出
由于在配置中启用了调试工具栏,因此它会显示在浏览器中 -
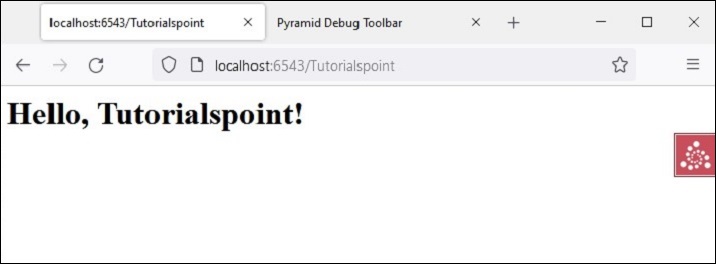
调试消息也显示在调试工具栏的日志选项卡上,如下所示 -
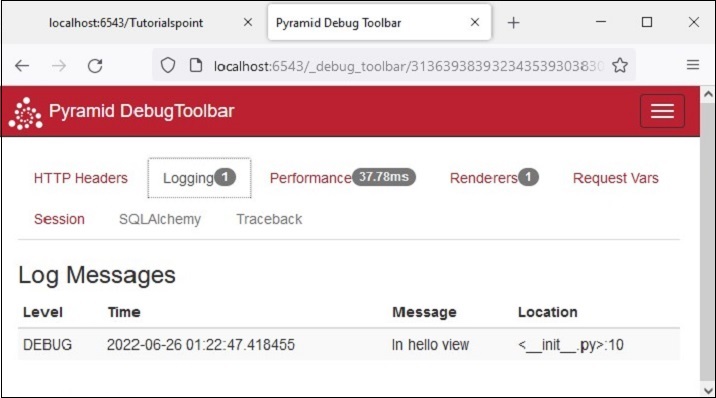
Python Pyramid - 安全性
Pyramid 的声明式安全系统确定当前用户的身份并验证用户是否可以访问某些资源。安全策略可以阻止用户调用视图。在调用任何视图之前,授权系统使用请求中的凭据来确定是否允许访问。
安全策略定义为一个类,该类通过 **pyramid.security** 模块中定义的以下方法控制用户访问 -
**forget(request)** - 此方法返回适合“忘记”当前已认证用户拥有的凭据集的标头元组。它通常在视图函数的主体中使用。
**remember(request, userid)** - 此方法在请求的响应上返回一系列标头元组。它们适合使用当前安全策略“记住”一组凭据,例如 userid。常见的用法可能在视图函数的主体中如下所示。
已认证用户的访问由此模块中的 **Allowed** 和 **Denied** 类的对象控制。
为了实现身份、记住和忘记机制的功能,Pyramid 提供了以下在 **pyramid.authentication** 模块中定义的 **helper** 类 -
**SessionAuthenticationHelper** - 将 userid 存储在会话中。
**AuthTktCookieHelper** - 使用“身份验证票证”cookie 存储 userid。
我们还可以使用 **extract_http_basic_credentials()** 函数使用 HTTP 基本身份验证检索用户凭据。
要从 WSGI 环境中的 REMOTE_USER 中检索 userid,可以使用 **request.environ.get('REMOTE_USER')**。
示例
现在让我们学习如何通过以下示例实现安全策略。“development.ini”的示例如下 -
[app:main]
use = egg:tutorial
pyramid.reload_templates = true
pyramid.includes = pyramid_debugtoolbar
hello.secret = a12b

[server:main]
use = egg:waitress#main
listen = localhost:6543
然后,我们编写以下 Python 代码中的安全策略类,并将其保存为 **security.py** -
from pyramid.authentication import AuthTktCookieHelper
USERS = {'admin': 'admin', 'manager': 'manager'}
class SecurityPolicy:
   def __init__(self, secret):
      self.authtkt = AuthTktCookieHelper(secret=secret)
   def identity(self, request):
      identity = self.authtkt.identify(request)
      if identity is not None and identity['userid'] in USERS:
      return identity
   def authenticated_userid(self, request):
      identity = self.identity(request)
      if identity is not None:
         return identity['userid']
   def remember(self, request, userid, **kw):
      return self.authtkt.remember(request, userid, **kw)
   def forget(self, request, **kw):
      return self.authtkt.forget(request, **kw)
我们包文件夹中的 **__init__.py** 文件定义了以下配置。使用 Configurator 类的 **set_security_policy()** 方法在配置中添加了上面定义的安全策略类。三个路由 - home、login 和 logout - 添加到配置中。
from pyramid.config import Configurator
from .security import SecurityPolicy

def main(global_config, **settings):
   config = Configurator(settings=settings)
   config.include('pyramid_chameleon')
   config.set_security_policy(
      SecurityPolicy(
         secret=settings['hello.secret'],
      ),
   )
   config.add_route('home', '/')
   config.add_route('login', '/login')
   config.add_route('logout', '/logout')
   config.scan('.views')
   return config.make_wsgi_app()
views.py 中定义了与上述路由相对应的三个视图。
from pyramid.httpexceptions import HTTPFound
from pyramid.security import remember, forget

from pyramid.view import view_config, view_defaults
from .security import USERS

@view_defaults(renderer='home.pt')
class HelloViews:
   def __init__(self, request):
      self.request = request
      self.logged_in = request.authenticated_userid
   @view_config(route_name='home')
   def home(self):
      return {'name': 'Welcome'}
   @view_config(route_name='login', renderer='login.pt')
   def login(self):
      request = self.request
      login_url = request.route_url('login')
      referrer = request.url
      if referrer == login_url:
         referrer = '/'
      came_from = request.params.get('came_from', referrer)
      message = ''
      login = ''
      password = ''
      if 'form.submitted' in request.params:
         login = request.params['login']
         password = request.params['password']
         pw = USERS.get(login)
         if pw == password:
            headers = remember(request, login)
            return HTTPFound(location=came_from, headers=headers)
         message = 'Failed login'
         return dict(
            name='Login', message=message,
            url=request.application_url + '/login',
            came_from=came_from,
            login=login, password=password,)

   @view_config(route_name='logout')
   def logout(self):
      request = self.request
      headers = forget(request)
      url = request.route_url('home')
      return HTTPFound(location=url, headers=headers)
登录视图呈现登录表单。当用户输入的用户 ID 和密码与 USERS 列表中的内容进行验证时,“记住”这些详细信息。另一方面,注销视图通过“忘记”释放这些详细信息。
主页视图呈现以下 chameleon 模板 - **home.pt**
<!DOCTYPE html>
<html lang="en">
<body>
   <div>
      <a tal:condition="view.logged_in is None" href="${request.application_url}/login">Log In</a>
      <a tal:condition="view.logged_in is not None" href="${request.application_url}/logout">Logout</a>
   </div>
   <h1>Hello. ${name}</h1>
</body>
</html>
以下是登录视图的 chameleon 模板 **login.pt**。
<!DOCTYPE html>
<html lang="en">
<body>
   <h1>Login</h1>
   <span tal:replace="message"/>

   <form action="${url}" method="post">
      <input type="hidden" name="came_from" value="${came_from}"/>
      <label for="login">Username</label>
      <input type="text" id="login" name="login" value="${login}"/><br/>
      <label for="password">Password</label>
      <input type="password" id="password" name="password" value="${password}"/><br/>
      <input type="submit" name="form.submitted" value="Log In"/>
   </form>
</body>
</html>
development.ini 和 setup.py 放在外部项目文件夹中,而 **__init__.py、views.py、security.py** 和模板 **home.pt** 以及 **login.pt** 应保存在名为 hello 的包文件夹下。
使用以下命令安装包 -
Env\hello>pip3 install -e.
使用 **pserve** 实用程序启动服务器。
pserve development.ini
输出
打开浏览器并访问 **https://:6543/** 链接。

单击“登录”链接以打开登录表单 -
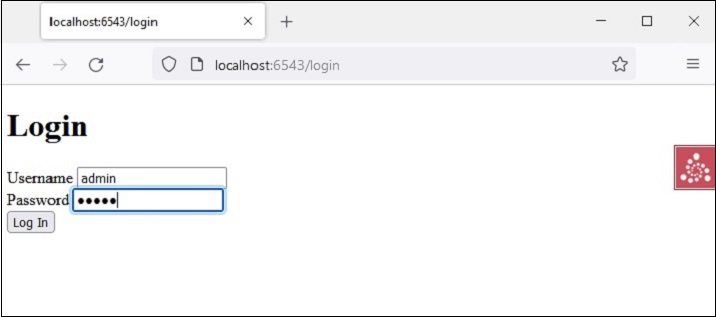
主页会返回,链接更改为注销,因为凭据被记住。
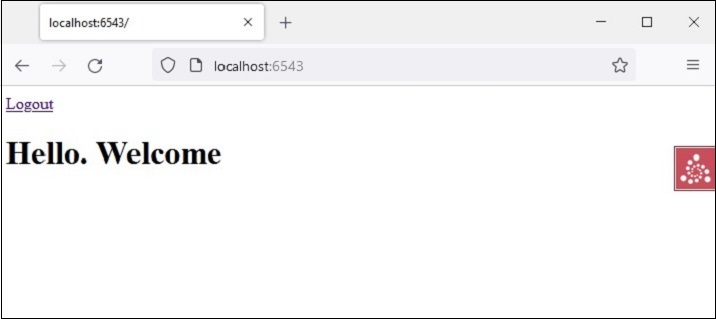
单击“注销”链接将导致忘记凭据,并显示默认主页。
Python Pyramid - 部署
本教程中迄今为止开发的 Pyramid 应用程序示例已在本地计算机上执行。要使其公开访问,必须将其部署在支持 WSGI 标准的生产服务器上。
为此,可以使用许多与 WSGI 兼容的 http 服务器。例如 -
- waitress
- paste.httpserver
- CherryPy
- uWSGI
- gevent
- mod_wsgi
我们已经讨论了如何使用 Waitress 服务器来托管 Pyramid 应用程序。它可以在具有公共 IP 地址的机器的 80(HTTP)和 443(HTTPS)端口上提供服务。
mod_wsgi
Apache 服务器是一种流行的开源 HTTP 服务器软件,由 Apache 软件基金会发布。它为互联网上大多数 Web 服务器提供支持。**mod_wsgi**(由 **Graham Dumpleton** 开发)是一个 Apache 模块,它为在 Apache 上部署基于 Python 的 Web 应用程序提供 WSGI 接口。
在本节中,解释了在 Apache 服务器上部署 Pyramid 应用程序的分步过程。在这里,我们将使用 XAMPP,这是一个流行的开源 Apache 发行版。可以从 https://www.apachefriends.org/download.html. 下载。
mod_wsgi 模块使用 PIP 安装程序安装。在安装之前,将 MOD_WSGI_APACHE_ROOTDIR 环境变量设置为 Apache 可执行文件所在的目录。
C:\Python310\Scripts>set MOD_WSGI_APACHE_ROOTDIR=C:/xampp/apache
C:\Python310\Scripts>pip install mod_wsgi
接下来,在命令终端中运行以下命令。
C:\Python310\Scripts>mod_wsgi-express module-config
LoadFile "C:/Python310/python310.dll"
LoadModule wsgi_module "C:/Python310/lib/site-packages/mod_wsgi/server/mod_wsgi.cp310-win_amd64.pyd"
WSGIPythonHome "C:/Python310"
这些是需要合并到 Apache 配置文件中的 mod_wsgi 模块设置。打开 XAMPP 安装的 **httpd.conf** 文件,并将上述命令行的输出复制到其中。
接下来,为我们的应用程序创建虚拟主机配置。Apache 将虚拟主机信息存储在 **httpd-vhosts.conf** 文件中,该文件位于 C:\XAMPP\Apache\conf\extra\ 文件夹中。打开该文件并在其中添加以下行 -
<VirtualHost *>
   ServerName localhost:6543
   WSGIScriptAlias / e:/pyramid-env/hello/production.ini
   <Directory e:/pyramid-env/hello>
      Order deny,allow
      Allow from all
      Require all granted
   </Directory>
</VirtualHost>
这里假设使用 Cookiecutter 实用程序构建了一个 hello Pyramid 项目。这里使用了要在生产环境中使用的 PasteDeploy 配置文件。
此虚拟主机配置需要合并到 Apache 的 httpd.conf 文件中。这是通过在其中添加以下行来完成的 -
# Virtual hosts
   Include conf/extra/httpd-vhosts.conf
现在,我们必须将以下代码保存为 **pyramid.wsgi** 文件,该文件返回 Pyramid WSGI 应用程序对象。
from pyramid.paster import get_app, setup_logging
ini_path = 'e:/pyramid-env/hello/production.ini'
setup_logging(ini_path)
application = get_app(ini_path, 'main')
执行上述过程后,重新启动 XAMPP 服务器,我们应该能够在 Apache 服务器上运行 Pyramid 应用程序。
部署到 Uvicorn
Uvicorn 是一款兼容 ASGI 服务器(ASGI 代表异步网关接口)。由于 Pyramid 是一个基于 WSGI 的 Web 框架,我们需要借助 **asgiref.wsgi** 模块中定义的 **WsgiToAsgi()** 函数将 WSGI 应用对象转换为 ASGI 对象。
from asgiref.wsgi import WsgiToAsgi
from pyramid.config import Configurator
from pyramid.response import Response

def hello_world(request):
   return Response("Hello")

with Configurator() as config:
   config.add_route("hello", "/")
   config.add_view(hello_world, route_name="hello")
   wsgi_app = config.make_wsgi_app()

app = WsgiToAsgi(wsgi_app)
将以上代码保存为 app.py。使用 pip 工具安装 Uvicorn。
pip3 install uvicorn
以 ASGI 模式运行 Pyramid 应用。
uvicorn app:app
类似地,它可以使用 **daphne** 服务器提供服务。
daphne app:app