- Spring Security 教程
- Sprint Security - 首页
- Spring Security - 简介
- Spring Security - 架构
- Spring Security - 项目模块
- Spring Security - 环境设置
- Spring Security - 表单登录
- Spring Security - 自定义表单登录
- Spring Security - 注销
- Spring Security - 记住我
- Spring Security - 重定向
- Spring Security - 标签库
- Spring Security - XML 配置
- Spring Security - 认证提供程序
- Spring Security - 基本认证
- Spring Security - AuthenticationFailureHandler
- Spring Security - JWT
- Spring Security - 检索用户信息
- Spring Security - Maven
- Spring Security - 默认密码编码器
- Spring Security – 密码编码
- Spring Security - 方法级别
- Spring Security 有用资源
- Spring Security - 快速指南
- Spring Security - 有用资源
- Spring Security - 讨论
Spring Security - 认证提供程序
Spring Security 允许我们根据需要自定义身份验证过程。从自定义登录页面到我们自己的自定义身份验证提供程序和身份验证过滤器,我们几乎可以自定义身份验证过程的每个方面。我们可以定义我们自己的身份验证过程,该过程可以从使用用户名和密码的基本身份验证到使用令牌和 OTP 的复杂身份验证(例如双因素身份验证)。此外,我们可以使用各种数据库——关系型和非关系型,使用各种密码编码器,将恶意用户锁定在他们的帐户之外,等等。
Spring Security 架构
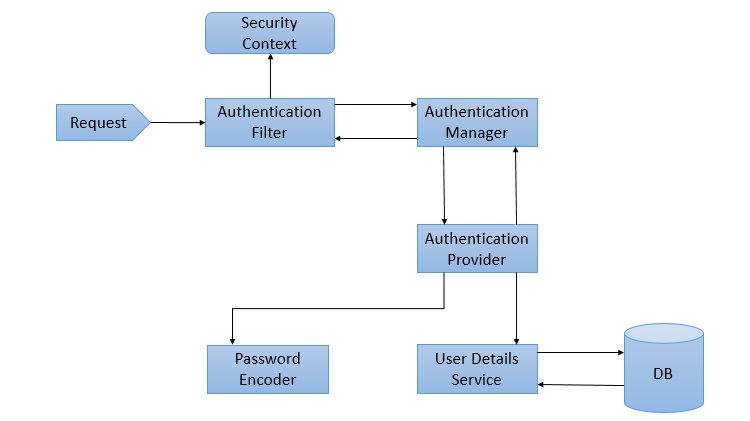
如上图所示,Spring Security 的基本组件如下所示。在接下来的过程中,我们将简要讨论它们。我们还将讨论它们在身份验证和授权过程中的作用。
AuthenticationFilter
这是拦截请求并尝试对其进行身份验证的过滤器。在 Spring Security 中,它将请求转换为 Authentication 对象并将身份验证委托给 AuthenticationManager。
AuthenticationManager
它是身份验证的主要策略接口。它使用唯一的 authenticate() 方法来对请求进行身份验证。authenticate() 方法执行身份验证,并在身份验证成功时返回 Authentication 对象,或在身份验证失败时抛出 AuthenticationException。如果该方法无法决定,它将返回 null。在此过程中,身份验证过程被委托给 AuthenticationProvider,我们将在接下来讨论。
AuthenticationProvider
AuthenticationManager 由 ProviderManager 实现,后者将流程委托给一个或多个 AuthenticationProvider 实例。任何实现 AuthenticationProvider 接口的类都必须实现两种方法——authenticate() 和 supports()。首先,让我们谈谈 supports() 方法。它用于检查我们的 AuthenticationProvider 实现类是否支持特定的身份验证类型。如果支持,则返回 true,否则返回 false。接下来,是 authenticate() 方法。这是发生身份验证的地方。如果支持身份验证类型,则启动身份验证过程。在此类中,可以使用UserDetailsService实现的 loadUserByUsername() 方法。如果找不到用户,它可能会抛出 UsernameNotFoundException。
另一方面,如果找到用户,则使用用户的身份验证详细信息来对用户进行身份验证。例如,在基本身份验证场景中,用户提供的密码可能会与数据库中的密码进行检查。如果发现它们彼此匹配,则表示成功。然后,我们可以从此方法返回一个 Authentication 对象,该对象将存储在 Security Context 中,我们将在后面讨论。
Spring Security 提供了以下主要的 AuthenticationProvider 实现。
DaoAuthenticationProvider − 此提供程序用于提供基于数据库的身份验证。
LdapAuthenticationProvider − 此提供程序专门用于基于 LDAP(轻量级目录访问协议)的身份验证。
OpenIDAuthenticationProvider − 此提供程序用于基于 OpenID 的身份验证,可与 Google/Facebook 等 OpenID 身份验证提供程序一起使用。
JwtAuthenticationProvider − 对于基于 JWT(Java Web Token)的身份验证,我们可以使用 JwtAuthenticationProvider 类。
RememberMeAuthenticationProvider − 此类用于基于用户“记住我”令牌的用户身份验证。
我们将在接下来的部分创建自己的 AuthenticationProvider。
UserDetailsService
它是 Spring Security 的核心接口之一。任何请求的身份验证大多取决于 UserDetailsService 接口的实现。它最常用于数据库支持的身份验证以检索用户数据。数据通过实现唯一的 loadUserByUsername() 方法来检索,在该方法中,我们可以提供我们的逻辑来获取用户的用户详细信息。如果找不到用户,该方法将抛出 UsernameNotFoundException。
PasswordEncoder
在 Spring Security 4 之前,PasswordEncoder 的使用是可选的。用户可以使用内存中身份验证存储纯文本密码。但 Spring Security 5 已强制使用 PasswordEncoder 来存储密码。这使用其众多实现之一对用户的密码进行编码。其最常见的实现是 BCryptPasswordEncoder。此外,我们可以为我们的开发目的使用 NoOpPasswordEncoder 的实例。它将允许密码以纯文本形式存储。但它不应该用于生产或实际应用。
Spring Security 上下文
这是在身份验证成功后存储当前已认证用户详细信息的地方。然后,身份验证对象在整个应用程序中对会话可用。因此,如果我们需要用户名或任何其他用户详细信息,我们需要先获取 SecurityContext。这是通过 SecurityContextHolder 完成的,SecurityContextHolder 是一个辅助类,它提供了对安全上下文的访问。我们可以分别使用 setAuthentication() 和 getAuthentication() 方法来存储和检索用户详细信息。
自定义身份验证器
我们可以通过实现 AuthenticationProvider 接口来创建一个自定义身份验证器。AuthenticatorProvider 接口有两种方法authenticate() 和supports()。
authenticate() 方法
@Override
public Authentication authenticate(Authentication authentication) throws AuthenticationException {
   String username = authentication.getName();
   String password = authentication.getCredentials().toString();

   UserDetails user = userDetailsService.loadUserByUsername(username);

   if (user == null || !password.equals(user.getPassword())) {
      throw new BadCredentialsException("Invalid username or password");
   }

   List<GrantedAuthority> authorities = new ArrayList();
   authorities.add(new SimpleGrantedAuthority("ROLE_USER"));
   return new UsernamePasswordAuthenticationToken(username, password, authorities);
}
在这里,在 authenticate() 方法中,我们使用身份验证对象获取用户名和密码,并将用户名/密码与用户凭据进行比较。如果用户详细信息无效,我们将抛出 BadCredentialsException 异常。否则,将准备一个新的角色,并使用所需的角色返回 UsernamePasswordAuthenticationToken。
supports() 方法
@Override
public boolean supports(Class<?> authentication) {
   return authentication.equals(UsernamePasswordAuthenticationToken.class);
}
Spring Security 配置
在 AuthenticationManager 中使用在 AuthenticationProvider 中创建的,并将其标记为托管 Bean。
@Bean
public AuthenticationManager authManager(HttpSecurity http) throws Exception {
   AuthenticationManagerBuilder authenticationManagerBuilder =
      http.getSharedObject(AuthenticationManagerBuilder.class);
   WebAuthenticationProvider authProvider = new WebAuthenticationProvider(userDetailsService());
   authenticationManagerBuilder.authenticationProvider(authProvider);
   return authenticationManagerBuilder.build();
}
这就是我们需要做的。现在让我们看看完整的代码。
在开始使用 Spring 框架编写第一个示例之前,您必须确保已正确设置 Spring 环境,如Spring Security - 环境设置章节中所述。我们还假设您对 Spring Tool Suite IDE 有些了解。
现在让我们继续编写一个由 Maven 管理的基于 Spring MVC 的应用程序,该应用程序将要求用户登录,对用户进行身份验证,然后提供使用 Spring Security 表单登录功能注销的选项。
使用 Spring Initializr 创建项目
Spring Initializr 是开始 Spring Boot 项目的好方法。它提供了一个易于使用的用户界面来创建项目,添加依赖项,选择 Java 运行时等。它生成一个骨架项目结构,一旦下载,就可以导入到 Spring Tool Suite 中,然后我们可以继续使用我们的现成项目结构。
我们选择一个 Maven 项目,将项目命名为 formlogin,Java 版本为 21。添加以下依赖项
Spring Web
Spring Security
Spring Boot DevTools
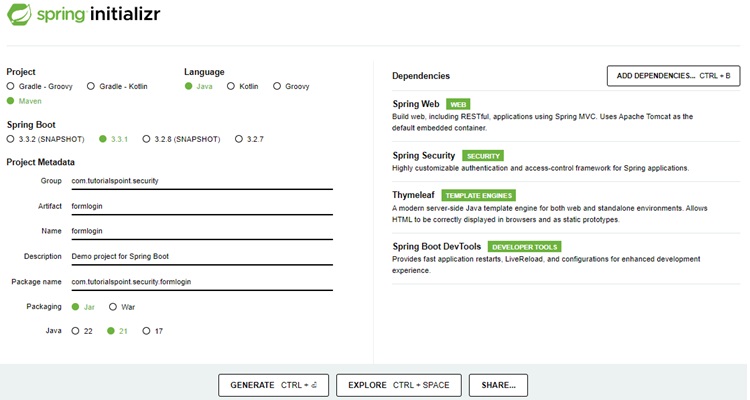
Thymeleaf 是 Java 的模板引擎。它允许我们快速开发静态或动态网页以在浏览器中呈现。它具有极强的扩展性,允许我们详细定义和自定义模板的处理。除此之外,我们可以通过点击此链接了解更多关于 Thymeleaf 的信息。
让我们继续生成我们的项目并下载它。然后,我们将其解压缩到我们选择的文件夹中,并使用任何 IDE 打开它。我将使用Spring Tools Suite 4。它可以从https://springframework.org.cn/tools网站免费下载,并且针对 Spring 应用程序进行了优化。
包含所有相关依赖项的 pom.xml
让我们看一下我们的 pom.xml 文件。它应该看起来与此类似 -
pom.xml
<?xml version="1.0" encoding="UTF-8"?>
<project xmlns="http://maven.apache.org/POM/4.0.0" xmlns:xsi="http://www.w3.org/2001/XMLSchema-instance"
xsi:schemaLocation="http://maven.apache.org/POM/4.0.0 https://maven.apache.org/xsd/maven-4.0.0.xsd">
   <modelVersion>4.0.0</modelVersion>
   <parent>
      <groupId>org.springframework.boot</groupId>
      <artifactId>spring-boot-starter-parent</artifactId>
      <version>3.3.1</version>
      <relativePath/> <!-- lookup parent from repository -->
   </parent>
   <groupId>com.tutorialspoint.security</groupId>
   <artifactId>formlogin</artifactId>
   <version>0.0.1-SNAPSHOT</version>
   <name>formlogin</name>
   <description>Demo project for Spring Boot</description>
   <url/>
   <licenses>
      <license/>
   </licenses>
   <developers>
      <developer/>
   </developers>
   <scm>
      <connection/>
      <developerConnection/>
      <tag/>
      <url/>
   </scm>
   <properties>
      <java.version>21</java.version>
   </properties>
   <dependencies>
      <dependency>
         <groupId>org.springframework.boot</groupId>
         <artifactId>spring-boot-starter-security</artifactId>
      </dependency>
      <dependency>
         <groupId>org.springframework.boot</groupId>
         <artifactId>spring-boot-starter-thymeleaf</artifactId>
      </dependency>
      <dependency>
         <groupId>org.springframework.boot</groupId>
         <artifactId>spring-boot-starter-web</artifactId>
      </dependency>
      <dependency>
         <groupId>org.thymeleaf.extras</groupId>
         <artifactId>thymeleaf-extras-springsecurity6</artifactId>
      </dependency>
      <dependency>
         <groupId>org.springframework.boot</groupId>
         <artifactId>spring-boot-devtools</artifactId>
         <scope>runtime</scope>
         <optional>true</optional>
      </dependency>
      <dependency>
         <groupId>org.springframework.boot</groupId>
         <artifactId>spring-boot-starter-test</artifactId>
         <scope>test</scope>
      </dependency>
      <dependency>
         <groupId>org.springframework.security</groupId>
         <artifactId>spring-security-test</artifactId>
         <scope>test</scope>
      </dependency>
   </dependencies>
   <build>
      <plugins>
         <plugin>
            <groupId>org.springframework.boot</groupId>
            <artifactId>spring-boot-maven-plugin</artifactId>
         </plugin>
      </plugins>
   </build>
</project>
身份验证提供程序
在我们的 config 包内,我们通过实现 AuthenticationProvider 接口创建了 WebAuthenticationProvider 类。就像在 authenticate() 方法中一样,我们必须比较用户名和密码,我们使用了 UserDetailsService 实例来获取用户详细信息。
package com.tutorialspoint.security.formlogin.config;

import java.util.ArrayList;
import java.util.List;

import org.springframework.security.authentication.AuthenticationProvider;
import org.springframework.security.authentication.BadCredentialsException;
import org.springframework.security.authentication.UsernamePasswordAuthenticationToken;
import org.springframework.security.core.Authentication;
import org.springframework.security.core.AuthenticationException;
import org.springframework.security.core.GrantedAuthority;
import org.springframework.security.core.authority.SimpleGrantedAuthority;
import org.springframework.security.core.userdetails.UserDetails;
import org.springframework.security.core.userdetails.UserDetailsService;
import org.springframework.stereotype.Component;

@Component
public class WebAuthenticationProvider implements AuthenticationProvider {

   private final UserDetailsService userDetailsService;
   public WebAuthenticationProvider(UserDetailsService userDetailsService) {
      this.userDetailsService = userDetailsService;
   }

   @Override
   public boolean supports(Class<?> authentication) {
      return authentication.equals(UsernamePasswordAuthenticationToken.class);
   }

   @Override
   public Authentication authenticate(Authentication authentication) throws AuthenticationException {
      String username = authentication.getName();
      String password = authentication.getCredentials().toString();

      UserDetails user = userDetailsService.loadUserByUsername(username);

      if (user == null || !password.equals(user.getPassword())) {
         throw new BadCredentialsException("Invalid username or password");
      }

      List<GrantedAuthority> authorities = new ArrayList();
      authorities.add(new SimpleGrantedAuthority("ROLE_USER"));
      return new UsernamePasswordAuthenticationToken(username, password, authorities);

   }
}
Spring Security 配置类
在我们的 config 包内,我们创建了 WebSecurityConfig 类。我们将使用此类进行我们的安全配置,因此让我们使用 @Configuration 注解和 @EnableWebSecurity 对其进行注释。因此,Spring Security 知道将此类视为配置类。如我们所见,Spring 使配置应用程序变得非常容易。
WebSecurityConfig
package com.tutorialspoint.security.formlogin.config;

import org.springframework.context.annotation.Bean;
import org.springframework.context.annotation.Configuration;
import org.springframework.security.authentication.AuthenticationManager;
import org.springframework.security.config.Customizer;
import org.springframework.security.config.annotation.authentication.builders.AuthenticationManagerBuilder;
import org.springframework.security.config.annotation.web.builders.HttpSecurity;
import org.springframework.security.config.annotation.web.configuration.EnableWebSecurity;
import org.springframework.security.config.annotation.web.configurers.AbstractHttpConfigurer;
import org.springframework.security.core.userdetails.User;
import org.springframework.security.core.userdetails.UserDetails;
import org.springframework.security.core.userdetails.UserDetailsService;
import org.springframework.security.provisioning.InMemoryUserDetailsManager;
import org.springframework.security.web.SecurityFilterChain;

@Configuration
@EnableWebSecurity
public class WebSecurityConfig {

   @Bean
   public AuthenticationManager authManager(HttpSecurity http) throws Exception {
      AuthenticationManagerBuilder authenticationManagerBuilder =
         http.getSharedObject(AuthenticationManagerBuilder.class);
      WebAuthenticationProvider authProvider = new WebAuthenticationProvider(userDetailsService());
      authenticationManagerBuilder.authenticationProvider(authProvider);
      return authenticationManagerBuilder.build();
   }

   @Bean
   protected UserDetailsService userDetailsService() {
      UserDetails user = User.builder()
         .username("user")
         .password("user123")
         .roles("USER")
         .build();
      UserDetails admin = User.builder()
         .username("admin")
         .password("admin123")
         .roles("USER", "ADMIN")
         .build();
      return new InMemoryUserDetailsManager(user, admin);
   }

   @Bean
   protected SecurityFilterChain filterChain(HttpSecurity http) throws Exception {
      return http
         .csrf(AbstractHttpConfigurer::disable)
         .authorizeHttpRequests(
            request -> request.requestMatchers("/login").permitAll()
            .requestMatchers("/**").authenticated()
         )
         .formLogin(Customizer.withDefaults())
         .logout(config -> config
         .logoutUrl("/logout")
         .logoutSuccessUrl("/login"))
         .build();
   }
}
配置类详细信息
让我们看一下我们的配置类。
首先,我们将使用 userDetailsService() 方法创建 UserDetailsService 类的 Bean。我们将使用此 Bean 来管理此应用程序的用户。在这里,为了简单起见,我们将使用 InMemoryUserDetailsManager 实例来创建用户。这些用户以及我们给定的用户名和密码分别映射到 User 和 Admin 角色。
Http 安全配置
完成以上步骤后,我们继续进行下一个配置。在这里,我们定义了 filterChain 方法。此方法将 HttpSecurity 作为参数。我们将对其进行配置以使用我们的表单登录和注销功能。
我们可以观察到所有这些功能都可以在 Spring Security 中使用。让我们详细研究以下部分 -
return http
   .csrf(AbstractHttpConfigurer::disable)
   .authorizeHttpRequests(
      request -> request.requestMatchers("/login").permitAll()
         .requestMatchers("/**").authenticated()
    )
    .formLogin(Customizer.withDefaults())
    .logout(config -> config
    .logoutUrl("/logout")
    .logoutSuccessUrl("/login"))
    .build();
这里需要注意几点 -
然后我们添加需要所有请求都经过身份验证的配置。
之后,我们使用上面提到的 Spring Security 的 formLogin() 功能。这使得浏览器会要求输入默认的用户名/密码登录表单,并使用 logout() 提供注销功能。
身份验证管理器配置
让我们看看我们自定义的 AuthenticationProvider 配置。
AuthenticationManagerBuilder authenticationManagerBuilder =
   http.getSharedObject(AuthenticationManagerBuilder.class);
WebAuthenticationProvider authProvider = new WebAuthenticationProvider(userDetailsService());
authenticationManagerBuilder.authenticationProvider(authProvider);
return authenticationManagerBuilder.build();
我们首先构建了一个 AuthenticationManagerBuilder 实例并向其传递一个 authenticationProvider。WebAuthenticationProvider 实例作为自定义身份验证提供程序创建,并带有一个 userDetailsService 对象。
控制器类
在这个类中,为了简单起见,我们为应用程序的首页创建了一个映射到单个 "/" 端点的映射。这将重定向到 index.html。
AuthController
package com.tutorialspoint.security.formlogin.controllers;

import org.springframework.stereotype.Controller;
import org.springframework.web.bind.annotation.GetMapping;

@Controller
public class AuthController {
   @GetMapping("/")
   public String home() {
      return "index";
   }
}
视图
在/src/main/resources/templates文件夹中创建 index.html,并使用以下内容作为主页。
index.html
<!DOCTYPE html>
<html xmlns="http://www.w3.org/1999/xhtml"
xmlns:th="https://www.thymeleaf.org"
xmlns:sec="https://www.thymeleaf.org/thymeleaf-extras-springsecurity6">
<head>
<title>
Hello World!
</title>
</head>
<body>
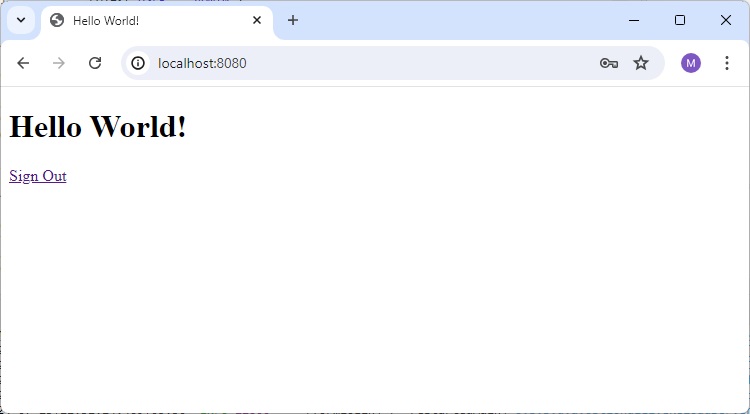
<h1 th:inline="text">Hello World!</h1>
<a href="/logout" alt="logout">Sign Out</a>
</body>
<html>
运行应用程序
由于我们已经准备好所有组件,让我们运行应用程序。右键单击项目,选择以...运行,然后选择Spring Boot 应用。
它将启动应用程序,并且应用程序启动后,我们可以运行 localhost:8080 以检查更改。
输出
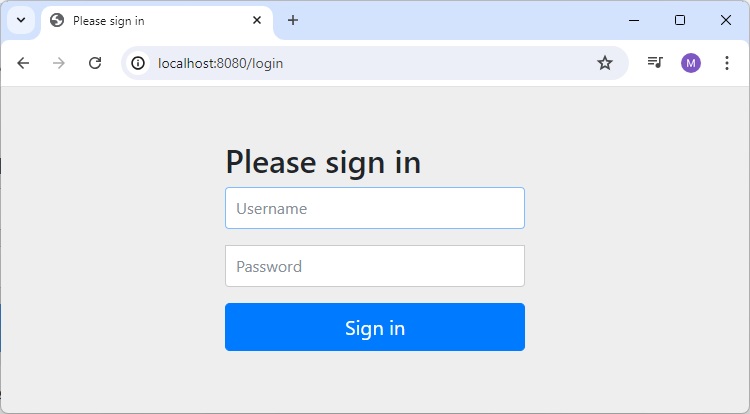
现在打开 localhost:8080,您可以看到浏览器正在通过系统对话框要求输入用户名/密码。
浏览器用户名/密码对话框
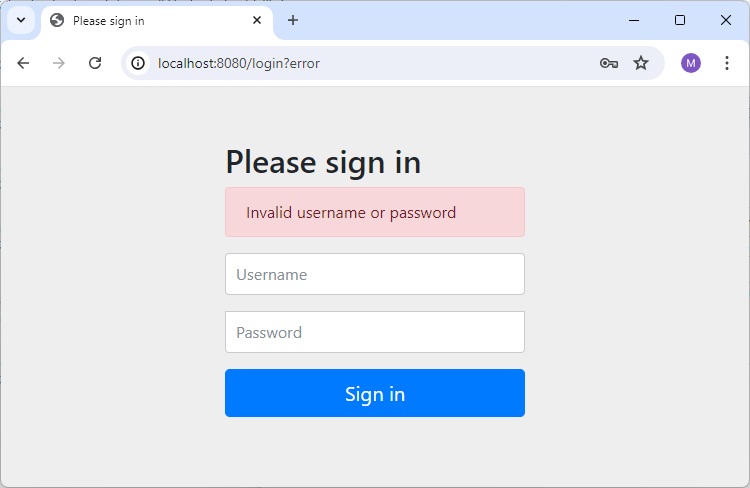
输入无效凭据
如果我们输入无效凭据,则相同的对话框将再次弹出。
用户主页
如果我们为用户输入有效的凭据,它将加载用户的主页。