- Struts 2 教程
- Struts2 - 首页
- Struts2 - 基本MVC架构
- Struts2 - 概述
- Struts2 - 环境搭建
- Struts2 - 架构
- Struts2 - 例子
- Struts2 - 配置
- Struts2 - Action
- Struts 2 - 拦截器
- Struts2 - 结果类型
- Struts2 - 值栈/OGNL
- Struts2 - 文件上传
- Struts2 - 数据库访问
- Struts2 - 发送邮件
- Struts2 - 校验
- Struts2 - 国际化
- Struts2 - 类型转换
- Struts2 - 主题/模板
- Struts2 - 异常处理
- Struts2 - 注解
- Struts 2 标签
- Struts2 - 控制标签
- Struts2 - 数据标签
- Struts2 - 表单标签
- Struts2 - Ajax 标签
- Struts 2 集成
- Struts2 - Spring
- Struts2 - Tiles
- Struts2 - Hibernate
- Struts 2 有用资源
- Struts2 - 常见问题解答
- Struts2 - 快速指南
- Struts2 - 有用资源
- Struts2 - 讨论
Struts 2 - 拦截器
从概念上讲,拦截器与Servlet过滤器或JDK的Proxy类相同。拦截器允许实现与Action和框架分离的横切功能。您可以使用拦截器实现以下功能:
在调用Action之前提供预处理逻辑。
在调用Action之后提供后处理逻辑。
捕获异常,以便可以执行替代处理。
Struts2框架提供的许多功能都是使用拦截器实现的;
例如包括异常处理、文件上传、生命周期回调等。事实上,由于Struts2的大部分功能都依赖于拦截器,因此每个Action不太可能分配7个或8个拦截器。
Struts2框架拦截器
Struts 2框架提供了一个很好的现成拦截器列表,这些拦截器已预先配置并可以使用。下面列出了一些重要的拦截器:
| 序号 | 拦截器及描述 |
|---|---|
| 1 | 别名 允许参数在不同请求中具有不同的名称别名。 |
| 2 | checkbox 通过为未选中的复选框添加false参数值来协助管理复选框。 |
| 3 | conversionError 将字符串转换为参数类型时出现的错误信息放入Action的字段错误中。 |
| 4 | createSession 如果HTTP会话尚不存在,则自动创建一个。 |
| 5 | debugging 为开发者提供几个不同的调试屏幕。 |
| 6 | execAndWait 在Action在后台执行时,将用户发送到一个中间等待页面。 |
| 7 | exception 将Action抛出的异常映射到结果,允许通过重定向进行自动异常处理。 |
| 8 | fileUpload 方便文件上传。 |
| 9 | i18n 在用户的会话期间跟踪所选语言环境。 |
| 10 | logger 通过输出正在执行的Action的名称来提供简单的日志记录。 |
| 11 | params 在Action上设置请求参数。 |
| 12 | prepare 这通常用于执行预处理工作,例如设置数据库连接。 |
| 13 | profile 允许为Action记录简单的性能分析信息。 |
| 14 | scope 在会话或应用程序范围内存储和检索Action的状态。 |
| 15 | ServletConfig 为Action提供对各种基于Servlet的信息的访问。 |
| 16 | timer 以Action执行所需时间长度的形式提供简单的性能分析信息。 |
| 17 | token 检查Action是否有有效的令牌,以防止重复提交表单。 |
| 18 | validation 为Action提供验证支持。 |
请查看Struts 2文档以了解上述拦截器的完整详细信息。但我将向您展示如何在Struts应用程序中一般使用拦截器。
如何使用拦截器?
让我们看看如何将现有的拦截器用于我们的“Hello World”程序。我们将使用timer拦截器,其目的是衡量执行Action方法所需的时间。同时,我使用params拦截器,其目的是将请求参数发送到Action。您可以尝试在不使用此拦截器的例子,您会发现name属性没有被设置,因为参数无法到达Action。
我们将保留HelloWorldAction.java、web.xml、HelloWorld.jsp和index.jsp文件,因为它们是在例子章节中创建的,但是让我们修改struts.xml文件以添加拦截器,如下所示:
<?xml version = "1.0" Encoding = "UTF-8"?>
<!DOCTYPE struts PUBLIC
   "-//Apache Software Foundation//DTD Struts Configuration 2.0//EN"
   "http://struts.apache.org/dtds/struts-2.0.dtd">
<struts>
   <constant name = "struts.devMode" value = "true" />

   <package name = "helloworld" extends = "struts-default">
      <action name = "hello"
         class = "com.tutorialspoint.struts2.HelloWorldAction"
         method = "execute">
         <interceptor-ref name = "params"/>
         <interceptor-ref name = "timer" />
         <result name = "success">/HelloWorld.jsp</result>
      </action>
   </package>
</struts>
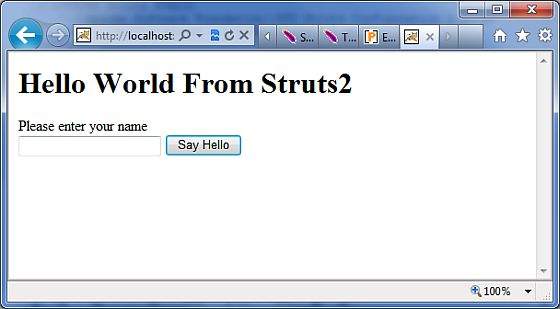
右键单击项目名称,然后单击导出>WAR文件以创建WAR文件。然后将此WAR部署到Tomcat的webapps目录中。最后,启动Tomcat服务器并尝试访问URL https://:8080/HelloWorldStruts2/index.jsp。这将生成以下屏幕:

现在在给定的文本框中输入任何单词,然后单击“Say Hello”按钮以执行定义的操作。现在,如果您检查生成的日志,您将找到以下文本:
INFO: Server startup in 3539 ms
27/08/2011 8:40:53 PM
com.opensymphony.xwork2.util.logging.commons.CommonsLogger info
INFO: Executed action [//hello!execute] took 109 ms.
底部的这一行是由timer拦截器生成的,它表明Action执行总共耗时109毫秒。
创建自定义拦截器
在您的应用程序中使用自定义拦截器是提供横切应用程序功能的一种优雅方法。创建自定义拦截器很容易;需要扩展的接口是以下Interceptor接口:
public interface Interceptor extends Serializable {
   void destroy();
   void init();
   String intercept(ActionInvocation invocation)
   throws Exception;
}
顾名思义,init()方法提供了一种初始化拦截器的方法,而destroy()方法提供了一种拦截器清理的工具。与Action不同,拦截器在请求之间被重用,并且需要是线程安全的,特别是intercept()方法。
ActionInvocation对象提供了对运行时环境的访问。它允许访问Action本身以及调用Action和确定Action是否已被调用的方法。
如果您不需要初始化或清理代码,则可以扩展AbstractInterceptor类。这提供了init()和destroy()方法的默认空操作实现。
创建拦截器类
让我们在Java 资源 > src文件夹中创建以下MyInterceptor.java文件:
package com.tutorialspoint.struts2;

import java.util.*;
import com.opensymphony.xwork2.ActionInvocation;
import com.opensymphony.xwork2.interceptor.AbstractInterceptor;

public class MyInterceptor extends AbstractInterceptor {

   public String intercept(ActionInvocation invocation)throws Exception {

      /* let us do some pre-processing */
      String output = "Pre-Processing";
      System.out.println(output);

      /* let us call action or next interceptor */
      String result = invocation.invoke();

      /* let us do some post-processing */
      output = "Post-Processing";
      System.out.println(output);

      return result;
   }
}
正如您所注意到的,实际的Action将通过invocation.invoke()调用由拦截器执行。因此,您可以根据您的需求进行一些预处理和一些后处理。
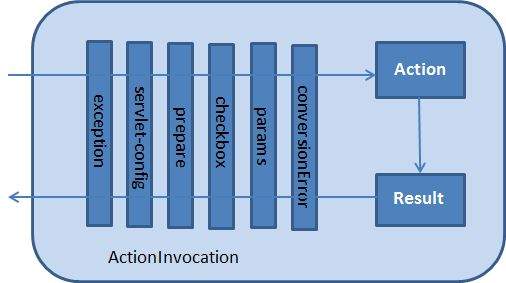
框架本身首先通过对ActionInvocation对象的invoke()进行第一次调用来启动此过程。每次调用invoke()时,ActionInvocation都会查询其状态并执行下一个拦截器。当所有已配置的拦截器都已调用时,invoke()方法将导致Action本身被执行。
下图通过请求流程显示了相同的概念:

创建Action类
让我们在Java 资源 > src下创建一个名为HelloWorldAction.java的java文件,包名为com.tutorialspoint.struts2,内容如下。
package com.tutorialspoint.struts2;

import com.opensymphony.xwork2.ActionSupport;

public class HelloWorldAction extends ActionSupport {
   private String name;

   public String execute() throws Exception {
      System.out.println("Inside action....");
      return "success";
   }

   public String getName() {
      return name;
   }

   public void setName(String name) {
      this.name = name;
   }
}
这是我们在之前的例子中看到的同一个类。我们为“name”属性提供了标准的getter和setter方法,以及一个返回字符串“success”的execute方法。
创建视图
让我们在Eclipse项目的WebContent文件夹中创建以下jsp文件HelloWorld.jsp。
<%@ page contentType = "text/html; charset = UTF-8" %>
<%@ taglib prefix = "s" uri = "/struts-tags" %>

<html>
   <head>
      <title>Hello World</title>
   </head>

   <body>
      Hello World, <s:property value = "name"/>
   </body>
</html>
创建主页
我们还需要在WebContent文件夹中创建index.jsp。此文件将用作初始Action URL,用户可以单击该URL来告诉Struts 2框架调用HelloWorldAction类的已定义方法并呈现HelloWorld.jsp视图。
<%@ page language = "java" contentType = "text/html; charset = ISO-8859-1"
   pageEncoding = "ISO-8859-1"%>
<%@ taglib prefix = "s" uri = "/struts-tags"%>
   <!DOCTYPE html PUBLIC "-//W3C//DTD HTML 4.01 Transitional//EN"
   "http://www.w3.org/TR/html4/loose.dtd">

<html>
   <head>
      <title>Hello World</title>
   </head>

   <body>
      <h1>Hello World From Struts2</h1>
      <form action = "hello">
         <label for = "name">Please enter your name</label><br/>
         <input type = "text" name = "name"/>
         <input type = "submit" value = "Say Hello"/>
      </form>
   </body>
</html>
上面视图文件中定义的hello Action将使用struts.xml文件映射到HelloWorldAction类及其execute方法。
配置文件
现在,我们需要注册我们的拦截器,然后像我们在之前的例子中调用默认拦截器一样调用它。要注册新定义的拦截器,将<interceptors>...</interceptors>标签直接放在struts.xml文件中的<package>标签下。对于默认拦截器,您可以跳过此步骤,就像我们在之前的示例中所做的那样。但在这里,让我们注册并使用它,如下所示:
<?xml version = "1.0" Encoding = "UTF-8"?>
<!DOCTYPE struts PUBLIC
   "-//Apache Software Foundation//DTD Struts Configuration 2.0//EN"
   "http://struts.apache.org/dtds/struts-2.0.dtd">

<struts>
   <constant name = "struts.devMode" value = "true" />
   <package name = "helloworld" extends = "struts-default">

      <interceptors>
         <interceptor name = "myinterceptor"
            class = "com.tutorialspoint.struts2.MyInterceptor" />
      </interceptors>

      <action name = "hello"
         class = "com.tutorialspoint.struts2.HelloWorldAction"
         method = "execute">
         <interceptor-ref name = "params"/>
         <interceptor-ref name = "myinterceptor" />
         <result name = "success">/HelloWorld.jsp</result>
      </action>

   </package>
</struts>
需要注意的是,您可以在<package>标签内注册多个拦截器,同时您可以在<action>标签内调用多个拦截器。您可以使用不同的Action调用相同的拦截器。
web.xml文件需要在WebContent下的WEB-INF文件夹下创建,如下所示:
<?xml version = "1.0" Encoding = "UTF-8"?>
<web-app xmlns:xsi = "http://www.w3.org/2001/XMLSchema-instance"
   xmlns = "http://java.sun.com/xml/ns/javaee"
   xmlns:web = "http://java.sun.com/xml/ns/javaee/web-app_2_5.xsd"
   xsi:schemaLocation = "http://java.sun.com/xml/ns/javaee
   http://java.sun.com/xml/ns/javaee/web-app_3_0.xsd"
   id = "WebApp_ID" version = "3.0">

   <display-name>Struts 2</display-name>

   <welcome-file-list>
      <welcome-file>index.jsp</welcome-file>
   </welcome-file-list>

   <filter>
      <filter-name>struts2</filter-name>
      <filter-class>
         org.apache.struts2.dispatcher.FilterDispatcher
      </filter-class>
   </filter>

   <filter-mapping>
      <filter-name>struts2</filter-name>
      <url-pattern>/*</url-pattern>
   </filter-mapping>
</web-app>
右键单击项目名称,然后单击导出>WAR文件以创建WAR文件。然后将此WAR部署到Tomcat的webapps目录中。最后,启动Tomcat服务器并尝试访问URL https://:8080/HelloWorldStruts2/index.jsp。这将生成以下屏幕:

现在在给定的文本框中输入任何单词,然后单击“Say Hello”按钮以执行定义的操作。现在,如果您检查生成的日志,您将在底部找到以下文本:
Pre-Processing
Inside action....
Post-Processing
堆叠多个拦截器
您可以想象,必须为每个Action配置多个拦截器很快就会变得难以管理。为此,拦截器使用拦截器栈进行管理。这是一个例子,直接来自strutsdefault.xml文件:
<interceptor-stack name = "basicStack">
   <interceptor-ref name = "exception"/>
   <interceptor-ref name = "servlet-config"/>
   <interceptor-ref name = "prepare"/>
   <interceptor-ref name = "checkbox"/>
   <interceptor-ref name = "params"/>
   <interceptor-ref name = "conversionError"/>
</interceptor-stack>
上述栈称为basicStack,可以在您的配置中使用,如下所示。此配置节点位于<package .../>节点下。每个<interceptor-ref .../>标签引用在当前拦截器栈之前配置的拦截器或拦截器栈。因此,在配置初始拦截器和拦截器栈时,确保名称在所有拦截器和拦截器栈配置中都是唯一的非常重要。
我们已经看到了如何将拦截器应用于Action,应用拦截器栈没有什么不同。事实上,我们使用完全相同的标签:
<action name = "hello" class = "com.tutorialspoint.struts2.MyAction">
   <interceptor-ref name = "basicStack"/>
   <result>view.jsp</result>
</action
上述“basicStack”的注册将向hello Action注册所有六个拦截器的完整栈。需要注意的是,拦截器的执行顺序与其配置顺序相同。例如,在上述情况下,exception将首先执行,第二个将是servlet-config,依此类推。