在Snack中使用Material Bottom Tab Navigator
标签用于在应用程序中实现多页面视图。标签通常放置在屏幕顶部或底部。一些库允许在移动应用程序中创建标签。标签可以使用图标代替文本类型的标签。在本文中,展示了 React Native 和 Javascript 代码,其中包含两个不同的示例,第一个示例使用来自 '@react-navigation/material-bottom-tabs' 的 createMaterialBottomTabNavigator 来创建标签,然后将它们呈现为标签。在另一个示例中,使用来自 Ionicons 的图标来创建标签,然后将它们渲染到设备屏幕上。
算法 1
步骤 1 - 从 'react-native' 中导入 Text、View、StyleSheet。
步骤 2 - 从 '@react-navigation/native' 中导入 NavigationContainer,然后从 '@react-navigation/material-bottom-tabs' 中导入 createMaterialBottomTabNavigator。
步骤 3 - 编写单独的箭头函数来显示不同页面的内容。
步骤 4 - 创建 App.js 并编写代码。使用 createMaterialBottomTabNavigator() 创建 BtmTbs。
步骤 5 - 创建 NavigationContainer 标签并在其中创建 BtmTbs.Navigator。从不同的 BtmTbs.Screen 调用页面内容函数。
步骤 6 - 检查结果。
示例 1:使用来自 '@react-navigation/material-bottom-tabs' 创建标签类型标签。
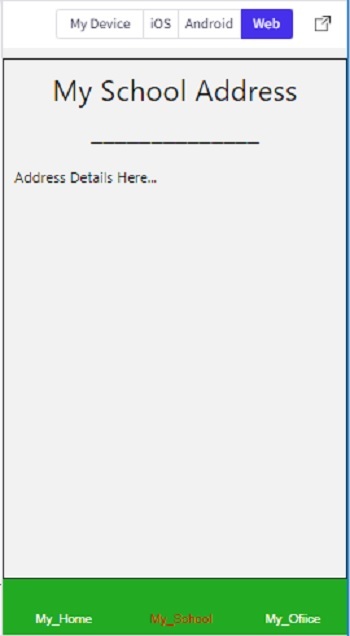
在此示例中,使用 createMaterialBottomTabNavigator 和 ‘@reactnavigation/material-bottom-tabs’ 来开发标签类型标签。
项目中使用的重要文件是
App.js
App.js:这是此项目的 javascript 主文件。
import{Component}from'react';
import{Text,View,StyleSheet}from'react-native';
import{NavigationContainer}from'@react-navigation/native';
import{createMaterialBottomTabNavigator}from'@react-navigation/material-bottom-tabs';

constBtmTbs=createMaterialBottomTabNavigator();

exportdefaultclassBottomBtmTbsExampleOneextendsComponent{
   render(){
      return(
         <NavigationContainer>
            <BtmTbs.Navigator
               initialRouteName="My_Home"
               activeColor="#c00"
               inactiveColor="#ffe"
               barStyle={{backgroundColor:'#2a2'}}>
               <BtmTbs.Screenname="My_Home"component={AddressHome}/>
               <BtmTbs.Screenname="My_School"component={AddressSchool}/>
               <BtmTbs.Screenname="My_Ofiice"component={AddressOffice}/>
            </BtmTbs.Navigator>
         </NavigationContainer>
      );
   }
}

AddressHome=()=>(
   <Viewstyle={styles.Addresscontents}>
      <Textstyle={styles.AddressHeader}>MyHomeAddress</Text>
      <Textstyle={styles.AddressHeader}>______________</Text>
      <br/>
      <Textstyle={styles.AddressContent}>AddressDetailsHere...</Text>
   </View>
);
AddressSchool=()=>(
   <Viewstyle={styles.Addresscontents}>
      <Textstyle={styles.AddressHeader}>MySchoolAddress</Text>
      <Textstyle={styles.AddressHeader}>______________</Text>
      <br/>
      <Textstyle={styles.AddressContent}>AddressDetailsHere...</Text>
   </View>
);

AddressOffice=()=>(
   <Viewstyle={styles.Addresscontents}>
      <Textstyle={styles.AddressHeader}>MyOfficeAddress</Text>
      <Textstyle={styles.AddressHeader}>______________</Text>
      <br/>
      <Textstyle={styles.AddressContent}>AddressDetailsHere...</Text>
   </View>
);
conststyles=StyleSheet.create({
   Addresscontents:{
      flex:1,
      width:'100%',
      padding:10,
      marginTop:10,
      borderWidth:1,
      borderColor:'black',
   },
   AddressHeader:{
      color:'black',
      fontSize:28,
      textAlign:'center',
   },
});
输出
可以在线查看结果。当用户输入代码时,Web 视图会默认被选中,结果会立即显示。

算法 2
步骤 1 - 从 'react-native' 中导入 Text、View、StyleSheet。从 'react-native-vector-icons/Ionicons' 中导入 Icon。还从 'react-navigation' 中导入 createAppContainer。
步骤 2 - 编写单独的函数来显示不同页面的内容。
步骤 3 - 创建 App.js 并编写代码。创建名为 My_Home、My_School 和 My_Office 的类来创建屏幕。
步骤 4 - 使用 createMaterialBottomTabNavigator() 创建 BtmTbs。现在使用 tabBarIcon 选择图标并设置图标属性。
步骤 5 - 使用 createAppContainer 并使用 BtmTbs 作为参数。从不同的 BtmTbs.Screen 调用页面内容函数。
步骤 6 - 检查结果。
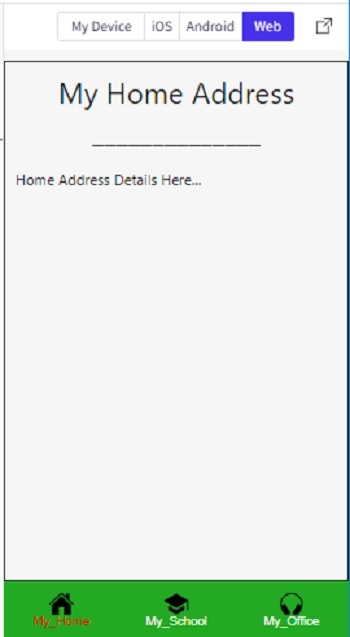
示例 2:在 Snack 上使用来自 Ionicons 的图标创建标签。
项目中使用的重要文件是
App.js
App.js:这是此项目的 javascript 主文件。
示例
import {Component} from 'react';
import {StyleSheet, Text, View} from 'react-native';
import {createAppContainer} from 'react-navigation';
import { createMaterialBottomTabNavigator } from 'react-navigation-material-bottom-tabs';
import Icon from 'react-native-vector-icons/Ionicons';

class My_Home extends Component {
   render() {
      return (
         <View style={styles.Addresscontents}>
            <Text style={styles.AddressHeader}>My Home Address</Text>
            <Text style={styles.AddressHeader}>______________</Text>
            <br/>
            <Text style={styles.AddressContent}>Home Address Details Here...</Text>
         </View>
      );
   }
}

class My_School extends Component {
   render() {
      return (
         <View style={styles.Addresscontents}>
            <Text style={styles.AddressHeader}>My School Address</Text>
            <Text style={styles.AddressHeader}>______________</Text>
            <br/>
            <Text style={styles.AddressContent}>School Address Details Here...</Text>
         </View>
      );
   }
}

class My_Office extends Component {
   render() {
      return (
         <View style={styles.Addresscontents}>
            <Text style={styles.AddressHeader}>My Office Address</Text>
            <Text style={styles.AddressHeader}>______________</Text>
            <br/>
            <Text style={styles.AddressContent}>Office Address Details Here...</Text>
         </View>
      );
   }
}

const BtmTbs = createMaterialBottomTabNavigator(
   {
      My_Home: {
         screen: My_Home,
         navigationOptions:{
            tabBarLabel:'My_Home',
            tabBarIcon: () => (
            <View>
               <Icon size={25} name={'ios-home'}/>
            </View>),
         }
      },
      My_School: {
         screen: My_School,
         navigationOptions:{
            tabBarLabel:'My_School',
            tabBarIcon: () => (
            <View>
            <Iconsize={25} name={'school'}/>
            </View>),
            activeColor:"#c00",
            inactiveColor:"#ffe",
            barStyle: { backgroundColor: '#2a2' },
         }
      },
      My_Office: {
         screen: My_Office,
         navigationOptions:{
            tabBarLabel:'My_Office',
            tabBarIcon: () => (
            <View>
            <Iconsize={25} name={'headset'}/>
            </View>),
            activeColor:"#c00",
            inactiveColor:"#ffe",
            barStyle: { backgroundColor: '#2a2' },
         }
      },
   },
   {
      initialRouteName: "My_Home",
      activeColor:"#c00",
      inactiveColor:"#ffe",
      barStyle: { backgroundColor: '#2a2' },
   },
);

const styles = StyleSheet.create({
   Addresscontents: {
      flex: 1,
      width: '100%',
      padding: 10,
      marginTop: 10,
      borderWidth: 1,
      borderColor: 'black',
   },
   AddressHeader: {
      color: 'black',
      fontSize: 28,
      textAlign: 'center',
   },
});

export default createAppContainer(BtmTbs);
输出
可以在线查看结果。当用户输入代码时,Web 视图会默认被选中,结果会立即显示。

在本文中,使用两个不同的示例,给出了在 Expo Snack 上使用 Material Bottom Tab Navigator 显示不同形式的底部标签的方法。首先,给出了创建标签类型底部标签的方法。第二个示例介绍了创建图标类型底部标签的方法,并在在线 Web 视图中显示了输出。


 数据结构
数据结构 网络
网络 关系型数据库管理系统
 操作系统
操作系统 Java
Java iOS
iOS HTML
HTML CSS
CSS Android
 Python
 C语言编程
C语言编程 C++
C++ C#
C# MongoDB
 MySQL
MySQL Javascript
 PHP
PHP