- Arduino 教程
- Arduino - 首页
- Arduino - 概览
- Arduino - 开发板描述
- Arduino - 安装
- Arduino - 程序结构
- Arduino - 数据类型
- Arduino - 变量与常量
- Arduino - 运算符
- Arduino - 控制语句
- Arduino - 循环
- Arduino - 函数
- Arduino - 字符串
- Arduino - 字符串对象
- Arduino - 时间
- Arduino - 数组
- Arduino 函数库
- Arduino - I/O 函数
- Arduino - 高级 I/O 函数
- Arduino - 字符函数
- Arduino - 数学库
- Arduino - 三角函数
- Arduino 高级
- Arduino - Due & Zero
- Arduino - 脉冲宽度调制
- Arduino - 随机数
- Arduino - 中断
- Arduino - 通信
- Arduino - 集成电路
- Arduino - 串行外设接口
- Arduino 项目
- Arduino - 闪烁 LED
- Arduino - 渐变 LED
- Arduino - 读取模拟电压
- Arduino - LED 条形图
- Arduino - 键盘注销
- Arduino - 键盘消息
- Arduino - 鼠标按钮控制
- Arduino - 键盘串口
- Arduino 传感器
- Arduino - 湿度传感器
- Arduino - 温度传感器
- Arduino - 水位检测器/传感器
- Arduino - PIR 传感器
- Arduino - 超声波传感器
- Arduino - 连接开关
- 电机控制
- Arduino - 直流电机
- Arduino - 伺服电机
- Arduino - 步进电机
- Arduino 和声音
- Arduino - 音调库
- Arduino - 无线通信
- Arduino - 网络通信
- Arduino 有用资源
- Arduino - 快速指南
- Arduino - 有用资源
- Arduino - 讨论
Arduino - 键盘注销
此示例使用键盘库在将 Arduino UNO 上的 2 号引脚拉低至地时注销计算机上的用户会话。该草图模拟了同时按下两三个键的顺序,并在短暂延迟后释放它们。
警告 - 当您使用 Keyboard.print() 命令时,Arduino 会接管您的计算机键盘。为了确保在运行使用此函数的草图时不会失去对计算机的控制,请在调用 Keyboard.print() 之前设置可靠的控制系统。此草图设计为仅在引脚被拉低至地后才发送键盘命令。
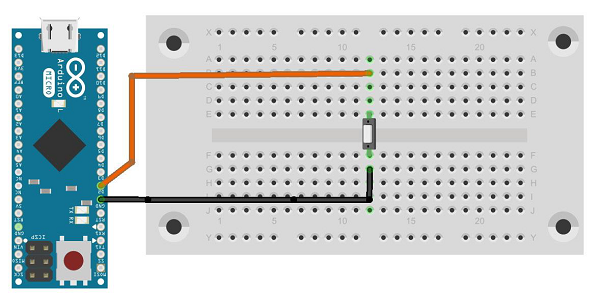
所需组件
您将需要以下组件 -
- 1 × 面包板
- 1 × Arduino Leonardo、Micro 或 Due 开发板
- 1 × 推按钮
- 1 × 跳线
步骤
按照电路图,并将组件连接到面包板上,如下图所示。
草图
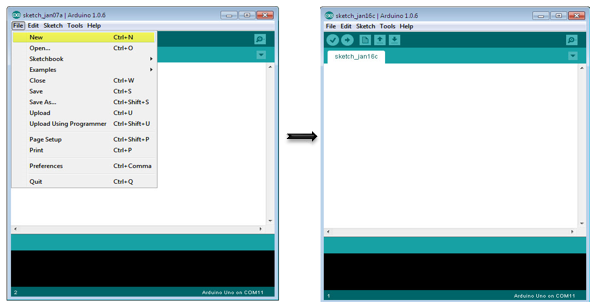
在您的计算机上打开 Arduino IDE 软件。使用 Arduino 语言进行编码将控制您的电路。通过点击新建打开一个新的草图文件。
对于此示例,您需要使用 Arduino IDE 1.6.7
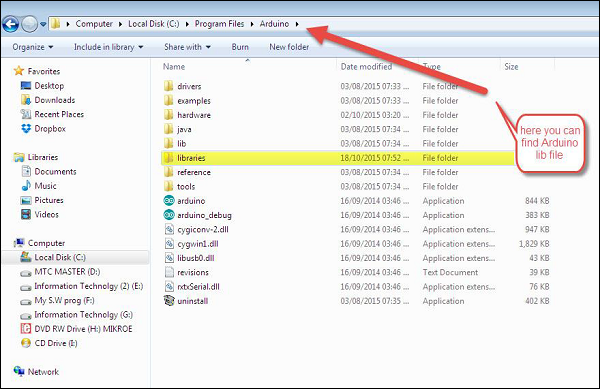
注意 - 您必须在 Arduino 库文件中包含键盘库。将键盘库文件复制并粘贴到名为库(突出显示)的文件中,如下图所示。
Arduino 代码
/*
   Keyboard logout
   This sketch demonstrates the Keyboard library.
   When you connect pin 2 to ground, it performs a logout.
   It uses keyboard combinations to do this, as follows:
   On Windows, CTRL-ALT-DEL followed by ALT-l
   On Ubuntu, CTRL-ALT-DEL, and ENTER
   On OSX, CMD-SHIFT-q
   To wake: Spacebar.
   Circuit:
   * Arduino Leonardo or Micro
   * wire to connect D2 to ground.
*/

#define OSX 0
#define WINDOWS 1
#define UBUNTU 2

#include "Keyboard.h"

// change this to match your platform:
int platform = WINDOWS;

void setup() {
   // make pin 2 an input and turn on the
   // pullup resistor so it goes high unless
   // connected to ground:

   pinMode(2, INPUT_PULLUP);
   Keyboard.begin();
}

void loop() {
   while (digitalRead(2) == HIGH) {
      // do nothing until pin 2 goes low
      delay(500);
   }

   delay(1000);

   switch (platform) {
      case OSX:
      Keyboard.press(KEY_LEFT_GUI);

      // Shift-Q logs out:
      Keyboard.press(KEY_LEFT_SHIFT);
      Keyboard.press('Q');
      delay(100);

      // enter:
      Keyboard.write(KEY_RETURN);
      break;

      case WINDOWS:
      // CTRL-ALT-DEL:
      Keyboard.press(KEY_LEFT_CTRL);
      Keyboard.press(KEY_LEFT_ALT);
      Keyboard.press(KEY_DELETE);
      delay(100);
      Keyboard.releaseAll();

      //ALT-l:
      delay(2000);
      Keyboard.press(KEY_LEFT_ALT);
      Keyboard.press('l');
      Keyboard.releaseAll();
      break;

      case UBUNTU:
      // CTRL-ALT-DEL:
      Keyboard.press(KEY_LEFT_CTRL);
      Keyboard.press(KEY_LEFT_ALT);
      Keyboard.press(KEY_DELETE);

      delay(1000);
      Keyboard.releaseAll();

      // Enter to confirm logout:
      Keyboard.write(KEY_RETURN);
      break;
   }

   // do nothing:
   while (true);
}

Keyboard.releaseAll();

   // enter:
      Keyboard.write(KEY_RETURN);
      break;
      case WINDOWS:

   // CTRL-ALT-DEL:
      Keyboard.press(KEY_LEFT_CTRL);
      Keyboard.press(KEY_LEFT_ALT);
      Keyboard.press(KEY_DELETE);
      delay(100);
      Keyboard.releaseAll();

   //ALT-l:
      delay(2000);
      Keyboard.press(KEY_LEFT_ALT);
      Keyboard.press('l');
      Keyboard.releaseAll();
      break;

   case UBUNTU:
      // CTRL-ALT-DEL:
      Keyboard.press(KEY_LEFT_CTRL);
      Keyboard.press(KEY_LEFT_ALT);
      Keyboard.press(KEY_DELETE);
      delay(1000);
      Keyboard.releaseAll();

      // Enter to confirm logout:
      Keyboard.write(KEY_RETURN);
      break;
   }

// do nothing:
   while (true);
}
代码说明
在将程序上传到开发板之前,请确保将您当前使用的正确操作系统分配给 platform 变量。
在草图运行期间,按下按钮会将 2 号引脚连接到地,开发板会将注销序列发送到 USB 连接的 PC。
结果
当您将 2 号引脚连接到地时,它会执行注销操作。
它使用以下键盘组合来注销 -
在 Windows 上,CTRL-ALT-DEL,然后是 ALT-l
在 Ubuntu 上,CTRL-ALT-DEL 和 ENTER
在 OSX 上,CMD-SHIFT-q
广告