
 数据结构
数据结构 网络
网络 关系型数据库管理系统
 操作系统
操作系统 Java
Java iOS
iOS HTML
HTML CSS
CSS Android
 Python
 C语言编程
C语言编程 C++
C++ C#
C# MongoDB
 MySQL
MySQL Javascript
 PHP
PHP如何在Android中实现自定义AlertDialog视图?
此示例演示了如何在Android中实现自定义AlertDialog视图。
步骤1 - 在Android Studio中创建一个新项目,转到文件⇒新建项目,并填写所有必需的详细信息以创建新项目。
步骤2 - 将以下代码添加到res/layout/activity_main.xml。
<?xml version="1.0" encoding="utf-8"?>
<androidx.constraintlayout.widget.ConstraintLayout
   xmlns:android="http://schemas.android.com/apk/res/android"
   xmlns:app="http://schemas.android.com/apk/res-auto"
   xmlns:tools="http://schemas.android.com/tools"
   android:layout_width="match_parent"
   android:layout_height="match_parent"
   tools:context=".MainActivity">
   <Button
      android:id="@+id/buttonShowDialog"
      android:layout_width="wrap_content"
      android:layout_height="wrap_content"
      android:layout_centerInParent="true"
      android:background="@color/colorPrimary"
      android:padding="15dp"
      android:text="Android Custom Dialog Example"
      android:textAllCaps="false"
      android:textColor="#ffffff" />
</androidx.constraintlayout.widget.ConstraintLayout>
步骤3 - 将以下代码添加到res/layout/my_dialog.xml。
<?xml version="1.0" encoding="utf-8"?>
<LinearLayout xmlns:android="http://schemas.android.com/apk/res/android"
   android:orientation="vertical"
   android:layout_width="match_parent"
   android:layout_height="match_parent">
   <RelativeLayout
      android:layout_width="match_parent"
      android:layout_height="80dp"
      android:background="@color/colorPrimary">
      <ImageView
         android:layout_width="50dp"
         android:layout_height="50dp"
         android:layout_centerInParent="true"
         android:background="@drawable/ic_success" />
   </RelativeLayout>
   <TextView
      android:layout_width="match_parent"
      android:layout_height="wrap_content"
      android:text="Success"
      android:textAlignment="center"
      android:textAppearance="@style/TextAppearance.AppCompat.Headline"/>
   <TextView
      android:layout_width="match_parent"
      android:layout_height="wrap_content"
      android:layout_marginTop="10dp"
      android:text="Lorem ipsum dolor sit amet, consectetur adipiscing elit.
      Nulla eu erat tincidunt lacus fermentum rutrum."
      android:textAlignment="center"
      android:textAppearance="@style/TextAppearance.AppCompat.Medium"/>
   <Button
      android:id="@+id/buttonOk"
      android:layout_width="200dp"
      android:layout_height="wrap_content"
      android:layout_gravity="center"
      android:layout_marginTop="15dp"
      android:background="@drawable/button_background"
      android:text="Ok"
      android:textColor="@color/colorPrimary" />
</LinearLayout>
步骤4 - 将以下代码添加到res/drawable/button_background.xml。
<?xml version="1.0" encoding="utf-8"?>
<selector xmlns:android="http://schemas.android.com/apk/res/android">
   <item>
      <shape>
         <stroke android:width="2dp" android:color="@color/colorPrimary" />
         <solid android:color="@android:color/transparent" />
         <corners android:bottomLeftRadius="6dp" android:bottomRightRadius="6dp" android:topLeftRadius="6dp" android:topRightRadius="6dp" />
      </shape>
   </item>
</selector>
步骤5 - 将以下代码添加到res/drawable/ic_success.xml。
<?xml version="1.0" encoding="utf-8"?>
<vector xmlns:android="http://schemas.android.com/apk/res/android"
   android:height="24dp"
   android:viewportHeight="512"
   android:viewportWidth="512"
   android:width="24dp">
   <path android:fillColor="#FFFFFF" android:pathData="M468.907,214.604c-11.423,0 -20.682,9.26
      -20.682,20.682v20.831c-0.031,54.338 -21.221,105.412 -59.666,143.812c38.417,38.372
      -89.467,59.5 -143.761,59.5c-0.04,0 -0.08,0 -0.12,0C132.506,459.365 41.3,368.056 41.364,255.883c0.031,
      -54.337 21.221,-105.411 59.667,-143.813c38.417,- 38.372 89.468,-59.5 143.761,
      -59.5c0.04,0 0.08,0 0.12,0c28.672,0.016 56.49,5.942 82.68,17.611c10.436,4.65 22.659,
      -0.041 27.309,-10.474c4.648,-10.433 -0.04,-22.659 - 10.474,-27.309c-31.516,-14.043
      -64.989,-21.173 -99.492,-21.192c-0.052,0 -0.092,0 - 0.144,0c-65.329,0 -126.767,25.428
      -172.993,71.6C25.536,129.014 0.038,190.473 0,255.861c-0.037,65.386 25.389,126.874 71.599,
      173.136c46.21,46.262 107.668,71.76 173.055,71.798c0.051,0 0.092,0 0.144,0c65.329,0 126.767,
      -25.427 172.993,-71.6c46.262,-46.20971.76,-107.66871.798,-173.066v20.842C489.589,
      223.864 480.33,214.604 468.907,214.604z"/>
   <path android:fillColor="#FFFFFF" android:pathData="M505.942,39.803c-8.077,- 8.076 -21.172,-8.076
      -29.249,0L244.794,271.701l-52.609,-52.609c-8.076,-8.077 -21.172,-8.077 -29.248,0c-8.077,8.077
      -8.077,21.172 0,29.249l67.234,67.234c4.038,4.0399.332,6.058 14.625,6.058c5.293,0 10.586,-2.019 14.625,
      -6.058L505.942,69.052C514.019,60.975 514.019,47.88 505.942,39.803z"/>
</vector>
步骤6 - 将以下代码添加到src/MainActivity.java
package com.app.sample;
import androidx.appcompat.app.AlertDialog;
import androidx.appcompat.app.AppCompatActivity;
import android.os.Bundle;
import android.os.Bundle;
import android.view.LayoutInflater;
import android.view.View;
import android.view.ViewGroup;
public class MainActivity extends AppCompatActivity {
   @Override
   protected void onCreate(Bundle savedInstanceState) {
      super.onCreate(savedInstanceState);
      setContentView(R.layout.activity_main);
      findViewById(R.id.buttonShowDialog).setOnClickListener(new
      View.OnClickListener() {
         @Override
         public void onClick(View v) {
            showCustomDialog();
         }
      });
   }
   private void showCustomDialog() {
      ViewGroup viewGroup = findViewById(android.R.id.content);
      View dialogView = LayoutInflater.from(this).inflate(R.layout.my_dialog, viewGroup, false);
      AlertDialog.Builder builder = new AlertDialog.Builder(this);
      builder.setView(dialogView);
      AlertDialog alertDialog = builder.create();
      alertDialog.show();
   }
}
步骤7 - 将以下代码添加到Manifests/AndroidManifest.xml
<?xml version="1.0" encoding="utf-8"?>
<manifest xmlns:android="http://schemas.android.com/apk/res/android" package="com.app.sample">
   <application
      android:allowBackup="true"
      android:icon="@mipmap/ic_launcher"
      android:label="@string/app_name"
      android:roundIcon="@mipmap/ic_launcher_round"
      android:supportsRtl="true"
      android:theme="@style/AppTheme">
      <activity android:name=".MainActivity">
         <intent-filter>
            <action android:name="android.intent.action.MAIN" />
            <category android:name="android.intent.category.LAUNCHER" />
         </intent-filter>
      </activity>
   </application>
</manifest>
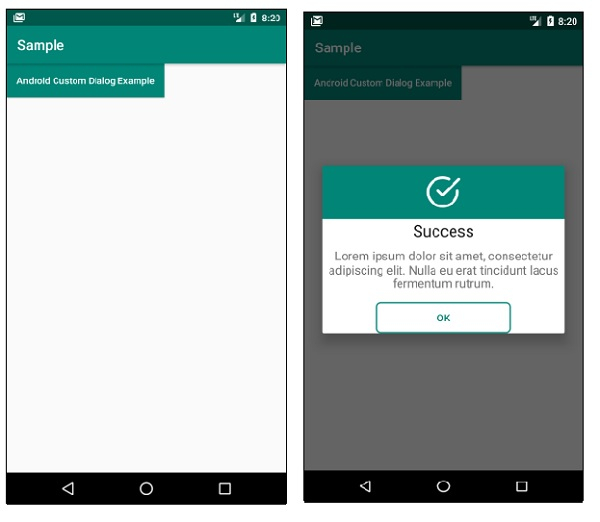
让我们尝试运行您的应用程序。我假设您已将您的实际Android移动设备连接到您的计算机。要从Android Studio运行应用程序,请打开您的项目的一个活动文件,然后单击工具栏中的运行![]() 图标。选择您的移动设备作为选项,然后检查您的移动设备,它将显示您的默认屏幕 -
图标。选择您的移动设备作为选项,然后检查您的移动设备,它将显示您的默认屏幕 -
点击这里下载项目代码。

更新于: 2019年11月15日
1K+ 浏览量

广告