- iOS 教程
- iOS - 首页
- iOS - 入门
- iOS - 环境设置
- iOS - Objective-C 基础
- iOS - 第一个 iPhone 应用程序
- iOS - 动作和出口
- iOS - 代理
- iOS - UI 元素
- iOS - 加速度计
- iOS - 通用应用程序
- iOS - 相机管理
- iOS - 位置处理
- iOS - SQLite 数据库
- iOS - 发送电子邮件
- iOS - 音频和视频
- iOS - 文件处理
- iOS - 访问地图
- iOS - 应用内购买
- iOS - iAd 集成
- iOS - GameKit
- iOS - 故事板
- iOS - 自动布局
- iOS - Twitter 和 Facebook
- iOS - 内存管理
- iOS - 应用程序调试
- iOS 有用资源
- iOS - 快速指南
- iOS - 有用资源
- iOS - 讨论
iOS - 自动布局
自动布局是在iOS 6.0中引入的。当我们使用自动布局时,我们的部署目标应为 6.0 及更高版本。自动布局帮助我们创建可用于多种方向和多种设备的界面。
示例目标
我们将添加两个按钮,它们将放置在距屏幕中心一定距离的位置。我们还将尝试添加一个可调整大小的文本字段,该字段将放置在按钮上方的某个距离。
我们的方法
我们将在代码中添加一个文本字段和两个按钮以及它们的约束。每个 UI 元素的约束都将创建并添加到父视图。为了获得所需的结果,我们必须禁用我们添加的每个 UI 元素的自动调整大小。
涉及的步骤
步骤 1 - 创建一个简单的基于视图的应用程序。
步骤 2 - 我们将只编辑 ViewController.m,内容如下:
#import "ViewController.h"

@interface ViewController ()
@property (nonatomic, strong) UIButton *leftButton;
@property (nonatomic, strong) UIButton *rightButton;
@property (nonatomic, strong) UITextField *textfield;

@end
@implementation ViewController

- (void)viewDidLoad {
   [super viewDidLoad];
   UIView *superview = self.view;

   /*1. Create leftButton and add to our view*/
   self.leftButton = [UIButton buttonWithType:UIButtonTypeRoundedRect];
   self.leftButton.translatesAutoresizingMaskIntoConstraints = NO;
   [self.leftButton setTitle:@"LeftButton" forState:UIControlStateNormal];
   [self.view addSubview:self.leftButton];

   /* 2. Constraint to position LeftButton's X*/
   NSLayoutConstraint *leftButtonXConstraint = [NSLayoutConstraint
   constraintWithItem:self.leftButton attribute:NSLayoutAttributeCenterX
   relatedBy:NSLayoutRelationGreaterThanOrEqual toItem:superview attribute:
   NSLayoutAttributeCenterX multiplier:1.0 constant:-60.0f];

   /* 3. Constraint to position LeftButton's Y*/
   NSLayoutConstraint *leftButtonYConstraint = [NSLayoutConstraint
   constraintWithItem:self.leftButton attribute:NSLayoutAttributeCenterY
   relatedBy:NSLayoutRelationEqual toItem:superview attribute:
   NSLayoutAttributeCenterY multiplier:1.0f constant:0.0f];

   /* 4. Add the constraints to button's superview*/
   [superview addConstraints:@[ leftButtonXConstraint,
   leftButtonYConstraint]];

   /*5. Create rightButton and add to our view*/
   self.rightButton = [UIButton buttonWithType:UIButtonTypeRoundedRect];
   self.rightButton.translatesAutoresizingMaskIntoConstraints = NO;
   [self.rightButton setTitle:@"RightButton" forState:UIControlStateNormal];
   [self.view addSubview:self.rightButton];

   /*6. Constraint to position RightButton's X*/
   NSLayoutConstraint *rightButtonXConstraint = [NSLayoutConstraint
   constraintWithItem:self.rightButton attribute:NSLayoutAttributeCenterX
   relatedBy:NSLayoutRelationGreaterThanOrEqual toItem:superview attribute:
   NSLayoutAttributeCenterX multiplier:1.0 constant:60.0f];

   /*7. Constraint to position RightButton's Y*/
   rightButtonXConstraint.priority = UILayoutPriorityDefaultHigh;
   NSLayoutConstraint *centerYMyConstraint = [NSLayoutConstraint
   constraintWithItem:self.rightButton attribute:NSLayoutAttributeCenterY
   relatedBy:NSLayoutRelationGreaterThanOrEqual toItem:superview attribute:
   NSLayoutAttributeCenterY multiplier:1.0f constant:0.0f];
   [superview addConstraints:@[centerYMyConstraint,
   rightButtonXConstraint]];

   //8. Add Text field
   self.textfield = [[UITextField alloc]initWithFrame:
   CGRectMake(0, 100, 100, 30)];
   self.textfield.borderStyle = UITextBorderStyleRoundedRect;
   self.textfield.translatesAutoresizingMaskIntoConstraints = NO;
   [self.view addSubview:self.textfield];

   //9. Text field Constraints
   NSLayoutConstraint *textFieldTopConstraint = [NSLayoutConstraint
   constraintWithItem:self.textfield attribute:NSLayoutAttributeTop
   relatedBy:NSLayoutRelationGreaterThanOrEqual toItem:superview
   attribute:NSLayoutAttributeTop multiplier:1.0 constant:60.0f];
   NSLayoutConstraint *textFieldBottomConstraint = [NSLayoutConstraint
   constraintWithItem:self.textfield attribute:NSLayoutAttributeTop
   relatedBy:NSLayoutRelationGreaterThanOrEqual toItem:self.rightButton
   attribute:NSLayoutAttributeTop multiplier:0.8 constant:-60.0f];
   NSLayoutConstraint *textFieldLeftConstraint = [NSLayoutConstraint
   constraintWithItem:self.textfield attribute:NSLayoutAttributeLeft
   relatedBy:NSLayoutRelationEqual toItem:superview attribute:
   NSLayoutAttributeLeft multiplier:1.0 constant:30.0f];
   NSLayoutConstraint *textFieldRightConstraint = [NSLayoutConstraint
   constraintWithItem:self.textfield attribute:NSLayoutAttributeRight
   relatedBy:NSLayoutRelationEqual toItem:superview attribute:
   NSLayoutAttributeRight multiplier:1.0 constant:-30.0f];
   [superview addConstraints:@[textFieldBottomConstraint ,
   textFieldLeftConstraint, textFieldRightConstraint,
   textFieldTopConstraint]];
}

- (void)didReceiveMemoryWarning {
   [super didReceiveMemoryWarning];
   // Dispose of any resources that can be recreated.
}
@end
注意事项
在标记为 1、5 和 8 的步骤中,我们分别以编程方式添加了两个按钮和一个文本字段。
在其余步骤中,我们创建了约束并将这些约束添加到相应的父视图(实际上是 self-views)。其中一个左侧按钮的约束如下所示:
NSLayoutConstraint *leftButtonXConstraint = [NSLayoutConstraint
constraintWithItem:self.leftButton attribute:NSLayoutAttributeCenterX
relatedBy:NSLayoutRelationGreaterThanOrEqual toItem:superview attribute:
NSLayoutAttributeCenterX multiplier:1.0 constant:-60.0f];
我们有 constraintWithItem 和 toItem,它们决定我们在哪些 UI 元素之间创建约束。attribute 决定两个元素是如何关联在一起的。“relatedBy”决定属性对元素之间有何影响。Multiplier 是乘法因子,constant 将添加到乘法器中。
在上面的示例中,leftButton 的 X 始终大于或等于相对于父视图中心的 -60 像素。类似地,定义了其他约束。
输出
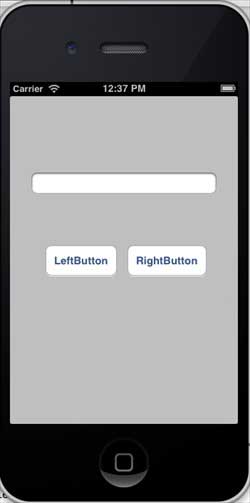
当我们运行应用程序时,我们将在 iPhone 模拟器上获得以下输出:

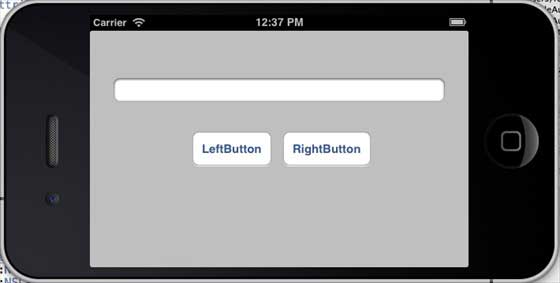
当我们将模拟器的方向更改为横向时,我们将获得以下输出:

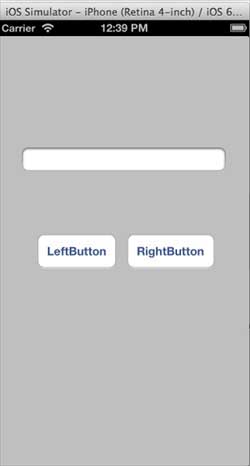
当我们在 iPhone 5 模拟器上运行相同的应用程序时,我们将获得以下输出:

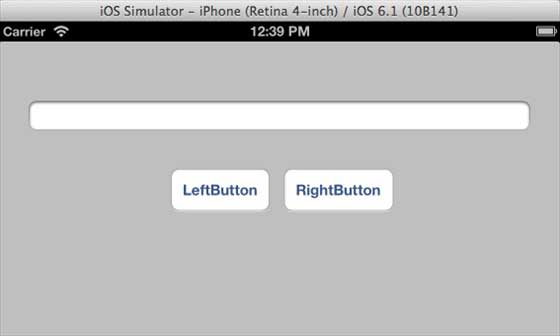
当我们将模拟器的方向更改为横向时,我们将获得以下输出:

广告