- MFC 教程
- MFC - 首页
- MFC - 概述
- MFC - 环境设置
- MFC - VC++ 项目
- MFC - 入门
- MFC - Windows 基础
- MFC - 对话框
- MFC - Windows 资源
- MFC - 属性表
- MFC - Windows 布局
- MFC - 控件管理
- MFC - Windows 控件
- MFC - 消息和事件
- MFC - ActiveX 控件
- MFC - 文件系统
- MFC - 标准 I/O
- MFC - 文档视图
- MFC - 字符串
- MFC - CArray
- MFC - 链表
- MFC - 数据库类
- MFC - 序列化
- MFC - 多线程
- MFC - Internet 编程
- MFC - GDI
- MFC - 库
- MFC 有用资源
- MFC - 快速指南
- MFC - 有用资源
- MFC - 讨论
MFC - 属性表
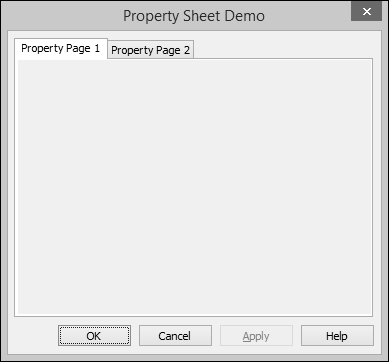
属性表,也称为选项卡对话框,是一个包含属性页的对话框。每个属性页都基于一个对话框模板资源,并包含控件。它包含在一个页面中,顶部有一个选项卡。选项卡命名页面并指示其用途。用户可以在属性表中单击一个选项卡以选择一组控件。
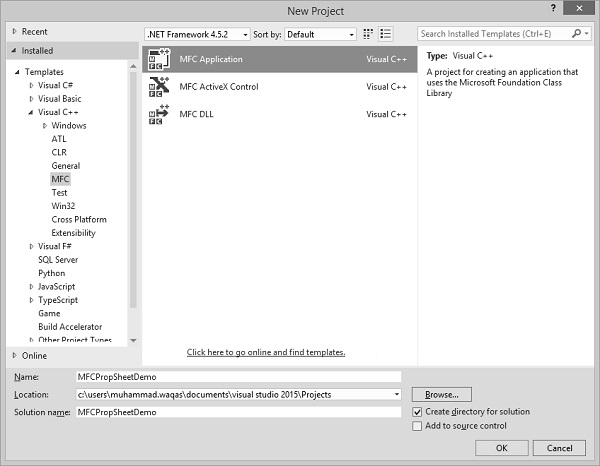
要创建属性页,让我们通过创建一个基于对话框的 MFC 项目来查看一个简单的示例。
创建项目后,我们需要添加一些属性页。
Visual Studio 通过显示“添加资源”对话框、展开“对话框”节点并选择其中一个 IDD_PROPPAGE_X 项,使创建属性页的资源变得容易。
步骤 1 - 在解决方案资源管理器中右键单击您的项目,然后选择“添加”→“资源”。
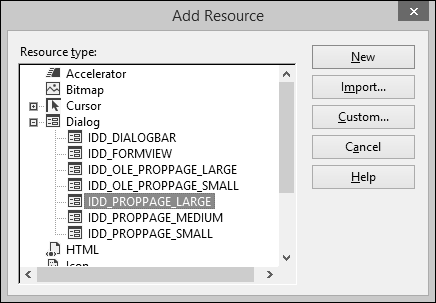
步骤 2 - 选择 IDD_PROPPAGE_LARGE 并单击“新建”。
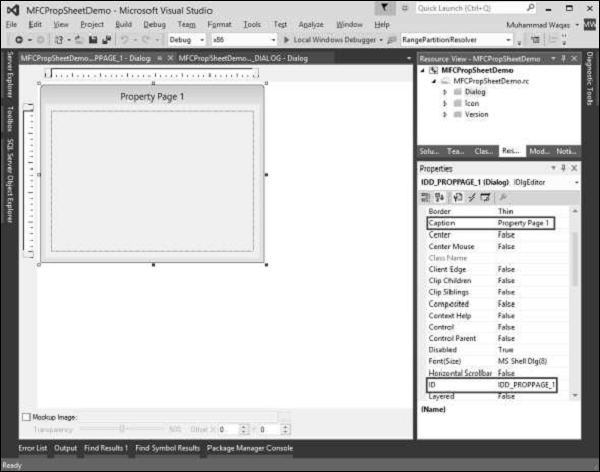
步骤 3 - 让我们将此属性页的 ID 和标题分别更改为IDD_PROPPAGE_1和属性页 1,如上所示。
步骤 4 - 在设计器窗口中右键单击属性页。
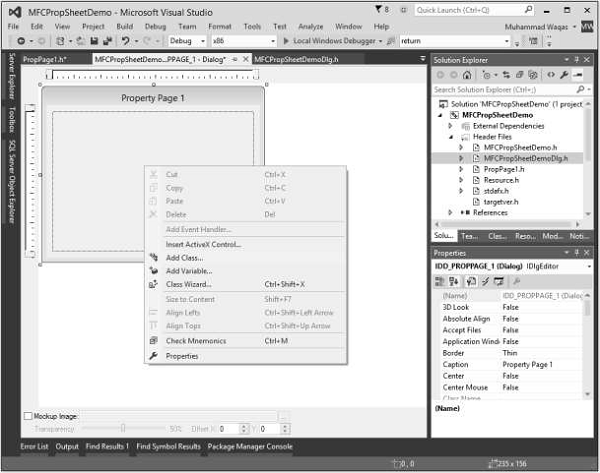
步骤 5 - 选择“添加类”选项。
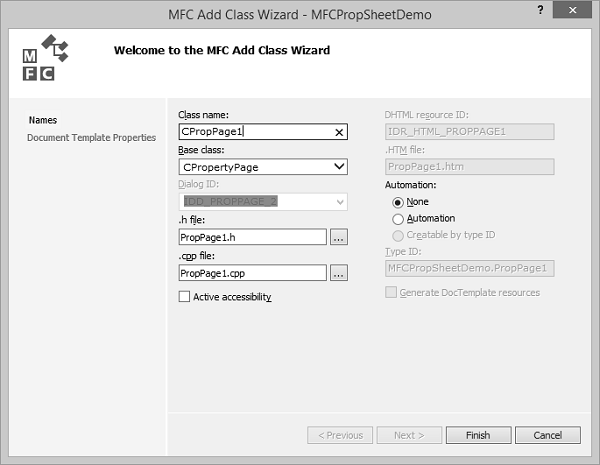
步骤 6 - 输入类名,并从基类下拉列表中选择 CPropertyPage。
步骤 7 - 单击“完成”继续。
步骤 8 - 通过遵循上述步骤,再添加一个 ID 为 IDD_PROPPAGE_2、标题为属性页 2 的属性页。
步骤 9 - 您现在可以看到创建了两个属性页。要实现其功能,我们需要一个属性表。
属性表将属性页组合在一起并将其作为实体。
要创建属性表,请按照以下步骤操作 -
步骤 1 - 右键单击您的项目,然后选择“添加”>“类”菜单选项。
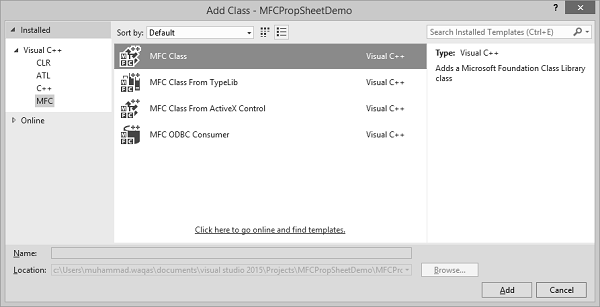
步骤 2 - 从左侧窗格中选择“Visual C++”→“MFC”,从模板窗格中选择“MFC 类”,然后单击“添加”。
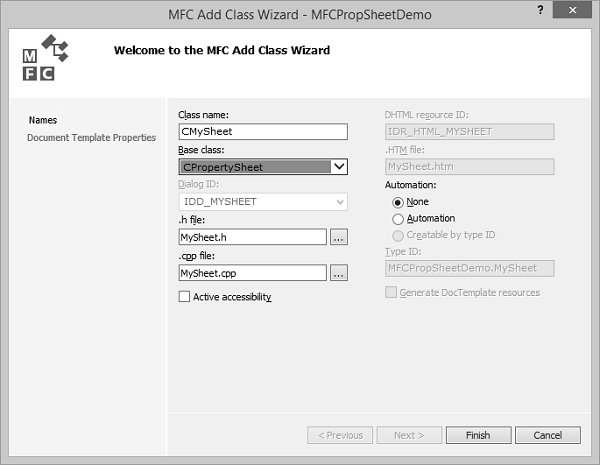
步骤 3 - 输入类名,并从基类下拉列表中选择 CPropertySheet。
步骤 4 - 单击“完成”继续。
步骤 5 - 要启动此属性表,我们需要对我们的主项目类进行以下更改。
步骤 6 - 在 CMFCPropSheetDemo.cpp 文件中添加以下引用。
#include "MySheet.h"
#include "PropPage1.h"
#include "PropPage2.h"
步骤 7 - 修改 CMFCPropSheetDemoApp::InitInstance() 方法,如下面的代码所示。
CMySheet mySheet(L"Property Sheet Demo");
CPropPage1 page1;
CPropPage2 page2;

mySheet.AddPage(&page1);
mySheet.AddPage(&page2);

m_pMainWnd = &mySheet;
INT_PTR nResponse = mySheet.DoModal();
步骤 8 - 以下是 CMFCPropSheetDemo.cpp 文件的完整实现。
// MFCPropSheetDemo.cpp : Defines the class behaviors for the application.
//
#include "stdafx.h"
#include "MFCPropSheetDemo.h"
#include "MFCPropSheetDemoDlg.h"
#include "MySheet.h"
#include "PropPage1.h"
#include "PropPage2.h"

#ifdef _DEBUG
#define new DEBUG_NEW
#endif


// CMFCPropSheetDemoApp
BEGIN_MESSAGE_MAP(CMFCPropSheetDemoApp, CWinApp)
   ON_COMMAND(ID_HELP, &CWinApp::OnHelp)
END_MESSAGE_MAP()


// CMFCPropSheetDemoApp construction

CMFCPropSheetDemoApp::CMFCPropSheetDemoApp() {

   // support Restart Manager
   m_dwRestartManagerSupportFlags = AFX_RESTART_MANAGER_SUPPORT_RESTART;
   // TODO: add construction code here,
   // Place all significant initialization in InitInstance
}


// The one and only CMFCPropSheetDemoApp object

CMFCPropSheetDemoApp theApp;


// CMFCPropSheetDemoApp initialization

BOOL CMFCPropSheetDemoApp::InitInstance() {

   // InitCommonControlsEx() is required on Windows XP if an application
   // manifest specifies use of ComCtl32.dll version 6 or later to enable
   // visual styles. Otherwise, any window creation will fail.
   INITCOMMONCONTROLSEX InitCtrls;
   InitCtrls.dwSize = sizeof(InitCtrls);
   // Set this to include all the common control classes you want to use
   // in your application.
   InitCtrls.dwICC = ICC_WIN95_CLASSES;
   InitCommonControlsEx(&InitCtrls);

   CWinApp::InitInstance();


   AfxEnableControlContainer();

   // Create the shell manager, in case the dialog contains
   // any shell tree view or shell list view controls.
   CShellManager *pShellManager = new CShellManager;

   // Activate "Windows Native" visual manager for enabling themes in MFC controls
   CMFCVisualManager::SetDefaultManager(RUNTIME_CLASS(CMFCVisualManagerWindows));
   // Standard initialization
   // If you are not using these features and wish to reduce the size
   // of your final executable, you should remove from the following
   // the specific initialization routines you do not need
   // Change the registry key under which our settings are stored
   // TODO: You should modify this string to be something appropriate
   // such as the name of your company or organization
   SetRegistryKey(_T("Local AppWizard-Generated Applications"));

   CMySheet mySheet(L"Property Sheet Demo");
   CPropPage1 page1;
   CPropPage2 page2;

   mySheet.AddPage(&page1);
   mySheet.AddPage(&page2);

   m_pMainWnd = &mySheet;
   INT_PTR nResponse = mySheet.DoModal();
   if (nResponse == IDOK) {
      // TODO: Place code here to handle when the dialog is
      // dismissed with OK
   }else if (nResponse == IDCANCEL) {
      // TODO: Place code here to handle when the dialog is
      // dismissed with Cancel
   }else if (nResponse == -1) {
      TRACE(traceAppMsg, 0, "Warning: dialog creation failed,
        so application is terminating unexpectedly.\n");
      TRACE(traceAppMsg, 0, "Warning: if you are using MFC controls on the dialog,
        you cannot #define _AFX_NO_MFC_CONTROLS_IN_DIALOGS.\n");
   }

   // Delete the shell manager created above.
   if (pShellManager != NULL) {
      delete pShellManager;
   }

   // Since the dialog has been closed, return FALSE so that we exit the
   // application, rather than start the application's message pump.
   return FALSE;
}
步骤 9 - 当上述代码编译并执行时,您将看到以下对话框。此对话框包含两个属性页。