- Spring MVC 基础
- Spring MVC - 首页
- Spring MVC - 概述
- Spring MVC - 环境搭建
- Spring MVC - Hello World 示例
- Spring MVC - 表单处理
- Spring MVC - 表单处理
- Spring MVC - 页面重定向
- Spring MVC - 静态页面
- Spring MVC - 表单标签库
- Spring MVC - 文本框
- Spring MVC - 密码框
- Spring MVC - 文本区域
- Spring MVC - 复选框
- Spring MVC - 多个复选框
- Spring MVC - 单选按钮
- Spring MVC - 多个单选按钮
- Spring MVC - 下拉列表
- Spring MVC - 列表框
- Spring MVC - 隐藏域
- Spring MVC - 错误处理
- Spring MVC - 文件上传
- Spring MVC - 处理器映射
- Bean 名称 URL 处理器映射
- 控制器类名称处理器映射
- 简单 URL 处理器映射
- Spring MVC - 控制器
- Spring MVC - 多动作控制器
- 属性方法名称解析器
- 参数方法名称解析器
- 可参数化视图控制器
- Spring MVC - 视图解析器
- 内部资源视图解析器
- Spring MVC - XML 视图解析器
- 资源包视图解析器
- 多个解析器映射
- Spring MVC - 集成
- Spring MVC - Hibernate 验证器
- Spring MVC - 生成 RSS Feed
- Spring MVC - 生成 XML
- Spring MVC - 生成 JSON
- Spring MVC - 生成 Excel
- Spring MVC - 生成 PDF
- Spring MVC - 使用 log4j
- Spring 常见问题解答
- Spring - 常见问题解答
- Spring 有用资源
- Spring MVC - 快速指南
- Spring MVC - 有用资源
- Spring MVC - 讨论
Spring MVC - 文本区域示例
以下示例说明如何使用 Spring Web MVC 框架在表单中使用文本区域。首先,我们需要一个可运行的 Eclipse IDE,然后按照以下步骤使用 Spring Web 框架开发基于动态表单的 Web 应用程序。
| 步骤 | 描述 |
|---|---|
| 1 | 创建一个名为 HelloWeb 的项目,位于 com.tutorialspoint 包下,如 Spring MVC - Hello World 章节中所述。 |
| 2 | 在 com.tutorialspoint 包下创建 Java 类 User 和 UserController。 |
| 3 | 在 jsp 子文件夹下创建视图文件 user.jsp 和 users.jsp。 |
| 4 | 最后一步是创建源文件和配置文件的内容,并导出应用程序,如下所述。 |
User.java
package com.tutorialspoint;

public class User {

   private String username;
   private String password;
   private String address;

   public String getUsername() {
      return username;
   }
   public void setUsername(String username) {
      this.username = username;
   }

   public String getPassword() {
      return password;
   }
   public void setPassword(String password) {
      this.password = password;
   }
   public String getAddress() {
      return address;
   }
   public void setAddress(String address) {
      this.address = address;
   }
}
UserController.java
package com.tutorialspoint;

import org.springframework.stereotype.Controller;
import org.springframework.web.bind.annotation.ModelAttribute;
import org.springframework.web.bind.annotation.RequestMapping;
import org.springframework.web.bind.annotation.RequestMethod;
import org.springframework.web.servlet.ModelAndView;
import org.springframework.ui.ModelMap;

@Controller
public class UserController {

   @RequestMapping(value = "/user", method = RequestMethod.GET)
   public ModelAndView user() {
      return new ModelAndView("user", "command", new User());
   }

   @RequestMapping(value = "/addUser", method = RequestMethod.POST)
   public String addUser(@ModelAttribute("SpringWeb")User user,
      ModelMap model) {
      model.addAttribute("username", user.getUsername());
      model.addAttribute("password", user.getPassword());
      model.addAttribute("address", user.getAddress());

      return "users";
   }
}
这里,对于第一个服务方法 user(),我们在 ModelAndView 对象中传递了一个空的 User 对象,名称为 "command",因为如果在 JSP 文件中使用 <form:form> 标签,Spring 框架期望有一个名为 "command" 的对象。因此,当调用 user() 方法时,它会返回 user.jsp 视图。
第二个服务方法 addUser() 将针对 HelloWeb/addUser URL 上的 POST 方法调用。您将根据提交的信息准备模型对象。最后,服务方法将返回 "users" 视图,这将导致渲染 users.jsp。
user.jsp
<%@taglib uri = "http://www.springframework.org/tags/form" prefix = "form"%>
<html>
   <head>
      <title>Spring MVC Form Handling</title>
   </head>
   <body>

   <h2>User Information</h2>
   <form:form method = "POST" action = "/HelloWeb/addUser">
      <table>
         <tr>
            <td><form:label path = "username">User Name</form:label></td>
            <td><form:input path = "username" /></td>
         </tr>
         <tr>
            <td><form:label path = "password">Age</form:label></td>
            <td><form:password path = "password" /></td>
         </tr>
         <tr>
            <td><form:label path = "address">Address</form:label></td>
            <td><form:textarea path = "address" rows = "5" cols = "30" /></td>
         </tr>
         <tr>
            <td colspan = "2">
               <input type = "submit" value = "Submit"/>
            </td>
         </tr>
      </table>
   </form:form>
   </body>
</html>
这里,我们使用<form:textarea />标签来渲染 HTML 文本区域框。例如:
<form:textarea path = "address" rows = "5" cols = "30" />
它将渲染以下 HTML 内容。
<textarea id = "address" name = "address" rows = "5" cols = "30"></textarea>
users.jsp
<%@taglib uri = "http://www.springframework.org/tags/form" prefix = "form"%>
<html>
   <head>
      <title>Spring MVC Form Handling</title>
   </head>
   <body>

      <h2>Submitted User Information</h2>
      <table>
         <tr>
            <td>Username</td>
            <td>${username}</td>
         </tr>
         <tr>
            <td>Password</td>
            <td>${password}</td>
         </tr>
         <tr>
            <td>Address</td>
            <td>${address}</td>
         </tr>
      </table>
   </body>
</html>
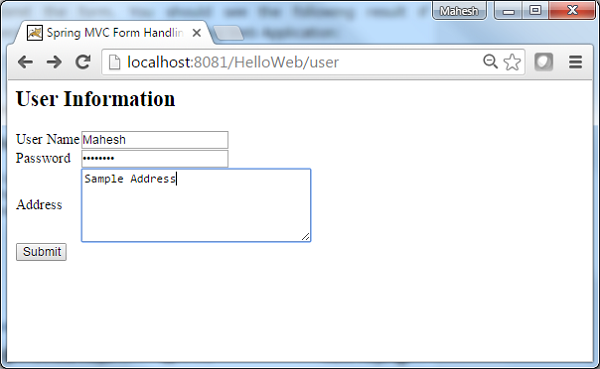
创建完源文件和配置文件后,导出您的应用程序。右键单击您的应用程序,使用导出 → WAR 文件选项并将您的 HelloWeb.war 文件保存到 Tomcat 的 webapps 文件夹中。
现在,启动您的 Tomcat 服务器,并确保您可以使用标准浏览器从 webapps 文件夹访问其他网页。尝试 URL –https://:8080/HelloWeb/user,如果 Spring Web 应用程序一切正常,我们将看到以下屏幕。
提交所需信息后,单击提交按钮提交表单。如果 Spring Web 应用程序一切正常,我们将看到以下屏幕。

广告