- WebRTC 教程
- WebRTC - 首页
- WebRTC - 概述
- WebRTC - 架构
- WebRTC - 环境
- WebRTC - MediaStream APIs
- WebRTC - RTCPeerConnection APIs
- WebRTC - RTCDataChannel APIs
- WebRTC - 发送消息
- WebRTC - 信令
- WebRTC - 浏览器支持
- WebRTC - 移动端支持
- WebRTC - 视频演示
- WebRTC - 语音演示
- WebRTC - 文本演示
- WebRTC - 安全性
- WebRTC 资源
- WebRTC - 快速指南
- WebRTC - 有用资源
- WebRTC - 讨论
WebRTC - 信令
大多数 WebRTC 应用不仅仅是能够通过视频和音频进行通信。它们需要许多其他功能。在本章中,我们将构建一个基本的信令服务器。
信令和协商
要连接到另一个用户,您应该知道他在网络上的位置。您的设备的IP地址允许启用互联网的设备彼此之间直接发送数据。RTCPeerConnection 对象负责此操作。一旦设备知道如何在互联网上找到彼此,它们就开始交换有关每个设备支持的协议和编解码器的信息。
要与另一个用户通信,您只需交换联系信息,其余部分将由 WebRTC 完成。连接到另一个用户的过程也称为信令和协商。它包括以下几个步骤:
创建对等连接的潜在候选者列表。
用户或应用程序选择一个用户进行连接。
信令层通知另一个用户有人想要连接到他。他可以接受或拒绝。
第一个用户收到对报价的接受通知。
第一个用户使用另一个用户启动RTCPeerConnection。
两个用户通过信令服务器交换软件和硬件信息。
两个用户交换位置信息。
连接成功或失败。
WebRTC 规范不包含任何关于交换信息的标准。因此,请记住,以上只是信令发生方式的一个示例。您可以使用任何您喜欢的协议或技术。
构建服务器
我们将构建的服务器能够将两个不在同一台计算机上的用户连接在一起。我们将创建我们自己的信令机制。我们的信令服务器将允许一个用户呼叫另一个用户。一旦用户呼叫了另一个用户,服务器就会在他们之间传递 offer、answer 和 ICE 候选者,并建立 WebRTC 连接。
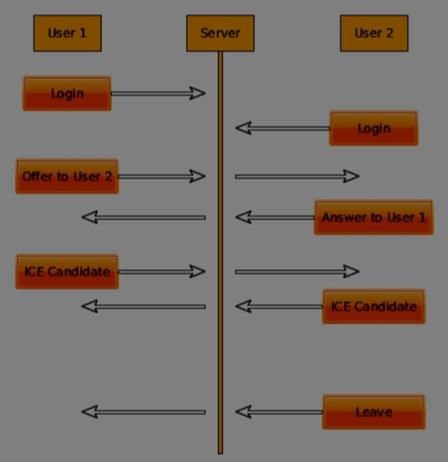
上图是使用信令服务器时用户之间的消息流。首先,每个用户向服务器注册。在本例中,这将是一个简单的字符串用户名。用户注册后,他们就可以互相呼叫了。用户 1 使用他希望呼叫的用户的标识符发出一个 offer。另一个用户应该回答。最后,ICE 候选者在用户之间发送,直到他们能够建立连接。
要创建 WebRTC 连接,客户端必须能够在不使用 WebRTC 对等连接的情况下传输消息。这就是我们将使用 HTML5 WebSockets 的地方——两个端点(Web 服务器和 Web 浏览器)之间的双向套接字连接。现在让我们开始使用 WebSocket 库。创建server.js文件并插入以下代码:
//require our websocket library
var WebSocketServer = require('ws').Server;

//creating a websocket server at port 9090
var wss = new WebSocketServer({port: 9090});

//when a user connects to our sever
wss.on('connection', function(connection) {
   console.log("user connected");

   //when server gets a message from a connected user
   connection.on('message', function(message){
      console.log("Got message from a user:", message);
   });

   connection.send("Hello from server");
});
第一行需要我们已经安装的 WebSocket 库。然后我们在端口 9090 上创建一个套接字服务器。接下来,我们监听connection事件。当用户与服务器建立 WebSocket 连接时,将执行此代码。然后,我们监听用户发送的任何消息。最后,我们向已连接的用户发送“Hello from server”的响应。
现在运行node server,服务器应该开始监听套接字连接。
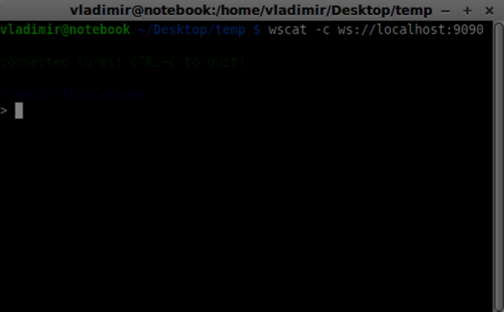
为了测试我们的服务器,我们将使用我们也已经安装的wscat实用程序。此工具有助于直接连接到 WebSocket 服务器并测试命令。在一个终端窗口中运行我们的服务器,然后打开另一个窗口并运行wscat -c ws://:9090命令。您应该在客户端看到以下内容:
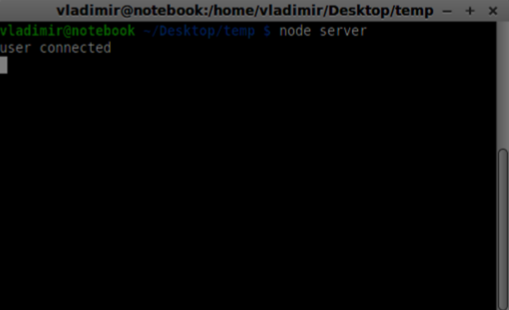
服务器还应该记录已连接的用户:
用户注册
在我们的信令服务器中,我们将为每个连接使用基于字符串的用户名,以便我们知道将消息发送到哪里。让我们稍微更改一下我们的connection处理程序:
connection.on('message', function(message) {
   var data;

   //accepting only JSON messages
   try {
      data = JSON.parse(message);
   } catch (e) {
      console.log("Invalid JSON");
      data = {};
   }

});
这样,我们只接受 JSON 消息。接下来,我们需要将所有已连接的用户存储在某个地方。我们将为此使用一个简单的 Javascript 对象。更改我们文件顶部的内容:
//require our websocket library
var WebSocketServer = require('ws').Server;

//creating a websocket server at port 9090
var wss = new WebSocketServer({port: 9090});

//all connected to the server users
var users = {};
我们将为来自客户端的每条消息添加一个type字段。例如,如果用户想要登录,他发送login类型的消息。让我们定义它:
connection.on('message', function(message){
   var data;

   //accepting only JSON messages
   try {
      data = JSON.parse(message);
   } catch (e) {
      console.log("Invalid JSON");
      data = {};
   }

   //switching type of the user message
   switch (data.type) {
      //when a user tries to login
      case "login":
         console.log("User logged:", data.name);

         //if anyone is logged in with this username then refuse
         if(users[data.name]) {
            sendTo(connection, {
               type: "login",
               success: false
            });
         } else {
            //save user connection on the server
            users[data.name] = connection;
            connection.name = data.name;

            sendTo(connection, {
               type: "login",
               success: true
            });

         }

         break;

      default:
         sendTo(connection, {
            type: "error",
            message: "Command no found: " + data.type
         });

         break;
   }

});
如果用户发送一条带有login类型的消息,我们将:
检查是否有人已经使用此用户名登录
如果是,则告诉用户他未成功登录
如果没有人使用此用户名,我们将用户名作为键添加到连接对象。
如果命令无法识别,我们将发送错误。
以下代码是用于向连接发送消息的辅助函数。将其添加到server.js文件中:
function sendTo(connection, message) {
   connection.send(JSON.stringify(message));
}
上述函数确保我们所有的消息都以 JSON 格式发送。
当用户断开连接时,我们应该清理其连接。当close事件触发时,我们可以删除用户。将以下代码添加到connection处理程序中:
connection.on("close", function() {
   if(connection.name) {
      delete users[connection.name];
   }
});
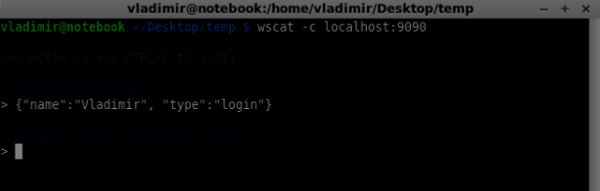
现在让我们使用登录命令测试我们的服务器。请记住,所有消息都必须以 JSON 格式编码。运行我们的服务器并尝试登录。您应该看到类似以下内容:
拨打电话
成功登录后,用户想要呼叫另一个用户。他应该向另一个用户发出offer来实现它。添加offer处理程序:
case "offer":
   //for ex. UserA wants to call UserB
   console.log("Sending offer to: ", data.name);

   //if UserB exists then send him offer details
   var conn = users[data.name];

   if(conn != null){
      //setting that UserA connected with UserB
      connection.otherName = data.name;

      sendTo(conn, {
         type: "offer",
         offer: data.offer,
         name: connection.name
      });
   }

   break;
首先,我们获取我们尝试呼叫的用户connection。如果它存在,我们将向他发送offer详细信息。我们还将otherName添加到connection对象。这是为了简化以后查找它。
应答
对响应的应答具有与我们在offer处理程序中使用的类似模式。我们的服务器只是将所有消息作为answer传递给另一个用户。在offer处理程序之后添加以下代码:
case "answer":
   console.log("Sending answer to: ", data.name);

   //for ex. UserB answers UserA
   var conn = users[data.name];

   if(conn != null) {
      connection.otherName = data.name;
      sendTo(conn, {
         type: "answer",
         answer: data.answer
      });
   }

   break;
您可以看到这与offer处理程序如何相似。请注意,此代码遵循RTCPeerConnection对象上的createOffer和createAnswer函数。
现在我们可以测试我们的 offer/answer 机制。同时连接两个客户端并尝试发出 offer 和 answer。您应该看到以下内容:
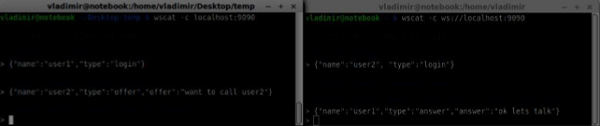
在此示例中,offer和answer是简单的字符串,但在实际应用程序中,它们将填充 SDP 数据。
ICE 候选者
最后一部分是在用户之间处理 ICE 候选者。我们使用相同的技术将消息传递给用户。主要区别在于,候选者消息可能每个用户多次发生,并且顺序可能不同。添加candidate处理程序:
case "candidate":
   console.log("Sending candidate to:",data.name);
   var conn = users[data.name];

   if(conn != null) {
      sendTo(conn, {
         type: "candidate",
         candidate: data.candidate
      });
   }

   break;
它应该与offer和answer处理程序类似地工作。
离开连接
为了允许我们的用户从另一个用户断开连接,我们应该实现挂断功能。它还会告诉服务器删除所有用户引用。添加leave处理程序:
case "leave":
   console.log("Disconnecting from", data.name);
   var conn = users[data.name];
   conn.otherName = null;

   //notify the other user so he can disconnect his peer connection
   if(conn != null) {
      sendTo(conn, {
         type: "leave"
      });
   }

   break;
这也会向另一个用户发送leave事件,以便他可以相应地断开他的对等连接。我们还应该处理用户从信令服务器中断开连接的情况。让我们修改我们的close处理程序:
connection.on("close", function() {

   if(connection.name) {
      delete users[connection.name];

      if(connection.otherName) {
         console.log("Disconnecting from ", connection.otherName);
         var conn = users[connection.otherName];
         conn.otherName = null;

         if(conn != null) {
            sendTo(conn, {
               type: "leave"
            });
         }
      }
   }
});
现在,如果连接终止,我们的用户将断开连接。当我们仍处于offer、answer或candidate状态时,用户关闭浏览器窗口时将触发close事件。
完整的信令服务器
这是我们信令服务器的完整代码:
//require our websocket library
var WebSocketServer = require('ws').Server;

//creating a websocket server at port 9090
var wss = new WebSocketServer({port: 9090});

//all connected to the server users
var users = {};

//when a user connects to our sever
wss.on('connection', function(connection) {

   console.log("User connected");

   //when server gets a message from a connected user
   connection.on('message', function(message) {

      var data;
      //accepting only JSON messages
      try {
         data = JSON.parse(message);
      } catch (e) {
         console.log("Invalid JSON");
         data = {};
      }

      //switching type of the user message
      switch (data.type) {
         //when a user tries to login

         case "login":
            console.log("User logged", data.name);

            //if anyone is logged in with this username then refuse
            if(users[data.name]) {
               sendTo(connection, {
                  type: "login",
                  success: false
               });
            } else {
               //save user connection on the server
               users[data.name] = connection;
               connection.name = data.name;

               sendTo(connection, {
                  type: "login",
                  success: true
               });
            }

            break;

         case "offer":
            //for ex. UserA wants to call UserB
            console.log("Sending offer to: ", data.name);

            //if UserB exists then send him offer details
            var conn = users[data.name];

            if(conn != null) {
               //setting that UserA connected with UserB
               connection.otherName = data.name;

               sendTo(conn, {
                  type: "offer",
                  offer: data.offer,
                  name: connection.name
               });
            }

            break;

         case "answer":
            console.log("Sending answer to: ", data.name);
            //for ex. UserB answers UserA
            var conn = users[data.name];

            if(conn != null) {
               connection.otherName = data.name;
               sendTo(conn, {
                  type: "answer",
                  answer: data.answer
               });
            }

            break;

         case "candidate":
            console.log("Sending candidate to:",data.name);
            var conn = users[data.name];

            if(conn != null) {
               sendTo(conn, {
                  type: "candidate",
                  candidate: data.candidate
               });
            }

            break;

         case "leave":
            console.log("Disconnecting from", data.name);
            var conn = users[data.name];
            conn.otherName = null;

            //notify the other user so he can disconnect his peer connection
            if(conn != null) {
               sendTo(conn, {
                  type: "leave"
               });
            }

            break;

         default:
            sendTo(connection, {
               type: "error",
               message: "Command not found: " + data.type
            });

            break;
      }
   });

   //when user exits, for example closes a browser window
   //this may help if we are still in "offer","answer" or "candidate" state
   connection.on("close", function() {

      if(connection.name) {
      delete users[connection.name];

         if(connection.otherName) {
            console.log("Disconnecting from ", connection.otherName);
            var conn = users[connection.otherName];
            conn.otherName = null;

            if(conn != null) {
               sendTo(conn, {
                  type: "leave"
               });
            }
         }
      }
   });

   connection.send("Hello world");

});

function sendTo(connection, message) {
   connection.send(JSON.stringify(message));
}
所以工作完成了,我们的信令服务器已经准备好了。请记住,在建立 WebRTC 连接时,如果操作顺序错误,可能会导致问题。
总结
在本章中,我们构建了一个简单直接的信令服务器。我们介绍了信令过程、用户注册和 offer/answer 机制。我们还实现了在用户之间发送候选者。