- Behave 教程
- Behave - 首页
- Behave - 简介
- Behave - 安装
- Behave - 命令行
- Behave - 配置文件
- Behave - 功能测试设置
- Behave - Gherkin 关键字
- Behave - 功能文件
- Behave - 步骤实现
- Behave - 入门步骤
- Behave - 支持的语言
- Behave - 步骤参数
- Behave - 场景大纲
- Behave - 多行文本
- Behave - 设置表
- Behave - 步骤中的步骤
- Behave - 背景
- Behave - 数据类型
- Behave - 标签
- Behave - 枚举
- Behave - 步骤匹配器
- Behave - 正则表达式
- Behave - 可选部分
- Behave - 多方法
- Behave - 步骤函数
- Behave - 步骤参数
- Behave - 运行脚本
- Behave - 排除测试
- Behave - 重试机制
- Behave - 报告
- Behave - Hook
- Behave - 调试
- Behave 有用资源
- Behave - 快速指南
- Behave - 有用资源
- Behave - 讨论
Behave - 运行脚本
我们可以通过运行命令行参数来运行 Behave 测试,或者我们可以创建一个运行脚本。此脚本提供了运行测试并生成相应报告的功能。
我们可以重试并执行失败的测试。此外,在执行整个套件之前,运行脚本能够进行应用程序编程接口 (API) 调用,并确保 API 没有问题。
运行脚本步骤
按照以下步骤在 Behave 中成功创建和执行运行脚本。
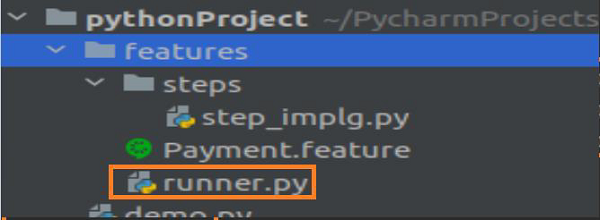
步骤 1 - 在 features 文件夹中创建一个运行脚本 (runner.py)。
您的计算机上将出现以下屏幕 -
步骤 2 - 运行测试的运行脚本实现
可以使用以下代码实现运行脚本以运行测试 -
import subprocess
if __name__ == '__main__':
#command line args along with error capture on failure with check true
      s = subprocess.run('behave --no-capture',shell=True, check=True)
步骤 3 - 执行运行脚本
使用命令 **python3 runner.py** 执行 runner.py 文件(如果 Python 版本为 3)。您的计算机上将出现以下屏幕

步骤 4 - 通过传递命令行参数来参数化运行脚本。
运行测试的运行脚本实现可以如下进行 -
import argparse
import subprocess
if __name__ == '__main__':
   p = argparse.ArgumentParser()
  #--testdir command line argument added
   p.add_argument('--testdir', required=False, help="File path")
   a = p.parse_args()
   testdir = a.testdir
   #complete command
   c= f'behave --no-capture {testdir}'
   s = subprocess.run(c, shell=True, check=True)
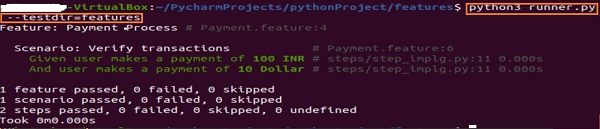
步骤 5 - 执行运行脚本
使用命令 python3 runner.py --testdir=features 执行 runner.py 文件。
广告