Flutter - 快速指南


Flutter - 简介

通常,开发移动应用程序是一项复杂且具有挑战性的任务。有很多框架可用于开发移动应用程序。Android 提供了一个基于 Java 语言的原生框架,而 iOS 提供了一个基于 Objective-C/Swift 语言的原生框架。

但是,要开发支持这两个操作系统的应用程序,我们需要使用两种不同的框架用两种不同的语言进行编码。为了帮助克服这种复杂性,存在支持这两个操作系统的移动框架。这些框架从简单的基于 HTML 的混合移动应用程序框架(使用 HTML 作为用户界面和 JavaScript 作为应用程序逻辑)到复杂的特定语言框架(承担将代码转换为原生代码的繁重工作)不等。无论其简单性或复杂性如何,这些框架总是有很多缺点,其中一个主要缺点是其性能缓慢。

在这种情况下,Flutter——一个基于 Dart 语言的简单且高性能的框架,通过直接在操作系统的画布上渲染 UI 而不是通过原生框架来提供高性能。

Flutter 还提供了许多现成的 Widget(UI)来创建现代应用程序。这些 Widget 已针对移动环境进行了优化,使用 Widget 设计应用程序就像设计 HTML 一样简单。

具体来说,Flutter 应用程序本身就是一个 Widget。Flutter Widget 也支持动画和手势。应用程序逻辑基于响应式编程。Widget 可以选择具有状态。通过更改 Widget 的状态,Flutter 将自动(响应式编程)比较 Widget 的状态(旧的和新的),并仅使用必要的更改渲染 Widget,而不是重新渲染整个 Widget。

我们将在接下来的章节中讨论完整的架构。

Flutter 的特性

Flutter 框架为开发人员提供了以下特性:

  • 现代且响应式的框架。

  • 使用 Dart 编程语言,非常容易学习。

  • 快速开发。

  • 美观流畅的用户界面。

  • 庞大的 Widget 目录。

  • 在多个平台上运行相同的 UI。

  • 高性能应用程序。

Flutter 的优势

Flutter 配备了美观且可自定义的 Widget,可实现高性能和出色的移动应用程序。它满足所有自定义需求和要求。除此之外,Flutter 还提供了许多其他优势,如下所述:

  • Dart 拥有大量的软件包存储库,可让您扩展应用程序的功能。

  • 开发人员只需要为两个应用程序(Android 和 iOS 平台)编写一个代码库。Flutter 未来也可能扩展到其他平台。

  • Flutter 需要较少的测试。由于其单一代码库,如果我们为这两个平台编写一次自动化测试就足够了。

  • Flutter 的简单性使其成为快速开发的理想选择。其自定义能力和可扩展性使其更加强大。

  • 使用 Flutter,开发人员可以完全控制 Widget 及其布局。

  • Flutter 提供了很棒的开发者工具,以及令人惊叹的热重载功能。

Flutter 的缺点

尽管 Flutter 拥有众多优点,但它也存在以下缺点:

  • 由于它是用 Dart 语言编写的,因此开发人员需要学习新的语言(尽管它很容易学习)。

  • 现代框架尽可能地将逻辑和 UI 分开,但在 Flutter 中,用户界面和逻辑是混合在一起的。我们可以通过智能编码和使用高级模块来分离用户界面和逻辑来克服这一点。

  • Flutter 只是另一个用于创建移动应用程序的框架。在用户数量庞大的细分市场中,开发人员难以选择合适的开发工具。

Flutter - 安装

本章将详细指导您在本地计算机上安装 Flutter。

在 Windows 上安装

在本节中,让我们看看如何在 Windows 系统中安装Flutter SDK及其要求。

步骤 1 - 访问 URL,https://flutterdart.cn/docs/get-started/install/windows 并下载最新的 Flutter SDK。截至 2019 年 4 月,版本为 1.2.1,文件为 flutter_windows_v1.2.1-stable.zip。

步骤 2 - 将 zip 压缩文件解压缩到一个文件夹中,例如 C:\flutter\

步骤 3 - 更新系统路径以包含 flutter bin 目录。

步骤 4 - Flutter 提供了一个工具 flutter doctor,用于检查是否满足 Flutter 开发的所有要求。

flutter doctor

步骤 5 - 运行上述命令将分析系统并显示其报告,如下所示:

Doctor summary (to see all details, run flutter doctor -v):
[√] Flutter (Channel stable, v1.2.1, on Microsoft Windows [Version
10.0.17134.706], locale en-US)
[√] Android toolchain - develop for Android devices (Android SDK version
28.0.3)
[√] Android Studio (version 3.2)
[√] VS Code, 64-bit edition (version 1.29.1)
[!] Connected device
! No devices available
! Doctor found issues in 1 category.

该报告表明所有开发工具都可用,但设备未连接。我们可以通过 USB 连接 Android 设备或启动 Android 模拟器来解决此问题。

步骤 6 - 安装最新的 Android SDK(如果 flutter doctor 报告需要)。

步骤 7 - 安装最新的 Android Studio(如果 flutter doctor 报告需要)。

步骤 8 - 启动 Android 模拟器或将真实的 Android 设备连接到系统。

步骤 9 - 为 Android Studio 安装 Flutter 和 Dart 插件。它提供了启动模板以创建新的 Flutter 应用程序,以及在 Android Studio 本身中运行和调试 Flutter 应用程序的选项等。

  • 打开 Android Studio。

  • 单击文件 → 设置 → 插件。

  • 选择 Flutter 插件并单击安装。

  • 当提示安装 Dart 插件时,单击是。

  • 重新启动 Android Studio。

在 macOS 上安装

要在 macOS 上安装 Flutter,您需要执行以下步骤:

步骤 1 - 访问 URL,https://flutterdart.cn/docs/get-started/install/macos 并下载最新的 Flutter SDK。截至 2019 年 4 月,版本为 1.2.1,文件为 flutter_macos_v1.2.1-stable.zip。

步骤 2 - 将 zip 压缩文件解压缩到一个文件夹中,例如 /path/to/flutter

步骤 3 - 更新系统路径以包含 flutter bin 目录(在 ~/.bashrc 文件中)。

> export PATH = "$PATH:/path/to/flutter/bin"

步骤 4 - 使用以下命令在当前会话中启用更新的路径,然后对其进行验证。

source ~/.bashrc
source $HOME/.bash_profile
echo $PATH

Flutter 提供了一个工具 flutter doctor,用于检查是否满足 Flutter 开发的所有要求。它类似于 Windows 版本。

步骤 5 - 安装最新的 XCode(如果 flutter doctor 报告需要)。

步骤 6 - 安装最新的 Android SDK(如果 flutter doctor 报告需要)。

步骤 7 - 安装最新的 Android Studio(如果 flutter doctor 报告需要)。

步骤 8 - 启动 Android 模拟器或将真实的 Android 设备连接到系统以开发 Android 应用程序。

步骤 9 - 打开 iOS 模拟器或将真实的 iPhone 设备连接到系统以开发 iOS 应用程序。

步骤 10 - 为 Android Studio 安装 Flutter 和 Dart 插件。它提供了启动模板以创建新的 Flutter 应用程序,以及在 Android Studio 本身中运行和调试 Flutter 应用程序的选项等。

  • 打开 Android Studio

  • 单击首选项 → 插件

  • 选择 Flutter 插件并单击安装

  • 当提示安装 Dart 插件时,单击是。

  • 重新启动 Android Studio。

在 Android Studio 中创建简单应用程序

在本章中,让我们创建一个简单的Flutter应用程序,以了解在 Android Studio 中创建 Flutter 应用程序的基本知识。

步骤 1 - 打开 Android Studio

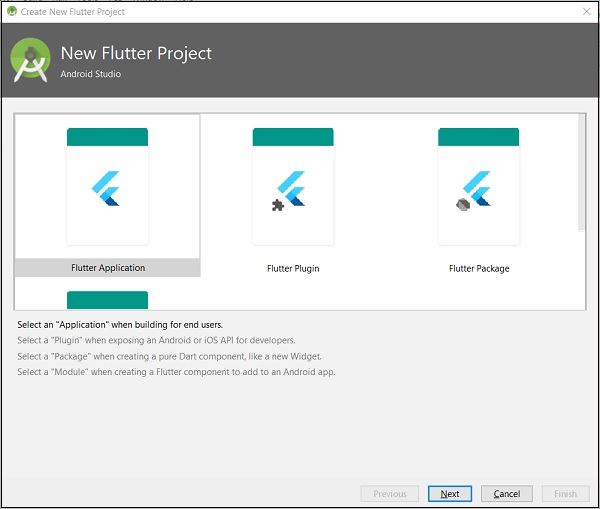
步骤 2 - 创建 Flutter 项目。为此,请单击文件 → 新建 → 新建 Flutter 项目
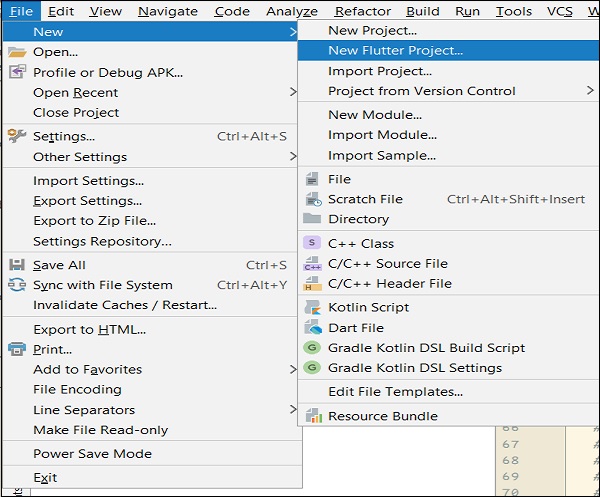
New Flutter Project

步骤 3 - 选择 Flutter 应用程序。为此,请选择Flutter 应用程序并单击下一步

Flutter Application Next

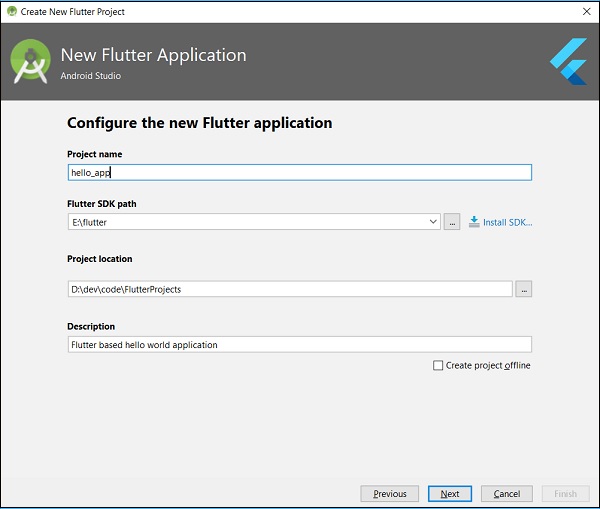
步骤 4 - 按如下所示配置应用程序,然后单击下一步

  • 项目名称:hello_app

  • Flutter SDK 路径:<path_to_flutter_sdk>

  • 项目位置:<path_to_project_folder>

  • 描述:基于 Flutter 的 Hello World 应用程序

Project Name

步骤 5 - 配置项目。

将公司域名设置为flutterapp.tutorialspoint.com,然后单击完成

步骤 6 - 输入公司域名。

Android Studio 创建了一个功能最少的完全可用的 Flutter 应用程序。让我们检查一下应用程序的结构,然后更改代码以执行我们的任务。

应用程序的结构及其用途如下:
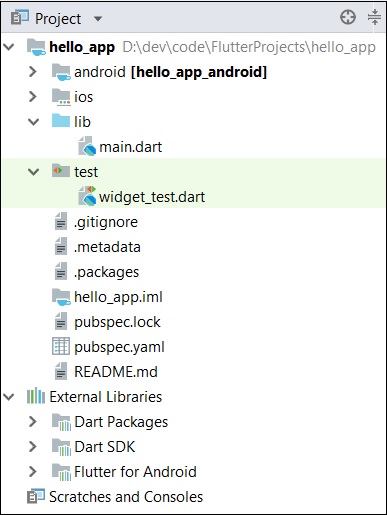
Structure Application

此处解释了应用程序结构的各个组件:

  • android - 自动生成的源代码以创建 Android 应用程序

  • ios - 自动生成的源代码以创建 iOS 应用程序

  • lib - 包含使用 Flutter 框架编写的 Dart 代码的主要文件夹

  • lib/main.dart - Flutter 应用程序的入口点

  • test - 包含用于测试 Flutter 应用程序的 Dart 代码的文件夹

  • test/widget_test.dart - 示例代码

  • .gitignore - Git 版本控制文件

  • .metadata - 由 Flutter 工具自动生成

  • .packages - 自动生成以跟踪 Flutter 包

  • .iml - Android Studio 使用的项目文件

  • pubspec.yaml - 由Pub(Flutter 包管理器)使用

  • pubspec.lock - 由 Flutter 包管理器Pub自动生成

  • README.md - 用 Markdown 格式编写的项目描述文件

步骤 7 - 将lib/main.dart 文件中的 Dart 代码替换为以下代码:

import 'package:flutter/material.dart';

void main() => runApp(MyApp());

class MyApp extends StatelessWidget {
   // This widget is the root of your application.
   @override
   Widget build(BuildContext context) {
      return MaterialApp(
         title: 'Hello World Demo Application',
         theme: ThemeData(
            primarySwatch: Colors.blue,
         ),
         home: MyHomePage(title: 'Home page'),
      );
   }
}
class MyHomePage extends StatelessWidget {
   MyHomePage({Key key, this.title}) : super(key: key);
   final String title;

   @override
   Widget build(BuildContext context) {
      return Scaffold(
         appBar: AppBar(
            title: Text(this.title),
         ),
         body: Center(
            child:
            Text(
               'Hello World',
            )
         ),
      );
   }
}

让我们逐行了解 Dart 代码。

  • 第 1 行 - 导入 Flutter 包material。material 是一个 Flutter 包,用于根据 Android 指定的材料设计指南创建用户界面。

  • 第 3 行 - 这是 Flutter 应用程序的入口点。调用runApp函数并向其传递MyApp类的对象。runApp函数的目的是将给定的 Widget 附加到屏幕上。

  • 第 5-17 行 - Widget 用于在 Flutter 框架中创建 UI。StatelessWidget是一个 Widget,它不维护 Widget 的任何状态。MyApp扩展了StatelessWidget并覆盖了其build 方法build方法的目的是创建应用程序 UI 的一部分。这里,build方法使用MaterialApp,一个 Widget 来创建应用程序的根级 UI。它具有三个属性 - title、themehome

    • title是应用程序的标题

    • theme是 Widget 的主题。在这里,我们使用ThemeData类及其属性primarySwatch蓝色设置为应用程序的整体颜色。

    • home 是应用程序的内部 UI,我们设置了另一个 Widget,MyHomePage

  • 第 19 - 38 行MyHomePageMyApp 相同,除了它返回 Scaffold 组件。Scaffold 是一个顶级组件,与 MaterialApp 组件并列使用,用于创建符合 Material Design 的 UI。它有两个重要的属性,appBar 用于显示应用程序的标题,body 用于显示应用程序的实际内容。AppBar 是另一个用于渲染应用程序标题的组件,我们已在 appBar 属性中使用它。在 body 属性中,我们使用了 Center 组件,它将它的子组件居中。Text 是最终的也是最内部的组件,用于显示文本,它显示在屏幕的中央。

步骤 8 − 现在,使用 运行 → 运行 main.dart 运行应用程序。
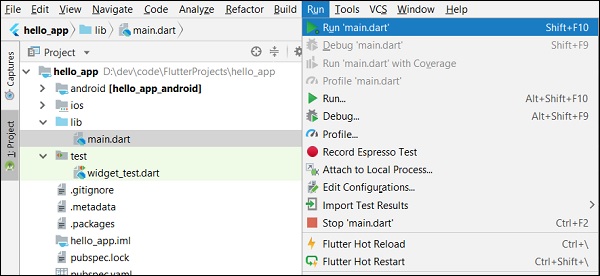
Main Dart

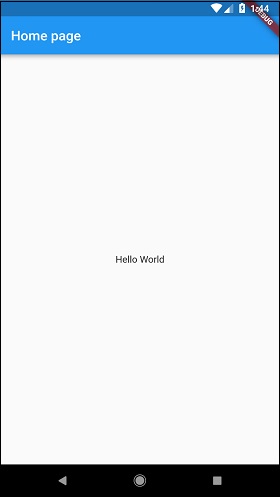
步骤 9 − 最后,应用程序的输出如下所示 −

Home Page

Flutter - 架构应用程序

在本章中,让我们讨论 Flutter 框架的架构。

组件

Flutter 框架的核心概念是 在 Flutter 中,一切皆为组件。组件基本上是用于创建应用程序用户界面的用户界面组件。

Flutter 中,应用程序本身就是一个组件。应用程序是顶级组件,其 UI 使用一个或多个子组件(组件)构建,这些子组件又使用其子组件构建。这种 组合性 特性帮助我们创建任何复杂度的用户界面。

例如,Hello World 应用程序(在上一章中创建)的组件层次结构如下所示 −
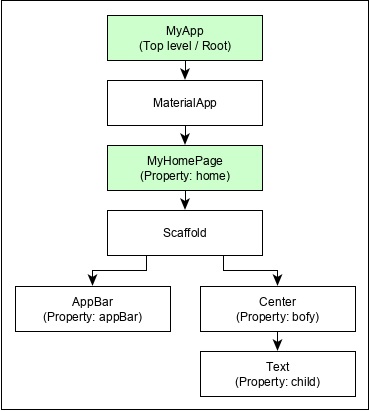
Hello World Application

这里以下几点值得注意 −

  • MyApp 是用户创建的组件,它使用 Flutter 原生组件 MaterialApp 构建。

  • MaterialApp 有一个 home 属性来指定主页的用户界面,它又是一个用户创建的组件 MyHomePage

  • MyHomePage 使用另一个 Flutter 原生组件 Scaffold 构建

  • Scaffold 具有两个属性 – bodyappBar

  • body 用于指定其主要用户界面,appBar 用于指定其标题用户界面

  • 标题 UI 使用 Flutter 原生组件 AppBar 构建,主体 UI 使用 Center 组件构建。

  • Center 组件有一个属性 Child,它引用实际内容,并且它使用 Text 组件构建

手势

Flutter 组件通过一个特殊的组件 GestureDetector 支持交互。GestureDetector 是一个不可见的组件,能够捕获用户交互,例如其子组件的点击、拖动等。Flutter 的许多原生组件都通过使用 GestureDetector 支持交互。我们还可以通过将 GestureDetector 组件与现有组件组合来将交互功能整合到现有组件中。我们将在后续章节中单独学习手势。

状态的概念

Flutter 组件通过提供一个特殊的组件 StatefulWidget 来支持 状态维护。组件需要从 StatefulWidget 组件派生才能支持状态维护,所有其他组件都应该从 StatefulWidget 派生。Flutter 组件在原生中是 反应式 的。这类似于 reactjs,并且 StatefulWidget 只要其内部状态发生变化就会自动重新渲染。重新渲染通过查找旧组件 UI 和新组件 UI 之间的差异并仅渲染必要的更改来进行优化

Flutter 框架最重要的概念是,该框架根据复杂性被分为多个类别,并以复杂度递减的顺序清晰地排列在多层中。一层使用其紧邻下一层构建。最顶层是特定于 AndroidiOS 的组件。下一层包含所有 Flutter 原生组件。下一层是 渲染层,它是一个低级渲染器组件,渲染 Flutter 应用中的所有内容。层级一直延伸到核心平台特定代码

Flutter 中层的概览如下所示 −
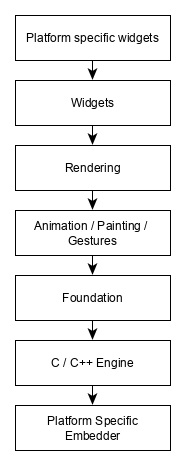
Overview Of Layer

以下几点总结了 Flutter 的架构 −

  • 在 Flutter 中,一切皆为组件,一个复杂的组件是由已存在的组件组合而成的。

  • 必要时可以使用 GestureDetector 组件整合交互功能。

  • 必要时可以使用 StatefulWidget 组件维护组件的状态。

  • Flutter 提供分层设计,以便可以根据任务的复杂性对任何层进行编程。

我们将在后续章节中详细讨论所有这些概念。

Flutter - Dart 编程入门

Dart 是一种开源通用编程语言。它最初由 Google 开发。Dart 是一种面向对象的语言,具有 C 风格的语法。它支持诸如接口、类等编程概念,与其他编程语言不同,Dart 不支持数组。Dart 集合可用于复制数据结构,如数组、泛型和可选类型。

以下代码显示了一个简单的 Dart 程序 −

void main() {
   print("Dart language is easy to learn");
}

变量和数据类型

变量 是命名的存储位置,数据类型 只是指与变量和函数关联的数据的类型和大小。

Dart 使用 var 关键字声明变量。var 的语法定义如下:

var name = 'Dart';

finalconst 关键字用于声明常量。它们定义如下 −

void main() {
   final a = 12;
   const pi = 3.14;
   print(a);
   print(pi);
}

Dart 语言支持以下数据类型 −

  • 数字 − 用于表示数字字面量 - 整数和双精度浮点数。

  • 字符串 − 表示一系列字符。字符串值用单引号或双引号指定。

  • 布尔值 − Dart 使用 bool 关键字表示布尔值 - true 和 false。

  • 列表和映射 − 用于表示对象的集合。一个简单的列表可以定义如下 −。

void main() {
   var list = [1,2,3,4,5];
   print(list);
}

上面显示的列表生成 [1,2,3,4,5] 列表。

映射可以定义如下 −

void main() {
   var mapping = {'id': 1,'name':'Dart'};
   print(mapping);
}
  • 动态 − 如果未定义变量类型,则其默认类型为动态。以下示例说明了动态类型变量 −

void main() {
   dynamic name = "Dart";
   print(name);
}

决策和循环

决策块在执行指令之前评估条件。Dart 支持 If、If..else 和 switch 语句。

循环用于重复执行代码块,直到满足特定条件。Dart 支持 for、for..in、while 和 do..while 循环。

让我们了解一个关于控制语句和循环用法的简单示例 −

void main() {
   for( var i = 1 ; i <= 10; i++ ) {
      if(i%2==0) {
         print(i);
      }
   }
}

以上代码打印从 1 到 10 的偶数。

函数

函数是一组语句,它们一起执行特定的任务。让我们看看这里显示的 Dart 中的一个简单函数 −

void main() {
   add(3,4);
}
void add(int a,int b) {
   int c;
   c = a+b;
   print(c);
}

以上函数将两个值相加,并生成 7 作为输出。

面向对象编程

Dart 是一种面向对象的语言。它支持面向对象的编程特性,如类、接口等。

类是创建对象的蓝图。类定义包括以下内容 −

  • 字段
  • Getter 和 Setter
  • 构造函数
  • 函数

现在,让我们使用以上定义创建一个简单的类 −

class Employee {
   String name;
   
   //getter method
   String get emp_name {
      return name;
   }
   //setter method
   void set emp_name(String name) {
      this.name = name;
   }
   //function definition
   void result() {
      print(name);
   }
}
void main() {
   //object creation
   Employee emp = new Employee();
   emp.name = "employee1";
   emp.result(); //function call
}

Flutter - Widget 入门

正如我们在上一章中学到的,组件在 Flutter 框架中无处不在。我们已经在前面的章节中学习了如何在前面的章节中创建新的组件。

在本章中,让我们了解创建组件背后的实际概念以及 Flutter 框架中提供的不同类型的组件。

让我们检查 Hello World 应用程序的 MyHomePage 组件。为此目的的代码如下所示 −

class MyHomePage extends StatelessWidget { 
   MyHomePage({Key key, this.title}) : super(key: key); 
   
   final String title; 
   @override 
   Widget build(BuildContext context) {
      return Scaffold( 
         appBar: AppBar(title: Text(this.title), ), 
         body: Center(child: Text( 'Hello World',)),
      );
   }
}

在这里,我们通过扩展 StatelessWidget 创建了一个新的组件。

请注意,StatelessWidget 只需要在派生类中实现一个单一方法 buildbuild 方法获取构建组件所需的上下文环境,通过 BuildContext 参数,并返回它构建的组件。

在代码中,我们使用了 title 作为构造函数参数之一,还使用了 Key 作为另一个参数。title 用于显示标题,Key 用于在构建环境中识别组件。

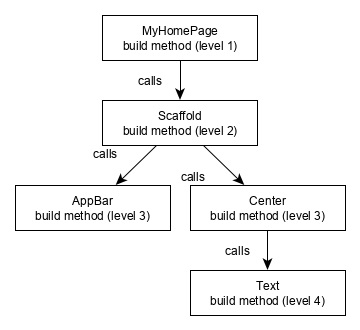
在这里,build 方法调用 Scaffoldbuild 方法,后者又调用 AppBarCenterbuild 方法来构建其用户界面。

最后,Centerbuild 方法调用 Textbuild 方法。

为了更好地理解,下面给出了相同的可视化表示 −

Visual Representation

组件构建可视化

Flutter 中,组件可以根据其功能分为多个类别,如下所示 −

  • 平台特定组件
  • 布局组件
  • 状态维护组件
  • 平台无关/基本组件

现在让我们详细讨论每个组件。

平台特定组件

Flutter 具有特定于特定平台(Android 或 iOS)的组件。

Android 特定组件是根据 Android 操作系统的 Material Design 指南 设计的。Android 特定组件称为 Material 组件

iOS 特定组件是根据 Apple 的 Human Interface Guidelines 设计的,它们被称为 Cupertino 组件。

一些最常用的 Material 组件如下 −

  • Scaffold
  • AppBar
  • BottomNavigationBar
  • TabBar
  • TabBarView
  • ListTile
  • RaisedButton
  • FloatingActionButton
  • FlatButton
  • IconButton
  • DropdownButton
  • PopupMenuButton
  • ButtonBar
  • TextField
  • Checkbox
  • Radio
  • Switch
  • Slider
  • 日期和时间选择器
  • SimpleDialog
  • AlertDialog

一些最常用的 Cupertino 组件如下 −

  • CupertinoButton
  • CupertinoPicker
  • CupertinoDatePicker
  • CupertinoTimerPicker
  • CupertinoNavigationBar
  • CupertinoTabBar
  • CupertinoTabScaffold
  • CupertinoTabView
  • CupertinoTextField
  • CupertinoDialog
  • CupertinoDialogAction
  • CupertinoFullscreenDialogTransition
  • CupertinoPageScaffold
  • CupertinoPageTransition
  • CupertinoActionSheet
  • CupertinoActivityIndicator
  • CupertinoAlertDialog
  • CupertinoPopupSurface
  • CupertinoSlider

布局组件

在 Flutter 中,可以通过组合一个或多个组件来创建组件。为了将多个组件组合成一个组件,Flutter 提供了大量具有布局功能的组件。例如,可以使用 Center 组件将子组件居中。

一些流行的布局组件如下 −

  • 容器(Container) - 一个使用BoxDecoration部件装饰的矩形框,包含背景、边框和阴影。

  • 居中(Center) - 将其子部件居中。

  • 行(Row) - 将其子部件水平排列。

  • 列(Column) - 将其子部件垂直排列。

  • 堆叠(Stack) - 将一个部件叠加在另一个部件之上。

我们将在后续的布局部件简介章节中详细介绍布局部件。

状态维护组件

在Flutter中,所有部件都派生自StatelessWidgetStatefulWidget

派生自StatelessWidget的部件不包含任何状态信息,但它可能包含派生自StatefulWidget的部件。应用程序的动态特性来自于部件的交互行为以及交互过程中状态的变化。例如,点击一个计数器按钮将使计数器的内部状态增加/减少1,并且Flutter部件的响应特性将使用新的状态信息自动重新渲染部件。

我们将在后续的状态管理章节中详细学习StatefulWidget部件的概念。

平台无关/基本组件

Flutter提供了大量的基本部件,可以以平台无关的方式创建简单和复杂的用户界面。让我们在本节中了解一些基本部件。

文本(Text)

Text部件用于显示一段字符串。可以使用style属性和TextStyle类设置字符串的样式。此目的的示例代码如下:

Text('Hello World!', style: TextStyle(fontWeight: FontWeight.bold))

Text部件有一个特殊的构造函数Text.rich,它接受类型为TextSpan的子部件来指定具有不同样式的字符串。TextSpan部件本质上是递归的,它接受TextSpan作为其子部件。此目的的示例代码如下:

Text.rich( 
   TextSpan( 
      children: <TextSpan>[ 
         TextSpan(text: "Hello ", style:  
         TextStyle(fontStyle: FontStyle.italic)),  
         TextSpan(text: "World", style: 
         TextStyle(fontWeight: FontWeight.bold)),  
      ], 
   ), 
)

Text部件最重要的属性如下:

  • maxLines,int - 显示的最大行数

  • overflow,TextOverFlow - 使用TextOverFlow类指定如何处理视觉溢出

  • style,TextStyle - 使用TextStyle类指定字符串的样式

  • textAlign,TextAlign - 使用TextAlign类指定文本的对齐方式,例如右对齐、左对齐、两端对齐等。

  • textDirection,TextDirection - 文本流的方向,从左到右或从右到左。

图像(Image)

Image部件用于在应用程序中显示图像。Image部件提供了不同的构造函数来从多个来源加载图像,如下所示:

  • Image - 使用ImageProvider的通用图像加载器

  • Image.asset - 从Flutter项目的资源加载图像

  • Image.file - 从系统文件夹加载图像

  • Image.memory - 从内存加载图像

  • Image.Network - 从网络加载图像

Flutter中加载和显示图像最简单的选项是将图像作为应用程序的资源,并在需要时将其加载到部件中。

  • 在项目文件夹中创建一个名为assets的文件夹,并将所需的图像放置其中。

  • 在pubspec.yaml中指定资源,如下所示:

flutter: 
   assets: 
      - assets/smiley.png
  • 现在,在应用程序中加载并显示图像。

Image.asset('assets/smiley.png')
  • 下面显示了Hello World应用程序的MyHomePage部件的完整源代码和结果。

class MyHomePage extends StatelessWidget {
   MyHomePage({Key key, this.title}) : super(key: key); 
   final String title; 

   @override 
   Widget build(BuildContext context) {
      return Scaffold( 
         appBar: AppBar( title: Text(this.title), ), 
         body: Center( child: Image.asset("assets/smiley.png")),
      ); 
   }
}

加载的图像如下所示:
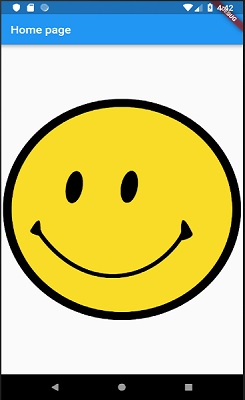
Hello World Application Output

Image部件最重要的属性如下:

  • image,ImageProvider - 要加载的实际图像

  • width,double - 图像的宽度

  • height,double - 图像的高度

  • alignment,AlignmentGeometry - 如何在其边界内对齐图像

图标(Icon)

Icon部件用于显示IconData类中描述的字体中的字形。加载简单电子邮件图标的代码如下:

Icon(Icons.email)

在Hello World应用程序中应用它的完整源代码如下:

class MyHomePage extends StatelessWidget { 
   MyHomePage({Key key, this.title}) : super(key: key); 
   final String title; 

   @override 
   Widget build(BuildContext context) {
      return Scaffold(
         appBar: AppBar(title: Text(this.title),),
         body: Center( child: Icon(Icons.email)),
      );
   }
}

加载的图标如下所示:

Homepage

Flutter - 布局入门

由于Flutter的核心概念是一切皆为部件,因此Flutter将用户界面布局功能整合到部件本身。Flutter提供了很多专门设计的部件,例如Container、Center、Align等,仅仅用于布局用户界面。通过组合其他部件构建的部件通常使用布局部件。让我们在本节中学习Flutter布局的概念。

布局部件的类型

根据其子部件,布局部件可以分为两类:

  • 支持单个子部件的部件
  • 支持多个子部件的部件

让我们在接下来的部分中学习这两种部件及其功能。

单子部件

在此类别中,部件只有一个部件作为其子部件,并且每个部件都具有特殊的布局功能。

例如,Center部件只是将其子部件相对于其父部件居中,而Container部件提供了完全的灵活性,可以使用不同的选项(如填充、装饰等)将其子部件放置在其内部的任何给定位置。

单子部件是创建具有单个功能的高质量部件(如按钮、标签等)的绝佳选择。

使用Container部件创建简单按钮的代码如下:

class MyButton extends StatelessWidget {
   MyButton({Key key}) : super(key: key); 

   @override 
   Widget build(BuildContext context) {
      return Container(
         decoration: const BoxDecoration(
            border: Border(
               top: BorderSide(width: 1.0, color: Color(0xFFFFFFFFFF)),
               left: BorderSide(width: 1.0, color: Color(0xFFFFFFFFFF)),
               right: BorderSide(width: 1.0, color: Color(0xFFFF000000)),
               bottom: BorderSide(width: 1.0, color: Color(0xFFFF000000)),
            ),
         ),
         child: Container(
            padding: const
            EdgeInsets.symmetric(horizontal: 20.0, vertical: 2.0),
            decoration: const BoxDecoration(
               border: Border(
                  top: BorderSide(width: 1.0, color: Color(0xFFFFDFDFDF)),
                  left: BorderSide(width: 1.0, color: Color(0xFFFFDFDFDF)),
                  right: BorderSide(width: 1.0, color: Color(0xFFFF7F7F7F)),
                  bottom: BorderSide(width: 1.0, color: Color(0xFFFF7F7F7F)),
               ),
               color: Colors.grey,
            ),
            child: const Text(
               'OK',textAlign: TextAlign.center, style: TextStyle(color: Colors.black)
            ), 
         ), 
      ); 
   }
}

这里,我们使用了两个部件 - 一个Container部件和一个Text部件。部件的结果是一个自定义按钮,如下所示:

OK

让我们检查一下Flutter提供的一些最重要的单子布局部件:

  • Padding - 用于通过给定的填充来排列其子部件。这里,填充可以通过EdgeInsets类提供。

  • Align - 使用alignment属性的值在其内部对齐其子部件。alignment属性的值可以通过FractionalOffset类提供。FractionalOffset类以距左上角的距离来指定偏移量。

一些可能的偏移量值如下:

  • FractionalOffset(1.0, 0.0) 表示右上角。

  • FractionalOffset(0.0, 1.0) 表示左下角。

关于偏移量的示例代码如下:

Center(
   child: Container(
      height: 100.0, 
      width: 100.0, 
      color: Colors.yellow, child: Align(
         alignment: FractionalOffset(0.2, 0.6),
         child: Container( height: 40.0, width:
            40.0, color: Colors.red,
         ), 
      ), 
   ), 
)
  • FittedBox - 它缩放子部件,然后根据指定的适配方式对其进行定位。

  • AspectRatio - 它尝试将子部件的大小调整为指定的纵横比。

  • ConstrainedBox

  • Baseline

  • FractionalSizedBox

  • IntrinsicHeight

  • IntrinsicWidth

  • LimitedBox

  • OffStage

  • OverflowBox

  • SizedBox

  • SizedOverflowBox

  • Transform

  • CustomSingleChildLayout

我们的Hello World应用程序使用基于Material的布局部件来设计主页。让我们修改我们的Hello World应用程序,使用如下指定的基本布局部件来构建主页:

  • Container - 通用、单子、基于框的容器部件,具有对齐、填充、边框和边距以及丰富的样式功能。

  • Center - 简单、单子容器部件,将子部件居中。

下面是MyHomePageMyApp部件的修改后的代码:

class MyApp extends StatelessWidget {
   @override
   Widget build(BuildContext context) {
      return MyHomePage(title: "Hello World demo app");
   }
}
class MyHomePage extends StatelessWidget {
   MyHomePage({Key key, this.title}) : super(key: key);
   final String title;
   @override
   Widget build(BuildContext context) {
      return Container(
         decoration: BoxDecoration(color: Colors.white,),
         padding: EdgeInsets.all(25), child: Center(
            child:Text(
               'Hello World', style: TextStyle(
                  color: Colors.black, letterSpacing: 0.5, fontSize: 20,
               ),
               textDirection: TextDirection.ltr,
            ),
         )
      );
   }
}

这里,

  • Container部件是顶级或根部件。Container使用decorationpadding属性配置其内容布局。

  • BoxDecoration具有许多属性,如颜色、边框等,用于装饰Container部件,这里使用color设置容器的颜色。

  • Container部件的padding通过使用EdgeInsets类设置,该类提供了指定填充值的选项。

  • CenterContainer部件的子部件。同样,TextCenter部件的子部件。Text用于显示消息,Center用于相对于父部件Container居中显示文本消息。

上面给出的代码的最终结果是一个布局示例,如下所示:
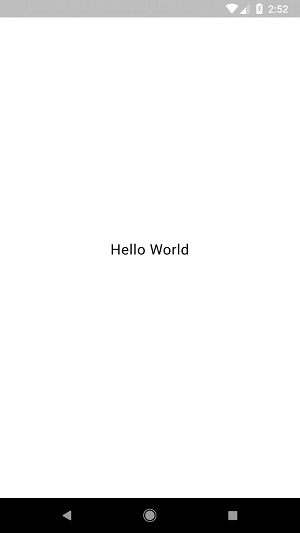
Final Result

多子部件

在此类别中,给定部件将有多个子部件,并且每个部件的布局都是唯一的。

例如,Row部件允许将其子部件水平排列,而Column部件允许将其子部件垂直排列。通过组合RowColumn,可以构建任何复杂程度的部件。

让我们在本节中学习一些常用的部件。

  • Row - 允许将其子部件水平排列。

  • Column - 允许将其子部件垂直排列。

  • ListView - 允许将其子部件作为列表排列。

  • GridView - 允许将其子部件作为画廊排列。

  • Expanded - 用于使Row和Column部件的子部件占用最大可能的区域。

  • Table - 基于表格的部件。

  • Flow - 基于流的部件。

  • Stack - 基于堆叠的部件。

高级布局应用程序

在本节中,让我们学习如何使用单子布局部件和多子布局部件创建具有自定义设计的复杂产品列表用户界面。

为此,请按照以下顺序操作:

  • 在Android Studio中创建一个新的Flutter应用程序product_layout_app

  • main.dart代码替换为以下代码:

import 'package:flutter/material.dart'; 
void main() => runApp(MyApp()); 

class MyApp extends StatelessWidget {
   // This widget is the root of your application.
   @override 
   Widget build(BuildContext context) {
      return MaterialApp( 
         title: 'Flutter Demo', theme: ThemeData( 
         primarySwatch: Colors.blue,), 
         home: MyHomePage(title: 'Product layout demo home page'),
      ); 
   } 
} 
class MyHomePage extends StatelessWidget {
   MyHomePage({Key key, this.title}) : super(key: key); 
   final String title; 
      
   @override 
   Widget build(BuildContext context) {
      return Scaffold(
         appBar: AppBar(title: Text(this.title),), 
         body: Center(child: Text( 'Hello World', )), 
      ); 
   }
}
  • 这里,

  • 我们通过扩展StatelessWidget而不是默认的StatefulWidget创建了MyHomePage部件,然后删除了相关的代码。

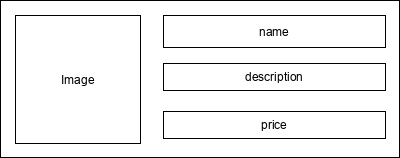
  • 现在,根据指定的如下所示的设计创建一个新的部件ProductBox

ProductBox
  • ProductBox的代码如下所示。

class ProductBox extends StatelessWidget {
   ProductBox({Key key, this.name, this.description, this.price, this.image}) 
      : super(key: key); 
   final String name; 
   final String description; 
   final int price; 
   final String image; 

   Widget build(BuildContext context) {
      return Container(
         padding: EdgeInsets.all(2), height: 120,  child: Card( 
            child: Row(
               mainAxisAlignment: MainAxisAlignment.spaceEvenly, children: <Widget>[
                  Image.asset("assets/appimages/" +image), Expanded(
                     child: Container(
                        padding: EdgeInsets.all(5), child: Column(
                           mainAxisAlignment: MainAxisAlignment.spaceEvenly, 
                              children: <Widget>[ 
                              
                              Text(this.name, style: TextStyle(fontWeight: 
                                 FontWeight.bold)), Text(this.description), 
                              Text("Price: " + this.price.toString()), 
                           ], 
                        )
                     )
                  )
               ]
            )
         )
      );
   }
}
  • 请注意代码中的以下内容:

  • ProductBox使用了四个参数,如下所示:

    • name - 产品名称

    • description - 产品描述

    • price - 产品价格

    • image - 产品图片

  • ProductBox使用了七个内置部件,如下所示:

    • Container
    • Expanded
    • Row
    • Column
    • Card
    • 文本(Text)
    • 图像(Image)
  • ProductBox使用上述部件进行设计。部件的排列或层次结构在下面所示的图中指定:
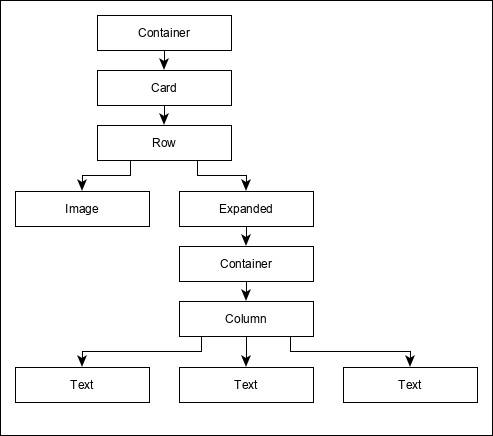
Hierarchy of the widget
  • 现在,将一些虚拟图片(见下文)放置到应用程序的assets文件夹中,并在pubspec.yaml文件中配置assets文件夹,如下所示:

assets: 
   - assets/appimages/floppy.png 
   - assets/appimages/iphone.png 
   - assets/appimages/laptop.png 
   - assets/appimages/pendrive.png 
   - assets/appimages/pixel.png 
   - assets/appimages/tablet.png
iphone

iPhone.png

Pixel

Pixel.png

Laptop

Laptop.png

Tablet

Tablet.png

Pendrive

Pendrive.png

Floppy Disk

Floppy.png

最后,在MyHomePage部件中使用ProductBox部件,如下所示:

class MyHomePage extends StatelessWidget { 
   MyHomePage({Key key, this.title}) : super(key: key); 
   final String title; 

   @override 
   Widget build(BuildContext context) {
      return Scaffold(
         appBar: AppBar(title:Text("Product Listing")), 
         body: ListView(
            shrinkWrap: true, padding: const EdgeInsets.fromLTRB(2.0, 10.0, 2.0, 10.0), 
            children: <Widget> [
               ProductBox(
                  name: "iPhone", 
                  description: "iPhone is the stylist phone ever", 
                  price: 1000, 
                  image: "iphone.png"
               ), 
               ProductBox(
                  name: "Pixel", 
                  description: "Pixel is the most featureful phone ever", 
                  price: 800, 
                  image: "pixel.png"
               ), 
               ProductBox( 
                  name: "Laptop", 
                  description: "Laptop is most productive development tool", 
                  price: 2000, 
                  image: "laptop.png"
               ), 
               ProductBox( 
                  name: "Tablet", 
                  description: "Tablet is the most useful device ever for meeting", 
                  price: 1500, 
                  image: "tablet.png"
               ), 
               ProductBox(
                  name: "Pendrive", 
                  description: "Pendrive is useful storage medium", 
                  price: 100, 
                  image: "pendrive.png"
               ), 
               ProductBox(
                  name: "Floppy Drive", 
                  description: "Floppy drive is useful rescue storage medium", 
                  price: 20, 
                  image: "floppy.png"
               ), 
            ],
         )
      );
   }
}
  • 这里,我们使用ProductBox作为ListView部件的子部件。

  • 产品布局应用程序(product_layout_app)的完整代码(main.dart)如下:

import 'package:flutter/material.dart'; 
void main() => runApp(MyApp()); 

class MyApp extends StatelessWidget { 
   // This widget is the root of your application. 
   @override 
   Widget build(BuildContext context) {
      return MaterialApp(
         title: 'Flutter Demo', theme: ThemeData(
            primarySwatch: Colors.blue,
         ), 
         home: MyHomePage(title: 'Product layout demo home page'), 
      );
   }
}
class MyHomePage extends StatelessWidget { 
   MyHomePage({Key key, this.title}) : super(key: key); 
   final String title; 
   
   @override 
   Widget build(BuildContext context) { 
      return Scaffold( 
         appBar: AppBar(title: Text("Product Listing")), 
         body: ListView(
            shrinkWrap: true, 
            padding: const EdgeInsets.fromLTRB(2.0, 10.0, 2.0, 10.0), 
            children: <Widget>[ 
               ProductBox(
                  name: "iPhone", 
                  description: "iPhone is the stylist phone ever", 
                  price: 1000, 
                  image: "iphone.png"
               ), 
               ProductBox( 
                  name: "Pixel",    
                  description: "Pixel is the most featureful phone ever", 
                  price: 800, 
                  image: "pixel.png"
               ), 
               ProductBox( 
                  name: "Laptop", 
                  description: "Laptop is most productive development tool", 
                  price: 2000, 
                  image: "laptop.png"
               ), 
               ProductBox( 
                  name: "Tablet", 
                  description: "Tablet is the most useful device ever for meeting", 
                  price: 1500, 
                  image: "tablet.png"
               ), 
               ProductBox( 
                  name: "Pendrive", 
                  description: "Pendrive is useful storage medium", 
                  price: 100, 
                  image: "pendrive.png"
               ), 
               ProductBox(
                  name: "Floppy Drive", 
                  description: "Floppy drive is useful rescue storage medium", 
                  price: 20, 
                  image: "floppy.png"
               ), 
            ],
         )
      );
   }
}
class ProductBox extends StatelessWidget {
   ProductBox({Key key, this.name, this.description, this.price, this.image}) :
      super(key: key); 
   final String name; 
   final String description; 
   final int price; 
   final String image; 
   
   Widget build(BuildContext context) {
      return Container(
         padding: EdgeInsets.all(2), 
         height: 120, 
         child: Card(
            child: Row(
               mainAxisAlignment: MainAxisAlignment.spaceEvenly, 
               children: <Widget>[ 
                  Image.asset("assets/appimages/" + image), 
                  Expanded( 
                     child: Container( 
                        padding: EdgeInsets.all(5), 
                        child: Column(    
                           mainAxisAlignment: MainAxisAlignment.spaceEvenly, 
                           children: <Widget>[ 
                              Text(
                                 this.name, style: TextStyle(
                                    fontWeight: FontWeight.bold
                                 )
                              ),
                              Text(this.description), Text(
                                 "Price: " + this.price.toString()
                              ), 
                           ], 
                        )
                     )
                  )
               ]
            )
         )
      );
   }
}

应用程序的最终输出如下所示:
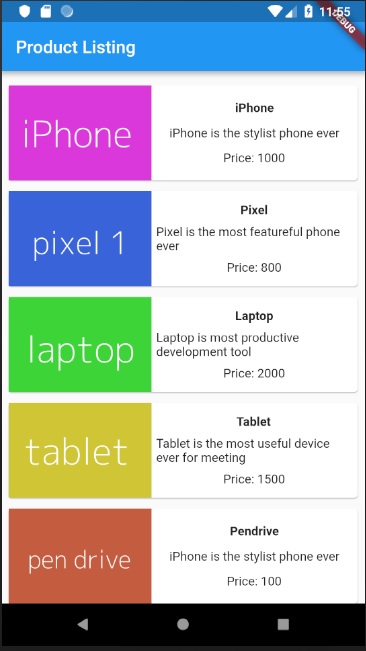
Product Listing

Flutter - 手势入门

手势主要是用户与移动(或任何基于触摸的设备)应用程序交互的方式。手势通常定义为用户为了激活移动设备的特定控件而进行的任何物理动作/移动。手势可以像轻触移动设备屏幕一样简单,也可以像在游戏应用程序中使用的更复杂的动作。

这里提到了一些广泛使用的手势:

  • 轻触(Tap) - 用指尖短暂触摸设备表面,然后松开指尖。

  • 双击(Double Tap) - 在短时间内连续点击两次。

  • 拖动(Drag) - 用指尖触摸设备表面,然后以稳定的方式移动指尖,最后松开指尖。

  • 轻扫(Flick) - 类似于拖动,但以更快的速度进行。

  • 捏合(Pinch) - 使用两只手指捏合设备表面。

  • 散开/缩放(Spread/Zoom) - 捏合的反向操作。

  • 平移 - 用指尖触碰设备表面,并在任何方向移动,而不松开指尖。

Flutter 通过其独有的 Widget,GestureDetector,为所有类型的手势提供了极好的支持。GestureDetector 是一个非视觉 Widget,主要用于检测用户的手势。要识别针对某个 Widget 的手势,可以将该 Widget 放置在 GestureDetector Widget 内部。GestureDetector 将捕获手势并根据手势分派多个事件。

下面列出了一些手势及其对应的事件:

  • 点击
    • onTapDown
    • onTapUp
    • onTap
    • onTapCancel
  • 双击
    • onDoubleTap
  • 长按
    • onLongPress
  • 垂直拖动
    • onVerticalDragStart
    • onVerticalDragUpdate
    • onVerticalDragEnd
  • 水平拖动
    • onHorizontalDragStart
    • onHorizontalDragUpdate
    • onHorizontalDragEnd
  • 平移
    • onPanStart
    • onPanUpdate
    • onPanEnd

现在,让我们修改 hello world 应用以包含手势检测功能,并尝试理解这个概念。

  • MyHomePage Widget 的主体内容更改为如下所示:

body: Center( 
   child: GestureDetector( 
      onTap: () { 
         _showDialog(context); 
      }, 
      child: Text( 'Hello World', ) 
   ) 
),
  • 请注意,在这里,我们在 Widget 层次结构中将GestureDetector Widget 放置在 Text Widget 上方,捕获了 onTap 事件,然后最终显示了一个对话框窗口。

  • 实现 *_showDialog* 函数,以便在用户点击hello world 消息时显示对话框。它使用通用的showDialogAlertDialog Widget 创建一个新的对话框 Widget。代码如下所示:

// user defined function void _showDialog(BuildContext context) { 
   // flutter defined function 
   showDialog( 
      context: context, builder: (BuildContext context) { 
         // return object of type Dialog
         return AlertDialog( 
            title: new Text("Message"), 
            content: new Text("Hello World"),   
            actions: <Widget>[ 
               new FlatButton( 
                  child: new Text("Close"),  
                  onPressed: () {   
                     Navigator.of(context).pop();  
                  }, 
               ), 
            ], 
         ); 
      }, 
   ); 
}
  • 应用程序将使用热重载功能在设备中重新加载。现在,只需点击消息“Hello World”,它将显示如下所示的对话框:
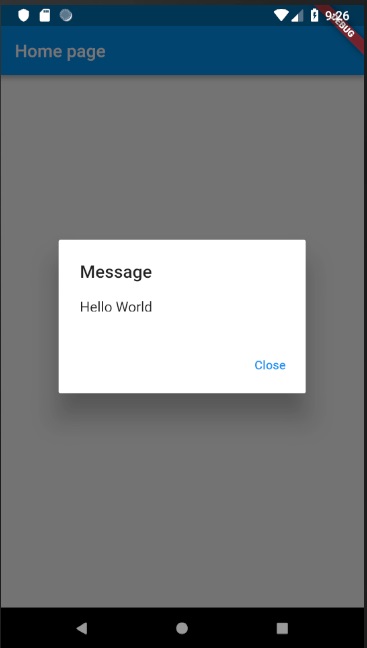
Hot Reload Features
  • 现在,通过点击对话框中的关闭选项关闭对话框。

  • 完整代码(main.dart)如下:

import 'package:flutter/material.dart'; 
void main() => runApp(MyApp()); 

class MyApp extends StatelessWidget { 
   // This widget is the root of your application.    
   @override 
   Widget build(BuildContext context) {
      return MaterialApp(
         title: 'Hello World Demo Application', 
         theme: ThemeData( primarySwatch: Colors.blue,), 
         home: MyHomePage(title: 'Home page'), 
      ); 
   }
}
class MyHomePage extends StatelessWidget {
   MyHomePage({Key key, this.title}) : super(key: key); 
   final String title; 
   
   // user defined function 
   void _showDialog(BuildContext context) { 
      // flutter defined function showDialog( 
         context: context, builder: (BuildContext context) { 
            // return object of type Dialog return AlertDialog(
               title: new Text("Message"), 
               content: new Text("Hello World"),   
               actions: <Widget>[
                  new FlatButton(
                     child: new Text("Close"), 
                     onPressed: () {   
                        Navigator.of(context).pop();  
                     }, 
                  ), 
               ],
            );
         },
      );
   }
   @override 
   Widget build(BuildContext context) {
      return Scaffold(
         appBar: AppBar(title: Text(this.title),),
         body: Center(
            child: GestureDetector( 
               onTap: () {
                  _showDialog(context);
               },
            child: Text( 'Hello World', )
            )
         ),
      );
   }
}

最后,Flutter 还通过Listener Widget 提供了一种低级的手势检测机制。它将检测所有用户交互,然后分派以下事件:

  • PointerDownEvent
  • PointerMoveEvent
  • PointerUpEvent
  • PointerCancelEvent

Flutter 还提供了一小组 Widget 来执行特定以及高级手势。这些 Widget 列出如下:

  • Dismissible - 支持轻扫手势来关闭 Widget。

  • Draggable - 支持拖动手势来移动 Widget。

  • LongPressDraggable - 支持拖动手势来移动 Widget,当其父 Widget 也可拖动时。

  • DragTarget - 接受任何Draggable Widget

  • IgnorePointer - 从手势检测过程中隐藏 Widget 及其子元素。

  • AbsorbPointer - 停止手势检测过程本身,因此任何重叠的 Widget 也无法参与手势检测过程,因此不会引发任何事件。

  • Scrollable - 支持滚动 Widget 内可用的内容。

Flutter - 状态管理

在应用程序中管理状态是应用程序生命周期中最重要和必要的流程之一。

让我们考虑一个简单的购物车应用程序。

  • 用户将使用其凭据登录应用程序。

  • 用户登录后,应用程序应在所有屏幕中保留已登录的用户详细信息。

  • 同样,当用户选择产品并将其保存到购物车中时,购物车信息应在页面之间保留,直到用户结账。

  • 用户及其购物车信息在任何实例中都称为该实例下应用程序的状态。

状态管理可以根据特定状态在应用程序中持续的时间分为两类。

  • 短暂的 - 持续几秒钟,例如动画的当前状态或单个页面,例如产品的当前评分。Flutter 通过 StatefulWidget 支持它。

  • 应用程序状态 - 持续整个应用程序,例如已登录的用户详细信息、购物车信息等。Flutter 通过 scoped_model 支持它。

导航和路由

在任何应用程序中,从一个页面/屏幕导航到另一个页面/屏幕定义了应用程序的工作流程。处理应用程序导航的方式称为路由。Flutter 提供了一个基本的路由类 - MaterialPageRoute 和两个方法 - Navigator.push 和 Navigator.pop,来定义应用程序的工作流程。

MaterialPageRoute

MaterialPageRoute 是一个 Widget,用于通过用特定于平台的动画替换整个屏幕来呈现其 UI。

MaterialPageRoute(builder: (context) => Widget())

在这里,builder 将接受一个函数来构建其内容,方法是提供应用程序的当前上下文。

Navigation.push

Navigation.push 用于使用 MaterialPageRoute Widget 导航到新屏幕。

Navigator.push( context, MaterialPageRoute(builder: (context) => Widget()), );

Navigation.pop

Navigation.pop 用于导航到上一个屏幕。

Navigator.pop(context);

让我们创建一个新的应用程序来更好地理解导航概念。

在 Android Studio 中创建一个新的 Flutter 应用程序,product_nav_app

  • 将 assets 文件夹从 product_nav_app 复制到 product_state_app,并在 pubspec.yaml 文件中添加 assets。

flutter:
   assets: 
   - assets/appimages/floppy.png 
   - assets/appimages/iphone.png 
   - assets/appimages/laptop.png 
   - assets/appimages/pendrive.png 
   - assets/appimages/pixel.png 
   - assets/appimages/tablet.png
  • 将默认启动代码(main.dart)替换为我们的启动代码。

import 'package:flutter/material.dart'; 
void main() => runApp(MyApp()); 

class MyApp extends StatelessWidget { 
   // This widget is the root of your application. 
   @override 
   Widget build(BuildContext context) { 
      return MaterialApp( 
         title: 'Flutter Demo', 
         theme: ThemeData( 
            primarySwatch: Colors.blue, 
         ), 
         home: MyHomePage(
            title: 'Product state demo home page'
         ),
      );
   }
}
class MyHomePage extends StatelessWidget {
   MyHomePage({Key key, this.title}) : super(key: key);
   final String title;
   @override 
   Widget build(BuildContext context) {
      return Scaffold(
         appBar: AppBar(
            title: Text(this.title), 
         ), 
         body: Center(
            child: Text('Hello World',)
         ), 
      ); 
   } 
}
  • 让我们创建一个 Product 类来组织产品信息。

class Product { 
   final String name; 
   final String description; 
   final int price; 
   final String image; 
   Product(this.name, this.description, this.price, this.image); 
}
  • 让我们在 Product 类中编写一个 getProducts 方法来生成我们的虚拟产品记录。

static List<Product> getProducts() {
   List<Product> items = <Product>[]; 
   
   items.add(
      Product( 
         "Pixel", 
         "Pixel is the most feature-full phone ever", 800, 
         "pixel.png"
      )
   ); 
   items.add(
      Product(
         "Laptop", 
         "Laptop is most productive development tool", 
         2000, "
         laptop.png"
      )
   ); 
   items.add(
      Product( 
         "Tablet", 
         "Tablet is the most useful device ever for meeting", 
         1500, 
         "tablet.png"
      )
   ); 
   items.add(
      Product( 
         "Pendrive", 
         "Pendrive is useful storage medium",
         100, 
         "pendrive.png"
      )
   ); 
   items.add(
      Product( 
         "Floppy Drive", 
         "Floppy drive is useful rescue storage medium", 
         20, 
         "floppy.png"
      )
   ); 
   return items; 
}
import product.dart in main.dart
import 'Product.dart';
  • 让我们包含我们的新 Widget,RatingBox。

class RatingBox extends StatefulWidget {
   @override 
   _RatingBoxState createState() =>_RatingBoxState(); 
} 
class _RatingBoxState extends State<RatingBox> {
   int _rating = 0; 
   void _setRatingAsOne() {
      setState(() {
         _rating = 1; 
      }); 
   } 
   void _setRatingAsTwo() {
      setState(() {
         _rating = 2; 
      }); 
   }
   void _setRatingAsThree() {
      setState(() {
         _rating = 3;
      });
   }
   Widget build(BuildContext context) {
      double _size = 20; 
      print(_rating); 
      return Row(
         mainAxisAlignment: MainAxisAlignment.end, 
         crossAxisAlignment: CrossAxisAlignment.end, 
         mainAxisSize: MainAxisSize.max, 
         children: <Widget>[
            Container(
               padding: EdgeInsets.all(0), 
               child: IconButton(
                  icon: (
                     _rating >= 1? 
                     Icon( 
                        Icons.star, 
                        size: _size, 
                     ) 
                     : Icon(
                        Icons.star_border, 
                        size: _size, 
                     )
                  ), 
                  color: Colors.red[500], 
                  onPressed: _setRatingAsOne, 
                  iconSize: _size, 
               ), 
            ), 
            Container(
               padding: EdgeInsets.all(0), 
               child: IconButton(
                  icon: (
                     _rating >= 2? 
                     Icon(
                        Icons.star, 
                        size: _size, 
                     ) 
                     : Icon(
                        Icons.star_border, 
                        size: _size, 
                     )
                  ), 
                  color: Colors.red[500], 
                  onPressed: _setRatingAsTwo, 
                  iconSize: _size, 
               ), 
            ), 
            Container(
               padding: EdgeInsets.all(0), 
               child: IconButton(
                  icon: (
                     _rating >= 3 ? 
                     Icon(
                        Icons.star, 
                        size: _size, 
                     ) 
                     : Icon( 
                        Icons.star_border, 
                        size: _size, 
                     )
                  ), 
                  color: Colors.red[500], 
                  onPressed: _setRatingAsThree, 
                  iconSize: _size, 
               ), 
            ), 
         ], 
      ); 
   }
}
  • 让我们修改我们的 ProductBox Widget 以与我们的新 Product 类一起使用。

class ProductBox extends StatelessWidget {    
   ProductBox({Key key, this.item}) : super(key: key); 
   final Product item; 
   
   Widget build(BuildContext context) {
      return Container(
         padding: EdgeInsets.all(2), 
         height: 140, 
         child: Card( 
            child: Row(
               mainAxisAlignment: MainAxisAlignment.spaceEvenly, 
               children: <Widget>[ 
                  Image.asset("assets/appimages/" + this.item.image), 
                  Expanded(
                     child: Container(
                        padding: EdgeInsets.all(5), 
                        child: Column(
                           mainAxisAlignment: MainAxisAlignment.spaceEvenly, 
                           children: <Widget>[
                              Text(this.item.name, 
                              style: TextStyle(fontWeight: FontWeight.bold)), 
                              Text(this.item.description), 
                              Text("Price: " + this.item.price.toString()), 
                              RatingBox(), 
                           ], 
                        )
                     )
                  )
               ]
            ), 
         )
      ); 
   }
}

让我们重写我们的 MyHomePage Widget 以与 Product 模型一起使用,并使用 ListView 列出所有产品。

class MyHomePage extends StatelessWidget { 
   MyHomePage({Key key, this.title}) : super(key: key); 
   final String title; 
   final items = Product.getProducts(); 
   
   @override 
   Widget build(BuildContext context) { 
      return Scaffold( appBar: AppBar(title: Text("Product Navigation")), 
      body: ListView.builder( 
         itemCount: items.length, 
         itemBuilder: (context, index) {
            return GestureDetector( 
               child: ProductBox(item: items[index]), 
               onTap: () { 
                  Navigator.push( 
                     context, MaterialPageRoute( 
                        builder: (context) => ProductPage(item: items[index]), 
                     ), 
                  ); 
               }, 
            ); 
         }, 
      )); 
   } 
}

在这里,我们使用了 MaterialPageRoute 导航到产品详细信息页面。

  • 现在,让我们添加 ProductPage 来显示产品详细信息。

class ProductPage extends StatelessWidget { 
   ProductPage({Key key, this.item}) : super(key: key); 
   final Product item; 
   
   @override 
   Widget build(BuildContext context) {
      return Scaffold(
         appBar: AppBar( 
            title: Text(this.item.name), 
         ), 
         body: Center(
            child: Container(
               padding: EdgeInsets.all(0), 
               child: Column(
                  mainAxisAlignment: MainAxisAlignment.start, 
                  crossAxisAlignment: CrossAxisAlignment.start, 
                  children: <Widget>[
                     Image.asset("assets/appimages/" + this.item.image), 
                     Expanded(
                        child: Container(
                           padding: EdgeInsets.all(5), 
                           child: Column(
                              mainAxisAlignment: MainAxisAlignment.spaceEvenly, 
                              children: <Widget>[
                                 Text(
                                    this.item.name, style: TextStyle(
                                       fontWeight: FontWeight.bold
                                    )
                                 ), 
                                 Text(this.item.description), 
                                 Text("Price: " + this.item.price.toString()), 
                                 RatingBox(),
                              ], 
                           )
                        )
                     )
                  ]
               ), 
            ), 
         ), 
      ); 
   } 
}

应用程序的完整代码如下:

import 'package:flutter/material.dart'; 
void main() => runApp(MyApp()); 

class Product {
   final String name; 
   final String description; 
   final int price; 
   final String image; 
   Product(this.name, this.description, this.price, this.image); 
   
   static List<Product> getProducts() {
      List<Product> items = <Product>[]; 
      items.add(
         Product(
            "Pixel", 
            "Pixel is the most featureful phone ever", 
            800, 
            "pixel.png"
         )
      );
      items.add(
         Product(
            "Laptop", 
            "Laptop is most productive development tool", 
            2000, 
            "laptop.png"
         )
      ); 
      items.add(
         Product(
            "Tablet", 
            "Tablet is the most useful device ever for meeting", 
            1500, 
            "tablet.png"
         )
      ); 
      items.add(
         Product( 
            "Pendrive", 
            "iPhone is the stylist phone ever", 
            100, 
            "pendrive.png"
         )
      ); 
      items.add(
         Product(
            "Floppy Drive", 
            "iPhone is the stylist phone ever", 
            20, 
            "floppy.png"
         )
      ); 
      items.add(
         Product(
            "iPhone", 
            "iPhone is the stylist phone ever", 
            1000, 
            "iphone.png"
         )
      ); 
      return items; 
   }
}
class MyApp extends StatelessWidget {
   // This widget is the root of your application. 
   @override 
   Widget build(BuildContext context) {
      return MaterialApp(
         title: 'Flutter Demo', 
         theme: ThemeData( 
            primarySwatch: Colors.blue, 
         ), 
         home: MyHomePage(title: 'Product Navigation demo home page'), 
      ); 
   }
}
class MyHomePage extends StatelessWidget {
   MyHomePage({Key key, this.title}) : super(key: key); 
   final String title; 
   final items = Product.getProducts(); 
   
   @override 
   Widget build(BuildContext context) {
      return Scaffold(
         appBar: AppBar(title: Text("Product Navigation")), 
         body: ListView.builder( 
            itemCount: items.length, 
            itemBuilder: (context, index) { 
               return GestureDetector( 
                  child: ProductBox(item: items[index]), 
                  onTap: () { 
                     Navigator.push( 
                        context, 
                        MaterialPageRoute( 
                           builder: (context) => ProductPage(item: items[index]), 
                        ), 
                     ); 
                  }, 
               ); 
            }, 
         )
      ); 
   }
} 
class ProductPage extends StatelessWidget {
   ProductPage({Key key, this.item}) : super(key: key); 
   final Product item; 
   
   @override 
   Widget build(BuildContext context) {
      return Scaffold(
         appBar: AppBar(
            title: Text(this.item.name), 
         ), 
         body: Center(
            child: Container( 
               padding: EdgeInsets.all(0), 
               child: Column( 
                  mainAxisAlignment: MainAxisAlignment.start, 
                  crossAxisAlignment: CrossAxisAlignment.start, 
                  children: <Widget>[ 
                     Image.asset("assets/appimages/" + this.item.image), 
                     Expanded( 
                        child: Container( 
                           padding: EdgeInsets.all(5), 
                           child: Column( 
                              mainAxisAlignment: MainAxisAlignment.spaceEvenly, 
                              children: <Widget>[ 
                                 Text(this.item.name, style: TextStyle(fontWeight: FontWeight.bold)), 
                                 Text(this.item.description), 
                                 Text("Price: " + this.item.price.toString()), 
                                 RatingBox(), 
                              ], 
                           )
                        )
                     ) 
                  ]
               ), 
            ), 
         ), 
      ); 
   } 
}
class RatingBox extends StatefulWidget { 
   @override 
   _RatingBoxState createState() => _RatingBoxState(); 
} 
class _RatingBoxState extends State<RatingBox> { 
   int _rating = 0;
   void _setRatingAsOne() {
      setState(() {
         _rating = 1; 
      }); 
   }
   void _setRatingAsTwo() {
      setState(() {
         _rating = 2; 
      }); 
   } 
   void _setRatingAsThree() { 
      setState(() {
         _rating = 3; 
      }); 
   }
   Widget build(BuildContext context) {
      double _size = 20; 
      print(_rating); 
      return Row(
         mainAxisAlignment: MainAxisAlignment.end, 
         crossAxisAlignment: CrossAxisAlignment.end, 
         mainAxisSize: MainAxisSize.max, 
         children: <Widget>[
            Container(
               padding: EdgeInsets.all(0), 
               child: IconButton(
                  icon: (
                     _rating >= 1 ? Icon( 
                        Icons.star, 
                        size: _size, 
                     ) 
                     : Icon( 
                        Icons.star_border, 
                        size: _size, 
                     )
                  ), 
                  color: Colors.red[500], 
                  onPressed: _setRatingAsOne, 
                  iconSize: _size, 
               ), 
            ), 
            Container(
               padding: EdgeInsets.all(0), 
               child: IconButton( 
                  icon: (
                     _rating >= 2 ? 
                     Icon( 
                        Icons.star, 
                        size: _size, 
                     ) 
                     : Icon( 
                        Icons.star_border, 
                        size: _size, 
                     )
                  ), 
                  color: Colors.red[500], 
                  onPressed: _setRatingAsTwo, 
                  iconSize: _size, 
               ), 
            ), 
            Container(
               padding: EdgeInsets.all(0), 
               child: IconButton(
                  icon: (
                     _rating >= 3 ? 
                     Icon( 
                        Icons.star, 
                        size: _size, 
                     )
                     : Icon( 
                        Icons.star_border, 
                        size: _size, 
                     )
                  ), 
                  color: Colors.red[500], 
                  onPressed: _setRatingAsThree, 
                  iconSize: _size, 
               ), 
            ), 
         ], 
      ); 
   } 
} 
class ProductBox extends StatelessWidget {
   ProductBox({Key key, this.item}) : super(key: key); 
   final Product item; 
   
   Widget build(BuildContext context) {
      return Container(
         padding: EdgeInsets.all(2), 
         height: 140, 
         child: Card(
            child: Row(
               mainAxisAlignment: MainAxisAlignment.spaceEvenly, 
               children: <Widget>[ 
                  Image.asset("assets/appimages/" + this.item.image), 
                  Expanded( 
                     child: Container( 
                        padding: EdgeInsets.all(5), 
                        child: Column( 
                           mainAxisAlignment: MainAxisAlignment.spaceEvenly, 
                           children: <Widget>[ 
                              Text(this.item.name, style: TextStyle(fontWeight: FontWeight.bold)), Text(this.item.description), 
                              Text("Price: " + this.item.price.toString()), 
                              RatingBox(), 
                           ], 
                        )
                     )
                  ) 
               ]
            ), 
         )
      ); 
   } 
}

运行应用程序并点击任意一个产品项目。它将显示相关的详细信息页面。我们可以通过点击后退按钮移动到主页。应用程序的产品列表页面和产品详细信息页面如下所示:
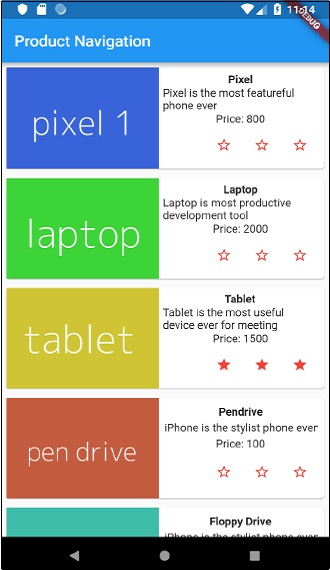
Product Navigation

Pixel1

Flutter - 动画

动画是任何移动应用程序中一个复杂的流程。尽管其复杂性,动画将用户体验提升到一个新的水平,并提供丰富的用户交互。由于其丰富性,动画成为现代移动应用程序不可或缺的一部分。Flutter 框架认识到动画的重要性,并提供了一个简单直观的框架来开发所有类型的动画。

简介

动画是在特定持续时间内按特定顺序显示一系列图像/图片的过程,以产生运动的错觉。动画最重要的方面如下:

  • 动画有两个不同的值:起始值和结束值。动画从起始值开始,经过一系列中间值,最后以结束值结束。例如,要使 Widget 淡出,初始值将是完全不透明,最终值将是零不透明。

  • 中间值可以是线性的或非线性的(曲线)的,并且可以进行配置。了解动画按其配置方式工作。每个配置都会为动画提供不同的感觉。例如,使 Widget 淡出将是线性的,而球的弹跳将是非线性的。

  • 动画过程的持续时间会影响动画的速度(缓慢或快速)。

  • 控制动画过程的能力,例如启动动画、停止动画、重复动画特定次数、反转动画过程等。

  • 在 Flutter 中,动画系统不会执行任何真实的动画。相反,它仅提供每帧渲染图像所需的 value。

基于动画的类

Flutter 动画系统基于 Animation 对象。核心动画类及其用法如下:

Animation

在特定持续时间内生成两个数字之间的插值 value。最常见的 Animation 类如下:

  • Animation<double> - 在两个十进制数字之间插值 value

  • Animation<Color> - 在两种颜色之间插值颜色

  • Animation<Size> - 在两种尺寸之间插值尺寸

  • AnimationController - 用于控制动画本身的特殊 Animation 对象。每当应用程序准备好新帧时,它都会生成新的 value。它支持基于线性的动画,并且 value 从 0.0 开始到 1.0 结束

controller = AnimationController(duration: const Duration(seconds: 2), vsync: this);

在这里,controller 控制动画,duration 选项控制动画过程的持续时间。vsync 是一个用于优化动画中使用的资源的特殊选项。

CurvedAnimation

类似于 AnimationController,但支持非线性动画。CurvedAnimation 可以与 Animation 对象一起使用,如下所示:

controller = AnimationController(duration: const Duration(seconds: 2), vsync: this); 
animation = CurvedAnimation(parent: controller, curve: Curves.easeIn)

Tween<T>

派生自 Animatable<T>,用于生成除 0 和 1 之外的任何两个数字之间的数字。它可以通过使用 animate 方法并将实际的 Animation 对象传递给它来与 Animation 对象一起使用。

AnimationController controller = AnimationController( 
   duration: const Duration(milliseconds: 1000), 
vsync: this); Animation<int> customTween = IntTween(
   begin: 0, end: 255).animate(controller);
  • Tween 也可以与 CurvedAnimation 一起使用,如下所示:

AnimationController controller = AnimationController(
   duration: const Duration(milliseconds: 500), vsync: this); 
final Animation curve = CurvedAnimation(parent: controller, curve: Curves.easeOut); 
Animation<int> customTween = IntTween(begin: 0, end: 255).animate(curve);

在这里,controller 是实际的动画控制器。curve 提供非线性的类型,customTween 提供从 0 到 255 的自定义范围。

Flutter 动画的工作流程

动画的工作流程如下:

  • 在 StatefulWidget 的 initState 中定义并启动动画控制器。

AnimationController(duration: const Duration(seconds: 2), vsync: this); 
animation = Tween<double>(begin: 0, end: 300).animate(controller); 
controller.forward();
  • 添加基于动画的监听器,addListener 来更改 Widget 的状态。

animation = Tween<double>(begin: 0, end: 300).animate(controller) ..addListener(() {
   setState(() { 
      // The state that has changed here is the animation object’s value. 
   }); 
});
  • 内置 Widget,AnimatedWidget 和 AnimatedBuilder 可以用来跳过此过程。这两个 Widget 都接受 Animation 对象并获取动画所需的当前 value。

  • 在 Widget 的构建过程中获取动画 value,然后将其应用于宽度、高度或任何相关属性,而不是原始 value。

child: Container( 
   height: animation.value, 
   width: animation.value, 
   child: <Widget>, 
)

工作应用程序

让我们编写一个简单的基于动画的应用程序,以了解 Flutter 框架中动画的概念。

  • 在 Android Studio 中创建一个新的Flutter 应用程序,product_animation_app。

  • 将 assets 文件夹从 product_nav_app 复制到 product_animation_app,并在 pubspec.yaml 文件中添加 assets。

flutter: 
   assets: 
   - assets/appimages/floppy.png 
   - assets/appimages/iphone.png 
   - assets/appimages/laptop.png 
   - assets/appimages/pendrive.png 
   - assets/appimages/pixel.png 
   - assets/appimages/tablet.png
  • 删除默认启动代码(main.dart)。

  • 添加导入和基本 main 函数。

import 'package:flutter/material.dart'; 
void main() => runApp(MyApp());
  • 创建从 StatefulWidgtet 派生的 MyApp Widget。

class MyApp extends StatefulWidget { 
   _MyAppState createState() => _MyAppState(); 
}
  • 创建 _MyAppState Widget 并实现 initState 和 dispose,以及默认的 build 方法。

class _MyAppState extends State<MyApp> with SingleTickerProviderStateMixin { 
   Animation<double> animation; 
   AnimationController controller; 
   @override void initState() {
      super.initState(); 
      controller = AnimationController(
         duration: const Duration(seconds: 10), vsync: this
      ); 
      animation = Tween<double>(begin: 0.0, end: 1.0).animate(controller); 
      controller.forward(); 
   } 
   // This widget is the root of your application. 
   @override 
   Widget build(BuildContext context) {
      controller.forward(); 
      return MaterialApp(
         title: 'Flutter Demo',
         theme: ThemeData(primarySwatch: Colors.blue,), 
         home: MyHomePage(title: 'Product layout demo home page', animation: animation,)
      ); 
   } 
   @override 
   void dispose() {
      controller.dispose();
      super.dispose();
   }
}

这里,

  • 在 initState 方法中,我们创建了一个动画控制器对象(controller),一个动画对象(animation)并使用 controller.forward 启动了动画。

  • 在 dispose 方法中,我们处置了动画控制器对象(controller)。

  • 在 build 方法中,通过构造函数将动画发送到 MyHomePage Widget。现在,MyHomePage Widget 可以使用动画对象来为其内容设置动画。

  • 现在,添加 ProductBox Widget

class ProductBox extends StatelessWidget {
   ProductBox({Key key, this.name, this.description, this.price, this.image})
      : super(key: key);
   final String name; 
   final String description; 
   final int price; 
   final String image; 
   
   Widget build(BuildContext context) {
      return Container(
         padding: EdgeInsets.all(2), 
         height: 140, 
         child: Card( 
            child: Row( 
               mainAxisAlignment: MainAxisAlignment.spaceEvenly, 
               children: <Widget>[ 
                  Image.asset("assets/appimages/" + image), 
                  Expanded( 
                     child: Container( 
                        padding: EdgeInsets.all(5), 
                        child: Column( 
                           mainAxisAlignment: MainAxisAlignment.spaceEvenly, 
                           children: <Widget>[ 
                              Text(this.name, style: 
                                 TextStyle(fontWeight: FontWeight.bold)), 
                              Text(this.description), 
                                 Text("Price: " + this.price.toString()), 
                           ], 
                        )
                     )
                  )
               ]
            )
         )
      ); 
   }
}
  • 创建一个新的 Widget,MyAnimatedWidget,使用不透明度执行简单的淡入淡出动画。

class MyAnimatedWidget extends StatelessWidget { 
   MyAnimatedWidget({this.child, this.animation}); 
      
   final Widget child; 
   final Animation<double> animation; 
   
   Widget build(BuildContext context) => Center( 
   child: AnimatedBuilder(
      animation: animation, 
      builder: (context, child) => Container( 
         child: Opacity(opacity: animation.value, child: child), 
      ), 
      child: child), 
   ); 
}
  • 在这里,我们使用了 AniatedBuilder 来执行我们的动画。AnimatedBuilder 是一个 Widget,它在执行动画的同时构建其内容。它接受一个 animation 对象来获取当前动画 value。我们使用了动画 value,animation.value 来设置子 Widget 的不透明度。实际上,Widget 将使用不透明度概念为子 Widget 设置动画。

  • 最后,创建 MyHomePage Widget 并使用动画对象为其任何内容设置动画。

class MyHomePage extends StatelessWidget {
   MyHomePage({Key key, this.title, this.animation}) : super(key: key); 
   
   final String title; 
   final Animation<double> 
   animation; 
   
   @override 
   Widget build(BuildContext context) {
      return Scaffold(
         appBar: AppBar(title: Text("Product Listing")),body: ListView(
            shrinkWrap: true,
            padding: const EdgeInsets.fromLTRB(2.0, 10.0, 2.0, 10.0), 
            children: <Widget>[
               FadeTransition(
                  child: ProductBox(
                     name: "iPhone", 
                     description: "iPhone is the stylist phone ever", 
                     price: 1000, 
                     image: "iphone.png"
                  ), opacity: animation
               ), 
               MyAnimatedWidget(child: ProductBox(
                  name: "Pixel", 
                  description: "Pixel is the most featureful phone ever", 
                  price: 800, 
                  image: "pixel.png"
               ), animation: animation), 
               ProductBox(
                  name: "Laptop", 
                  description: "Laptop is most productive development tool", 
                  price: 2000, 
                  image: "laptop.png"
               ), 
               ProductBox(
                  name: "Tablet", 
                  description: "Tablet is the most useful device ever for meeting", 
                  price: 1500, 
                  image: "tablet.png"
               ), 
               ProductBox(
                  name: "Pendrive", 
                  description: "Pendrive is useful storage medium", 
                  price: 100, 
                  image: "pendrive.png"
               ),
               ProductBox(
                  name: "Floppy Drive", 
                  description: "Floppy drive is useful rescue storage medium", 
                  price: 20, 
                  image: "floppy.png"
               ),
            ],
         )
      );
   }
}

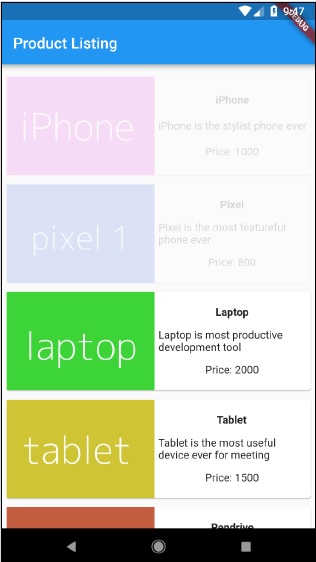
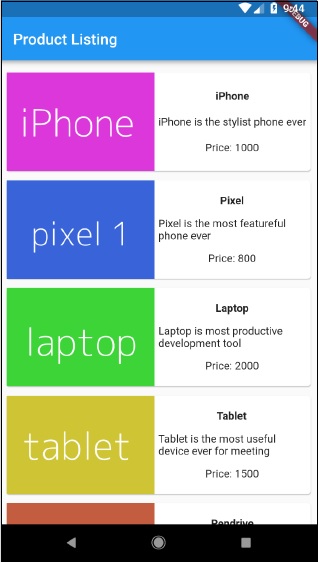
在这里,我们使用了 FadeAnimation 和 MyAnimationWidget 为列表中的前两个项目设置动画。FadeAnimation 是一个内置动画类,我们使用它来使用不透明度概念为其子元素设置动画。

  • 完整代码如下:

import 'package:flutter/material.dart'; 
void main() => runApp(MyApp()); 

class MyApp extends StatefulWidget { 
   _MyAppState createState() => _MyAppState(); 
} 
class _MyAppState extends State<MyApp> with SingleTickerProviderStateMixin {
   Animation<double> animation; 
   AnimationController controller; 
   
   @override 
   void initState() {
      super.initState(); 
      controller = AnimationController(
         duration: const Duration(seconds: 10), vsync: this); 
      animation = Tween<double>(begin: 0.0, end: 1.0).animate(controller); 
      controller.forward(); 
   } 
   // This widget is the root of your application. 
   @override 
   Widget build(BuildContext context) {
      controller.forward(); 
      return MaterialApp( 
         title: 'Flutter Demo', theme: ThemeData(primarySwatch: Colors.blue,), 
         home: MyHomePage(title: 'Product layout demo home page', animation: animation,) 
      ); 
   } 
   @override 
   void dispose() {
      controller.dispose();
      super.dispose(); 
   } 
}
class MyHomePage extends StatelessWidget { 
   MyHomePage({Key key, this.title, this.animation}): super(key: key);
   final String title; 
   final Animation<double> animation; 
   
   @override 
   Widget build(BuildContext context) {
      return Scaffold(
         appBar: AppBar(title: Text("Product Listing")), 
         body: ListView(
            shrinkWrap: true, 
            padding: const EdgeInsets.fromLTRB(2.0, 10.0, 2.0, 10.0), 
            children: <Widget>[
               FadeTransition(
                  child: ProductBox(
                     name: "iPhone", 
                     description: "iPhone is the stylist phone ever", 
                     price: 1000, 
                     image: "iphone.png"
                  ), 
                  opacity: animation
               ), 
               MyAnimatedWidget(
                  child: ProductBox( 
                     name: "Pixel", 
                     description: "Pixel is the most featureful phone ever", 
                     price: 800, 
                     image: "pixel.png"
                  ), 
                  animation: animation
               ), 
               ProductBox( 
                  name: "Laptop", 
                  description: "Laptop is most productive development tool", 
                  price: 2000, 
                  image: "laptop.png"
               ), 
               ProductBox(
                  name: "Tablet",
                  description: "Tablet is the most useful device ever for meeting",
                  price: 1500, 
                  image: "tablet.png"
               ), 
               ProductBox(
                  name: "Pendrive", 
                  description: "Pendrive is useful storage medium", 
                  price: 100, 
                  image: "pendrive.png"
               ), 
               ProductBox(
                  name: "Floppy Drive", 
                  description: "Floppy drive is useful rescue storage medium", 
                  price: 20, 
                  image: "floppy.png"
               ), 
            ], 
         )
      ); 
   } 
} 
class ProductBox extends StatelessWidget { 
   ProductBox({Key key, this.name, this.description, this.price, this.image}) :
      super(key: key);
   final String name; 
   final String description; 
   final int price; 
   final String image; 
   Widget build(BuildContext context) {
      return Container(
         padding: EdgeInsets.all(2), 
         height: 140, 
         child: Card(
            child: Row(
               mainAxisAlignment: MainAxisAlignment.spaceEvenly, 
               children: <Widget>[ 
                  Image.asset("assets/appimages/" + image), 
                  Expanded(
                     child: Container( 
                        padding: EdgeInsets.all(5), 
                        child: Column( 
                           mainAxisAlignment: MainAxisAlignment.spaceEvenly, 
                           children: <Widget>[ 
                              Text(
                                 this.name, style: TextStyle(
                                    fontWeight: FontWeight.bold
                                 )
                              ), 
                              Text(this.description), Text(
                                 "Price: " + this.price.toString()
                              ), 
                           ], 
                        )
                     )
                  ) 
               ]
            )
         )
      ); 
   } 
}
class MyAnimatedWidget extends StatelessWidget { 
   MyAnimatedWidget({this.child, this.animation}); 
   final Widget child; 
   final Animation<double> animation; 
 
   Widget build(BuildContext context) => Center( 
      child: AnimatedBuilder(
         animation: animation, 
         builder: (context, child) => Container( 
            child: Opacity(opacity: animation.value, child: child), 
         ), 
         child: child
      ), 
   ); 
}
  • 编译并运行应用程序以查看结果。应用程序的初始版本和最终版本如下所示:

Initial Version

Final Version

Flutter - 编写 Android 特定代码

Flutter 提供了一个通用框架来访问平台特定的功能。这使开发人员能够使用平台特定的代码扩展Flutter框架的功能。可以通过该框架轻松访问平台特定的功能,例如相机、电池电量、浏览器等。

访问平台特定代码的总体思路是通过简单的消息传递协议。Flutter 代码(客户端)和平台代码(主机)绑定到一个通用的消息通道。客户端通过消息通道向主机发送消息。主机监听消息通道,接收消息并执行必要的功能,最后通过消息通道将结果返回给客户端。

平台特定代码架构如下图所示:
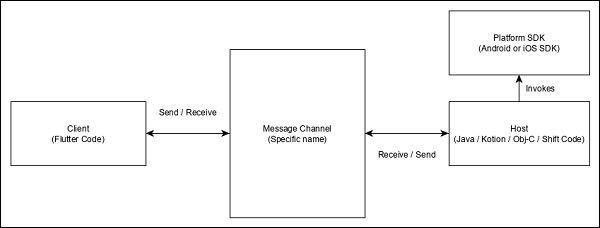
Specific Code Architecture

消息传递协议使用标准消息编解码器(StandardMessageCodec 类),该编解码器支持 JSON 类值的二进制序列化,例如数字、字符串、布尔值等。序列化和反序列化在客户端和主机之间透明地工作。

让我们编写一个简单的应用程序,使用Android SDK打开浏览器,并了解如何

  • 在 Android Studio 中创建一个新的 Flutter 应用程序,flutter_browser_app

  • 将 main.dart 代码替换为以下代码:

import 'package:flutter/material.dart'; 
void main() => runApp(MyApp()); 
class MyApp extends StatelessWidget { 
   @override 
   Widget build(BuildContext context) {
      return MaterialApp(
         title: 'Flutter Demo', 
         theme: ThemeData( 
            primarySwatch: Colors.blue, 
         ), 
         home: MyHomePage(title: 'Flutter Demo Home Page'),
      );
   }
}
class MyHomePage extends StatelessWidget { 
   MyHomePage({Key key, this.title}) : super(key: key); 
   final String title; 
   
   @override 
   Widget build(BuildContext context) {
      return Scaffold(
         appBar: AppBar(
            title: Text(this.title), 
         ), 
         body: Center(
            child: RaisedButton( 
               child: Text('Open Browser'), 
               onPressed: null, 
            ), 
         ), 
      ); 
   }
}
  • 在这里,我们创建了一个新的按钮来打开浏览器,并将它的 onPressed 方法设置为 null。

  • 现在,导入以下包:

import 'dart:async'; 
import 'package:flutter/services.dart';
  • 在这里,services.dart 包含调用平台特定代码的功能。

  • 在 MyHomePage 小部件中创建一个新的消息通道。

static const platform = const 
MethodChannel('flutterapp.tutorialspoint.com/browser');
  • 编写一个方法 _openBrowser 来通过消息通道调用平台特定方法 openBrowser 方法。

Future<void> _openBrowser() async { 
   try {
      final int result = await platform.invokeMethod(
         'openBrowser', <String, String>{ 
            'url': "https://flutterdart.cn" 
         }
      ); 
   } 
   on PlatformException catch (e) { 
      // Unable to open the browser 
      print(e); 
   }
}

在这里,我们使用 platform.invokeMethod 调用 openBrowser(将在后续步骤中解释)。openBrowser 有一个参数 url,用于打开特定的 URL。

  • 将 RaisedButton 的 onPressed 属性的值从 null 更改为 _openBrowser。

onPressed: _openBrowser,
  • 打开 MainActivity.java(在 android 文件夹内)并导入所需的库:

import android.app.Activity; 
import android.content.Intent; 
import android.net.Uri; 
import android.os.Bundle; 

import io.flutter.app.FlutterActivity; 
import io.flutter.plugin.common.MethodCall; 
import io.flutter.plugin.common.MethodChannel; 
import io.flutter.plugin.common.MethodChannel.MethodCallHandler; 
import io.flutter.plugin.common.MethodChannel.Result; 
import io.flutter.plugins.GeneratedPluginRegistrant;
  • 编写一个方法 openBrowser 来打开浏览器

private void openBrowser(MethodCall call, Result result, String url) { 
   Activity activity = this; 
   if (activity == null) { 
      result.error("ACTIVITY_NOT_AVAILABLE", 
      "Browser cannot be opened without foreground 
      activity", null); 
      return; 
   } 
   Intent intent = new Intent(Intent.ACTION_VIEW); 
   intent.setData(Uri.parse(url)); 
   
   activity.startActivity(intent); 
   result.success((Object) true); 
}
  • 现在,在 MainActivity 类中设置通道名称:

private static final String CHANNEL = "flutterapp.tutorialspoint.com/browser";
  • 编写 Android 特定的代码,在 onCreate 方法中设置消息处理:

new MethodChannel(getFlutterView(), CHANNEL).setMethodCallHandler( 
   new MethodCallHandler() { 
   @Override 
   public void onMethodCall(MethodCall call, Result result) { 
      String url = call.argument("url"); 
      if (call.method.equals("openBrowser")) {
         openBrowser(call, result, url); 
      } else { 
         result.notImplemented(); 
      } 
   } 
});

在这里,我们使用 MethodChannel 类创建了一个消息通道,并使用 MethodCallHandler 类来处理消息。onMethodCall 是实际负责通过检查消息来调用正确的平台特定代码的方法。onMethodCall 方法从消息中提取 url,然后仅当方法调用为 openBrowser 时才调用 openBrowser。否则,它返回 notImplemented 方法。

应用程序的完整源代码如下:

main.dart

MainActivity.java

package com.tutorialspoint.flutterapp.flutter_browser_app; 

import android.app.Activity; 
import android.content.Intent; 
import android.net.Uri; 
import android.os.Bundle; 
import io.flutter.app.FlutterActivity; 
import io.flutter.plugin.common.MethodCall; 
import io.flutter.plugin.common.MethodChannel.Result; 
import io.flutter.plugins.GeneratedPluginRegistrant; 

public class MainActivity extends FlutterActivity { 
   private static final String CHANNEL = "flutterapp.tutorialspoint.com/browser"; 
   @Override 
   protected void onCreate(Bundle savedInstanceState) { 
      super.onCreate(savedInstanceState); 
      GeneratedPluginRegistrant.registerWith(this); 
      new MethodChannel(getFlutterView(), CHANNEL).setMethodCallHandler(
         new MethodCallHandler() {
            @Override 
            public void onMethodCall(MethodCall call, Result result) {
               String url = call.argument("url"); 
               if (call.method.equals("openBrowser")) { 
                  openBrowser(call, result, url); 
               } else { 
                  result.notImplemented(); 
               }
            }
         }
      ); 
   }
   private void openBrowser(MethodCall call, Result result, String url) {
      Activity activity = this; if (activity == null) {
         result.error(
            "ACTIVITY_NOT_AVAILABLE", "Browser cannot be opened without foreground activity", null
         ); 
         return; 
      } 
      Intent intent = new Intent(Intent.ACTION_VIEW); 
      intent.setData(Uri.parse(url)); 
      activity.startActivity(intent); 
      result.success((Object) true); 
   }
}

main.dart

import 'package:flutter/material.dart'; 
import 'dart:async'; 
import 'package:flutter/services.dart'; 

void main() => runApp(MyApp()); 
class MyApp extends StatelessWidget {
   @override 
   Widget build(BuildContext context) {
      return MaterialApp(
         title: 'Flutter Demo', 
         theme: ThemeData( 
            primarySwatch: Colors.blue, 
         ), 
         home: MyHomePage(
            title: 'Flutter Demo Home Page'
         ), 
      ); 
   }
}
class MyHomePage extends StatelessWidget {
   MyHomePage({Key key, this.title}) : super(key: key); 
   final String title; 
   static const platform = const MethodChannel('flutterapp.tutorialspoint.com/browser'); 
   Future<void> _openBrowser() async {
      try {
         final int result = await platform.invokeMethod('openBrowser', <String, String>{ 
            'url': "https://flutterdart.cn" 
         });
      }
      on PlatformException catch (e) { 
         // Unable to open the browser print(e); 
      } 
   }
   @override 
   Widget build(BuildContext context) {
      return Scaffold( 
         appBar: AppBar( 
            title: Text(this.title), 
         ), 
         body: Center(
            child: RaisedButton( 
               child: Text('Open Browser'), 
               onPressed: _openBrowser, 
            ), 
         ),
      );
   }
}

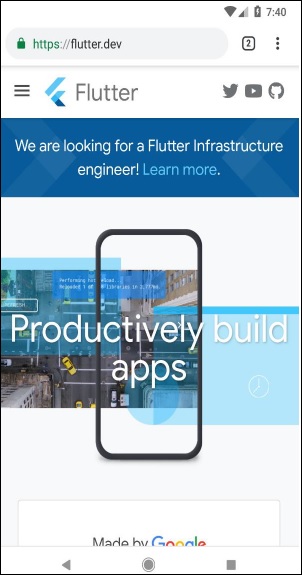
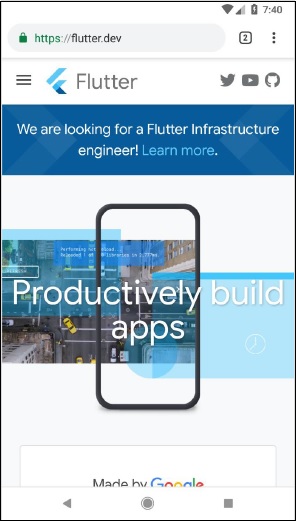
运行应用程序并点击“打开浏览器”按钮,您会看到浏览器已启动。浏览器应用程序 - 首页如下图所示:
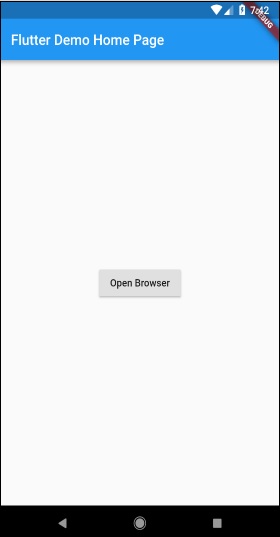
Flutter Demo Home Page

Productively Build Apps

Flutter - 编写 iOS 特定代码

访问 iOS 特定代码与 Android 平台类似,只是它使用 iOS 特定的语言 - Objective-C 或 Swift 以及 iOS SDK。否则,概念与 Android 平台相同。

让我们为 iOS 平台编写与上一章相同的应用程序。

  • 让我们在 Android Studio(macOS)中创建一个新的应用程序,flutter_browser_ios_app

  • 按照上一章中的步骤 2-6 操作。

  • 启动 Xcode 并点击文件 → 打开

  • 选择 Flutter 项目 ios 目录下的 Xcode 项目。

  • 打开Runner → Runner 路径下的 AppDelegate.m。它包含以下代码:

#include "AppDelegate.h" 
#include "GeneratedPluginRegistrant.h" 
@implementation AppDelegate 

- (BOOL)application:(UIApplication *)application
   didFinishLaunchingWithOptions:(NSDictionary *)launchOptions {
      // [GeneratedPluginRegistrant registerWithRegistry:self];
      // Override point for customization after application launch.
      return [super application:application didFinishLaunchingWithOptions:launchOptions];
   } 
@end
  • 我们添加了一个方法 openBrowser,用于使用指定的 url 打开浏览器。它接受单个参数 url。

- (void)openBrowser:(NSString *)urlString { 
   NSURL *url = [NSURL URLWithString:urlString]; 
   UIApplication *application = [UIApplication sharedApplication]; 
   [application openURL:url]; 
}
  • 在 didFinishLaunchingWithOptions 方法中,找到控制器并将其设置为 controller 变量。

FlutterViewController* controller = (FlutterViewController*)self.window.rootViewController;
  • 在 didFinishLaunchingWithOptions 方法中,将浏览器通道设置为 flutterapp.tutorialspoint.com/browse:

FlutterMethodChannel* browserChannel = [
   FlutterMethodChannel methodChannelWithName:
   @"flutterapp.tutorialspoint.com/browser" binaryMessenger:controller];
  • 创建一个变量 weakSelf 并设置当前类:

__weak typeof(self) weakSelf = self;
  • 现在,实现 setMethodCallHandler。通过匹配 call.method 调用 openBrowser。通过调用 call.arguments 获取 url,并在调用 openBrowser 时传递它。

[browserChannel setMethodCallHandler:^(FlutterMethodCall* call, FlutterResult result) {
   if ([@"openBrowser" isEqualToString:call.method]) { 
      NSString *url = call.arguments[@"url"];   
      [weakSelf openBrowser:url]; 
   } else { result(FlutterMethodNotImplemented); } 
}];
  • 完整代码如下:

#include "AppDelegate.h" 
#include "GeneratedPluginRegistrant.h" 
@implementation AppDelegate 

- (BOOL)application:(UIApplication *)application 
   didFinishLaunchingWithOptions:(NSDictionary *)launchOptions {
   
   // custom code starts 
   FlutterViewController* controller = (FlutterViewController*)self.window.rootViewController; 
   FlutterMethodChannel* browserChannel = [
      FlutterMethodChannel methodChannelWithName:
      @"flutterapp.tutorialspoint.com /browser" binaryMessenger:controller]; 
   
   __weak typeof(self) weakSelf = self; 
   [browserChannel setMethodCallHandler:^(
      FlutterMethodCall* call, FlutterResult result) { 
      
      if ([@"openBrowser" isEqualToString:call.method]) { 
         NSString *url = call.arguments[@"url"];
         [weakSelf openBrowser:url]; 
      } else { result(FlutterMethodNotImplemented); } 
   }]; 
   // custom code ends 
   [GeneratedPluginRegistrant registerWithRegistry:self]; 
   
   // Override point for customization after application launch. 
   return [super application:application didFinishLaunchingWithOptions:launchOptions]; 
}
- (void)openBrowser:(NSString *)urlString { 
   NSURL *url = [NSURL URLWithString:urlString]; 
   UIApplication *application = [UIApplication sharedApplication]; 
   [application openURL:url]; 
} 
@end
  • 打开项目设置。

  • 转到功能并启用后台模式

  • 添加*后台获取远程通知**

  • 现在,运行应用程序。它的工作原理与 Android 版本类似,但将打开 Safari 浏览器而不是 Chrome 浏览器。

Flutter - 包入门

Dart 组织和共享一组功能的方式是通过包。Dart 包仅仅是可共享的库或模块。通常,Dart 包与 Dart 应用程序相同,只是 Dart 包没有应用程序入口点 main。

包的通用结构(考虑一个演示包 my_demo_package)如下所示:

  • lib/src/* - 私有 Dart 代码文件。

  • lib/my_demo_package.dart - 主 Dart 代码文件。它可以像这样导入到应用程序中:

import 'package:my_demo_package/my_demo_package.dart'
  • 如果需要,其他私有代码文件可以导出到主代码文件(my_demo_package.dart)中,如下所示:

export src/my_private_code.dart
  • lib/* - 任意数量的 Dart 代码文件,以任何自定义文件夹结构排列。代码可以这样访问:

import 'package:my_demo_package/custom_folder/custom_file.dart'
  • pubspec.yaml - 项目规范,与应用程序相同。

包中的所有 Dart 代码文件都只是 Dart 类,并且 Dart 代码没有特殊要求才能将其包含在包中。

包的类型

由于 Dart 包基本上是相似功能的小集合,因此可以根据其功能进行分类。

Dart 包

通用 Dart 代码,可在 Web 和移动环境中使用。例如,english_words 就是这样一个包,它包含大约 5000 个单词,并具有诸如名词(列出英语中的名词)、音节(指定单词中的音节数)等基本实用程序函数。

Flutter 包

通用 Dart 代码,依赖于 Flutter 框架,只能在移动环境中使用。例如,fluro 是 Flutter 的自定义路由器。它依赖于 Flutter 框架。

Flutter 插件

通用 Dart 代码,依赖于 Flutter 框架以及底层平台代码(Android SDK 或 iOS SDK)。例如,camera 是一个与设备相机交互的插件。它依赖于 Flutter 框架以及底层框架来访问相机。

使用 Dart 包

Dart 包托管并发布到活动服务器 https://pub.dartlang.org。此外,Flutter 提供了一个简单的工具 pub 来管理应用程序中的 Dart 包。使用包所需的步骤如下:

  • 将包名称和所需的版本包含在 pubspec.yaml 中,如下所示:

dependencies: english_words: ^3.1.5
  • 可以通过检查在线服务器找到最新的版本号。

  • 使用以下命令将包安装到应用程序中:

flutter packages get
  • 在 Android Studio 中开发时,Android Studio 会检测 pubspec.yaml 中的任何更改,并向开发人员显示 Android Studio 包警报,如下所示:

Package Alert
  • 可以使用菜单选项在 Android Studio 中安装或更新 Dart 包。

  • 使用以下命令导入必要的文件并开始工作:

import 'package:english_words/english_words.dart';
  • 使用包中提供的任何方法:

nouns.take(50).forEach(print);
  • 在这里,我们使用 nouns 函数获取并打印前 50 个单词。

开发 Flutter 插件包

开发 Flutter 插件类似于开发 Dart 应用程序或 Dart 包。唯一的例外是插件将使用系统 API(Android 或 iOS)来获取所需的平台特定功能。

正如我们已经在前面的章节中学习了如何访问平台代码,让我们开发一个简单的插件 my_browser 来理解插件开发过程。my_browser 插件的功能是允许应用程序在平台特定的浏览器中打开给定的网站。

  • 启动 Android Studio。

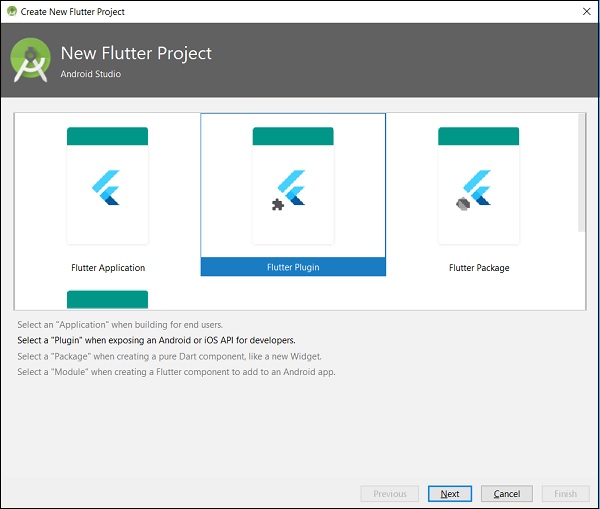
  • 点击文件 → 新建 Flutter 项目并选择 Flutter 插件选项。

  • 您会看到一个 Flutter 插件选择窗口,如下所示:

Flutter Plugin
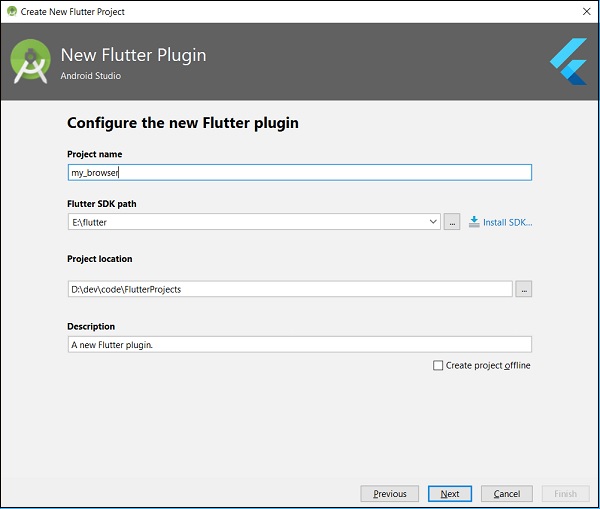
  • 输入 my_browser 作为项目名称,然后点击下一步。

  • 在窗口中输入插件名称和其他详细信息,如下所示:

Configure New Flutter Plugin
  • 在下面显示的窗口中输入公司域名 flutterplugins.tutorialspoint.com,然后点击完成。它将生成一个启动代码来开发我们的新插件。
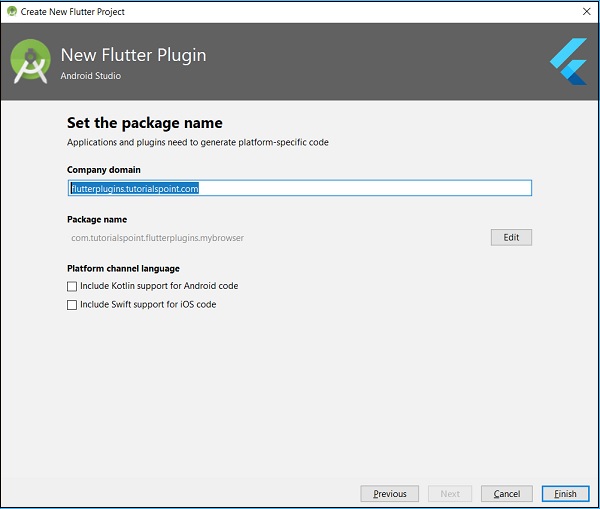
Package Name
  • 打开 my_browser.dart 文件并编写一个方法 openBrowser 来调用平台特定的 openBrowser 方法。

Future<void> openBrowser(String urlString) async { 
   try {
      final int result = await _channel.invokeMethod(
         'openBrowser', <String, String>{ 'url': urlString }
      );
   }
   on PlatformException catch (e) { 
      // Unable to open the browser print(e); 
   } 
}
  • 打开 MyBrowserPlugin.java 文件并导入以下类:

import android.app.Activity; 
import android.content.Intent; 
import android.net.Uri; 
import android.os.Bundle;
  • 在这里,我们必须导入从 Android 打开浏览器所需的库。

  • 在 MyBrowserPlugin 类中添加新的私有变量 mRegistrar,类型为 Registrar。

private final Registrar mRegistrar;
  • 在这里,Registrar 用于获取调用代码的上下文信息。

  • 添加一个构造函数,在 MyBrowserPlugin 类中设置 Registrar。

private MyBrowserPlugin(Registrar registrar) { 
   this.mRegistrar = registrar; 
}
  • 更改 registerWith 以在 MyBrowserPlugin 类中包含我们的新构造函数。

public static void registerWith(Registrar registrar) { 
   final MethodChannel channel = new MethodChannel(registrar.messenger(), "my_browser"); 
   MyBrowserPlugin instance = new MyBrowserPlugin(registrar); 
   channel.setMethodCallHandler(instance); 
}
  • 更改 onMethodCall 以在 MyBrowserPlugin 类中包含 openBrowser 方法。

@Override 
public void onMethodCall(MethodCall call, Result result) { 
   String url = call.argument("url");
   if (call.method.equals("getPlatformVersion")) { 
      result.success("Android " + android.os.Build.VERSION.RELEASE); 
   } 
   else if (call.method.equals("openBrowser")) { 
      openBrowser(call, result, url); 
   } else { 
      result.notImplemented(); 
   } 
}
  • 编写平台特定的 openBrowser 方法以在 MyBrowserPlugin 类中访问浏览器。

private void openBrowser(MethodCall call, Result result, String url) { 
   Activity activity = mRegistrar.activity(); 
   if (activity == null) {
      result.error("ACTIVITY_NOT_AVAILABLE", 
      "Browser cannot be opened without foreground activity", null); 
      return; 
   } 
   Intent intent = new Intent(Intent.ACTION_VIEW); 
   intent.setData(Uri.parse(url)); 
   activity.startActivity(intent); 
   result.success((Object) true); 
}
  • my_browser 插件的完整源代码如下:

my_browser.dart

import 'dart:async'; 
import 'package:flutter/services.dart'; 

class MyBrowser {
   static const MethodChannel _channel = const MethodChannel('my_browser'); 
   static Future<String> get platformVersion async { 
      final String version = await _channel.invokeMethod('getPlatformVersion'); return version; 
   } 
   Future<void> openBrowser(String urlString) async { 
      try {
         final int result = await _channel.invokeMethod(
            'openBrowser', <String, String>{'url': urlString}); 
      } 
      on PlatformException catch (e) { 
         // Unable to open the browser print(e); 
      }
   }
}

MyBrowserPlugin.java

package com.tutorialspoint.flutterplugins.my_browser; 

import io.flutter.plugin.common.MethodCall; 
import io.flutter.plugin.common.MethodChannel; 
import io.flutter.plugin.common.MethodChannel.MethodCallHandler; 
import io.flutter.plugin.common.MethodChannel.Result; 
import io.flutter.plugin.common.PluginRegistry.Registrar; 
import android.app.Activity; 
import android.content.Intent; 
import android.net.Uri; 
import android.os.Bundle; 

/** MyBrowserPlugin */ 
public class MyBrowserPlugin implements MethodCallHandler {
   private final Registrar mRegistrar; 
   private MyBrowserPlugin(Registrar registrar) { 
      this.mRegistrar = registrar; 
   } 
   /** Plugin registration. */
   public static void registerWith(Registrar registrar) {
      final MethodChannel channel = new MethodChannel(
         registrar.messenger(), "my_browser"); 
      MyBrowserPlugin instance = new MyBrowserPlugin(registrar); 
      channel.setMethodCallHandler(instance); 
   } 
   @Override 
   public void onMethodCall(MethodCall call, Result result) { 
      String url = call.argument("url"); 
      if (call.method.equals("getPlatformVersion")) { 
         result.success("Android " + android.os.Build.VERSION.RELEASE); 
      } 
      else if (call.method.equals("openBrowser")) { 
         openBrowser(call, result, url); 
      } else { 
         result.notImplemented(); 
      } 
   } 
   private void openBrowser(MethodCall call, Result result, String url) { 
      Activity activity = mRegistrar.activity(); 
      if (activity == null) {
         result.error("ACTIVITY_NOT_AVAILABLE",
            "Browser cannot be opened without foreground activity", null); 
         return; 
      }
      Intent intent = new Intent(Intent.ACTION_VIEW); 
      intent.setData(Uri.parse(url)); 
      activity.startActivity(intent); 
      result.success((Object) true); 
   } 
}
  • 创建一个新项目 my_browser_plugin_test 来测试我们新创建的插件。

  • 打开 pubspec.yaml 并将 my_browser 设置为插件依赖项。

dependencies: 
   flutter: 
      sdk: flutter 
   my_browser: 
      path: ../my_browser
  • Android Studio 将提示 pubspec.yaml 已更新,如下面的 Android Studio 包警报所示:

Android Studio Package Alert
  • 点击获取依赖项选项。Android Studio 将从 Internet 获取包并为应用程序正确配置它。

  • 打开 main.dart 并包含 my_browser 插件,如下所示:

import 'package:my_browser/my_browser.dart';
  • 从 my_browser 插件调用 openBrowser 函数,如下所示:

onPressed: () => MyBrowser().openBrowser("https://flutterdart.cn"),
  • main.dart 的完整代码如下:

import 'package:flutter/material.dart'; 
import 'package:my_browser/my_browser.dart'; 

void main() => runApp(MyApp()); 

class MyApp extends StatelessWidget { 
   @override 
   Widget build(BuildContext context) {
      return MaterialApp( 
         title: 'Flutter Demo', 
         theme: ThemeData( 
            primarySwatch: Colors.blue, 
         ), 
         home: MyHomePage(
            title: 'Flutter Demo Home Page'
         ), 
      );,
   }
} 
class MyHomePage extends StatelessWidget { 
   MyHomePage({Key key, this.title}) : super(key: key); 
   final String title; 
   @override 
   Widget build(BuildContext context) {
      return Scaffold(
         appBar: AppBar( 
            title: Text(this.title), 
         ), 
         body: Center(
            child: RaisedButton(
               child: Text('Open Browser'), 
               onPressed: () => MyBrowser().openBrowser("https://flutterdart.cn"), 
            ),
         ), 
      ); 
   }
}
  • 运行应用程序并点击“打开浏览器”按钮,您会看到浏览器已启动。您会看到浏览器应用程序 - 首页,如下图所示:
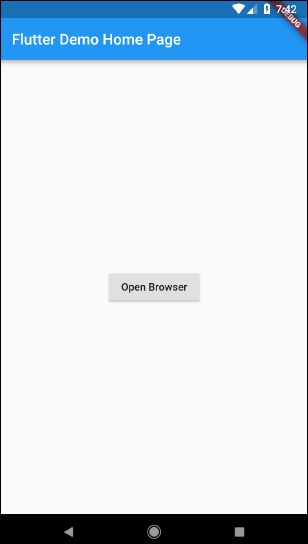
Open Browser

您会看到浏览器应用程序 - 浏览器屏幕,如下图所示:

Flutter Infrastructure

Flutter - 访问 REST API

Flutter 提供 http 包来使用 HTTP 资源。http 是一个基于 Future 的库,并使用 await 和 async 功能。它提供了许多高级方法,并简化了基于 REST 的移动应用程序的开发。

基本概念

http 包提供了一个高级类和 http 来执行 Web 请求。

  • http 类提供执行所有类型 HTTP 请求的功能。

  • http 方法接受一个 url,以及通过 Dart Map 的其他信息(发布数据、其他标头等)。它请求服务器并以异步/等待模式收集响应。例如,以下代码从指定的 url 读取数据并在控制台中打印它。

print(await http.read('https://flutterdart.cn/'));

一些核心方法如下:

  • read - 通过 GET 方法请求指定的 url 并将响应作为 Future<String> 返回

  • get - 通过 GET 方法请求指定的 url 并将响应作为 Future<Response> 返回。Response 是一个包含响应信息的类。

  • post - 通过 POST 方法请求指定的 url,发布提供的数据,并将响应作为 Future<Response> 返回

  • put - 通过 PUT 方法请求指定的 url 并将响应作为 Future <Response> 返回

  • head - 通过 HEAD 方法请求指定的 url 并将响应作为 Future<Response> 返回

  • delete - 通过 DELETE 方法请求指定的 url 并将响应作为 Future<Response> 返回

http 还提供了一个更标准的 HTTP 客户端类 client。client 支持持久连接。当要向特定服务器发出大量请求时,它将很有用。它需要使用 close 方法正确关闭。否则,它类似于 http 类。示例代码如下:

var client = new http.Client(); 
try { 
   print(await client.get('https://flutterdart.cn/')); 
} 
finally { 
   client.close(); 
}

访问产品服务 API

让我们创建一个简单的应用程序,从 Web 服务器获取产品数据,然后使用ListView显示产品。

  • 在 Android Studio 中创建一个新的Flutter应用程序,product_rest_app

  • 将默认的启动代码(main.dart)替换为我们的product_nav_app代码。

  • 将 assets 文件夹从product_nav_app复制到product_rest_app,并在 pubspec.yaml 文件中添加 assets。

flutter: 
   assets: 
      - assets/appimages/floppy.png 
      - assets/appimages/iphone.png 
      - assets/appimages/laptop.png 
      - assets/appimages/pendrive.png 
      - assets/appimages/pixel.png 
      - assets/appimages/tablet.png
  • 在 pubspec.yaml 文件中配置 http 包,如下所示:

dependencies: 
   http: ^0.12.0+2
  • 这里,我们将使用 http 包的最新版本。Android Studio 会发送一个包警报,提示 pubspec.yaml 已更新。

Latest Version
  • 点击获取依赖项选项。Android Studio 将从 Internet 获取包并为应用程序正确配置它。

  • 在 main.dart 文件中导入 http 包 -

import 'dart:async'; 
import 'dart:convert'; 
import 'package:http/http.dart' as http;
  • 创建一个新的 JSON 文件 products.json,其中包含如下所示的产品信息 -

[ 
   { 
      "name": "iPhone", 
      "description": "iPhone is the stylist phone ever", 
      "price": 1000, 
      "image": "iphone.png" 
   }, 
   { 
      "name": "Pixel", 
      "description": "Pixel is the most feature phone ever", 
      "price": 800, 
      "image": "pixel.png"
   }, 
   { 
      "name": "Laptop", 
      "description": "Laptop is most productive development tool", 
      "price": 2000, 
      "image": "laptop.png" 
   }, 
   { 
      "name": "Tablet", 
      "description": "Tablet is the most useful device ever for meeting", 
      "price": 1500, 
      "image": "tablet.png" 
   }, 
   { 
      "name": "Pendrive", 
      "description": "Pendrive is useful storage medium", 
      "price": 100, 
      "image": "pendrive.png" 
   }, 
   { 
      "name": "Floppy Drive", 
      "description": "Floppy drive is useful rescue storage medium", 
      "price": 20, 
      "image": "floppy.png" 
   } 
]
  • 创建一个新文件夹 JSONWebServer,并将 JSON 文件 products.json 放入其中。

  • 运行任何以 JSONWebServer 作为根目录的 Web 服务器,并获取其 Web 路径。例如,http://192.168.184.1:8000/products.json。我们可以使用任何 Web 服务器,如 Apache、Nginx 等。

  • 最简单的方法是安装基于 Node 的 http-server 应用程序。请按照以下步骤安装和运行 http-server 应用程序

    • 安装 Nodejs 应用程序 (nodejs.org)

    • 转到 JSONWebServer 文件夹。

cd /path/to/JSONWebServer
  • 使用 npm 安装 http-server 包。

npm install -g http-server
  • 现在,运行服务器。

http-server . -p 8000 

Starting up http-server, serving . 
Available on: 
   http://192.168.99.1:8000
   http://127.0.0.1:8000 
   Hit CTRL-C to stop the server
  • 在 lib 文件夹中创建一个新文件 Product.dart,并将 Product 类移动到其中。

  • 在 Product 类中编写一个工厂构造函数 Product.fromMap,用于将映射数据 Map 转换为 Product 对象。通常,JSON 文件将被转换为 Dart Map 对象,然后转换为相关的对象(Product)。

factory Product.fromJson(Map<String, dynamic> data) {
   return Product(
      data['name'],
      data['description'], 
      data['price'],
      data['image'],
   );
}
  • Product.dart 的完整代码如下 -

class Product {
   final String name; 
   final String description;
   final int price;
   final String image; 
   
   Product(this.name, this.description, this.price, this.image); 
   factory Product.fromMap(Map<String, dynamic> json) { 
      return Product( 
         json['name'], 
         json['description'], 
         json['price'], 
         json['image'], 
      );
   }
}
  • 在主类中编写两个方法 - parseProducts 和 fetchProducts - 从 Web 服务器获取并加载产品信息到 List<Product> 对象中。

List<Product> parseProducts(String responseBody) { 
   final parsed = json.decode(responseBody).cast<Map<String, dynamic>>(); 
   return parsed.map<Product>((json) =>Product.fromJson(json)).toList(); 
} 
Future<List<Product>> fetchProducts() async { 
   final response = await http.get('http://192.168.1.2:8000/products.json'); 
   if (response.statusCode == 200) { 
      return parseProducts(response.body); 
   } else { 
      throw Exception('Unable to fetch products from the REST API');
   } 
}
  • 请注意以下几点 -

    • Future 用于延迟加载产品信息。延迟加载是一个推迟代码执行直到必要时的概念。

    • http.get 用于从互联网获取数据。

    • json.decode 用于将 JSON 数据解码为 Dart Map 对象。JSON 数据解码后,将使用 Product 类的 fromMap 方法将其转换为 List<Product>。

    • 在 MyApp 类中,添加新的成员变量 products,类型为 Future<Product>,并在构造函数中包含它。

class MyApp extends StatelessWidget { 
   final Future<List<Product>> products; 
   MyApp({Key key, this.products}) : super(key: key); 
   ...
  • 在 MyHomePage 类中,添加新的成员变量 products,类型为 Future<Product>,并在构造函数中包含它。此外,移除 items 变量及其相关方法,getProducts 方法调用。将 products 变量放在构造函数中。这将允许仅在应用程序首次启动时从互联网获取产品。

class MyHomePage extends StatelessWidget { 
   final String title; 
   final Future<ListList<Product>> products; 
   MyHomePage({Key key, this.title, this.products}) : super(key: key); 
   ...
  • 更改 MyApp 组件的 build 方法中的 home 选项(MyHomePage)以适应上述更改 -

home: MyHomePage(title: 'Product Navigation demo home page', products: products),
  • 更改 main 函数以包含 Future<Product> 参数 -

void main() => runApp(MyApp(fetchProduct()));
  • 创建一个新的组件 ProductBoxList,用于在主页上构建产品列表。

class ProductBoxList extends StatelessWidget { 
   final List<Product> items;
   ProductBoxList({Key key, this.items}); 
   
   @override 
   Widget build(BuildContext context) {
      return ListView.builder(
         itemCount: items.length,
         itemBuilder: (context, index) {
            return GestureDetector(
               child: ProductBox(item: items[index]), 
               onTap: () {
                  Navigator.push(
                     context, MaterialPageRoute(
                        builder: (context) =gt; ProductPage(item: items[index]), 
                     ), 
                  ); 
               }, 
            ); 
         }, 
      ); 
   } 
}

请注意,我们使用了与导航应用程序中相同的方法来列出产品,只是将其设计为一个单独的组件,并传递类型为 List<Product> 的 products(对象)。

  • 最后,修改 MyHomePage 组件的 build 方法,使用 Future 选项而不是普通方法调用来获取产品信息。

Widget build(BuildContext context) { 
   return Scaffold(
      appBar: AppBar(title: Text("Product Navigation")),
      body: Center(
         child: FutureBuilder<List<Product>>(
            future: products, builder: (context, snapshot) {
               if (snapshot.hasError) print(snapshot.error); 
               return snapshot.hasData ? ProductBoxList(items: snapshot.data)
               
               // return the ListView widget : 
               Center(child: CircularProgressIndicator()); 
            }, 
         ), 
      )
   ); 
}
  • 这里要注意,我们使用了 FutureBuilder 组件来渲染组件。FutureBuilder 将尝试从其 future 属性(类型为 Future<List<Product>>)获取数据。如果 future 属性返回数据,它将使用 ProductBoxList 渲染组件,否则会抛出错误。

  • main.dart 的完整代码如下:

import 'package:flutter/material.dart'; 
import 'dart:async'; 
import 'dart:convert'; 
import 'package:http/http.dart' as http; 
import 'Product.dart'; 

void main() => runApp(MyApp(products: fetchProducts())); 

List<Product> parseProducts(String responseBody) { 
   final parsed = json.decode(responseBody).cast<Map<String, dynamic>>(); 
   return parsed.map<Product>((json) => Product.fromMap(json)).toList(); 
} 
Future<List<Product>> fetchProducts() async { 
   final response = await http.get('http://192.168.1.2:8000/products.json'); 
   if (response.statusCode == 200) { 
      return parseProducts(response.body); 
   } else { 
      throw Exception('Unable to fetch products from the REST API'); 
   } 
}
class MyApp extends StatelessWidget {
   final Future<List<Product>> products; 
   MyApp({Key key, this.products}) : super(key: key); 
   
   // This widget is the root of your application. 
   @override 
   Widget build(BuildContext context) {
      return MaterialApp(
         title: 'Flutter Demo', 
         theme: ThemeData( 
            primarySwatch: Colors.blue, 
         ), 
         home: MyHomePage(title: 'Product Navigation demo home page', products: products), 
      ); 
   }
}
class MyHomePage extends StatelessWidget { 
   final String title; 
   final Future<List<Product>> products; 
   MyHomePage({Key key, this.title, this.products}) : super(key: key); 
   
   // final items = Product.getProducts();
   @override 
   Widget build(BuildContext context) { 
      return Scaffold(
         appBar: AppBar(title: Text("Product Navigation")), 
         body: Center(
            child: FutureBuilder<List<Product>>(
               future: products, builder: (context, snapshot) {
                  if (snapshot.hasError) print(snapshot.error); 
                  return snapshot.hasData ? ProductBoxList(items: snapshot.data) 
                  
                  // return the ListView widget : 
                  Center(child: CircularProgressIndicator()); 
               },
            ),
         )
      );
   }
}
class ProductBoxList extends StatelessWidget {
   final List<Product> items; 
   ProductBoxList({Key key, this.items}); 
   
   @override 
   Widget build(BuildContext context) {
      return ListView.builder(
         itemCount: items.length, 
         itemBuilder: (context, index) { 
            return GestureDetector( 
               child: ProductBox(item: items[index]), 
               onTap: () { 
                  Navigator.push(
                     context, MaterialPageRoute( 
                        builder: (context) => ProductPage(item: items[index]), 
                     ), 
                  ); 
               }, 
            ); 
         }, 
      ); 
   } 
} 
class ProductPage extends StatelessWidget { 
   ProductPage({Key key, this.item}) : super(key: key); 
   final Product item; 
   @override 
   Widget build(BuildContext context) {
      return Scaffold(
         appBar: AppBar(title: Text(this.item.name),), 
         body: Center( 
            child: Container(
               padding: EdgeInsets.all(0), 
               child: Column( 
                  mainAxisAlignment: MainAxisAlignment.start, 
                  crossAxisAlignment: CrossAxisAlignment.start, 
                  children: <Widget>[
                     Image.asset("assets/appimages/" + this.item.image), 
                     Expanded( 
                        child: Container( 
                           padding: EdgeInsets.all(5), 
                           child: Column( 
                              mainAxisAlignment: MainAxisAlignment.spaceEvenly, 
                              children: <Widget>[ 
                                 Text(this.item.name, style: 
                                    TextStyle(fontWeight: FontWeight.bold)), 
                                 Text(this.item.description), 
                                 Text("Price: " + this.item.price.toString()), 
                                 RatingBox(), 
                              ], 
                           )
                        )
                     ) 
                  ]
               ), 
            ), 
         ), 
      ); 
   } 
}
class RatingBox extends StatefulWidget { 
   @override 
   _RatingBoxState createState() =>_RatingBoxState(); 
} 
class _RatingBoxState extends State<RatingBox> { 
   int _rating = 0; 
   void _setRatingAsOne() {
      setState(() { 
         _rating = 1; 
      }); 
   }
   void _setRatingAsTwo() {
      setState(() {
         _rating = 2; 
      }); 
   }
   void _setRatingAsThree() { 
      setState(() {
         _rating = 3; 
      }); 
   }
   Widget build(BuildContext context) {
      double _size = 20; 
      print(_rating); 
      return Row(
         mainAxisAlignment: MainAxisAlignment.end, 
         crossAxisAlignment: CrossAxisAlignment.end, 
         mainAxisSize: MainAxisSize.max, 
         
         children: <Widget>[
            Container(
               padding: EdgeInsets.all(0), 
               child: IconButton( 
                  icon: (
                     _rating >= 1 
                     ? Icon(Icons.star, ize: _size,) 
                     : Icon(Icons.star_border, size: _size,)
                  ), 
                  color: Colors.red[500], onPressed: _setRatingAsOne, iconSize: _size, 
               ), 
            ), 
            Container(
               padding: EdgeInsets.all(0), 
               child: IconButton(
                  icon: (
                     _rating >= 2 
                     ? Icon(Icons.star, size: _size,) 
                     : Icon(Icons.star_border, size: _size, )
                  ), 
                  color: Colors.red[500], 
                  onPressed: _setRatingAsTwo, 
                  iconSize: _size, 
               ), 
            ), 
            Container(
               padding: EdgeInsets.all(0), 
               child: IconButton(
                  icon: (
                     _rating >= 3 ? 
                     Icon(Icons.star, size: _size,)
                     : Icon(Icons.star_border, size: _size,)
                  ), 
                  color: Colors.red[500], 
                  onPressed: _setRatingAsThree, 
                  iconSize: _size, 
               ), 
            ), 
         ], 
      ); 
   } 
}
class ProductBox extends StatelessWidget {
   ProductBox({Key key, this.item}) : super(key: key); 
   final Product item; 
   
   Widget build(BuildContext context) {
      return Container(
         padding: EdgeInsets.all(2), height: 140, 
         child: Card(
            child: Row( 
               mainAxisAlignment: MainAxisAlignment.spaceEvenly, 
               children: <Widget>[
                  Image.asset("assets/appimages/" + this.item.image), 
                  Expanded( 
                     child: Container( 
                        padding: EdgeInsets.all(5), 
                        child: Column( 
                           mainAxisAlignment: MainAxisAlignment.spaceEvenly, 
                           children: <Widget>[ 
                              Text(this.item.name, style:TextStyle(fontWeight: FontWeight.bold)), 
                              Text(this.item.description), 
                              Text("Price: " + this.item.price.toString()), 
                              RatingBox(), 
                           ], 
                        )
                     )
                  )
               ]
            ), 
         )
      ); 
   } 
}

最后运行应用程序以查看结果。它与我们的 Navigation 示例相同,只是数据来自互联网,而不是在编写应用程序时输入的本地静态数据。

Flutter - 数据库概念

Flutter 提供了许多与数据库交互的高级包。最重要的包包括 -

  • sqflite - 用于访问和操作 SQLite 数据库,以及

  • firebase_database - 用于访问和操作来自 Google 的云托管 NoSQL 数据库。

在本章中,让我们详细讨论每个包。

SQLite

SQLite 数据库是事实上的标准 SQL 基嵌入式数据库引擎。它是一个小巧且经过时间考验的数据库引擎。sqflite 包提供了许多功能,可以有效地使用 SQLite 数据库。它提供了标准的方法来操作 SQLite 数据库引擎。sqflite 包提供的核心功能如下 -

  • 创建/打开(openDatabase 方法)一个 SQLite 数据库。

  • 对 SQLite 数据库执行 SQL 语句(execute 方法)。

  • 高级查询方法(query 方法),以减少查询和获取 SQLite 数据库信息所需的代码。

让我们创建一个产品应用程序,使用 sqflite 包从标准的 SQLite 数据库引擎中存储和获取产品信息,并了解 SQLite 数据库和 sqflite 包背后的概念。

  • 在 Android Studio 中创建一个新的 Flutter 应用程序 product_sqlite_app。

  • 将默认的启动代码(main.dart)替换为我们的 product_rest_app 代码。

  • product_nav_app 中的 assets 文件夹复制到 product_rest_app 中,并在 *pubspec.yaml` 文件中添加 assets。

flutter: 
   assets: 
      - assets/appimages/floppy.png 
      - assets/appimages/iphone.png 
      - assets/appimages/laptop.png 
      - assets/appimages/pendrive.png 
      - assets/appimages/pixel.png 
      - assets/appimages/tablet.png
  • 在 pubspec.yaml 文件中配置 sqflite 包,如下所示 -

dependencies: sqflite: any

使用 sqflite 的最新版本号代替 any

  • 在 pubspec.yaml 文件中配置 path_provider 包,如下所示 -

dependencies: path_provider: any
  • 这里,path_provider 包用于获取系统的临时文件夹路径和应用程序的路径。使用 sqflite 的最新版本号代替 any

  • Android Studio 会提示 pubspec.yaml 已更新。

Updated
  • 点击获取依赖项选项。Android Studio 将从 Internet 获取包并为应用程序正确配置它。

  • 在数据库中,我们需要主键 id 作为附加字段,以及产品属性,如名称、价格等。因此,在 Product 类中添加 id 属性。此外,添加一个新方法 toMap,用于将产品对象转换为 Map 对象。fromMap 和 toMap 用于序列化和反序列化 Product 对象,它用于数据库操作方法。

class Product { 
   final int id; 
   final String name; 
   final String description; 
   final int price; 
   final String image; 
   static final columns = ["id", "name", "description", "price", "image"]; 
   Product(this.id, this.name, this.description, this.price, this.image); 
   factory Product.fromMap(Map<String, dynamic> data) {
      return Product( 
         data['id'], 
         data['name'], 
         data['description'], 
         data['price'], 
         data['image'], 
      ); 
   } 
   Map<String, dynamic> toMap() => {
      "id": id, 
      "name": name, 
      "description": description, 
      "price": price, 
      "image": image 
   }; 
}
  • 在 lib 文件夹中创建一个新文件 Database.dart,用于编写 SQLite 相关的功能。

  • 在 Database.dart 中导入必要的导入语句。

import 'dart:async'; 
import 'dart:io'; 
import 'package:path/path.dart'; 
import 'package:path_provider/path_provider.dart'; 
import 'package:sqflite/sqflite.dart'; 
import 'Product.dart';
  • 请注意以下几点 -

    • async 用于编写异步方法。

    • io 用于访问文件和目录。

    • path 用于访问与文件路径相关的 Dart 核心实用程序函数。

    • path_provider 用于获取临时路径和应用程序路径。

    • sqflite 用于操作 SQLite 数据库。

  • 创建一个新类 SQLiteDbProvider

  • 声明一个基于单例的静态 SQLiteDbProvider 对象,如下所示 -

class SQLiteDbProvider { 
   SQLiteDbProvider._(); 
   static final SQLiteDbProvider db = SQLiteDbProvider._(); 
   static Database _database; 
}
  • SQLiteDBProvoider 对象及其方法可以通过静态变量 db 访问。

SQLiteDBProvoider.db.<emthod>
  • 创建一个获取数据库(Future 选项)的方法,类型为 Future<Database>。在创建数据库时创建产品表并加载初始数据。

Future<Database> get database async { 
   if (_database != null) 
   return _database; 
   _database = await initDB(); 
   return _database; 
}
initDB() async { 
   Directory documentsDirectory = await getApplicationDocumentsDirectory(); 
   String path = join(documentsDirectory.path, "ProductDB.db"); 
   return await openDatabase(
      path, 
      version: 1,
      onOpen: (db) {}, 
      onCreate: (Database db, int version) async {
         await db.execute(
            "CREATE TABLE Product ("
            "id INTEGER PRIMARY KEY,"
            "name TEXT,"
            "description TEXT,"
            "price INTEGER," 
            "image TEXT" ")"
         ); 
         await db.execute(
            "INSERT INTO Product ('id', 'name', 'description', 'price', 'image') 
            values (?, ?, ?, ?, ?)", 
            [1, "iPhone", "iPhone is the stylist phone ever", 1000, "iphone.png"]
         ); 
         await db.execute(
            "INSERT INTO Product ('id', 'name', 'description', 'price', 'image') 
            values (?, ?, ?, ?, ?)", 
            [2, "Pixel", "Pixel is the most feature phone ever", 800, "pixel.png"]
         ); 
         await db.execute(
            "INSERT INTO Product ('id', 'name', 'description', 'price', 'image') 
            values (?, ?, ?, ?, ?)", 
            [3, "Laptop", "Laptop is most productive development tool", 2000, "laptop.png"]\
         ); 
         await db.execute( 
            "INSERT INTO Product ('id', 'name', 'description', 'price', 'image') 
            values (?, ?, ?, ?, ?)", 
            [4, "Tablet", "Laptop is most productive development tool", 1500, "tablet.png"]
         );
         await db.execute( 
            "INSERT INTO Product 
            ('id', 'name', 'description', 'price', 'image') 
            values (?, ?, ?, ?, ?)", 
            [5, "Pendrive", "Pendrive is useful storage medium", 100, "pendrive.png"]
         );
         await db.execute( 
            "INSERT INTO Product 
            ('id', 'name', 'description', 'price', 'image') 
            values (?, ?, ?, ?, ?)", 
            [6, "Floppy Drive", "Floppy drive is useful rescue storage medium", 20, "floppy.png"]
         ); 
      }
   ); 
}
  • 这里,我们使用了以下方法 -

    • getApplicationDocumentsDirectory - 返回应用程序目录路径

    • join - 用于创建特定于系统的路径。我们使用它来创建数据库路径。

    • openDatabase - 用于打开 SQLite 数据库

    • onOpen - 用于在打开数据库时编写代码

    • onCreate - 用于在首次创建数据库时编写代码

    • db.execute - 用于执行 SQL 查询。它接受一个查询。如果查询有占位符(?),则它接受第二个参数中的值列表。

  • 编写一个方法来获取数据库中的所有产品 -

Future<List<Product>> getAllProducts() async { 
   final db = await database; 
   List<Map> 
   results = await db.query("Product", columns: Product.columns, orderBy: "id ASC"); 
   
   List<Product> products = new List(); 
   results.forEach((result) { 
      Product product = Product.fromMap(result); 
      products.add(product); 
   }); 
   return products; 
}
  • 这里,我们做了以下操作 -

    • 使用 query 方法获取所有产品信息。query 提供了一种快捷方式来查询表信息,而无需编写整个查询。query 方法将根据我们的输入(如列、orderBy 等)自己生成正确的查询。

    • 使用 Product 的 fromMap 方法,通过循环结果对象获取产品详细信息,结果对象包含表中的所有行。

  • 编写一个方法来获取特定于 id 的产品

Future<Product> getProductById(int id) async {
   final db = await database; 
   var result = await db.query("Product", where: "id = ", whereArgs: [id]); 
   return result.isNotEmpty ? Product.fromMap(result.first) : Null; 
}
  • 这里,我们使用了 where 和 whereArgs 来应用过滤器。

  • 创建三个方法 - insert、update 和 delete 方法,用于插入、更新和删除数据库中的产品。

insert(Product product) async { 
   final db = await database; 
   var maxIdResult = await db.rawQuery(
      "SELECT MAX(id)+1 as last_inserted_id FROM Product");

   var id = maxIdResult.first["last_inserted_id"]; 
   var result = await db.rawInsert(
      "INSERT Into Product (id, name, description, price, image)" 
      " VALUES (?, ?, ?, ?, ?)", 
      [id, product.name, product.description, product.price, product.image] 
   ); 
   return result; 
}
update(Product product) async { 
   final db = await database; 
   var result = await db.update("Product", product.toMap(), 
   where: "id = ?", whereArgs: [product.id]); return result; 
} 
delete(int id) async { 
   final db = await database; 
   db.delete("Product", where: "id = ?", whereArgs: [id]); 
}
  • Database.dart 的最终代码如下 -

import 'dart:async'; 
import 'dart:io'; 
import 'package:path/path.dart'; 
import 'package:path_provider/path_provider.dart'; 
import 'package:sqflite/sqflite.dart'; 
import 'Product.dart'; 

class SQLiteDbProvider {
   SQLiteDbProvider._(); 
   static final SQLiteDbProvider db = SQLiteDbProvider._(); 
   static Database _database; 
   
   Future<Database> get database async {
      if (_database != null) 
      return _database; 
      _database = await initDB(); 
      return _database; 
   } 
   initDB() async {
      Directory documentsDirectory = await 
      getApplicationDocumentsDirectory(); 
      String path = join(documentsDirectory.path, "ProductDB.db"); 
      return await openDatabase(
         path, version: 1, 
         onOpen: (db) {}, 
         onCreate: (Database db, int version) async {
            await db.execute(
               "CREATE TABLE Product (" 
               "id INTEGER PRIMARY KEY," 
               "name TEXT," 
               "description TEXT," 
               "price INTEGER," 
               "image TEXT"")"
            ); 
            await db.execute(
               "INSERT INTO Product ('id', 'name', 'description', 'price', 'image') 
               values (?, ?, ?, ?, ?)", 
               [1, "iPhone", "iPhone is the stylist phone ever", 1000, "iphone.png"]
            ); 
            await db.execute( 
               "INSERT INTO Product ('id', 'name', 'description', 'price', 'image') 
               values (?, ?, ?, ?, ?)", 
               [2, "Pixel", "Pixel is the most feature phone ever", 800, "pixel.png"]
            );
            await db.execute(
               "INSERT INTO Product ('id', 'name', 'description', 'price', 'image') 
               values (?, ?, ?, ?, ?)", 
               [3, "Laptop", "Laptop is most productive development tool", 2000, "laptop.png"]
            ); 
            await db.execute( 
               "INSERT INTO Product ('id', 'name', 'description', 'price', 'image') 
               values (?, ?, ?, ?, ?)", 
               [4, "Tablet", "Laptop is most productive development tool", 1500, "tablet.png"]
            ); 
            await db.execute( 
               "INSERT INTO Product ('id', 'name', 'description', 'price', 'image') 
               values (?, ?, ?, ?, ?)", 
               [5, "Pendrive", "Pendrive is useful storage medium", 100, "pendrive.png"]
            );
            await db.execute( 
               "INSERT INTO Product ('id', 'name', 'description', 'price', 'image') 
               values (?, ?, ?, ?, ?)", 
               [6, "Floppy Drive", "Floppy drive is useful rescue storage medium", 20, "floppy.png"]
            ); 
         }
      ); 
   }
   Future<List<Product>> getAllProducts() async {
      final db = await database; 
      List<Map> results = await db.query(
         "Product", columns: Product.columns, orderBy: "id ASC"
      ); 
      List<Product> products = new List();   
      results.forEach((result) {
         Product product = Product.fromMap(result); 
         products.add(product); 
      }); 
      return products; 
   } 
   Future<Product> getProductById(int id) async {
      final db = await database; 
      var result = await db.query("Product", where: "id = ", whereArgs: [id]); 
      return result.isNotEmpty ? Product.fromMap(result.first) : Null; 
   } 
   insert(Product product) async { 
      final db = await database; 
      var maxIdResult = await db.rawQuery("SELECT MAX(id)+1 as last_inserted_id FROM Product"); 
      var id = maxIdResult.first["last_inserted_id"]; 
      var result = await db.rawInsert(
         "INSERT Into Product (id, name, description, price, image)" 
         " VALUES (?, ?, ?, ?, ?)", 
         [id, product.name, product.description, product.price, product.image] 
      ); 
      return result; 
   } 
   update(Product product) async { 
      final db = await database; 
      var result = await db.update(
         "Product", product.toMap(), where: "id = ?", whereArgs: [product.id]
      ); 
      return result; 
   } 
   delete(int id) async { 
      final db = await database; 
      db.delete("Product", where: "id = ?", whereArgs: [id]);
   } 
}
  • 更改 main 方法以获取产品信息。

void main() {
   runApp(MyApp(products: SQLiteDbProvider.db.getAllProducts())); 
}
  • 这里,我们使用了 getAllProducts 方法从数据库中获取所有产品。

  • 运行应用程序并查看结果。它将类似于前面的示例 Accessing Product service API,只是产品信息存储在本地 SQLite 数据库中并从中获取。

云 Firestore

Firebase 是一个 BaaS 应用开发平台。它提供了许多功能来加速移动应用程序开发,例如身份验证服务、云存储等。Firebase 的主要功能之一是 Cloud Firestore,一个基于云的实时 NoSQL 数据库。

Flutter 提供了一个特殊的包 cloud_firestore 来使用 Cloud Firestore。让我们在 Cloud Firestore 中创建一个在线产品商店,并创建一个应用程序来访问该产品商店。

  • 在 Android Studio 中创建一个新的 Flutter 应用程序 product_firebase_app。

  • 将默认的启动代码(main.dart)替换为我们的 product_rest_app 代码。

  • 将 product_rest_app 中的 Product.dart 文件复制到 lib 文件夹中。

class Product { 
   final String name; 
   final String description; 
   final int price; 
   final String image; 
   
   Product(this.name, this.description, this.price, this.image); 
   factory Product.fromMap(Map<String, dynamic> json) {
      return Product( 
         json['name'], 
         json['description'], 
         json['price'], 
         json['image'], 
      ); 
   }
}
  • 将 product_rest_app 中的 assets 文件夹复制到 product_firebase_app 中,并在 pubspec.yaml 文件中添加 assets。

flutter:
   assets: 
   - assets/appimages/floppy.png 
   - assets/appimages/iphone.png 
   - assets/appimages/laptop.png 
   - assets/appimages/pendrive.png 
   - assets/appimages/pixel.png 
   - assets/appimages/tablet.png
  • 在 pubspec.yaml 文件中配置 cloud_firestore 包,如下所示 -

dependencies: cloud_firestore: ^0.9.13+1
  • 这里,使用 cloud_firestore 包的最新版本。

  • Android Studio 会提示 pubspec.yaml 已更新,如下所示 -

Cloud Firestore Package
  • 点击获取依赖项选项。Android Studio 将从 Internet 获取包并为应用程序正确配置它。

  • 按照以下步骤在 Firebase 中创建一个项目 -

    • 通过在 https://firebase.google.com/pricing/. 选择免费计划来创建一个 Firebase 帐户。

    • 创建 Firebase 帐户后,它将重定向到项目概览页面。它列出了所有基于 Firebase 的项目,并提供了一个创建新项目的选项。

    • 点击添加项目,它将打开一个项目创建页面。

    • 输入 products app db 作为项目名称,然后点击创建项目选项。

    • 转到 *Firebase 控制台。

    • 点击项目概览。它将打开项目概览页面。

    • 点击 Android 图标。它将打开特定于 Android 开发的项目设置。

    • 输入 Android 包名称 com.tutorialspoint.flutterapp.product_firebase_app。

    • 点击注册应用程序。它将生成一个项目配置文件 google_service.json。

    • 下载 google_service.json,然后将其移动到项目的 android/app 目录中。此文件是我们的应用程序和 Firebase 之间的连接。

    • 打开 android/app/build.gradle 并包含以下代码 -

apply plugin: 'com.google.gms.google-services'
    • 打开 android/build.gradle 并包含以下配置 -

buildscript {
   repositories { 
      // ... 
   } 
   dependencies { 
      // ... 
      classpath 'com.google.gms:google-services:3.2.1' // new 
   } 
}

    这里,插件和类路径用于读取 google_service.json 文件。

    • 打开 android/app/build.gradle 并包含以下代码。

android {
   defaultConfig { 
      ... 
      multiDexEnabled true 
   } 
   ...
}
dependencies {
   ... 
   compile 'com.android.support: multidex:1.0.3' 
}

    此依赖项使 Android 应用程序能够使用多 dex 功能。

    • 按照 Firebase 控制台中的其余步骤操作,或跳过。

  • 使用以下步骤在新创建的项目中创建产品存储 -

    • 转到 Firebase 控制台。

    • 打开新创建的项目。

    • 单击左侧菜单中的“数据库”选项。

    • 单击“创建数据库”选项。

    • 单击“以测试模式启动”,然后单击“启用”。

    • 单击“添加集合”。输入“product”作为集合名称,然后单击“下一步”。

    • 输入此处图像中所示的示例产品信息 -

Sample Product Information
  • 使用添加文档选项添加其他产品信息。

  • 打开 main.dart 文件并导入 Cloud Firestore 插件文件,并删除 http 包。

import 'package:cloud_firestore/cloud_firestore.dart';
  • 删除 parseProducts 并更新 fetchProducts 以从 Cloud Firestore 而不是 Product 服务 API 中获取产品。

Stream<QuerySnapshot> fetchProducts() { 
   return Firestore.instance.collection('product').snapshots(); }
  • 在这里,Firestore.instance.collection 方法用于访问云存储中可用的 product 集合。Firestore.instance.collection 提供了许多选项来过滤集合以获取必要的文档。但是,我们没有应用任何过滤器来获取所有产品信息。

  • Cloud Firestore 通过 Dart Stream 概念提供集合,因此将 MyApp 和 MyHomePage 小部件中的 products 类型从 Future<list<Product>> 修改为 Stream<QuerySnapshot>。

  • 更改 MyHomePage 小部件的 build 方法以使用 StreamBuilder 而不是 FutureBuilder。

@override 
Widget build(BuildContext context) {
   return Scaffold(
      appBar: AppBar(title: Text("Product Navigation")), 
      body: Center(
         child: StreamBuilder<QuerySnapshot>(
            stream: products, builder: (context, snapshot) {
               if (snapshot.hasError) print(snapshot.error); 
               if(snapshot.hasData) {
                  List<DocumentSnapshot> 
                  documents = snapshot.data.documents; 
                  
                  List<Product> 
                  items = List<Product>(); 
                  
                  for(var i = 0; i < documents.length; i++) { 
                     DocumentSnapshot document = documents[i]; 
                     items.add(Product.fromMap(document.data)); 
                  } 
                  return ProductBoxList(items: items);
               } else { 
                  return Center(child: CircularProgressIndicator()); 
               }
            }, 
         ), 
      )
   ); 
}
  • 在这里,我们已将产品信息作为 List<DocumentSnapshot> 类型获取。由于我们的 Widget ProductBoxList 与文档不兼容,因此我们将文档转换为 List<Product> 类型,并进一步使用它。

  • 最后,运行应用程序并查看结果。由于我们使用了与SQLite 应用程序相同的 product 信息,并且仅更改了存储介质,因此生成的应用程序与SQLite 应用程序应用程序看起来相同。

Flutter - 国际化

如今,移动应用程序被来自不同国家的客户使用,因此应用程序需要以不同的语言显示内容。使应用程序能够以多种语言工作称为国际化应用程序。

为了使应用程序能够以不同的语言工作,它首先应该找到正在运行应用程序的系统的当前区域设置,然后需要以该特定区域设置显示其内容,此过程称为本地化。

Flutter 框架为本地化提供了三个基本类和从基本类派生的扩展实用程序类,以本地化应用程序。

基本类如下 -

  • Locale - Locale 是一个用于识别用户语言的类。例如,en-us 表示美式英语,可以创建为。

Locale en_locale = Locale('en', 'US')

这里,第一个参数是语言代码,第二个参数是国家/地区代码。创建阿根廷西班牙语 (es-ar)区域设置的另一个示例如下 -

Locale es_locale = Locale('es', 'AR')
  • Localizations - Localizations 是一个通用的 Widget,用于设置其子级的区域设置和本地化资源。

class CustomLocalizations { 
   CustomLocalizations(this.locale); 
   final Locale locale; 
   static CustomLocalizations of(BuildContext context) { 
      return Localizations.of<CustomLocalizations>(context, CustomLocalizations); 
   } 
   static Map<String, Map<String, String>> _resources = {
      'en': {
         'title': 'Demo', 
         'message': 'Hello World' 
      }, 
      'es': {
         'title': 'Manifestación', 
         'message': 'Hola Mundo', 
      }, 
   }; 
   String get title { 
      return _resources[locale.languageCode]['title']; 
   }
   String get message { 
      return _resources[locale.languageCode]['message']; 
   } 
}
  • 这里,CustomLocalizations 是一个新创建的自定义类,专门用于为 Widget 获取某些本地化内容(标题和消息)。of 方法使用 Localizations 类返回新的 CustomLocalizations 类。

  • LocalizationsDelegate<T> - LocalizationsDelegate<T> 是一个工厂类,通过它加载 Localizations Widget。它有三个可重写的方法 -

    • isSupported - 接受一个区域设置并返回指定的区域设置是否受支持。

@override 
bool isSupported(Locale locale) => ['en', 'es'].contains(locale.languageCode);

      这里,委托仅适用于 en 和 es 区域设置。

    • load - 接受一个区域设置并开始加载指定区域设置的资源。

@override 
Future<CustomLocalizations> load(Locale locale) { 
   return SynchronousFuture<CustomLocalizations>(CustomLocalizations(locale)); 
}

      这里,load 方法返回 CustomLocalizations。返回的 CustomLocalizations 可用于获取英语和西班牙语中标题和消息的值

    • shouldReload - 指定当其 Localizations Widget 重建时是否需要重新加载 CustomLocalizations。

@override 
bool shouldReload(CustomLocalizationsDelegate old) => false;
  • CustomLocalizationDelegate 的完整代码如下 -

class CustomLocalizationsDelegate extends 
LocalizationsDelegate<CustomLocalizations> { 
   const CustomLocalizationsDelegate(); 
   @override 
   bool isSupported(Locale locale) => ['en', 'es'].contains(locale.languageCode);
   @override 
   Future<CustomLocalizations> load(Locale locale) { 
      return SynchronousFuture<CustomLocalizations>(CustomLocalizations(locale));
   } 
   @override bool shouldReload(CustomLocalizationsDelegate old) => false; 
}

通常,Flutter 应用程序基于两个根级 Widget,MaterialApp 或 WidgetsApp。Flutter 为这两个 Widget 提供了现成的本地化,它们分别是 MaterialLocalizations 和 WidgetsLocaliations。此外,Flutter 还提供委托来加载 MaterialLocalizations 和 WidgetsLocaliations,它们分别是 GlobalMaterialLocalizations.delegate 和 GlobalWidgetsLocalizations.delegate。

让我们创建一个简单的启用国际化的应用程序来测试和理解该概念。

  • 创建一个新的 Flutter 应用程序,flutter_localization_app。

  • Flutter 使用专用的 Flutter 包 flutter_localizations 支持国际化。其理念是从主 SDK 中分离本地化内容。打开 pubspec.yaml 并添加以下代码以启用国际化包 -

dependencies: 
   flutter: 
      sdk: flutter 
   flutter_localizations:
      sdk: flutter
  • Android Studio 将显示以下警报,表明 pubspec.yaml 已更新。

Alert
  • 点击获取依赖项选项。Android Studio 将从 Internet 获取包并为应用程序正确配置它。

  • 在 main.dart 中导入 flutter_localizations 包,如下所示 -

import 'package:flutter_localizations/flutter_localizations.dart'; 
import 'package:flutter/foundation.dart' show SynchronousFuture;
  • 这里,SynchronousFuture 的目的是同步加载自定义本地化。

  • 创建自定义本地化及其相应的委托,如下所示 -

class CustomLocalizations { 
   CustomLocalizations(this.locale); 
   final Locale locale; 
   static CustomLocalizations of(BuildContext context) {
      return Localizations.of<CustomLocalizations>(context, CustomLocalizations); 
   }
   static Map<String, Map<String, String>> _resources = {
      'en': {
         'title': 'Demo', 
         'message': 'Hello World' 
      }, 
      'es': { 
         'title': 'Manifestación', 
         'message': 'Hola Mundo', 
      }, 
   }; 
   String get title { 
      return _resources[locale.languageCode]['title']; 
   } 
   String get message { 
      return _resources[locale.languageCode]['message']; 
   } 
}
class CustomLocalizationsDelegate extends
LocalizationsDelegate<CustomLocalizations> {
   const CustomLocalizationsDelegate();
   
   @override 
   bool isSupported(Locale locale) => ['en', 'es'].contains(locale.languageCode); 
   
   @override 
   Future<CustomLocalizations> load(Locale locale) { 
      return SynchronousFuture<CustomLocalizations>(CustomLocalizations(locale)); 
   } 
   @override bool shouldReload(CustomLocalizationsDelegate old) => false; 
}
  • 这里,创建 CustomLocalizations 以支持应用程序中标题和消息的本地化,并使用 CustomLocalizationsDelegate 加载 CustomLocalizations。

  • 使用 MaterialApp 属性 localizationsDelegates 和 supportedLocales 添加 MaterialApp、WidgetsApp 和 CustomLocalization 的委托,如下所示 -

localizationsDelegates: [
   const CustomLocalizationsDelegate(),   
   GlobalMaterialLocalizations.delegate, 
   GlobalWidgetsLocalizations.delegate, 
], 
supportedLocales: [
   const Locale('en', ''),
   const Locale('es', ''), 
],
  • 使用 CustomLocalizations 方法 of 获取标题和消息的本地化值,并在适当的位置使用它,如下所示 -

class MyHomePage extends StatelessWidget {
   MyHomePage({Key key, this.title}) : super(key: key); 
   final String title; 
   @override 
   Widget build(BuildContext context) {
      return Scaffold(
         appBar: AppBar(title: Text(CustomLocalizations .of(context) .title), ), 
         body: Center(
            child: Column(
               mainAxisAlignment: MainAxisAlignment.center, 
               children: <Widget>[ 
                  Text( CustomLocalizations .of(context) .message, ), 
               ], 
            ), 
         ),
      );
   }
}
  • 这里,为了简单起见,我们将 MyHomePage 类从 StatefulWidget 修改为 StatelessWidget,并使用 CustomLocalizations 获取标题和消息。

  • 编译并运行应用程序。应用程序将以英语显示其内容。

  • 关闭应用程序。转到设置 → 系统 → 语言和输入 → 语言*

  • 单击“添加语言”选项并选择西班牙语。这将安装西班牙语,然后将其列为选项之一。

  • 选择西班牙语并将其移到英语上方。这将设置西班牙语为第一语言,所有内容都将更改为西班牙语文本。

  • 现在重新启动国际化应用程序,您将看到标题和消息为西班牙语。

  • 我们可以通过在设置中将英语选项移到西班牙语选项上方来将语言恢复为英语。

  • 应用程序的结果(西班牙语)显示在下面给出的屏幕截图中 -

Manifestacion

使用 intl 包

Flutter 提供 intl 包以进一步简化本地化移动应用程序的开发。intl 包提供特殊方法和工具以半自动生成特定于语言的消息。

让我们使用 intl 包创建一个新的本地化应用程序,并了解该概念。

  • 创建一个新的 Flutter 应用程序,flutter_intl_app。

  • 打开 pubspec.yaml 并添加包详细信息。

dependencies: 
   flutter: 
      sdk: flutter 
   flutter_localizations: 
      sdk: flutter 
   intl: ^0.15.7 
   intl_translation: ^0.17.3
  • Android Studio 将显示如下所示的警报,通知 pubspec.yaml 已更新。

Informing Updation
  • 点击获取依赖项选项。Android Studio 将从 Internet 获取包并为应用程序正确配置它。

  • 从以前的示例 flutter_internationalization_app 复制 main.dart。

  • 导入 intl 包,如下所示 -

import 'package:intl/intl.dart';
  • 更新 CustomLocalization 类,如以下代码所示 -

class CustomLocalizations { 
   static Future<CustomLocalizations> load(Locale locale) {
      final String name = locale.countryCode.isEmpty ? locale.languageCode : locale.toString(); 
      final String localeName = Intl.canonicalizedLocale(name); 
      
      return initializeMessages(localeName).then((_) {
         Intl.defaultLocale = localeName; 
         return CustomLocalizations(); 
      }); 
   } 
   static CustomLocalizations of(BuildContext context) { 
      return Localizations.of<CustomLocalizations>(context, CustomLocalizations); 
   } 
   String get title {
      return Intl.message( 
         'Demo', 
         name: 'title', 
         desc: 'Title for the Demo application', 
      ); 
   }
   String get message{
      return Intl.message(
         'Hello World', 
         name: 'message', 
         desc: 'Message for the Demo application', 
      ); 
   }
}
class CustomLocalizationsDelegate extends 
LocalizationsDelegate<CustomLocalizations> {
   const CustomLocalizationsDelegate();
   
   @override
   bool isSupported(Locale locale) => ['en', 'es'].contains(locale.languageCode); 
   @override 
   Future<CustomLocalizations> load(Locale locale) { 
      return CustomLocalizations.load(locale); 
   } 
   @override 
   bool shouldReload(CustomLocalizationsDelegate old) => false; 
}
  • 这里,我们使用了 intl 包中的三个方法,而不是自定义方法。否则,概念相同。

    • Intl.canonicalizedLocale - 用于获取正确的区域设置名称。

    • Intl.defaultLocale - 用于设置当前区域设置

    • Intl.message - 用于定义新消息。

  • 导入l10n/messages_all.dart文件。我们将在稍后生成此文件

import 'l10n/messages_all.dart';
  • 现在,创建一个文件夹,lib/l10n

  • 打开命令提示符并转到应用程序根目录(其中 pubspec.yaml 可用),然后运行以下命令 -

flutter packages pub run intl_translation:extract_to_arb --output-
   dir=lib/l10n lib/main.dart
  • 这里,该命令将生成 intl_message.arb 文件,这是一个用于在不同区域设置中创建消息的模板。文件内容如下 -

{
   "@@last_modified": "2019-04-19T02:04:09.627551", 
   "title": "Demo", 
   "@title": {
      "description": "Title for the Demo application", 
      "type": "text", 
      "placeholders": {} 
   }, 
   "message": "Hello World", 
   "@message": {
      "description": "Message for the Demo 
      application", 
      "type": "text", 
      "placeholders": {} 
   }
}
  • 复制 intl_message.arb 并创建新文件 intl_en.arb。

  • 复制 intl_message.arb 并创建新文件 intl_es.arb,并将内容更改为西班牙语,如下所示 -

{
   "@@last_modified": "2019-04-19T02:04:09.627551",  
   "title": "Manifestación", 
   "@title": {
      "description": "Title for the Demo application", 
      "type": "text", 
      "placeholders": {} 
   },
   "message": "Hola Mundo",
   "@message": {
      "description": "Message for the Demo application", 
      "type": "text", 
      "placeholders": {} 
   } 
}
  • 现在,运行以下命令以创建最终消息文件 messages_all.dart。

flutter packages pub run intl_translation:generate_from_arb 
--output-dir=lib\l10n --no-use-deferred-loading 
lib\main.dart lib\l10n\intl_en.arb lib\l10n\intl_es.arb
  • 编译并运行应用程序。它的工作原理与上述应用程序 flutter_localization_app 类似。

Flutter - 测试

测试是应用程序开发生命周期中非常重要的阶段。它确保应用程序质量高。测试需要仔细的计划和执行。它也是开发中最耗时的阶段。

Dart 语言和 Flutter 框架为应用程序的自动化测试提供了广泛的支持。

测试类型

通常,有三种类型的测试流程可用于完全测试应用程序。它们如下 -

单元测试

单元测试是测试应用程序最简单的方法。它基于确保代码片段(通常是函数)或类的某个方法的正确性。但是,它没有反映真实环境,因此是查找错误的选择最少的选项。

Widget 测试

Widget 测试基于确保 Widget 创建、渲染和与其他 Widget 交互的正确性,如预期的那样。它更进一步,并提供接近实时环境以查找更多错误。

集成测试

集成测试涉及单元测试和 Widget 测试以及应用程序的外部组件,如数据库、Web 服务等,它模拟或模拟真实环境以查找几乎所有错误,但它是最复杂的过程。

Flutter 支持所有类型的测试。它为 Widget 测试提供了广泛且独有的支持。在本章中,我们将详细讨论 Widget 测试。

Widget 测试

Flutter 测试框架提供 testWidgets 方法来测试 Widget。它接受两个参数 -

  • 测试描述
  • 测试代码
testWidgets('test description: find a widget', '<test code>');

涉及的步骤

Widget 测试涉及三个不同的步骤 -

  • 在测试环境中渲染 Widget。

  • WidgetTester 是 Flutter 测试框架提供的用于构建和渲染 Widget 的类。WidgetTester 类的 pumpWidget 方法接受任何 Widget 并将其渲染在测试环境中。

testWidgets('finds a specific instance', (WidgetTester tester) async { 
   await tester.pumpWidget(MaterialApp( 
      home: Scaffold( 
         body: Text('Hello'), 
      ), 
   )); 
});
  • 查找我们需要测试的 Widget。

    • Flutter 框架提供了许多选项来查找测试环境中渲染的小部件,它们通常被称为查找器(Finders)。最常用的查找器是 find.text、find.byKey 和 find.byWidget。

      • find.text 查找包含指定文本的小部件。

find.text('Hello')
      • find.byKey 根据其特定的键查找小部件。

find.byKey('home')
      • find.byWidget 根据其实例变量查找小部件。

find.byWidget(homeWidget)
  • 确保小部件按预期工作。

  • Flutter 框架提供了许多选项来将小部件与预期的小部件进行匹配,它们通常被称为匹配器(Matchers)。我们可以使用测试框架提供的 expect 方法来匹配小部件,我们在第二步中找到的小部件与我们选择任何匹配器得到的预期小部件进行匹配。一些重要的匹配器如下所示。

    • findsOneWidget - 验证找到单个小部件。

expect(find.text('Hello'), findsOneWidget);
    • findsNothing - 验证未找到任何小部件

expect(find.text('Hello World'), findsNothing);
    • findsWidgets - 验证找到多个小部件。

expect(find.text('Save'), findsWidgets);
    • findsNWidgets - 验证找到 N 个小部件。

expect(find.text('Save'), findsNWidgets(2));

完整的测试代码如下所示:

testWidgets('finds hello widget', (WidgetTester tester) async { 
   await tester.pumpWidget(MaterialApp( 
      home: Scaffold( 
         body: Text('Hello'), 
      ), 
   )); 
   expect(find.text('Hello'), findsOneWidget); 
});

在这里,我们渲染了一个 MaterialApp 小部件,并在其主体中使用 Text 小部件显示文本 Hello。然后,我们使用 find.text 查找小部件,然后使用 findsOneWidget 进行匹配。

工作示例

让我们创建一个简单的 Flutter 应用程序并编写一个 Widget 测试,以便更好地理解所涉及的步骤和概念。

  • 在 Android Studio 中创建一个新的 Flutter 应用程序,命名为 flutter_test_app。

  • 打开 test 文件夹中的 widget_test.dart 文件。它包含如下所示的示例测试代码:

testWidgets('Counter increments smoke test', (WidgetTester tester) async {
   // Build our app and trigger a frame. 
   await tester.pumpWidget(MyApp()); 
   
   // Verify that our counter starts at 0. 
   expect(find.text('0'), findsOneWidget); 
   expect(find.text('1'), findsNothing); 
   
   // Tap the '+' icon and trigger a frame. 
   await tester.tap(find.byIcon(Icons.add)); 
   await tester.pump(); 
   
   // Verify that our counter has incremented. 
   expect(find.text('0'), findsNothing); 
   expect(find.text('1'), findsOneWidget); 
});
  • 在这里,测试代码执行以下功能:

    • 使用 tester.pumpWidget 渲染 MyApp 小部件。

    • 使用 findsOneWidget 和 findsNothing 匹配器确保计数器最初为零。

    • 使用 find.byIcon 方法查找计数器递增按钮。

    • 使用 tester.tap 方法点击计数器递增按钮。

    • 使用 findsOneWidget 和 findsNothing 匹配器确保计数器已递增。

  • 让我们再次点击计数器递增按钮,然后检查计数器是否增加到 2。

await tester.tap(find.byIcon(Icons.add)); 
await tester.pump(); 

expect(find.text('2'), findsOneWidget);
  • 点击运行菜单。

  • 点击 widget_test.dart 文件中的测试选项。这将运行测试并在结果窗口中报告结果。

Flutter Testing

Flutter - 部署

本章介绍如何在 Android 和 iOS 平台上部署 Flutter 应用程序。

Android 应用程序

  • 使用 Android 清单文件中的 android:label 条目更改应用程序名称。Android 应用程序清单文件 AndroidManifest.xml 位于 <app dir>/android/app/src/main 中。它包含有关 Android 应用程序的全部详细信息。我们可以使用 android:label 条目设置应用程序名称。

  • 使用清单文件中的 android:icon 条目更改启动器图标。

  • 根据需要使用标准选项签署应用程序。

  • 根据需要使用标准选项启用 Proguard 和混淆。

  • 通过运行以下命令创建发布版 APK 文件:

cd /path/to/my/application 
flutter build apk
  • 您可以看到如下所示的输出:

Initializing gradle...                                            8.6s 
Resolving dependencies...                                        19.9s 
Calling mockable JAR artifact transform to create file: 
/Users/.gradle/caches/transforms-1/files-1.1/android.jar/ 
c30932f130afbf3fd90c131ef9069a0b/android.jar with input 
/Users/Library/Android/sdk/platforms/android-28/android.jar 
Running Gradle task 'assembleRelease'... 
Done                                                             85.7s 
Built build/app/outputs/apk/release/app-release.apk (4.8MB).
  • 使用以下命令将 APK 安装到设备上:

flutter install
  • 通过创建应用程序包并使用标准方法将其推送到 Play 商店,将应用程序发布到 Google Play 商店。

flutter build appbundle

iOS 应用程序

  • 使用标准方法在App Store Connect中注册 iOS 应用程序。保存注册应用程序时使用的Bundle ID

  • 更新 XCode 项目设置中的显示名称以设置应用程序名称。

  • 更新 XCode 项目设置中的 Bundle Identifier 以设置 Bundle ID,我们在步骤 1 中使用过。

  • 根据需要使用标准方法进行代码签名。

  • 根据需要使用标准方法添加新的应用程序图标。

  • 使用以下命令生成 IPA 文件:

flutter build ios
  • 现在,您可以看到以下输出:

Building com.example.MyApp for device (ios-release)... 
Automatically signing iOS for device deployment 
using specified development team in Xcode project: 
Running Xcode build...                                   23.5s 
......................
  • 通过将应用程序 IPA 文件推送到 TestFlight 使用标准方法测试应用程序。

  • 最后,使用标准方法将应用程序推送到App Store

Flutter - 开发工具

本章详细介绍了 Flutter 开发工具。跨平台开发工具包的第一个稳定版本于 2018 年 12 月 4 日发布,即 Flutter 1.0。谷歌一直在不断改进和增强 Flutter 框架,并提供不同的开发工具。

Widget 集

Google 更新了 Material 和 Cupertino Widget 集,以在组件设计中提供像素级完美质量。Flutter 1.2 的即将发布的版本将设计为支持桌面键盘事件和鼠标悬停支持。

使用 Visual Studio Code 进行 Flutter 开发

Visual Studio Code 支持 Flutter 开发,并提供广泛的快捷方式以实现快速高效的开发。以下是 Visual Studio Code 为 Flutter 开发提供的一些主要功能:

  • 代码辅助 - 当您想检查选项时,可以使用Ctrl+Space获取代码完成选项列表。

  • 快速修复 - Ctrl+. 是快速修复工具,有助于修复代码。

  • 编码时的快捷方式。

  • 在注释中提供详细的文档。

  • 调试快捷方式。

  • 热重启。

Dart DevTools

我们可以使用 Android Studio 或 Visual Studio Code 或任何其他 IDE 来编写代码并安装插件。谷歌的开发团队一直在开发另一个名为 Dart DevTools 的开发工具,它是一个基于 Web 的编程套件。它支持 Android 和 iOS 平台。它基于时间线视图,因此开发人员可以轻松分析其应用程序。

安装 DevTools

要安装 DevTools,请在控制台中运行以下命令:

flutter packages pub global activate devtools

现在您可以看到以下输出:

Resolving dependencies... 
+ args 1.5.1 
+ async 2.2.0
+ charcode 1.1.2 
+ codemirror 0.5.3+5.44.0 
+ collection 1.14.11 
+ convert 2.1.1 
+ devtools 0.0.16 
+ devtools_server 0.0.2 
+ http 0.12.0+2 
+ http_parser 3.1.3 
+ intl 0.15.8 
+ js 0.6.1+1 
+ meta 1.1.7 
+ mime 0.9.6+2 
.................. 
.................. 
Installed executable devtools. 
Activated devtools 0.0.16.

运行服务器

您可以使用以下命令运行 DevTools 服务器:

flutter packages pub global run devtools

现在,您将收到类似于此的响应:

Serving DevTools at http://127.0.0.1:9100

启动您的应用程序

转到您的应用程序,打开模拟器并使用以下命令运行:

flutter run --observatory-port=9200

现在,您已连接到 DevTools。

在浏览器中启动 DevTools

现在在浏览器中访问以下 URL 以启动 DevTools:

https://127.0.0.1:9100/?port=9200

您将收到如下所示的响应:

Dart Dev Tools

Flutter SDK

要更新 Flutter SDK,请使用以下命令:

flutter upgrade

您可以看到如下所示的输出:

Flutter SDK

要升级 Flutter 包,请使用以下命令:

flutter packages upgrade

您可以看到以下响应:

Running "flutter packages upgrade" in my_app... 7.4s

Flutter Inspector

它用于探索 Flutter Widget 树。为此,请在控制台中运行以下命令:

flutter run --track-widget-creation

您可以看到如下所示的输出:

Launching lib/main.dart on iPhone X in debug mode... 
─Assembling Flutter resources...                       3.6s 
Compiling, linking and signing...                      6.8s 
Xcode build done.                                     14.2s 
2,904ms (!)
To hot reload changes while running, press "r". To hot restart (and rebuild state), press "R". 
An Observatory debugger and profiler on iPhone X is available at: http://127.0.0.1:50399/ 
For a more detailed help message, press "h". To detach, press "d"; to quit, press "q".

现在转到 URL http://127.0.0.1:50399/,您可以看到以下结果:

Result

Flutter - 编写高级应用程序

在本章中,我们将学习如何编写一个完整的移动应用程序 expense_calculator。expense_calculator 的目的是存储我们的支出信息。应用程序的完整功能如下:

  • 支出列表。

  • 输入新支出的表单。

  • 编辑/删除现有支出的选项。

  • 任何时刻的总支出。

我们将使用 Flutter 框架下面提到的高级功能来编写 expense_calculator 应用程序。

  • 高级 ListView 用法来显示支出列表。

  • 表单编程。

  • SQLite 数据库编程来存储我们的支出。

  • scoped_model 状态管理来简化我们的编程。

让我们开始编写expense_calculator应用程序。

  • 在 Android Studio 中创建一个新的 Flutter 应用程序,命名为 expense_calculator。

  • 打开 pubspec.yaml 并添加包依赖项。

dependencies: 
   flutter: 
      sdk: flutter 
   sqflite: ^1.1.0 
   path_provider: ^0.5.0+1 
   scoped_model: ^1.0.1 
   intl: any
  • 在此处观察这些要点:

    • sqflite 用于 SQLite 数据库编程。

    • path_provider 用于获取特定于系统的应用程序路径。

    • scoped_model 用于状态管理。

    • intl 用于日期格式化。

  • Android Studio 将显示以下警报,表明 pubspec.yaml 已更新。

Alert Writing Advanced Applications
  • 点击获取依赖项选项。Android Studio 将从 Internet 获取包并为应用程序正确配置它。

  • 删除 main.dart 中的现有代码。

  • 添加新文件 Expense.dart 以创建 Expense 类。Expense 类将具有以下属性和方法。

    • 属性:id - 在 SQLite 数据库中表示支出条目的唯一 ID。

    • 属性:amount - 支出金额。

    • 属性:date - 支出日期。

    • 属性:category - 类别表示支出领域,例如食品、旅行等。

    • formattedDate - 用于格式化 date 属性

    • fromMap - 用于将数据库表中的字段映射到支出对象中的属性,并创建新的支出对象。

factory Expense.fromMap(Map<String, dynamic> data) { 
   return Expense( 
      data['id'], 
      data['amount'], 
      DateTime.parse(data['date']),    
      data['category'] 
   ); 
}
    • toMap - 用于将支出对象转换为 Dart Map,可进一步用于数据库编程

Map<String, dynamic> toMap() => { 
   "id" : id, 
   "amount" : amount, 
   "date" : date.toString(), 
   "category" : category, 
};
    • columns - 用于表示数据库字段的静态变量。

  • 将以下代码输入 Expense.dart 文件并保存。

import 'package:intl/intl.dart'; class Expense {
   final int id; 
   final double amount; 
   final DateTime date; 
   final String category; 
   String get formattedDate { 
      var formatter = new DateFormat('yyyy-MM-dd'); 
      return formatter.format(this.date); 
   } 
   static final columns = ['id', 'amount', 'date', 'category'];
   Expense(this.id, this.amount, this.date, this.category); 
   factory Expense.fromMap(Map<String, dynamic> data) { 
      return Expense( 
         data['id'], 
         data['amount'], 
         DateTime.parse(data['date']), data['category'] 
      ); 
   }
   Map<String, dynamic> toMap() => {
      "id" : id, 
      "amount" : amount, 
      "date" : date.toString(), 
      "category" : category, 
   }; 
}
  • 以上代码简单明了,不言自明。

  • 添加新文件 Database.dart 以创建 SQLiteDbProvider 类。SQLiteDbProvider 类的目的是:

    • 使用 getAllExpenses 方法获取数据库中所有可用的支出。它将用于列出所有用户的支出信息。

Future<List<Expense>> getAllExpenses() async { 
   final db = await database; 
   
   List<Map> results = await db.query(
      "Expense", columns: Expense.columns, orderBy: "date DESC"
   );
   List<Expense> expenses = new List(); 
   results.forEach((result) {
      Expense expense = Expense.fromMap(result); 
      expenses.add(expense); 
   }); 
   return expenses; 
}
    • 使用 getExpenseById 方法根据数据库中可用的支出 ID 获取特定支出信息。它将用于向用户显示特定的支出信息。

Future<Expense> getExpenseById(int id) async {
   final db = await database;
   var result = await db.query("Expense", where: "id = ", whereArgs: [id]);
   
   return result.isNotEmpty ? 
   Expense.fromMap(result.first) : Null; 
}
    • 使用 getTotalExpense 方法获取用户的总支出。它将用于向用户显示当前的总支出。

Future<double> getTotalExpense() async {
   final db = await database; 
   List<Map> list = await db.rawQuery(
      "Select SUM(amount) as amount from expense"
   );
   return list.isNotEmpty ? list[0]["amount"] : Null; 
}
    • 使用 insert 方法将新的支出信息添加到数据库中。它将用于通过用户将新的支出条目添加到应用程序中。

Future<Expense> insert(Expense expense) async { 
   final db = await database; 
   var maxIdResult = await db.rawQuery(
      "SELECT MAX(id)+1 as last_inserted_id FROM Expense"
   );
   var id = maxIdResult.first["last_inserted_id"]; 
   var result = await db.rawInsert(
      "INSERT Into Expense (id, amount, date, category)" 
      " VALUES (?, ?, ?, ?)", [
         id, expense.amount, expense.date.toString(), expense.category
      ]
   ); 
   return Expense(id, expense.amount, expense.date, expense.category); 
}
    • 使用 update 方法更新现有支出信息。它将用于通过用户编辑和更新系统中可用的现有支出条目。

update(Expense product) async {
   final db = await database; 
   
   var result = await db.update("Expense", product.toMap(), 
   where: "id = ?", whereArgs: [product.id]); 
   return result; 
}
    • 使用 delete 方法删除现有支出信息。它将用于通过用户删除系统中可用的现有支出条目。

delete(int id) async {
   final db = await database;
   db.delete("Expense", where: "id = ?", whereArgs: [id]); 
}
  • SQLiteDbProvider 类的完整代码如下:

import 'dart:async'; 
import 'dart:io'; 
import 'package:path/path.dart'; 
import 'package:path_provider/path_provider.dart'; 
import 'package:sqflite/sqflite.dart'; 
import 'Expense.dart'; 

class SQLiteDbProvider {
   SQLiteDbProvider._(); 
   static final SQLiteDbProvider db = SQLiteDbProvider._(); 
   
   static Database _database; Future<Database> get database async { 
      if (_database != null) 
         return _database; 
      _database = await initDB(); 
      return _database; 
   } 
   initDB() async {
      Directory documentsDirectory = await getApplicationDocumentsDirectory(); 
      String path = join(documentsDirectory.path, "ExpenseDB2.db"); 
      return await openDatabase(
         path, version: 1, onOpen:(db){}, onCreate: (Database db, int version) async {
            await db.execute(
               "CREATE TABLE Expense (
                  ""id INTEGER PRIMARY KEY," "amount REAL," "date TEXT," "category TEXT""
               )
            "); 
            await db.execute(
               "INSERT INTO Expense ('id', 'amount', 'date', 'category') 
               values (?, ?, ?, ?)",[1, 1000, '2019-04-01 10:00:00', "Food"]
            );
            /*await db.execute(
               "INSERT INTO Product ('id', 'name', 'description', 'price', 'image') 
               values (?, ?, ?, ?, ?)", [
                  2, "Pixel", "Pixel is the most feature phone ever", 800, "pixel.png"
               ]
            ); 
            await db.execute(
               "INSERT INTO Product ('id', 'name', 'description', 'price', 'image') 
               values (?, ?, ?, ?, ?)", [
                  3, "Laptop", "Laptop is most productive development tool", 2000, "laptop.png"
               ]
            );
            await db.execute(
               "INSERT INTO Product ('id', 'name', 'description', 'price', 'image') 
               values (?, ?, ?, ?, ?)", [
                  4, "Tablet", "Laptop is most productive development tool", 1500, "tablet.png"
               ]
            );
            await db.execute(
               "INSERT INTO Product ('id', 'name', 'description', 'price', 'image') 
               values (?, ?, ?, ?, ?)", [
                  5, "Pendrive", "iPhone is the stylist phone ever", 100, "pendrive.png"
               ]
            ); 
            await db.execute(
               "INSERT INTO Product ('id', 'name', 'description', 'price', 'image') 
               values (?, ?, ?, ?, ?)", [
                  6, "Floppy Drive", "iPhone is the stylist phone ever", 20, "floppy.png"
               ]
            ); */ 
         }
      );
   }
   Future<List<Expense>> getAllExpenses() async {
      final db = await database; 
      List<Map> 
      results = await db.query(
         "Expense", columns: Expense.columns, orderBy: "date DESC"
      );
      List<Expense> expenses = new List(); 
      results.forEach((result) {
         Expense expense = Expense.fromMap(result);
         expenses.add(expense);
      }); 
      return expenses; 
   } 
   Future<Expense> getExpenseById(int id) async {
      final db = await database;
      var result = await db.query("Expense", where: "id = ", whereArgs: [id]); 
      return result.isNotEmpty ? Expense.fromMap(result.first) : Null; 
   }
   Future<double> getTotalExpense() async {
      final db = await database;
      List<Map> list = await db.rawQuery(
         "Select SUM(amount) as amount from expense"
      );
      return list.isNotEmpty ? list[0]["amount"] : Null; 
   }
   Future<Expense> insert(Expense expense) async {
      final db = await database; 
      var maxIdResult = await db.rawQuery(
         "SELECT MAX(id)+1 as last_inserted_id FROM Expense"
      );
      var id = maxIdResult.first["last_inserted_id"]; 
      var result = await db.rawInsert(
         "INSERT Into Expense (id, amount, date, category)" 
         " VALUES (?, ?, ?, ?)", [
            id, expense.amount, expense.date.toString(), expense.category
         ]
      );
      return Expense(id, expense.amount, expense.date, expense.category); 
   }
   update(Expense product) async {
      final db = await database; 
      var result = await db.update(
         "Expense", product.toMap(), where: "id = ?", whereArgs: [product.id]
      ); 
      return result; 
   }
   delete(int id) async {
      final db = await database;
      db.delete("Expense", where: "id = ?", whereArgs: [id]);
   }
}
  • 这里,

    • database 是获取 SQLiteDbProvider 对象的属性。

    • initDB 是用于选择和打开 SQLite 数据库的方法。

  • 创建一个新的文件 ExpenseListModel.dart 以创建 ExpenseListModel。该模型的目的是在内存中保存用户支出的完整信息,并在用户内存中的支出发生变化时更新应用程序的用户界面。它基于 scoped_model 包中的 Model 类。它具有以下属性和方法:

    • _items - 支出的私有列表。

    • items - 作为 UnmodifiableListView<Expense> 的 _items 的 getter,以防止意外或意外更改列表。

    • totalExpense - 基于 items 变量的总支出的 getter。

double get totalExpense {
   double amount = 0.0; 
   for(var i = 0; i < _items.length; i++) { 
      amount = amount + _items[i].amount; 
   } 
   return amount; 
}
    • load - 用于从数据库加载完整的支出并加载到 _items 变量中。它还会调用 notifyListeners 以更新 UI。

void load() {
   Future<List<Expense>> 
   list = SQLiteDbProvider.db.getAllExpenses(); 
   list.then( (dbItems) {
      for(var i = 0; i < dbItems.length; i++) { 
         _items.add(dbItems[i]); 
      } notifyListeners(); 
   });
}
    • byId - 用于从 _items 变量获取特定支出。

Expense byId(int id) { 
   for(var i = 0; i < _items.length; i++) { 
      if(_items[i].id == id) { 
         return _items[i]; 
      } 
   }
   return null; 
}
    • add - 用于将新的支出项添加到 _items 变量以及数据库中。它还会调用 notifyListeners 以更新 UI。

void add(Expense item) {
   SQLiteDbProvider.db.insert(item).then((val) { 
      _items.add(val); notifyListeners(); 
   }); 
}
    • Update - 用于将支出项更新到 _items 变量以及数据库中。它还会调用 notifyListeners 以更新 UI。

void update(Expense item) {
   bool found = false;
   for(var i = 0; i < _items.length; i++) {
      if(_items[i].id == item.id) {
         _items[i] = item; 
         found = true; 
         SQLiteDbProvider.db.update(item); break; 
      } 
   }
   if(found) notifyListeners(); 
}
    • delete - 用于从 _items 变量以及数据库中删除现有的支出项。它还会调用 notifyListeners 以更新 UI。

void delete(Expense item) { 
   bool found = false; 
   for(var i = 0; i < _items.length; i++) {
      if(_items[i].id == item.id) {
         found = true; 
         SQLiteDbProvider.db.delete(item.id); 
         _items.removeAt(i); break; 
      }
   }
   if(found) notifyListeners(); 
}
  • ExpenseListModel 类的完整代码如下:

import 'dart:collection'; 
import 'package:scoped_model/scoped_model.dart'; 
import 'Expense.dart'; 
import 'Database.dart'; 

class ExpenseListModel extends Model { 
   ExpenseListModel() { 
      this.load(); 
   } 
   final List<Expense> _items = []; 
   UnmodifiableListView<Expense> get items => 
   UnmodifiableListView(_items); 
   
   /*Future<double> get totalExpense { 
      return SQLiteDbProvider.db.getTotalExpense(); 
   }*/ 
   
   double get totalExpense {
      double amount = 0.0;
      for(var i = 0; i < _items.length; i++) { 
         amount = amount + _items[i].amount; 
      } 
      return amount; 
   }
   void load() {
      Future<List<Expense>> list = SQLiteDbProvider.db.getAllExpenses(); 
      list.then( (dbItems) {
         for(var i = 0; i < dbItems.length; i++) {
            _items.add(dbItems[i]); 
         } 
         notifyListeners(); 
      }); 
   }
   Expense byId(int id) {
      for(var i = 0; i < _items.length; i++) { 
         if(_items[i].id == id) { 
            return _items[i]; 
         } 
      }
      return null; 
   }
   void add(Expense item) {
      SQLiteDbProvider.db.insert(item).then((val) {
         _items.add(val);
         notifyListeners();
      }); 
   }
   void update(Expense item) {
      bool found = false; 
      for(var i = 0; i < _items.length; i++) {
         if(_items[i].id == item.id) {
            _items[i] = item; 
            found = true; 
            SQLiteDbProvider.db.update(item); 
            break; 
         }
      }
      if(found) notifyListeners(); 
   }
   void delete(Expense item) {
      bool found = false; 
      for(var i = 0; i < _items.length; i++) {
         if(_items[i].id == item.id) {
            found = true; 
            SQLiteDbProvider.db.delete(item.id); 
            _items.removeAt(i); break; 
         }
      }
      if(found) notifyListeners(); 
   }
}
  • 打开 main.dart 文件。导入如下指定的类:

import 'package:flutter/material.dart'; 
import 'package:scoped_model/scoped_model.dart'; 
import 'ExpenseListModel.dart'; 
import 'Expense.dart';
  • 添加 main 函数并通过传递 ScopedModel<ExpenseListModel> 小部件来调用 runApp。

void main() { 
   final expenses = ExpenseListModel(); 
   runApp(
      ScopedModel<ExpenseListModel>(model: expenses, child: MyApp(),)
   );
}
  • 这里,

    • expenses 对象从数据库加载所有用户支出信息。此外,当应用程序第一次打开时,它将创建具有适当表的所需数据库。

    • ScopedModel 在应用程序的整个生命周期中提供支出信息,并确保在任何实例中维护应用程序的状态。它使我们能够使用 StatelessWidget 而不是 StatefulWidget。

  • 使用 MaterialApp 小部件创建一个简单的 MyApp。

class MyApp extends StatelessWidget {
   // This widget is the root of your application. 
   @override 
   Widget build(BuildContext context) {
      return MaterialApp(
         title: 'Expense',
         theme: ThemeData(
            primarySwatch: Colors.blue, 
         ), 
         home: MyHomePage(title: 'Expense calculator'), 
      );
   }
}
  • 创建 MyHomePage 小部件以显示所有用户的支出信息以及顶部的总支出。右下角的浮动按钮将用于添加新的支出。

class MyHomePage extends StatelessWidget { 
   MyHomePage({Key key, this.title}) : super(key: key); 
   final String title; 
   @override 
   Widget build(BuildContext context) {
      return Scaffold(
         appBar: AppBar( 
            title: Text(this.title), 
         ), 
         body: ScopedModelDescendant<ExpenseListModel>(
            builder: (context, child, expenses) {
               return ListView.separated(
                  itemCount: expenses.items == null ? 1 
                  : expenses.items.length + 1, 
                  itemBuilder: (context, index) { 
                     if (index == 0) { 
                        return ListTile(
                           title: Text("Total expenses: " 
                           + expenses.totalExpense.toString(), 
                           style: TextStyle(fontSize: 24,
                           fontWeight: FontWeight.bold),) 
                        );
                     } else {
                        index = index - 1; 
                        return Dismissible( 
                           key: Key(expenses.items[index].id.toString()), 
                              onDismissed: (direction) { 
                              expenses.delete(expenses.items[index]); 
                              Scaffold.of(context).showSnackBar(
                                 SnackBar(
                                    content: Text(
                                       "Item with id, " 
                                       + expenses.items[index].id.toString() + 
                                       " is dismissed"
                                    )
                                 )
                              ); 
                           },
                           child: ListTile( onTap: () { 
                              Navigator.push(
                                 context, MaterialPageRoute(
                                    builder: (context) => FormPage(
                                       id: expenses.items[index].id,
                                       expenses: expenses, 
                                    )
                                 )
                              );
                           }, 
                           leading: Icon(Icons.monetization_on), 
                           trailing: Icon(Icons.keyboard_arrow_right), 
                           title: Text(expenses.items[index].category + ": " + 
                           expenses.items[index].amount.toString() + 
                           " \nspent on " + expenses.items[index].formattedDate, 
                           style: TextStyle(fontSize: 18, fontStyle: FontStyle.italic),))
                        ); 
                     }
                  },
                  separatorBuilder: (context, index) { 
                     return Divider(); 
                  }, 
               );
            },
         ),
         floatingActionButton: ScopedModelDescendant<ExpenseListModel>(
            builder: (context, child, expenses) {
               return FloatingActionButton( onPressed: () {
                  Navigator.push( 
                     context, MaterialPageRoute(
                        builder: (context) => ScopedModelDescendant<ExpenseListModel>(
                           builder: (context, child, expenses) { 
                              return FormPage( id: 0, expenses: expenses, ); 
                           }
                        )
                     )
                  ); 
                  // expenses.add(new Expense( 
                     // 2, 1000, DateTime.parse('2019-04-01 11:00:00'), 'Food')
                  ); 
                  // print(expenses.items.length); 
               },
               tooltip: 'Increment', child: Icon(Icons.add), ); 
            }
         )
      );
   }
}
  • 这里,

    • ScopedModelDescendant 用于将支出模型传递到 ListView 和 FloatingActionButton 小部件。

    • ListView.separated 和 ListTile 小部件用于列出支出信息。

    • Dismissible 小部件用于使用滑动手势删除支出条目。

    • Navigator 用于打开支出条目的编辑界面。可以通过点击支出条目来激活它。

  • 创建一个 FormPage 小部件。FormPage 小部件的目的是添加或更新支出条目。它也处理支出条目的验证。

class FormPage extends StatefulWidget { 
   FormPage({Key key, this.id, this.expenses}) : super(key: key); 
   final int id; 
   final ExpenseListModel expenses; 
   
   @override _FormPageState createState() => _FormPageState(id: id, expenses: expenses); 
}
class _FormPageState extends State<FormPage> {
   _FormPageState({Key key, this.id, this.expenses}); 
   
   final int id; 
   final ExpenseListModel expenses; 
   final scaffoldKey = GlobalKey<ScaffoldState>(); 
   final formKey = GlobalKey<FormState>(); 
   
   double _amount; 
   DateTime _date; 
   String _category; 
   
   void _submit() {
      final form = formKey.currentState; 
      if (form.validate()) {
         form.save(); 
         if (this.id == 0) expenses.add(Expense(0, _amount, _date, _category)); 
            else expenses.update(Expense(this.id, _amount, _date, _category)); 
         Navigator.pop(context); 
      }
   }
   @override 
   Widget build(BuildContext context) {
      return Scaffold(
         key: scaffoldKey, appBar: AppBar(
            title: Text('Enter expense details'),
         ), 
         body: Padding(
            padding: const EdgeInsets.all(16.0), 
            child: Form(
               key: formKey, child: Column(
                  children: [
                     TextFormField( 
                        style: TextStyle(fontSize: 22), 
                        decoration: const InputDecoration( 
                           icon: const Icon(Icons.monetization_on), 
                           labelText: 'Amount', 
                           labelStyle: TextStyle(fontSize: 18)
                        ), 
                        validator: (val) {
                           Pattern pattern = r'^[1-9]\d*(\.\d+)?$'; 
                           RegExp regex = new RegExp(pattern); 
                           if (!regex.hasMatch(val)) 
                           return 'Enter a valid number'; else return null; 
                        }, 
                        initialValue: id == 0 
                        ? '' : expenses.byId(id).amount.toString(), 
                        onSaved: (val) => _amount = double.parse(val), 
                     ), 
                     TextFormField( 
                        style: TextStyle(fontSize: 22), 
                        decoration: const InputDecoration( 
                           icon: const Icon(Icons.calendar_today),
                           hintText: 'Enter date', 
                           labelText: 'Date', 
                           labelStyle: TextStyle(fontSize: 18), 
                        ), 
                        validator: (val) {
                           Pattern pattern = r'^((?:19|20)\d\d)[- /.]
                              (0[1-9]|1[012])[- /.](0[1-9]|[12][0-9]|3[01])$'; 
                           RegExp regex = new RegExp(pattern); 
                           if (!regex.hasMatch(val)) 
                              return 'Enter a valid date'; 
                           else return null; 
                        },
                        onSaved: (val) => _date = DateTime.parse(val), 
                        initialValue: id == 0 
                        ? '' : expenses.byId(id).formattedDate, 
                        keyboardType: TextInputType.datetime, 
                     ),
                     TextFormField(
                        style: TextStyle(fontSize: 22), 
                        decoration: const InputDecoration(
                           icon: const Icon(Icons.category),
                           labelText: 'Category', 
                           labelStyle: TextStyle(fontSize: 18)
                        ),
                        onSaved: (val) => _category = val, 
                        initialValue: id == 0 ? '' 
                        : expenses.byId(id).category.toString(),
                     ), 
                     RaisedButton( 
                        onPressed: _submit, 
                        child: new Text('Submit'), 
                     ), 
                  ],
               ),
            ),
         ),
      );
   }
}
  • 这里,

    • TextFormField 用于创建表单条目。

    • TextFormField 的 validator 属性用于使用正则表达式模式验证表单元素。

    • _submit 函数与 expenses 对象一起使用,用于将支出添加到数据库或更新数据库中的支出。

  • main.dart 文件的完整代码如下所示:

import 'package:flutter/material.dart'; 
import 'package:scoped_model/scoped_model.dart'; 
import 'ExpenseListModel.dart'; 
import 'Expense.dart'; 

void main() { 
   final expenses = ExpenseListModel(); 
   runApp(
      ScopedModel<ExpenseListModel>(
         model: expenses, child: MyApp(), 
      )
   ); 
}
class MyApp extends StatelessWidget {
   // This widget is the root of your application. 
   @override
   Widget build(BuildContext context) {
      return MaterialApp(
         title: 'Expense',
         theme: ThemeData(
            primarySwatch: Colors.blue, 
         ), 
         home: MyHomePage(title: 'Expense calculator'), 
      );
   }
}
class MyHomePage extends StatelessWidget {
   MyHomePage({Key key, this.title}) : super(key: key);
   final String title;

   @override 
   Widget build(BuildContext context) {
      return Scaffold(
         appBar: AppBar(
            title: Text(this.title),
         ),
         body: ScopedModelDescendant<ExpenseListModel>(
            builder: (context, child, expenses) { 
               return ListView.separated(
                  itemCount: expenses.items == null ? 1 
                  : expenses.items.length + 1, itemBuilder: (context, index) { 
                     if (index == 0) { 
                        return ListTile( title: Text("Total expenses: " 
                        + expenses.totalExpense.toString(), 
                        style: TextStyle(fontSize: 24,fontWeight: 
                        FontWeight.bold),) ); 
                     } else {
                        index = index - 1; return Dismissible(
                           key: Key(expenses.items[index].id.toString()), 
                           onDismissed: (direction) {
                              expenses.delete(expenses.items[index]); 
                              Scaffold.of(context).showSnackBar(
                                 SnackBar(
                                    content: Text(
                                       "Item with id, " + 
                                       expenses.items[index].id.toString() 
                                       + " is dismissed"
                                    )
                                 )
                              );
                           }, 
                           child: ListTile( onTap: () {
                              Navigator.push( context, MaterialPageRoute(
                                 builder: (context) => FormPage(
                                    id: expenses.items[index].id, expenses: expenses, 
                                 )
                              ));
                           }, 
                           leading: Icon(Icons.monetization_on), 
                           trailing: Icon(Icons.keyboard_arrow_right), 
                           title: Text(expenses.items[index].category + ": " + 
                           expenses.items[index].amount.toString() + " \nspent on " + 
                           expenses.items[index].formattedDate, 
                           style: TextStyle(fontSize: 18, fontStyle: FontStyle.italic),))
                        );
                     }
                  }, 
                  separatorBuilder: (context, index) {
                     return Divider(); 
                  },
               ); 
            },
         ),
         floatingActionButton: ScopedModelDescendant<ExpenseListModel>(
            builder: (context, child, expenses) {
               return FloatingActionButton(
                  onPressed: () {
                     Navigator.push(
                        context, MaterialPageRoute(
                           builder: (context)
                           => ScopedModelDescendant<ExpenseListModel>(
                              builder: (context, child, expenses) { 
                                 return FormPage( id: 0, expenses: expenses, ); 
                              }
                           )
                        )
                     );
                     // expenses.add(
                        new Expense(
                           // 2, 1000, DateTime.parse('2019-04-01 11:00:00'), 'Food'
                        )
                     );
                     // print(expenses.items.length); 
                  },
                  tooltip: 'Increment', child: Icon(Icons.add), 
               );
            }
         )
      );
   } 
}
class FormPage extends StatefulWidget {
   FormPage({Key key, this.id, this.expenses}) : super(key: key); 
   final int id; 
   final ExpenseListModel expenses; 
   
   @override 
   _FormPageState createState() => _FormPageState(id: id, expenses: expenses); 
}
class _FormPageState extends State<FormPage> {
   _FormPageState({Key key, this.id, this.expenses}); 
   final int id; 
   final ExpenseListModel expenses; 
   final scaffoldKey = GlobalKey<ScaffoldState>(); 
   final formKey = GlobalKey<FormState>(); 
   double _amount; DateTime _date; 
   String _category;
   void _submit() {
      final form = formKey.currentState; 
      if (form.validate()) {
         form.save(); 
         if (this.id == 0) expenses.add(Expense(0, _amount, _date, _category)); 
         else expenses.update(Expense(this.id, _amount, _date, _category)); 
         Navigator.pop(context); 
      } 
   } 
   @override 
   Widget build(BuildContext context) {
      return Scaffold(
         key: scaffoldKey, appBar: AppBar( 
            title: Text('Enter expense details'), 
         ), 
         body: Padding(
            padding: const EdgeInsets.all(16.0),
            child: Form(
               key: formKey, child: Column(
                  children: [
                     TextFormField(
                        style: TextStyle(fontSize: 22), 
                        decoration: const InputDecoration( 
                           icon: const Icon(Icons.monetization_on), 
                           labelText: 'Amount', 
                           labelStyle: TextStyle(fontSize: 18)
                        ), 
                        validator: (val) {
                           Pattern pattern = r'^[1-9]\d*(\.\d+)?$'; 
                           RegExp regex = new RegExp(pattern); 
                           if (!regex.hasMatch(val)) return 'Enter a valid number'; 
                           else return null; 
                        },
                        initialValue: id == 0 ? '' 
                        : expenses.byId(id).amount.toString(), 
                        onSaved: (val) => _amount = double.parse(val), 
                     ),
                     TextFormField(
                        style: TextStyle(fontSize: 22), 
                        decoration: const InputDecoration(
                           icon: const Icon(Icons.calendar_today), 
                           hintText: 'Enter date', 
                           labelText: 'Date', 
                           labelStyle: TextStyle(fontSize: 18), 
                        ),
                        validator: (val) {
                           Pattern pattern = r'^((?:19|20)\d\d)[- /.]
                           (0[1-9]|1[012])[- /.](0[1-9]|[12][0-9]|3[01])$'; 
                           RegExp regex = new RegExp(pattern); 
                           if (!regex.hasMatch(val)) return 'Enter a valid date'; 
                           else return null; 
                        },
                        onSaved: (val) => _date = DateTime.parse(val), 
                        initialValue: id == 0 ? '' : expenses.byId(id).formattedDate, 
                        keyboardType: TextInputType.datetime, 
                     ),
                     TextFormField(
                        style: TextStyle(fontSize: 22), 
                        decoration: const InputDecoration(
                           icon: const Icon(Icons.category), 
                           labelText: 'Category', 
                           labelStyle: TextStyle(fontSize: 18)
                        ), 
                        onSaved: (val) => _category = val, 
                        initialValue: id == 0 ? '' : expenses.byId(id).category.toString(), 
                     ),
                     RaisedButton(
                        onPressed: _submit, 
                        child: new Text('Submit'), 
                     ),
                  ],
               ),
            ),
         ),
      );
   }
}
  • 现在,运行应用程序。

  • 使用浮动按钮添加新的支出。

  • 通过点击支出条目来编辑现有的支出。

  • 通过向任何方向滑动支出条目来删除现有的支出。

应用程序的一些屏幕截图如下所示:

Expense Calculator

Enter Expense Details

Total Expenses

Flutter - 总结

Flutter 框架通过提供一个出色的框架来构建真正平台独立的移动应用程序,做了一件很棒的事情。通过简化开发过程,提高生成的移动应用程序的性能,为 Android 和 iOS 平台提供丰富且相关的用户界面,Flutter 框架必将使许多新开发人员能够在不久的将来开发高性能且功能丰富的移动应用程序。

广告