- iOS 教程
- iOS - 首页
- iOS - 开始
- iOS - 环境设置
- iOS - Objective-C 基础
- iOS - 第一个 iPhone 应用
- iOS - 动作和出口
- iOS - 代理
- iOS - UI 元素
- iOS - 加速度计
- iOS - 通用应用程序
- iOS - 相机管理
- iOS - 位置处理
- iOS - SQLite 数据库
- iOS - 发送邮件
- iOS - 音频和视频
- iOS - 文件处理
- iOS - 访问地图
- iOS - 应用内购买
- iOS - iAd 集成
- iOS - GameKit
- iOS - 故事板
- iOS - 自动布局
- iOS - Twitter 和 Facebook
- iOS - 内存管理
- iOS - 应用程序调试
- iOS 有用资源
- iOS - 快速指南
- iOS - 有用资源
- iOS - 讨论
iOS - 表格视图
表格视图的使用
它用于显示一个垂直滚动的视图,该视图包含许多单元格(通常是可重用的单元格)。它具有标题、页脚、行和节等特殊功能。
重要属性
- 委托 (delegate)
- 数据源 (dataSource)
- 行高 (rowHeight)
- 节页脚高度 (sectionFooterHeight)
- 节标题高度 (sectionHeaderHeight)
- 分隔线颜色 (separatorColor)
- 表格页眉 (tableHeaderView)
- 表格页脚 (tableFooterView)
重要方法
- (UITableViewCell *)cellForRowAtIndexPath:(NSIndexPath *)indexPath
- (void)deleteRowsAtIndexPaths:(NSArray *)indexPaths
withRowAnimation:(UITableViewRowAnimation)animation
- (id)dequeueReusableCellWithIdentifier:(NSString *)identifier
- (id)dequeueReusableCellWithIdentifier:(NSString *)identifier
forIndexPath:(NSIndexPath *)indexPath
- (void)reloadData
- (void)reloadRowsAtIndexPaths:(NSArray *)indexPaths
withRowAnimation:(UITableViewRowAnimation)animation
- (NSArray *)visibleCells
示例代码和步骤
步骤 1 − 让我们像下面这样在ViewController.xib中添加一个表格视图。

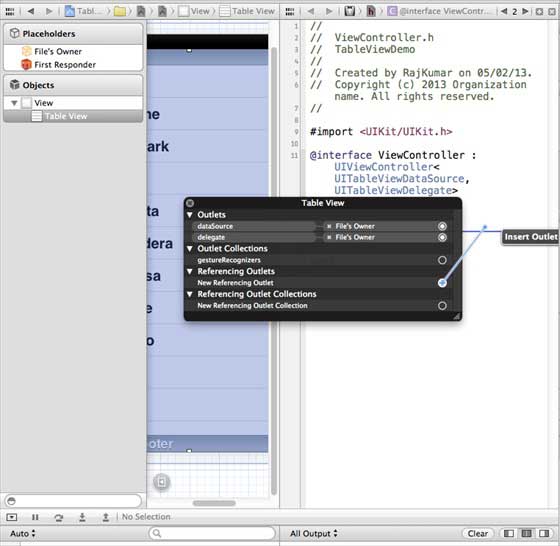
步骤 2 − 通过右键单击并选择数据源和委托,将表格视图的委托和数据源设置为文件所有者。设置数据源如下图所示。

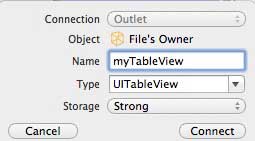
步骤 3 − 为 tableView 创建一个IBOutlet,并将其命名为myTableView。如下图所示。
步骤 4 − 然后添加一个 NSMutableArray 用于保存要在表格视图中显示的数据。
步骤 5 − 我们的 ViewController 应该采用UITableViewDataSource和UITableViewDelegate协议。ViewController.h应如下所示。
#import <UIKit/UIKit.h>

@interface ViewController : UIViewController<UITableViewDataSource,
   UITableViewDelegate> {
   IBOutlet UITableView *myTableView;
   NSMutableArray *myData;
}
@end
步骤 6 − 我们应该实现所需的表格视图委托和数据源方法。更新后的ViewController.m如下所示:
#import "ViewController.h"

@interface ViewController ()

@end

@implementation ViewController

- (void)viewDidLoad {
   [super viewDidLoad];
   // table view data is being set here
   myData = [[NSMutableArray alloc]initWithObjects:
   @"Data 1 in array",@"Data 2 in array",@"Data 3 in array",
   @"Data 4 in array",@"Data 5 in array",@"Data 5 in array",
   @"Data 6 in array",@"Data 7 in array",@"Data 8 in array",
   @"Data 9 in array", nil];
   // Do any additional setup after loading the view, typically from a nib.
}

- (void)didReceiveMemoryWarning {
   [super didReceiveMemoryWarning];
   // Dispose of any resources that can be recreated.
}

#pragma mark - Table View Data source
- (NSInteger)tableView:(UITableView *)tableView numberOfRowsInSection:
   (NSInteger)section {
   return [myData count]/2;
}

- (UITableViewCell *)tableView:(UITableView *)tableView cellForRowAtIndexPath:
   (NSIndexPath *)indexPath {
   static NSString *cellIdentifier = @"cellID";

   UITableViewCell *cell = [tableView dequeueReusableCellWithIdentifier:
   cellIdentifier];

   if (cell == nil) {
      cell = [[UITableViewCell alloc]initWithStyle:
      UITableViewCellStyleDefault reuseIdentifier:cellIdentifier];
   }

   NSString *stringForCell;

   if (indexPath.section == 0) {
      stringForCell= [myData objectAtIndex:indexPath.row];
   } else if (indexPath.section == 1) {
      stringForCell= [myData objectAtIndex:indexPath.row+ [myData count]/2];
   }
   [cell.textLabel setText:stringForCell];
   return cell;
}

// Default is 1 if not implemented
- (NSInteger)numberOfSectionsInTableView:(UITableView *)tableView {
   return 2;
}

- (NSString *)tableView:(UITableView *)tableView titleForHeaderInSection:
   (NSInteger)section {
   NSString *headerTitle;

   if (section==0) {
      headerTitle = @"Section 1 Header";
   } else {
      headerTitle = @"Section 2 Header";
   }
   return headerTitle;
}

- (NSString *)tableView:(UITableView *)tableView titleForFooterInSection:
   (NSInteger)section {
   NSString *footerTitle;

   if (section==0) {
      footerTitle = @"Section 1 Footer";
   } else {
      footerTitle = @"Section 2 Footer";
   }
   return footerTitle;
}

#pragma mark - TableView delegate

-(void)tableView:(UITableView *)tableView didSelectRowAtIndexPath:
   (NSIndexPath *)indexPath {
   [tableView deselectRowAtIndexPath:indexPath animated:YES];
   UITableViewCell *cell = [tableView cellForRowAtIndexPath:indexPath];
   NSLog(@"Section:%d Row:%d selected and its data is %@",
   indexPath.section,indexPath.row,cell.textLabel.text);
}
@end
步骤 7 − 当我们运行应用程序时,我们将得到以下输出:

ios_ui_elements.htm
广告