
 数据结构
数据结构 网络
网络 RDBMS
RDBMS 操作系统
操作系统 Java
Java iOS
iOS HTML
HTML CSS
CSS 安卓
安卓 Python
 C 编程语言
 C++
C++ C#
C# MongoDB
 MySQL
MySQL Javascript
 PHP
PHP安卓上的条形码扫描?
此示例演示了如何在安卓平台进行条形码扫描。
步骤 1 − 在 Android Studio 中创建一个新项目,进入 File ⇒ New Project,然后填写所有必需的信息以创建新项目。
步骤 2 − 向 res/layout/activity_main.xml 中添加以下代码。
<?xml version="1.0" encoding="utf-8"?>
<RelativeLayout xmlns:android="http://schemas.android.com/apk/res/android"
   xmlns:tools="http://schemas.android.com/tools"
   android:id="@+id/relativeLayout"
   android:layout_width="match_parent"
   android:layout_height="match_parent"
   android:padding="4dp"
   tools:context=".MainActivity">
<TextView
   android:layout_below="@id/button"
   android:layout_centerInParent="true"
   android:layout_marginBottom="10dp"
   android:text=" code reader"
   android:textSize="16sp"
   android:textStyle="bold"
   android:layout_width="wrap_content"
   android:layout_height="wrap_content"
   android:id="@+id/txtContent"/>
<Button
   android:layout_width="wrap_content"
   android:layout_height="wrap_content"
   android:text="Process"
   android:layout_marginTop="50dp"
   android:layout_centerHorizontal="true"
   android:id="@+id/button" />
</RelativeLayout>
步骤 3 − 在 Gradle 中添加以下依赖
implementation 'com.google.zxing:core:3.2.1'
implementation 'com.journeyapps:zxing-android-embedded:3.2.0@aar'
步骤 4 − 向 src/MainActivity.java 中添加以下代码
import androidx.appcompat.app.AppCompatActivity;
import android.content.Intent;
import android.os.Bundle;
import android.util.Log;
import android.view.View;
import android.widget.Button;
import android.widget.TextView;
import android.widget.Toast;
import com.google.zxing.integration.android.IntentIntegrator;
import com.google.zxing.integration.android.IntentResult;
public class MainActivity extends AppCompatActivity {
   Button btnBarcode;
   TextView textView;
   @Override
   protected void onCreate(Bundle savedInstanceState) {
      super.onCreate(savedInstanceState);
      setContentView(R.layout.activity_main);
      btnBarcode = findViewById(R.id.button);
      textView = findViewById(R.id.txtContent);
      btnBarcode.setOnClickListener(new View.OnClickListener() {
         @Override
         public void onClick(View v) {
            IntentIntegrator intentIntegrator = new IntentIntegrator(MainActivity.this);
            intentIntegrator.setDesiredBarcodeFormats(intentIntegrator.ALL_CODE_TYPES);
            intentIntegrator.setBeepEnabled(false);
            intentIntegrator.setCameraId(0);
            intentIntegrator.setPrompt("SCAN");
            intentIntegrator.setBarcodeImageEnabled(false);
            intentIntegrator.initiateScan();
         }
      });
   }
   @Override
   protected void onActivityResult(int requestCode, int resultCode, Intent data) {
      IntentResult Result = IntentIntegrator.parseActivityResult(requestCode, resultCode, data);
      if (Result != null) {
         if (Result.getContents() == null) {
            Toast.makeText(this, "cancelled", Toast.LENGTH_SHORT).show();
         } else {
            Log.d("MainActivity", "Scanned");
            Toast.makeText(this, "Scanned -> " + Result.getContents(), Toast.LENGTH_SHORT).show();
textView.setText(String.format("Scanned Result: %s", Result));
         }
      } else {
         super.onActivityResult(requestCode, resultCode, data);
      }
   }
}
步骤 5 − 向 androidManifest.xml 中添加以下代码
<?xml version="1.0" encoding="utf-8"?>
<manifest xmlns:android="http://schemas.android.com/apk/res/android"
   package="app.com.sample">
   <application
      android:allowBackup="true"
      android:icon="@mipmap/ic_launcher"
      android:label="@string/app_name"
      android:roundIcon="@mipmap/ic_launcher_round"
      android:supportsRtl="true"
      android:theme="@style/AppTheme">
      <activity android:name=".MainActivity">
         <intent-filter>
            <action android:name="android.intent.action.MAIN" />
            <category android:name="android.intent.category.LAUNCHER" />
         </intent-filter>
      </activity>
</application>
<uses-feature android:name="android.hardware.camera.autoFocus" />
<uses-feature android:name="android.hardware.camera" />
<uses-permission android:name="android.permission.CAMERA" />
<uses-permission android:name="android.permission.ACCESS_NETWORK_STATE" />
</manifest>
让我们尝试运行您的应用程序。我假设您已将实际的 Android 移动设备连接到了您的计算机。要从安卓工作室运行该应用程序,请打开您的一个项目活动文件,然后单击工具栏中的运行 ![]() 图标。选择您的移动设备作为选项,然后查看将显示默认界面的移动设备 −
图标。选择您的移动设备作为选项,然后查看将显示默认界面的移动设备 −
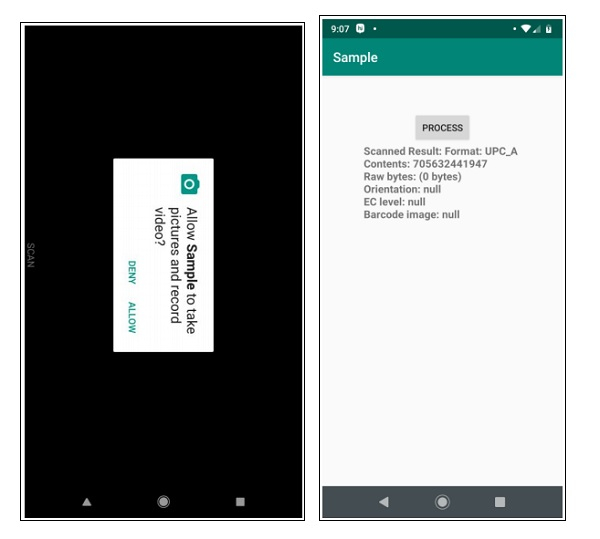
使用真机进行检查以获得更好的结果。

更新日期:2020 年 7 月 7 日
924 次浏览

广告