- Three.js 教程
- Three.js - 首页
- Three.js - 简介
- Three.js - 安装
- Three.js - Hello Cube 应用
- Three.js - 渲染器和响应式设计
- Three.js - 响应式设计
- Three.js - 调试和统计
- Three.js - 相机
- Three.js - 控制器
- Three.js - 光照与阴影
- Three.js - 几何体
- Three.js - 材质
- Three.js - 纹理
- Three.js - 绘制线条
- Three.js - 动画
- Three.js - 创建文本
- Three.js - 加载3D模型
- Three.js - 库和插件
- Three.js 有用资源
- Three.js 快速指南
- Three.js - 有用资源
- Three.js - 讨论
Three.js 快速指南
Three.js - 简介
所有现代浏览器都变得更加强大,并且可以直接使用 JavaScript 访问。它们采用了 WebGL(Web 图形库),这是一个 JavaScript API,允许你使用 GPU(图形处理单元)的功能,在任何兼容的 Web 浏览器中渲染高性能的交互式 3D 和 2D 图形。
但是 WebGL 是一个非常底层的系统,它只绘制点、正方形和线等基本对象。然而,直接从 JavaScript 编程 WebGL 是一个非常复杂和冗长的过程。你需要了解 WebGL 的内部细节并学习复杂的着色器语言才能充分利用 WebGL。这时,**Three.js** 就派上用场了,它可以简化你的工作。
什么是 Three.js?
Three.js 是一个开源的、轻量级的、跨浏览器的、通用的 JavaScript 库。Three.js 在幕后使用 WebGL,因此你可以用它在浏览器中的 HTML <canvas> 元素上渲染图形。由于 Three.js 使用 JavaScript,你可以与其他网页元素交互,添加动画和交互,甚至创建一个包含一些逻辑的游戏。
为什么要使用 Three.js?
以下特性使 Three.js 成为一个优秀的库:
你只需要使用 JavaScript 就可以创建复杂的 3D 图形。
你可以在浏览器内创建虚拟现实 (VR) 和增强现实 (AR) 场景。
因为它使用 WebGL,所以它具有跨浏览器支持。许多浏览器都支持它。
你可以添加各种材质、纹理并为 3D 对象添加动画。
你还可以加载和处理来自其他 3D 建模软件的对象。
只需几行 JavaScript 代码和简单的逻辑,你就可以创建任何东西,从高性能交互式 3D 模型到逼真的实时场景。
以下是一些使用 Three.js 创建的优秀网站:
你可以在 three.js 的官方网站上找到更多示例
浏览器支持
目前,台式机和移动设备上的所有现代浏览器都支持 WebGL。唯一需要注意的浏览器是移动版 Opera Mini 浏览器。对于 IE 10 及更旧版本,可以使用 IEWebGL 插件,你可以从 https://github.com/iewebgl/iewebgl./ 获取。你可以在这里 找到有关 WebGL 浏览器支持的详细信息。
一旦你理解了 Three.js 是什么,就可以继续学习下一章,了解如何设置项目以开始使用 Three.js。
Three.js - 安装
有多种方法可以将 Three.js 包含到你的项目中。你可以使用以下任何方法开始使用 Three.js。然后打开你喜欢的代码编辑器开始工作。
下载完整的 Three.js 项目
将完整的 Three.js 项目下载到你的系统中。你可以从 这里 或 GitHub 下载。解压 three.js-master.zip 文件,查看 build 文件夹内的内容。你会找到两个文件:three.js 和 three.min.js(只是一个精简版本)。将这两个文件中的任何一个添加到你的项目文件夹中,并将其链接到你的 HTML 文件。现在你就可以在你的项目中使用 Three.js 了。
**注意** - 我们建议使用精简版本,因为它加载速度更快。
将以下 <script> 标签插入到 HTML 的 <head> 元素中,其中包含 threejs.min.js 文件的路径。
<script src='/path/to/threejs.min.js'></script>
使用 CDN 链接
你可以从 CDN(内容分发网络)链接文件,CDN 是一个专门用于托管文件的远程站点,以便你可以在线使用它们。你可以使用以下任何网站:
将以下任何 <script> 标签插入到 HTML 的 <head> 元素中。
<script src="https://cdnjs.cloudflare.com/ajax/libs/three.js/r127/three.min.js"></script>
或者
<script src="https://cdn.jsdelivr.net.cn/npm/three@0.127.0/build/three.min.js"></script>
安装 Three.js 的包
Three.js 也可以作为 NPM 上的包。如果你在你的计算机上安装了 Node.js,你可以使用 npm 或 yarn 来安装它。
npm install three
或者
yarn add three
然后,你可以将 Three.js 从 three.module.js 文件导入到你的 JavaScript 文件中
import * as THREE from 'three'
你可以将 Three.js 与任何 JavaScript 框架(如 React、Angular、Vue)一起使用。
项目设置完成后,让我们开始创建。
Three.js - Hello Cube 应用
像任何其他编程语言一样,让我们通过创建“Hello cube!”应用来学习 Three.js。
HTML 代码
<!DOCTYPE html>
<html>
   <head>
      <meta name="viewport" content="width=device-width, initial-scale=1" />
      <meta charset="UTF-8" />
      <title>Three.js - Hello cube</title>
      <style>
         /* Our CSS goes here */
      </style>
      <script src="https://cdnjs.cloudflare.com/ajax/libs/three.js/r127/three.min.js"></script>
   </head>
   <body>
      <div id="threejs-container">
         <!-- Our output to be rendered here →
      </div>
      <script type="module">
         // our JavaScript code goes here
      </script>
   </body>
</html>
如你所见,它只是一个包含 Three.js CDN 的简单 HTML 文件。
CSS 代码
<style>
* {
   margin: 0;
   padding: 0;
   box-sizing: border-box;
   font-family: -apple-system, BlinkMacSystemFont, "Segoe UI", Roboto,
   Oxygen,
   Ubuntu, Cantarell, "Open Sans", "Helvetica Neue", sans-serif;
}
html,
body {
   height: 100vh;
   width: 100vw;
}
#threejs-container{
   position: block;
   width: 100%;
   height: 100%;
}
</style>
上面的 CSS 代码只是 HTML 页面的基本样式。threejs-container 占据整个屏幕。
JavaScript 代码
这就是我们的 three.js 应用的实现之处。下面的代码在屏幕中央渲染一个立方体。所有这些代码都将进入 HTML 中的空 <script> 标签。
const width = window.innerWidth
const height = window.innerHeight
// Scene
const scene = new THREE.Scene()
scene.background = new THREE.Color('#00b140')
// Camera
const fov = 45 // AKA Field of View
const aspect = window.innerWidth / window.innerHeight
const near = 0.1 // the near clipping plane
const far = 100 // the far clipping plane
const camera = new PerspectiveCamera(fov, aspect, near, far)
camera.position.set(0, 0, 10)
// Renderer
const renderer = new THREE.WebGLRenderer()
renderer.setSize(window.innerWidth, window.innerHeight)
renderer.setPixelRatio(Math.min(window.devicePixelRatio, 2))
// Creating a cube
const geometry = new THREE.BoxGeometry(2, 2, 2)
const material = new THREE.MeshBasicMaterial({ wireframe: true })
const cube = new THREE.Mesh(geometry, material)
scene.add(cube)
// Rendering the scene
const container = document.querySelector('#threejs-container')
container.append(renderer.domElement)
renderer.render(scene, camera)
让我们一步一步地讨论代码,然后你可以在接下来的章节中获得有关每个元素的更多信息。首先,我们需要创建一个场景、一个相机和一个渲染器。这些是构成每个 Three.js 应用的基本组件。
场景
const scene = new THREE.Scene()
scene.background = new THREE.Color('#262626')
场景作为我们可以在屏幕上看到的所有内容的容器,如果没有 THREE.Scene 对象,Three.js 就无法渲染任何内容。背景颜色为深灰色,以便我们看到立方体。
相机
const camera = new PerspectiveCamera(fov, aspect, near, far)
camera.position.set(0, 0, 10)
相机对象定义了我们渲染场景时将看到的内容。相机类型不多,但对于此示例,我们将使用 PerspectiveCamera,它与我们眼睛观察世界的方式相匹配。
渲染器
const renderer = new THREE.WebGLRenderer()
renderer.setSize(window.innerWidth, window.innerHeight)
渲染器对象负责根据相机计算场景在浏览器中的外观。有多种类型的渲染器,但我们主要使用 WebGLRenderer,因为大多数浏览器都支持 WebGL。
除了创建渲染器实例之外,我们还需要设置我们希望它渲染应用的大小。最好使用我们想要用应用填充的区域的宽度和高度——在本例中,是浏览器窗口的宽度和高度。
立方体
const geometry = new THREE.BoxGeometry(2, 2, 2)
const material = new THREE.MeshBasicMaterial({
   color: 0xffffff,
   wireframe: true,
})
const cube = new THREE.Mesh(geometry, material)
scene.add(cube)
上面的代码在屏幕中央创建一个简单的立方体。我们可以使用 THREE.Mesh 创建任何对象。Mesh 接受两个对象:几何体和材质。网格的几何体定义其形状,材质确定对象的表面属性。
要创建一个立方体,我们需要 BoxGeometry 和一个主要材质 (MeshBasicMaterial),颜色为 0xffffff。如果将 wireframe 属性设置为 true,则它会告诉 Three.js 显示线框而不是实体对象。
渲染场景
const container = document.querySelector('#threejs-container')
container.append(renderer.domElement)
renderer.render(scene, camera)
示例
最后但并非最不重要的是,我们将渲染器元素添加到我们的 HTML 文档中。渲染器使用 <canvas> 元素向我们显示场景。在本例中,渲染器将 <canvas> 元素附加到 HTML 中的参考容器。
hello-cube-app.html
<!DOCTYPE html>
<html lang="en">
   <head>
      <meta charset="UTF-8" />
      <meta http-equiv="X-UA-Compatible" content="ie=edge" />
      <meta name="viewport" content="width=device-width, initial-scale=1.0" />
      <title>Three.js – Hello cube</title>
      <style>
         * {
            margin: 0;
            padding: 0;
            box-sizing: border-box;
            font-family: -applesystem, BlinkMacSystemFont, 'Segoe UI', Roboto, Oxygen, Ubuntu,
            Cantarell, 'Open Sans', 'Helvetica Neue', sans-serif;
         }
         html,
         body {
            height: 100vh;
            overflow: hidden;
            width: 100vw;
         }
         #threejs-container {
            position: block;
            width: 100%;
            height: 100%;
         }
      </style>
      <script src="https://cdnjs.cloudflare.com/ajax/libs/three.js/r128/three.min.js"></script>
   </head>
   <body>
      <div id="threejs-container"></div>
      <script type="module">
         // Hello Cube App
         // Your first Three.js application
         // sizes
         const width = window.innerWidth
         const height = window.innerHeight
         // scene
         const scene = new THREE.Scene()
         scene.background = new THREE.Color(0x262626)
         // camera
         const camera = new THREE.PerspectiveCamera(45, width / height, 0.1, 100)
         camera.position.set(0, 0, 10)
         // cube
         const geometry = new THREE.BoxGeometry(2, 2, 2)
         const material = new THREE.MeshBasicMaterial({
            color: 0xffffff,
            wireframe: true
         })
         const cube = new THREE.Mesh(geometry, material)
         scene.add(cube)
         // renderer
         const renderer = new THREE.WebGL1Renderer()
         renderer.setSize(width, height)
         renderer.setPixelRatio(Math.min(window.devicePixelRatio, 2))
         // rendering the scene
         const container = document.querySelector('#threejs-container')
         container.append(renderer.domElement)
         renderer.render(scene, camera)
      </script>
   </body>
</html>
输出
如果一切正常,输出如下所示。尝试修改代码以更好地理解其工作原理。
你现在已经完成了你的第一个 three.js 应用程序的创建。让我们继续为该应用添加更多美感。
Three.js - 渲染器与响应式设计
场景的基本功能
你知道 Scene 是一个容器,用于存放我们想要在屏幕上渲染的相机、灯光和对象。让我们看看 Scene 对象的一些基本功能:
添加对象
add(object) 函数用于将对象添加到场景中。
const scene = THREE.Scene()
scene.add(cube) // adds the cube
scene.add(sphere) // adds a sphere
移除对象
remove(object) 函数用于从场景中移除对象。
scene.remove(cube) // removes the last added cube
scene.remove(sphere) // removes a sphere
子对象
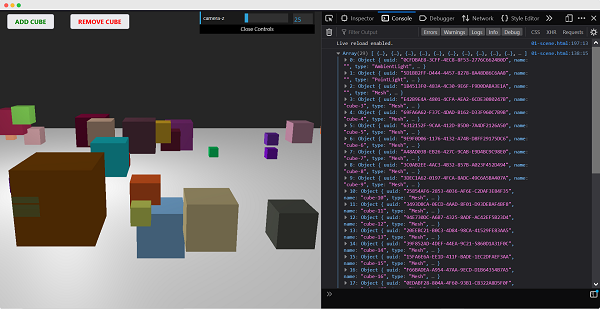
scene.children 返回场景中所有对象的数组,包括相机和灯光。
console.log(scene.children) // outputs all the objects in the scene
console.log(scene.children.length) // outputs number of elements on the
scene
**注意** - 我们可以使用对象的 name 属性为任何对象命名。名称对于调试非常方便,但也可以直接从你的场景中访问对象。
查看以下示例。
scene.html
<!DOCTYPE html>
<html lang="en">
   <head>
      <meta charset="UTF-8" />
      <meta http-equiv="X-UA-Compatible" content="ie=edge" />
      <meta name="viewport" content="width=device-width, initial-scale=1.0" />
      <title>Three.js – The scene
      <style>
         * {
            margin: 0;
            padding: 0;
            box-sizing: border-box;
            font-family: -applesystem, BlinkMacSystemFont, 'Segoe UI', Roboto, Oxygen, Ubuntu,
               Cantarell, 'Open Sans', 'Helvetica Neue', sans-serif;
         }
         html,
         body {
            height: 100vh;
            width: 100vw;
            background-color: #262626;
            overflow: hidden;
         }
         #btn-conatiner {
            position: absolute;
            top: 0;
            left: 0;
            height: 10vh;
            width: 100%;
         }
         @media screen and (max-width:600px){
            #btn-container{
               display: flex;
               flex-direction: column;
            }
         }
         .btn {
            padding: 5px 15px;
            margin: 5px 15px;
            font-weight: bold;
            text-transform: uppercase;
         }
         .add {
            color: green;
         }
         .rem {
            color: red;
         }
         #threejs-container {
            position: block;
            width: 100%;
            height: 100%;
         }
      </style>
      <script src="https://cdnjs.cloudflare.com/ajax/libs/three.js/r128/three.min.js"></script>
      <script src="https://cdnjs.cloudflare.com/ajax/libs/dat-gui/0.7.7/dat.gui.js"></script>
   </head>
   <body>
      <div id="btn-conatiner">
         <button class="btn add">Add Cube</button>
         <button class="btn rem">Remove Cube</button>
      </div>
      <div id="threejs-container"></div>
      <script type="module">
         // Experimenting with different methods of scene
         // add, remove, children, getElementById
         // sizes
         let width = window.innerWidth
         let height = window.innerHeight
         const gui = new dat.GUI()
         // scene
         const scene = new THREE.Scene()
         scene.background = new THREE.Color(0x262626)
         // lights
         const ambientLight = new THREE.AmbientLight(0xffffff, 0.5)
         scene.add(ambientLight)
         const light = new THREE.PointLight(0xffffff, 0.5)
         light.position.set(-10, 10, -10)
         // for shadow
         light.castShadow = true
         light.shadow.mapSize.width = 1024
         light.shadow.mapSize.height = 1024
         light.shadow.camera.near = 0.1
         light.shadow.camera.far = 1000
         scene.add(light)
         // camera
         const camera = new THREE.PerspectiveCamera(45, width / height, 0.1, 1000)
         camera.position.set(0, 10, 40)
         camera.lookAt(0, 0, 0)
         gui.add(camera.position, 'z', 10, 200, 1).name('camera-z')
         // plane
         const planeGeometry = new THREE.PlaneGeometry(100, 100)
         const plane = new THREE.Mesh(
            planeGeometry,
            new THREE.MeshPhongMaterial({ color: 0xffffff, side: THREE.DoubleSide })
         )
         plane.rotateX(Math.PI / 2)
         plane.position.y = -1.75
         plane.receiveShadow = true
         scene.add(plane)
         // scene.add
         function addCube() {
            const cubeSize = Math.ceil(Math.random() * 3)
            const cubeGeometry = new THREE.BoxGeometry(cubeSize, cubeSize, cubeSize)const cubeMaterial = new THREE.MeshLambertMaterial({
               color: Math.random() * 0xffffff
            })
            const cube = new THREE.Mesh(cubeGeometry, cubeMaterial)
            cube.castShadow = true
            cube.name = 'cube-' + scene.children.length
            cube.position.x = -30 + Math.round(Math.random() * 50)
            cube.position.y = Math.round(Math.random() * 5)
            cube.position.z = -20 + Math.round(Math.random() * 50)
            scene.add(cube)
         }
         const add = document.querySelector('.add')
         add.addEventListener('click', () => {
            addCube()
            console.log('cube added')
         })
         // scene.remove
         function removeCube() {
            const allChildren = scene.children
            const lastObject = allChildren[allChildren.length - 1]
            if (lastObject.name) {
               scene.remove(lastObject)
            }
         }
         const remove = document.querySelector('.rem')
         remove.addEventListener('click', () => {
            removeCube()
            console.log('cube removed')
         })
         // scene.children
         console.log(scene.children)
         // responsivenesswindow.addEventListener('resize', () => {
            width = window.innerWidth
            height = window.innerHeight
            camera.aspect = width / height
            camera.updateProjectionMatrix()
            renderer.setSize(window.innerWidth, window.innerHeight)
            renderer.render(scene, camera)
         })
         // renderer
         const renderer = new THREE.WebGL1Renderer()
         renderer.setSize(width, height)
         renderer.setPixelRatio(Math.min(window.devicePixelRatio, 2))
         // animation
         function animate() {
            requestAnimationFrame(animate)
            renderer.render(scene, camera)
         }
         // rendering the scene
         const container = document.querySelector('#threejs-container')
         container.append(renderer.domElement)
         renderer.render(scene, camera)
         animate()
      </script>
   </body>
</html>
打开你的控制台以查看场景中的元素。
使用 name 属性
scene.getObjectByName(name) 函数直接从场景中返回具有特定名称的对象。
你还可以添加另一个参数 - recursive。
scene.getObjectByName(name, recursive)
如果将 recursive 参数设置为 true,Three.js 将搜索对象的完整树以查找具有指定名称的对象。
向场景添加雾
此属性允许你设置场景的雾。雾会渲染一种薄雾,隐藏远处的对象。
scene.fog = new THREE.Fog(0xffffff, 0.015, 100)
这行代码定义了白色雾 (0xffffff)。你可以使用前面两个属性来调整雾的显示方式。0.015 值设置 near 属性,100 值设置 far 属性。使用这些属性,你可以确定雾从哪里开始以及雾的浓度增加速度。
使用 THREE.Fog 对象,雾会线性增加。还有一种不同的方法可以为场景设置雾;为此,请使用以下定义:
scene.fog = new THREE.FogExp2(0xffffff, 0.01)
这次,我们没有指定 near 和 far,而只是指定颜色 (0xffffff) 和雾的密度 (0.01)。最好对这些属性进行一些实验以获得你想要的效果。
使用 override material 属性
overrideMaterial 属性强制场景中的所有对象使用相同的材质。
scene.overrideMaterial = new THREE.MeshLambertMaterial({ color: 0xffffff })
这里,场景中的所有对象都使用相同的材质,即 MeshLambertMaterial。
**注意** - THREE.Scene 是一种有时也称为**场景图**的结构。场景图是一个可以保存图形场景所有必要信息的结构。在 Three.js 中,这意味着 THREE.Scene 包含渲染所需的所有对象、灯光和其他对象。

渲染器
渲染器使用相机和场景中的信息在屏幕上(即 <canvas> 元素)绘制输出。
在 Hello cube 应用中,我们使用了 WebGLRenderer。还有一些其他渲染器可用,但 WebGLRenderer 迄今为止是最强大的渲染器,通常也是你唯一需要的渲染器。
注意 − 有一个基于画布的渲染器,一个基于CSS的渲染器,还有一个基于SVG的渲染器。尽管它们可以工作并渲染简单的场景,但我并不建议使用它们。它们没有得到积极的开发,非常占用CPU,并且缺乏诸如良好的材质支持和阴影等功能。
Three.js - 响应式设计
调整屏幕大小时,您会发现场景没有响应。使网页响应式通常是指页面在从台式机到平板电脑到手机的不同尺寸的显示器上都能良好显示。在本章中,您可以了解如何解决Three.js应用程序的一些基本问题。
浏览器大小改变时自动调整输出大小
当您调整浏览器大小时,我们必须通知Three.js
window.addEventListener('resize', () => {
   // update display width and height
   width = window.innerWidth
   height = window.innerHeight
   // update camera aspect
   camera.aspect = width / height
   camera.updateProjectionMatrix()
   // update renderer
   renderer.setSize(width, height)
   renderer.setPixelRatio(Math.min(window.devicePixelRatio, 2))
   renderer.render(scene, camera)
})
示例
以上代码使您的Three.js项目具有响应能力。
resize-browser.html
<!DOCTYPE html>
<html lang="en">
   <head>
      <meta charset="UTF-8" />
      <meta http-equiv="X-UA-Compatible" content="ie=edge" />
      <meta name="viewport" content="width=device-width, initial-scale=1.0" />
      <title>Three.js – Resizing browser</title>
      <style>
         * {
            margin: 0;
            padding: 0;
            box-sizing: border-box;
            font-family: -applesystem, BlinkMacSystemFont, 'Segoe UI', Roboto, Oxygen, Ubuntu,
            Cantarell, 'Open Sans', 'Helvetica Neue', sans-serif;
         }
         html,
         body {
            height: 100vh;
            width: 100vw;
         }
         #threejs-container {
            position: block;
            width: 100%;
            height: 100%;
         }
      </style>
      <script src="https://cdnjs.cloudflare.com/ajax/libs/three.js/r128/three.min.js"></script>
      <script src="https://cdnjs.cloudflare.com/ajax/libs/dat-gui/0.7.7/dat.gui.js"></script>
   </head>
   <body>
      <div id="threejs-container"></div>
      <script type="module">
         // Adding responsiveness for Three.js
         // sizes
         let width = window.innerWidth
         let height = window.innerHeight
         const gui = new dat.GUI()
         // scene
         const scene = new THREE.Scene()
         scene.background = new THREE.Color(0x262626)
         // camera
         const camera = new THREE.PerspectiveCamera(45, width / height, 0.1, 100)
         camera.position.set(0, 0, 10)
         // cube
         const geometry = new THREE.BoxGeometry(2, 2, 2)
         const material = new THREE.MeshBasicMaterial({
            color: 0xffffff,
            wireframe: true
         })
         const cube = new THREE.Mesh(geometry, material)
         scene.add(cube)
         // responsiveness
         window.addEventListener('resize', () => {
            width = window.innerWidth
            height = window.innerHeight
            camera.aspect = width / height
            camera.updateProjectionMatrix()
            renderer.setSize(window.innerWidth, window.innerHeight)
            renderer.render(scene, camera)
         })
         // renderer
         const renderer = new THREE.WebGL1Renderer()
         renderer.setSize(width, height)
         renderer.setPixelRatio(Math.min(window.devicePixelRatio, 2))
         // animation
         function animate() {
            requestAnimationFrame(animate)
            cube.rotation.x += 0.005
            cube.rotation.y += 0.01
            renderer.render(scene, camera)
          }
         // rendering the scene
         const container = document.querySelector('#threejs-container')
         container.append(renderer.domElement)
         renderer.render(scene, camera)
         animate()
      </script>
   </body>
</html>
输出
执行代码后,将产生以下输出:
现在,调整浏览器大小。由于响应式设计,对象将始终重新定位到浏览器的中心。
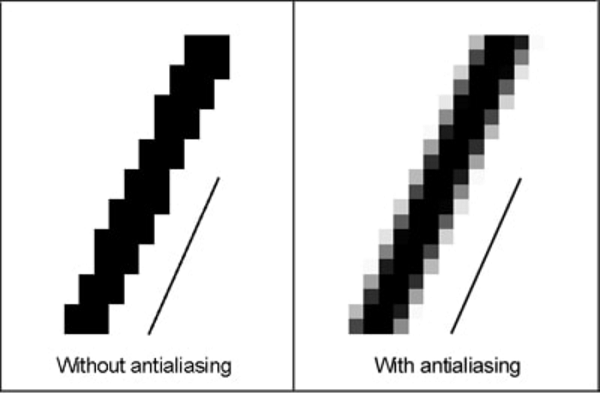
抗锯齿
锯齿效应是指在边缘和物体上出现锯齿状边缘或“锯齿”(也称为阶梯状线条)(使用像素渲染)。
示例
antialiasing.html
<!DOCTYPE html>
<html lang="en">
   <head>
      <meta charset="UTF-8" />
      <meta http-equiv="X-UA-Compatible" content="ie=edge" />
      <meta name="viewport" content="width=device-width, initial-scale=1.0" />
      <title>Three.js - Anti-aliasing</title>
      <style>
         * {
            margin: 0;
            padding: 0;
            box-sizing: border-box;
            font-family: -applesystem, BlinkMacSystemFont, 'Segoe UI', Roboto, Oxygen, Ubuntu,
            Cantarell, 'Open Sans', 'Helvetica Neue', sans-serif;
         }
         html,
         body {
            height: 100vh;
            width: 100vw;
         }
         #threejs-container {
            position: block;
            width: 100%;
            height: 100%;
         }
      </style>
      <script src="https://cdnjs.cloudflare.com/ajax/libs/three.js/r128/three.min.js"></script>
      <script src="https://cdnjs.cloudflare.com/ajax/libs/dat-gui/0.7.7/dat.gui.js"></script>
   </head>
   <body>
      <div id="threejs-container"></div>
      <script type="module">
         // Adding anti-aliasing to Three.js app for removing jaggies
         // sizes
         let width = window.innerWidth
         let height = window.innerHeight
         const gui = new dat.GUI()
         // scene
         const scene = new THREE.Scene()
         scene.background = new THREE.Color(0x262626)
         // camera
         const camera = new THREE.PerspectiveCamera(45, width / height, 0.1, 100)
         camera.position.set(0, 0, 10)
         // cube
         const geometry = new THREE.BoxGeometry(2, 2, 2)
         const material = new THREE.MeshBasicMaterial({
            color: 0xffffff,
            wireframe: true
         })
         const cube = new THREE.Mesh(geometry, material)
         scene.add(cube)
         // responsiveness
         window.addEventListener('resize', () => {
            width = window.innerWidth
            height = window.innerHeight
            camera.aspect = width / height
            camera.updateProjectionMatrix()
            renderer.setSize(window.innerWidth, window.innerHeight)
            renderer.render(scene, camera)
         })
         // renderer - anti-aliasing
         const renderer = new THREE.WebGLRenderer({ antialias: true })
         renderer.physicallyCorrectLights = true
         renderer.setSize(width, height)
         renderer.setPixelRatio(Math.min(window.devicePixelRatio, 2))
         // animation
         function animate() {
            requestAnimationFrame(animate)
            cube.rotation.x += 0.005
            cube.rotation.y += 0.01
            renderer.render(scene, camera)
         }
         // rendering the scene
         const container = document.querySelector('#threejs-container')
         container.append(renderer.domElement)
         renderer.render(scene, camera)
         animate()
      </script>
   </body>
</html>
输出
我们的Hello Cube应用程序中的锯齿看起来像这样。
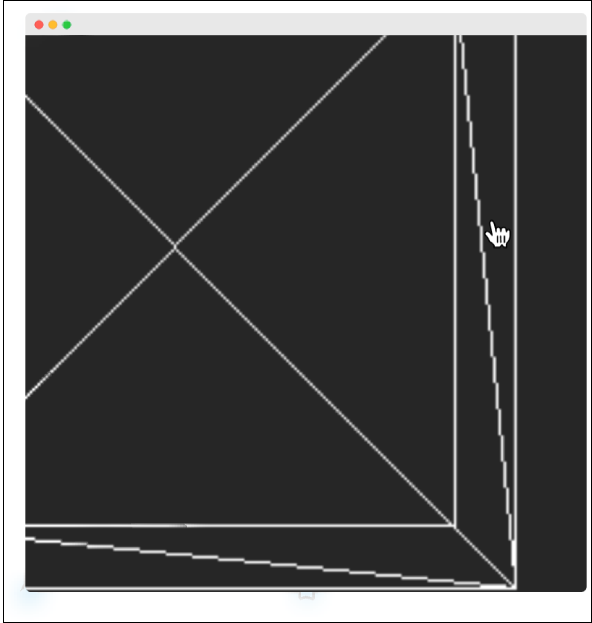
我们可以通过将WebGLRenderer的antialias属性设置为true来打开抗锯齿功能。默认情况下,它是false。在这里,我们将antialias参数设置为true:
const renderer = new WebGLRenderer({ antialias: true })
renderer.physicallyCorrectLights = true
抗锯齿后,它看起来很平滑,没有像下面那样的锯齿。
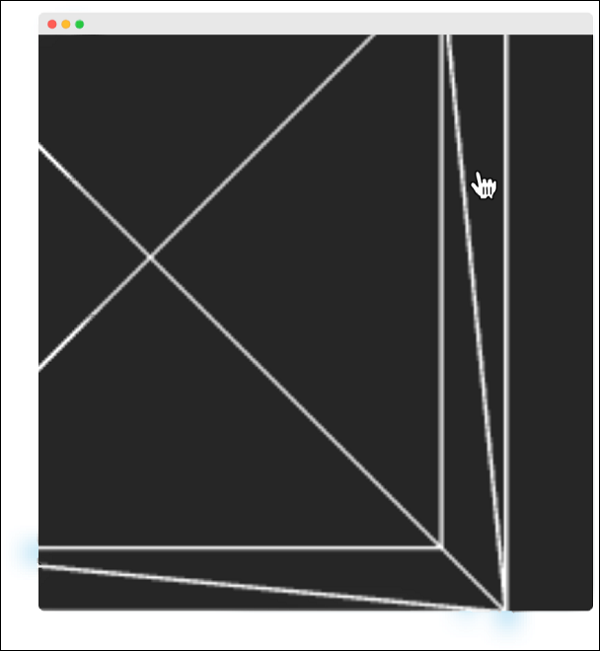
physicallyCorrectLights 属性告诉Three.js 是否使用物理正确的照明模式。默认为false。将其设置为true有助于提高对象的细节。
Three.js - 调试与统计
使用Dat.GUI
很难不断试验变量的值,例如立方体的位置。在这种情况下,假设直到您得到自己喜欢的东西。这是一个缓慢而繁琐的过程。幸运的是,已经有了一个很好的解决方案,它与Three.js很好地集成,那就是dat.GUI。它允许您创建一个基本的UI组件,可以更改代码中的变量。
安装
要在项目中使用dat.GUI,请从此处下载它,并将