- ASP.NET MVC 教程
- ASP.NET MVC - 首页
- ASP.NET MVC - 概述
- ASP.NET MVC - 设计模式
- ASP.NET MVC - 环境设置
- ASP.NET MVC - 快速入门
- ASP.NET MVC - 生命周期
- ASP.NET MVC - 路由
- ASP.NET MVC - 控制器
- ASP.NET MVC - 操作方法
- ASP.NET MVC - 过滤器
- ASP.NET MVC - 选择器
- ASP.NET MVC - 视图
- ASP.NET MVC - 数据模型
- ASP.NET MVC - 辅助方法
- ASP.NET MVC - 模型绑定
- ASP.NET MVC - 数据库
- ASP.NET MVC - 验证
- ASP.NET MVC - 安全性
- ASP.NET MVC - 缓存
- ASP.NET MVC - Razor
- ASP.NET MVC - 数据注解
- Nuget 包管理
- ASP.NET MVC - Web API
- ASP.NET MVC - 脚手架
- ASP.NET MVC - Bootstrap
- ASP.NET MVC - 单元测试
- ASP.NET MVC - 部署
- ASP.NET MVC - 自托管
- ASP.NET MVC 有用资源
- ASP.NET MVC - 快速指南
- ASP.NET MVC - 有用资源
- ASP.NET MVC - 讨论
ASP.NET MVC - 模型绑定
ASP.NET MVC 模型绑定允许您将 HTTP 请求数据与模型映射。它是一个使用浏览器在 HTTP 请求中发送的数据创建 .NET 对象的过程。刚接触 ASP.Net MVC 的 ASP.NET Web Forms 开发人员大多不清楚视图中的值是如何在到达控制器的操作方法时转换为模型类的,因此这种转换是由模型绑定器完成的。
模型绑定是 HTTP 请求和 C# 操作方法之间精心设计的桥梁。它使开发人员能够轻松处理表单(视图)上的数据,因为 POST 和 GET 会自动转换为您指定的數據模型。ASP.NET MVC 使用默认绑定器在后台完成此操作。
让我们来看一个简单的例子,在这个例子中,我们从上一章的项目中添加一个“创建视图”,我们将看到如何将这些值从视图获取到 EmployeeController 操作方法。
以下是 POST 的创建操作方法。
// POST: Employee/Create
[HttpPost]
public ActionResult Create(FormCollection collection){
   try{
      // TODO: Add insert logic here
      return RedirectToAction("Index");
   }catch{
      return View();
   }
}
右键单击“创建操作方法”,然后选择“添加视图…”
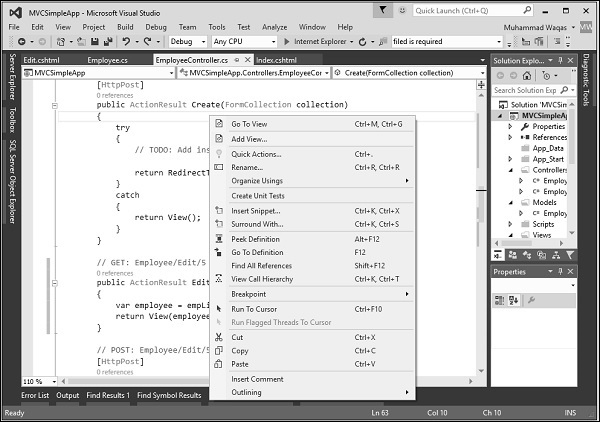
它将显示“添加视图”对话框。
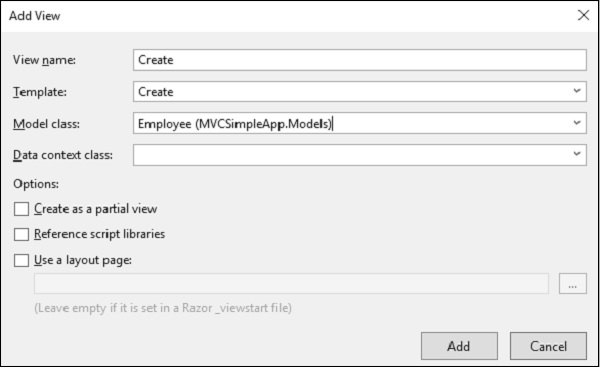
正如您在上面的屏幕截图中看到的,默认名称已提到。现在从“模板”下拉列表中选择“创建”,从“模型类”下拉列表中选择“Employee”。
您将在 Create.cshtml 视图中看到默认代码。
@model MVCSimpleApp.Models.Employee
@{
   Layout = null;
}

<!DOCTYPE html>
<html>
   <head>
      <meta name = "viewport" content = "width = device-width" />
      <title>Create</title>
   </head>

   <body>
      @using (Html.BeginForm()){
         @Html.AntiForgeryToken()
         <div class = "form-horizontal">
            <h4>Employee</h4>
            <hr />
            @Html.ValidationSummary(true, "", new { @class = "text-danger" })

            <div class = "form-group">
               @Html.LabelFor(model => model.Name, htmlAttributes:
                  new{ @class = "control-label col-md-2" })

               <div class = "col-md-10">
                  @Html.EditorFor(model => model.Name, new{ htmlAttributes =
                     new { @class = "form-control" } })

                  @Html.ValidationMessageFor(model => model.Name, "",
                     new{ @class = "text-danger" })
               </div>
            </div>

            <div class = "form-group">
               @Html.LabelFor(model => model.JoiningDate, htmlAttributes:
                  new{ @class = "control-label col-md-2" })

               <div class = "col-md-10">
                  @Html.EditorFor(model => model.JoiningDate, new{ htmlAttributes =
                     new { @class = "form-control" } })

                  @Html.ValidationMessageFor(model => model.JoiningDate, "",
                     new { @class = "text-danger" })
               </div>
            </div>

            <div class = "form-group">
               @Html.LabelFor(model => model.Age, htmlAttributes:
                  new { @class = "control-label col-md-2" })

               <div class = "col-md-10">
                  @Html.EditorFor(model => model.Age, new { htmlAttributes =
                     new { @class = "form-control" } })

                  @Html.ValidationMessageFor(model => model.Age, "", new{ @class = "text-danger" })
               </div>
            </div>

            <div class = "form-group">
               <div class = "col-md-offset-2 col-md-10">
                  <input type = "submit" value = "Create" class = "btn btn-default"/>
               </div>
            </div>

         </div>
      }

      <div>
         @Html.ActionLink("Back to List", "Index")
      </div>

   </body>
</html>
当用户在“创建视图”中输入值时,它在 FormCollection 和 Request.Form 中都可用。我们可以使用这些值中的任何一个来填充来自视图的员工信息。
让我们使用以下代码使用 FormCollection 创建员工。
// POST: Employee/Create
[HttpPost]
public ActionResult Create(FormCollection collection){
   try {
      Employee emp = new Employee();
      emp.Name = collection["Name"];
      DateTime jDate;
      DateTime.TryParse(collection["DOB"], out jDate);
      emp.JoiningDate = jDate;
      string age = collection["Age"];
      emp.Age = Int32.Parse(age);
      empList.Add(emp);
      return RedirectToAction("Index");
   }catch {
      return View();
   }
}
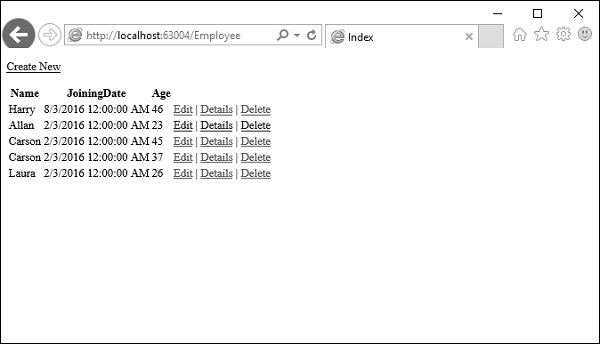
运行此应用程序并请求此 URL https://:63004/Employee/。您将收到以下输出。

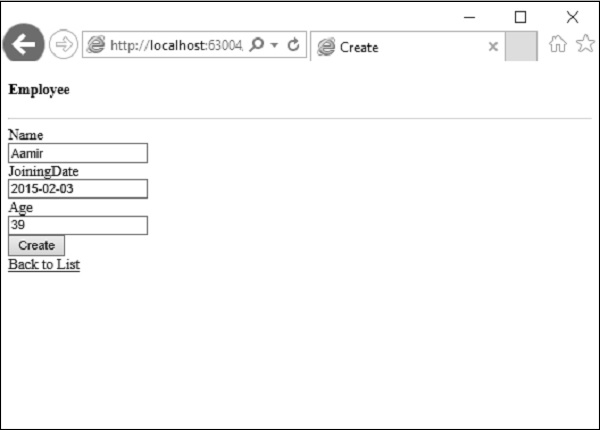
单击页面顶部的“创建新”链接,它将转到以下视图。

让我们输入要添加的另一个员工的数据。
单击“创建”按钮,您将看到新员工已添加到您的列表中。

在上面的示例中,我们获取 HTML 视图中所有发布的值,然后将这些值映射到 Employee 属性并逐个赋值。
在这种情况下,我们还将在发布的值与模型属性的格式不同的地方进行类型转换。
这也被称为手动绑定,这种类型的实现对于简单的小型数据模型来说可能还不错。但是,如果您有庞大的数据模型并且需要大量的类型转换,那么我们可以利用 ASP.NET MVC 模型绑定的强大功能和易用性。
让我们看看我们为模型绑定所做的相同示例。
我们需要将 Create 方法的参数更改为接受 Employee 模型对象,而不是像以下代码中所示的 FormCollection。
// POST: Employee/Create
[HttpPost]
public ActionResult Create(Employee emp){
   try{
      empList.Add(emp);
      return RedirectToAction("Index");
   }catch{
      return View();
   }
}
现在,模型绑定的魔力取决于提供值的 HTML 变量的 ID。
对于我们的 Employee 模型,HTML 输入字段的 ID 应该与 Employee 模型的属性名称相同,您可以看到 Visual Studio 在创建视图时使用了模型的相同属性名称。
@Html.EditorFor(model => model.Name, new { htmlAttributes = new { @class = "form-control" } })
映射将默认基于属性名称。在这里,我们会发现 HTML 辅助方法非常有用,因为这些辅助方法将生成具有模型绑定所需正确名称的 HTML。
运行此应用程序并请求 URL **https://:63004/Employee/**。您将看到以下输出。

让我们单击页面顶部的“创建新”链接,它将转到以下视图。
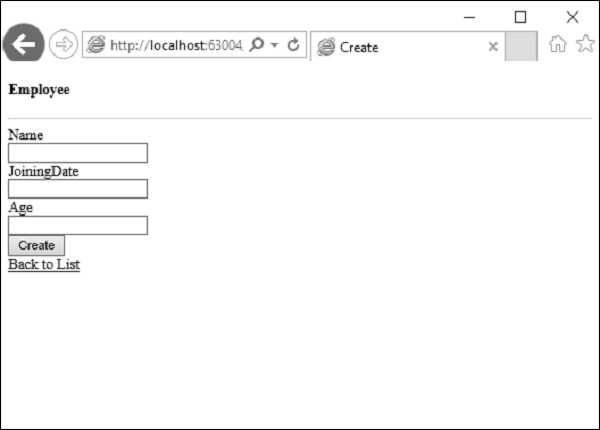
让我们输入要添加的另一个员工的数据。

现在单击“创建”按钮,您将看到新员工已使用 ASP.Net MVC 模型绑定添加到您的列表中。