如何在 Material UI 的自动完成组件中处理异步请求?
现代 Web 应用程序经常使用自动完成组件,允许用户在键入时从选项列表中搜索和选择选项。流行的 UI 框架 Material UI 提供了一个强大的自动完成组件,可以增强用户体验。在异步获取自动完成数据的情况下,有效地处理请求变得至关重要。
本文将探讨如何使用 Material UI 在自动完成组件中处理异步请求,以确保无缝的用户体验。
什么是异步请求?
在后续连接中,异步响应会发送回客户端,允许它发送新的请求,而无需在等待响应时阻塞。网关默认情况下始终发送同步响应。如果您想要异步响应,则需要执行一些额外的步骤。
在自动完成组件中,异步请求在处理大型数据集或从第三方 API 获取信息时至关重要。异步方法确保在整个数据检索过程中用户界面保持响应,避免任何应用程序延迟或冻结。
自动完成组件中的异步请求
自动完成组件可以通过两种不同的用例处理异步请求,如下所述:
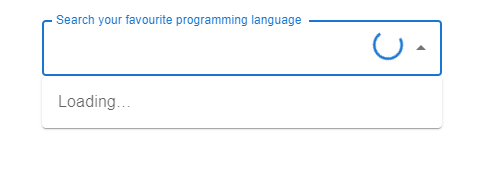
打开时加载 - 第一个用例是在打开时加载,只要网络请求处于挂起状态,就会显示进度状态。它会在加载选项之前等待与组件的交互。
边输入边搜索 - 第二个用例涉及边输入边搜索,在每次按键时都会发送一个新的请求。如果您的逻辑涉及在每次按键时检索新选项并使用文本框的当前值过滤服务器,请考虑对请求进行节流。
还必须通过覆盖 filterOptions 属性来关闭自动完成组件的内置过滤功能:
<Autocomplete filterOptions={(x) => x} />
现在让我们进一步了解在 Material UI React 中的自动完成组件中处理异步请求的完整步骤。
在自动完成组件中处理异步请求的步骤
步骤 1:创建一个新的 React 应用程序项目
为了使每个自动完成组件都能正常工作,我们需要一个 React 应用程序来运行。要创建一个新的 React 应用程序,请遵循以下命令:
npx create-react-app mynewproject
cd mynewproject
步骤 2:安装 Material UI 及其所需的模块
创建 React 应用程序后,现在让我们使用以下命令安装 Material UI 及其所需的依赖项:
npm install @mui/material @emotion/react @emotion/styled
步骤 3:导入自动完成组件
要将组件导入 React 主组件,如下所示:
import React from 'react';
import TextField from '@mui/material/TextField';
import Autocomplete from '@mui/material/Autocomplete';
步骤 4:添加延迟函数
为了处理异步请求,我们将首先创建一个延迟休眠函数,该函数返回一个在指定时间后解析的 Promise。
function delSleep(delay = 0) {
   return new Promise((resolve) => {
      setTimeout(resolve, delay);
   });
}
步骤 5:控制自动完成组件
const [autoOpen, setAutoOpen] = useState(false);
const [opData, setOpData] = useState([]);
const load = open && options.length === 0;

//the below fetches options only when Autocomplete is open
useEffect(() => {
   let active = true;

   if (!load) {
      return undefined;
   }

   (async () => {
      await sleep(1e3);

      if (active) {
         setOpData([...yourData]);
      }
   })();

   return () => {
      active = false;
   };
}, [load]);
步骤 6:在自动完成组件中渲染异步请求
以下是使用已定义的变量和 useEffect 渲染异步请求的代码:
<Autocomplete
   open={autoOpen}
   onOpen={() => {
      setAutoOpen(true);
   }}
   onClose={() => {
      setAutoOpen(false);
   }}
   isOptionEqualToValue={(opData, value) => opData.label === value.label}
   getOptionLabel={(opData) => opData.label}
   options={opData}
   loading={load}
   renderInput={(params) => (
      <TextField
         InputProps={{
            ...params.InputProps,
            endAdornment: (
               <div>
                  {load ? <CircularProgress  /> : null}
                  {params.InputProps.endAdornment}
               </div>
            ),
         }}
      />
   )}
/>
示例 1
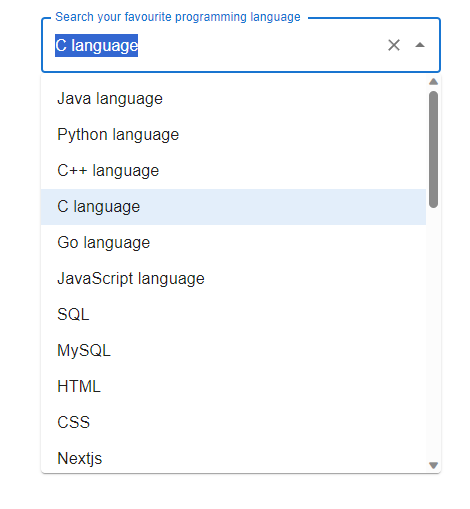
以下示例演示了在自动完成组件中处理异步请求的使用方法。在这里,当用户打开自动完成组件时,只要网络请求处于挂起状态,就会显示进度状态,以显示数据或来自数据列表数组的可用选项。
import React, { useEffect, useState } from "react";
import TextField from "@mui/material/TextField";
import Autocomplete from "@mui/material/Autocomplete";
import CircularProgress from "@mui/material/CircularProgress";

const data = [
   { label: "Java language" },
   { label: "Python language" },
   { label: "C++ language" },
   { label: "C language" },
   { label: "Go language" },
   { label: "JavaScript language" },
   { label: "SQL" },
   { label: "MySQL" },
   { label: "HTML" },
   { label: "CSS" },
   { label: "Nextjs " },
   { label: "ReactJS " },
   { label: "VueJS " },
   { label: "Angular " },
   { label: "Angular JS " },
   { label: "PHP language" },
   { label: "R language" },
   { label: "Objective C language" },
   { label: "Cobol language" },
   { label: "Perl language" },
   { label: "Pascal language" },
   { label: "LISP language" },
   { label: "Fortran language" },
   { label: "Swift language" },
   { label: "Ruby language" },
   { label: "Algol language" },
   { label: "Scala language" },
   { label: "Rust language" },
   { label: "TypeScript language" },
   { label: "Dart language" },
   { label: "Matlab language" },
   { label: "Ada language" },
   { label: ".NET language" },
   { label: "Bash language" },
];

function delaySleep(delay = 0) {
   return new Promise((resolve) => {
      setTimeout(resolve, delay);
   });
}

export default function App() {
   const [open, setOpen] = useState(false);
   const [dataOptions, setDataOptions] = useState([]);
   const load = open && dataOptions.length === 0;

   useEffect(() => {
      let active = true;

      if (!load) {
         return undefined;
      }

      (async () => {
         await delaySleep(1e3); // For demo purposes.

         if (active) {
            setDataOptions([...data]);
         }
      })();

      return () => {
         active = false;
      };
   }, [load]);

   useEffect(() => {
      if (!open) {
         setDataOptions([]);
      }
   }, [open]);

   return (
      <div
         style={{
            display: "flex",
            marginTop: 30,
            flexDirection: "column",
            alignItems: "center",
            justifyContent: "center",
         }}>
         <Autocomplete
            sx={{ width: 400 }}
            open={open}
            onOpen={() => {
               setOpen(true);
            }}
            onClose={() => {
               setOpen(false);
            }}
            getOptionLabel={(option) => option.label}
            isOptionEqualToValue={(option, value) => option.label === value.label}
            loading={load}
            options={dataOptions}
            renderInput={(params) => ( //render the Textfield with the data options
               <TextField
                  {...params}
                  label="Search your favourite programming language"
                  InputProps={{
                     ...params.InputProps,
                     endAdornment: (
                        <div>
                           {load ? (
                              <CircularProgress color="primary" size={30} />
                           ) : null}
                           {params.InputProps.endAdornment}
                        </div>
                     ),
                  }}
               />
            )}
         />
      </div>
   );
}
输出

示例 2
以下示例演示了在自动完成组件中处理异步请求的使用方法。在这里,当用户键入任何关键字时,它会在每次按键时获取新的选项,并使用文本框的当前值在服务器上进行过滤。
import React, { useEffect, useState } from "react";
import TextField from "@mui/material/TextField";
import Autocomplete from "@mui/material/Autocomplete";
import CircularProgress from "@mui/material/CircularProgress";

const data = [
   { label: "Java language" },
   { label: "Python language" },
   { label: "C++ language" },
   { label: "C language" },
   { label: "Go language" },
   { label: "JavaScript language" },
   { label: "SQL" },
   { label: "MySQL" },
   { label: "HTML" },
   { label: "CSS" },
   { label: "Nextjs " },
   { label: "ReactJS " },
   { label: "VueJS " },
   { label: "Angular " },
   { label: "Angular JS " },
   { label: "PHP language" },
   { label: "R language" },
   { label: "Objective C language" },
   { label: "Cobol language" },
   { label: "Perl language" },
   { label: "Pascal language" },
   { label: "LISP language" },
   { label: "Fortran language" },
   { label: "Swift language" },
   { label: "Ruby language" },
   { label: "Algol language" },
   { label: "Scala language" },
   { label: "Rust language" },
   { label: "TypeScript language" },
   { label: "Dart language" },
   { label: "Matlab language" },
   { label: "Ada language" },
   { label: ".NET language" },
   { label: "Bash language" },
];

function delaySleep(delay = 0) {
   return new Promise((resolve) => {
      setTimeout(resolve, delay);
   });
}

export default function App() {
   const [open, setOpen] = useState(false);
   const [dataOptions, setDataOptions] = useState([]);
   const load = open && dataOptions.length === 0;

   useEffect(() => {
      let active = true;

      if (!load) {
         return undefined;
      }

      (async () => {
         await delaySleep(1e3); // For demo purposes.

         if (active) {
            setDataOptions([...data]);
         }
      })();

      return () => {
         active = false;
      };
   }, [load]);

   useEffect(() => {
      if (!open) {
         setDataOptions([]);
      }
   }, [open]);

   return (
      <div
         style={{
            display: "flex",
            marginTop: 30,
            flexDirection: "column",
            alignItems: "center",
            justifyContent: "center",
         }}>
         <Autocomplete
            sx={{ width: 400 }}
            open={open}
            onOpen={() => {
               setOpen(true);
            }}
            onClose={() => {
               setOpen(false);
            }}
            filterOptions={(dataOptions, { inputValue }) => {
               const inputValueLowerCase = inputValue.toLowerCase();
               return dataOptions.filter((option) =>
                  option.label.toLowerCase().includes(inputValueLowerCase)
               );
            }}
            getOptionLabel={(option) => option.label}
            isOptionEqualToValue={(option, value) => option.label === value.label}
            loading={load}
            options={dataOptions}
            renderInput={(params) => ( //render the Textfield with the data options
               <TextField
                  {...params}
                  label="Search your favourite programming language"
                  InputProps={{
                     ...params.InputProps,
                     endAdornment: (
                        <div>
                           {load ? (
                              <CircularProgress color="primary" size={30} />
                           ) : null}
                           {params.InputProps.endAdornment}
                        </div>
                     ),
                  }}
               />
            )}
         />
      </div>
   );
}
输出


 数据结构
数据结构 网络
网络 关系型数据库管理系统
 操作系统
操作系统 Java
Java iOS
iOS HTML
HTML CSS
CSS Android
 Python
 C 编程
C 编程 C++
C++ C#
C# MongoDB
 MySQL
MySQL Javascript
 PHP
PHP