如何在 Material UI 中自定义 Chip?
在这篇文章中,我们将学习如何在 Material UI 中自定义芯片。芯片是代表输入、属性或操作的小组件。借助芯片,用户可以输入数据、选择选项、过滤内容或启动流程。
芯片也可以在 React 中的 MUI 中自定义。芯片的自定义可能包括更改芯片颜色、自定义删除图标、添加头像或使用其根属性创建芯片。我们将在本文中了解所有内容。
要使用 MUI 中的芯片,我们需要了解其 API 及其相关的 props。
Chip API
Chip API 用于将芯片添加到 React MUI 中。它带有 props -
avatar - 要在芯片上显示头像,我们使用 avatar 属性。
classes - 为了自定义组件的样式,我们可以使用 classes 属性。
color - 如果您想个性化芯片颜色,可以使用 color 属性。
component - component 属性在芯片内渲染根组件。
clickable - 使用此属性,我们可以使芯片可点击。按下时触发。
deleteIcon - 如果您希望更改芯片组件中的图标,可以使用 deleteIcon 修改它。
disabled - 要禁用芯片,只需使用 disabled。
icon - 您可以选择使用 icon 属性向芯片添加图标。
label - label 属性用于向组件添加内容。
onDelete - 要显示删除图标,我们使用 onDelete prop。
size - 要调整芯片的大小,请使用此 size prop。
skipFocusWhenDisabled - 要在芯片上跳过焦点,请相应地使用 prop。
sx - 要为芯片组件添加自定义样式,请使用 sx prop。
variant - 如果您希望使用不同的芯片变体,请使用 prop。
自定义芯片所需的步骤
要在 Material UI 中创建自定义芯片组件,请参阅以下步骤 -
步骤 1:创建 React 应用程序
在继续在 MUI 中自定义芯片组件之前,我们需要创建一个 React 应用程序。要创建一个新的 React 应用程序,请在您的终端中运行以下命令 -
npx create react app chipcompproject
项目创建完成后,通过运行以下命令导航到其目录 -
cd chipcompproject
步骤 2:将 MUI 添加到 React
创建 React 应用程序后,是时候将 Material UI 安装到 React 应用程序中了。要安装 MUI,请运行以下命令 -
npm install @mui/material @emotion/react @emotion/styled
步骤 3:创建芯片
要添加或创建芯片,我们使用 <Chip> API 组件,如下面的语法所示 -
const CopyChip = styled(Chip)(() => ({
   //add custom CSS styles below this
   …
})
<Chip label="Click label" />
关于使用芯片操作的步骤就介绍到这里。
示例
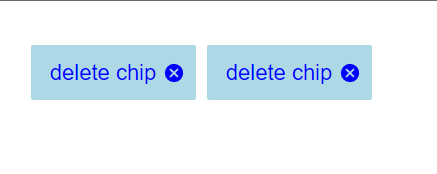
在此示例中,我们自定义了芯片组件的填充变体。在这里,我们定义了多个 CSS 属性,如边框、边框半径、颜色等,以将变体更改为填充。此外,我们还添加了带有自定义 CSS 规范(如颜色和大小)的删除图标。
import Chip from "@mui/material/Chip";
import { styled } from "@mui/material/styles"

//Create a custom chip using styled
const MuiChipCustom = styled(Chip)(() => ({
   width: 150, //adding custom css styles
   height: 50,
   backgroundColor: 'lightblue',
   borderRadius: 2,
   color: 'white',

   '& .MuiChip-label': {
      color: 'blue', //using the MUI chip label properties
      fontSize: 20
   },

   '& .MuiChip-deleteIcon': {
      color: 'blue',
      fontSize: 20
   },
}));

function App() {

   const deleteHandler = () => {
      alert('You just deleted the chip!')
   };

   return (
      <div
         style={{
            padding: 40,
            gap: 10,
            display: 'flex',
            flexDirection: 'row'
         }}>
         <MuiChipCustom label="delete chip" variant="filled" onDelete={deleteHandler} />
         <MuiChipCustom label="delete chip" variant="filled" onDelete={deleteHandler} />
      </div>
   );
};
export default App;
输出

示例
在此示例中,我们自定义了芯片组件的轮廓变体。在这里,我们定义了多个 CSS 属性,如边框、边框半径、颜色等,以将变体更改为轮廓,并且在这里我们也可以从芯片组件中删除 variant prop,因为它仍然可以工作。
import React from "react";
import { Chip } from "@mui/material";
import { styled } from "@mui/material/styles"

const MuiChipCustom = styled(Chip)(() => ({
   border: '2px solid lightblue',
   borderRadius: 25,
   width: 150,
   height: 50,
   color: 'white',

   '& .MuiChip-label': {
      color: 'lightblue',
      fontSize: 20
   },
}));

const App = () => {
   const handleClick = () => {
      alert('You just clicked the chip!')
   };

   return (
      <div
         style={{
            padding: 40,
            gap: 10,
            display: 'flex',
            flexDirection: 'row'
         }}>
         <MuiChipCustom label="click me" variant="outlined" onClick={handleClick} />
         <MuiChipCustom label="click me" variant="outlined" onClick={handleClick} />
      </div>
   );
};
export default App;
输出

示例
在此示例中,我们自定义了芯片组件中的图标。在这里,我们使用了 &.MuiChip-icon CSS 属性来更改添加到芯片开头的图标的颜色和字体大小,使其成为自定义。
import React from "react";
import { Chip } from "@mui/material";
import { styled } from "@mui/material/styles"
import { Clear, Delete, DeleteForever, Done } from "@mui/icons-material";

const MuiChipCustom = styled(Chip)(() => ({
   border: '2px solid green',
   borderRadius: 25,
   width: 150,
   height: 50,
   color: 'white',

   '& .MuiChip-label': {
      color: 'green',
      fontSize: 20,
   },

   '& .MuiChip-icon': {
      color: 'green',
      fontSize: 30
   },
}));

function App() {

   const handleClick = () => {
      alert('You just clicked the chip!')
   };

   return (
      <div
         style={{
            padding: 40,
            gap: 10,
            display: 'flex',
            flexDirection: 'row'
         }}>
         <MuiChipCustom icon={<Done />} label="click me" variant="outlined" onClick={handleClick} />
         <MuiChipCustom icon={<Delete />} label="click me" variant="outlined" onClick={handleClick} />
         <MuiChipCustom icon={<DeleteForever />} label="click me" variant="outlined" onClick={handleClick} />
         <MuiChipCustom icon={<Clear />} label="click me" variant="outlined" onClick={handleClick} />
      </div>
   );
};

export default App;
输出

示例
在此示例中,我们对芯片组件中的头像进行了一些更改。我们利用 &.MuiChip avatar CSS 属性调整芯片中头像的大小并赋予其外观。
import React from "react";
import { Avatar, Chip } from "@mui/material";
import { styled } from "@mui/material/styles"

const MuiChipCustom = styled(Chip)(() => ({
   border: '2px solid green',
   borderRadius: 25,
   width: 200,
   height: 50,
   color: 'white',

   '& .MuiChip-label': {
      color: 'green',
      fontSize: 20,
   },

   '& .MuiChip-avatar': {
      width: 40,
      height: 40
   },

}));

function App() {

   const handleClick = () => {
      alert('You just clicked the chip!')
   };

   return (
      <div
         style={{
            padding: 40,
            gap: 10,
            display: 'flex',
            flexDirection: 'row'
         }}>
         <MuiChipCustom avatar={<Avatar alt="tp" src="https://play-lh.googleusercontent.com/F10OOHNkeNbOf5x9DYpoihAIkLRlSMxCsPHyCErXgm0oM2gZtJwVymJIZoN59v4JJWBZ" />} label="tutorialspoint" variant="outlined" onClick={handleClick} />
         <MuiChipCustom avatar={<Avatar alt="tp" src="https://play-lh.googleusercontent.com/F10OOHNkeNbOf5x9DYpoihAIkLRlSMxCsPHyCErXgm0oM2gZtJwVymJIZoN59v4JJWBZ" />} label="tutorialspoint" variant="outlined" onClick={handleClick} />
         <MuiChipCustom avatar={<Avatar alt="tp" src="https://play-lh.googleusercontent.com/F10OOHNkeNbOf5x9DYpoihAIkLRlSMxCsPHyCErXgm0oM2gZtJwVymJIZoN59v4JJWBZ" />} label="tutorialspoint" variant="outlined" onClick={handleClick} />
         <MuiChipCustom avatar={<Avatar alt="tp" src="https://play-lh.googleusercontent.com/F10OOHNkeNbOf5x9DYpoihAIkLRlSMxCsPHyCErXgm0oM2gZtJwVymJIZoN59v4JJWBZ" />} label="tutorialspoint" variant="outlined" onClick={handleClick} />
      </div>
   );
};
export default App;
输出

结论
总而言之,在本文中,我们探讨了如何在 React MUI 中个性化芯片组件。我们介绍了实现这些自定义的所有步骤,包括修改删除图标、背景颜色和不同变体等示例。


 数据结构
数据结构 网络
网络 关系型数据库管理系统
 操作系统
操作系统 Java
Java iOS
iOS HTML
HTML CSS
CSS Android
 Python
 C 编程
C 编程 C++
C++ C#
C# MongoDB
 MySQL
MySQL Javascript
 PHP
PHP