- PyQt 教程
- PyQt - 首页
- PyQt - 简介
- PyQt - 环境配置
- PyQt - Hello World
- PyQt - 主要类
- PyQt - 使用 Qt Designer
- PyQt - 元对象
- PyQt 信号与槽
- PyQt - 信号和槽
- PyQt - 支持和信号
- PyQt - 未绑定和已绑定信号
- PyQt - 使用 PyQtSignal 创建新信号
- PyQt - 连接、断开和发射信号
- PyQt - 槽装饰器
- PyQt - 槽连接
- PyQt 布局
- PyQt - 布局管理
- PyQt - QBoxLayout
- PyQt - QGridLayout
- PyQt - QFormLayout
- PyQt - QHBoxLayout
- PyQt - QVBoxLayout
- PyQt - QStackedLayout
- PyQt - QGraphicsGridLayout
- PyQt - QGraphicsAnchorLayout
- PyQt - QGraphicsLayout
- PyQt - QGraphicsLinearLayout
- PyQt 基本控件
- PyQt - 基本控件
- PyQt - QLabel 控件
- PyQt - QLineEdit 控件
- PyQt - QPushButton 控件
- PyQt - QRadioButton 控件
- PyQt - QCheckBox 控件
- PyQt - QComboBox 控件
- PyQt - QSpinBox 控件
- PyQt - QMessageBox
- PyQt - QDialogButtonBox 控件
- PyQt - QFontComboBox 控件
- PyQt - QDoubleSpinBox 控件
- PyQt - QToolBox 控件
- PyQt - QDialog 类
- PyQt - QMessageBox
- PyQt - 多文档界面
- PyQt - 拖放操作
- PyQt 绘图 API
- PyQt - 绘图 API
- PyQt 数据库
- PyQt - 数据库处理
- PyQt 核心知识
- PyQt - BrushStyle 常量
- PyQt - QClipboard
- PyQt - QPixmap 类
- PyQt 有用资源
- PyQt - 快速指南
- PyQt - 有用资源
- PyQt - 讨论
PyQt - QHBoxLayout
QHBoxLayout 类用于创建水平布局容器。容器中的元素将从左到右依次排列。创建水平布局需要使用 PyQt 的各种函数,例如 setLayout()、addWidget() 和 addLayout()。因此,QHBoxLayout 对象的命令创建了一个活动的布局管理器。
所有这些类都可以作为构建水平方向容器的步骤:
步骤 1 - 从布局类创建一个布局对象。
步骤 2 - setLayout() - 将此布局对象分配给父窗口部件的属性。
步骤 3 - addWidget() - 可以将此方法称为一个函数,用于将窗口部件添加到布局中。
步骤 4 - addLayout() - 这是 QHBoxLayout 类的附加方法,允许我们将更复杂的窗口部件添加到 PyQt 窗口中。
在本教程中,我们将探讨如何使用 QHBoxlayout 水平排列 PyQt 窗口部件。

QHBoxLayout 的语法
QHBoxLayout 本身既是一个类,也是一个内置函数。以下是执行布局任务的语法:
QHBoxLayout()
在 PyQt 窗口中使用 QHBoxLayout
在盒布局系统中,开发人员提供了一种强大的方法来定位 GUI 组件及其应用程序。因此,QHBoxLayout 的三种主要用法:
- 创建窗口部件
- 设置 QHBoxLayout
- 设置窗口布局
示例
下面的示例演示了使用 QHBoxLayout 类创建水平容器布局的代码。
import sys
from PyQt6.QtWidgets import QApplication, QWidget, QPushButton, QHBoxLayout
class ExampleWidget(QWidget):
   def __init__(self):
      super().__init__()
      self.initUI()
   def initUI(self):
      # Create widgets
      box1 = QPushButton('A', self)
      box2 = QPushButton('B', self)
      box3 = QPushButton('C', self)

      # Create horizontal layout
      h_box = QHBoxLayout()
      h_box.addWidget(box1)
      h_box.addWidget(box2)
      h_box.addWidget(box3)

      # Set the layout for the main window
      self.setLayout(h_box)

      self.setGeometry(300, 300, 300, 150)
      self.setWindowTitle('QHBoxLayout')
      self.show()

if __name__ == '__main__':
   app = QApplication(sys.argv)
   ex = ExampleWidget()
   sys.exit(app.exec())
输出
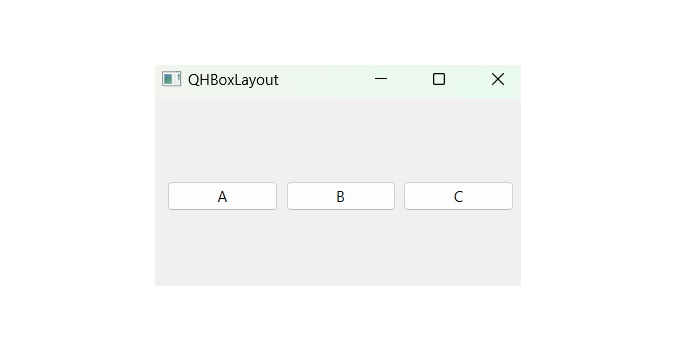
执行代码后,我们将得到一个从左到右的水平容器结果。

QHBoxLayout 中的边距和间距属性
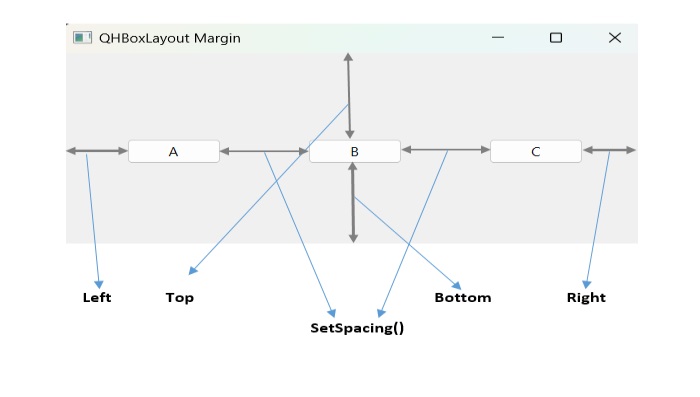
边距属性保持 PyQt 窗口的设计,因为它会在文本和容器边缘之间创建空间,而间距则保持两个窗口部件之间的间隙。
在 PyQt 窗口中,我们有两组基于边距和间距的属性:
- setSpacing() - 此对象与 QHBoxLayout 类关联,用于设置子窗口部件之间的间距。
- setContentsMargins() - 此属性对象也与 QHBoxLayout 类关联,通过以下四个参数来设置边距:左、上、右和下。
示例
在这个示例中,我们将演示使用 QHBoxLayout 类及其对象设置间距和边距属性。
import sys
from PyQt6.QtWidgets import QApplication, QWidget, QPushButton, QHBoxLayout
class ExampleWidget(QWidget):
   def __init__(self):
      super().__init__()
      self.initUI()
   def initUI(self):
      # Create widgets
      b1 = QPushButton('A', self)
      b2 = QPushButton('B', self)
      b3 = QPushButton('C', self)

      # Create horizontal layout
      h_box = QHBoxLayout()
      h_box.addWidget(b1)
      h_box.addWidget(b2)
      h_box.addWidget(b3)

      # Set spacing between widgets
      h_box.setSpacing(70)

      # Set content margins
      h_box.setContentsMargins(50, 50, 50, 50)

      # Set the layout for the main window
      self.setLayout(h_box)

      self.setGeometry(300, 300, 300, 150)
      self.setWindowTitle('QHBoxLayout Margin')
      self.show()

if __name__ == '__main__':
   app = QApplication(sys.argv)
   ex = ExampleWidget()
   sys.exit(app.exec())
输出
上述代码将产生以下输出:

广告