- Xamarin 教程
- Xamarin - 首页
- Xamarin - 安装
- Xamarin - 第一个应用程序
- Xamarin - 应用程序清单
- Xamarin - Android 资源
- Xamarin - Android 活动生命周期
- Xamarin - 权限
- Xamarin - 构建应用程序 GUI
- Xamarin - 菜单
- Xamarin - 布局
- Xamarin - Android 小部件
- Xamarin - Android 对话框
- Xamarin - 图库
- Xamarin - Android 视图
- Xamarin - 多屏幕应用程序
- Xamarin - 部署您的应用程序
- Xamarin 有用资源
- Xamarin - 快速指南
- Xamarin - 有用资源
- Xamarin - 讨论
Xamarin - 构建应用程序 GUI
TextView
TextView 是 Android 小部件中非常重要的组件。它主要用于在 Android 屏幕上显示文本。
要创建 TextView,只需打开main.axml并在线性布局标签之间添加以下代码。
<TextView
   android:text = "Hello I am a text View"
   android:layout_width = "match_parent"
   android:layout_height = "wrap_content"
   android:id = "@+id/textview1" />
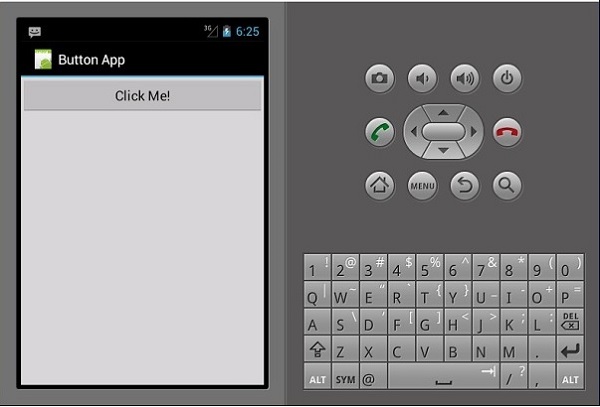
Button
按钮是一个控件,用于在点击时触发事件。在您的Main.axml文件中,键入以下代码以创建按钮。
<Button
   android:id = "@+id/MyButton"
   android:layout_width = "fill_parent"
   android:layout_height = "wrap_content"
   android:text = "@string/Hello" />
打开Resources\Values\Strings.xml并在<resources>标签之间键入以下代码行。
<string name="Hello">Click Me!</string>
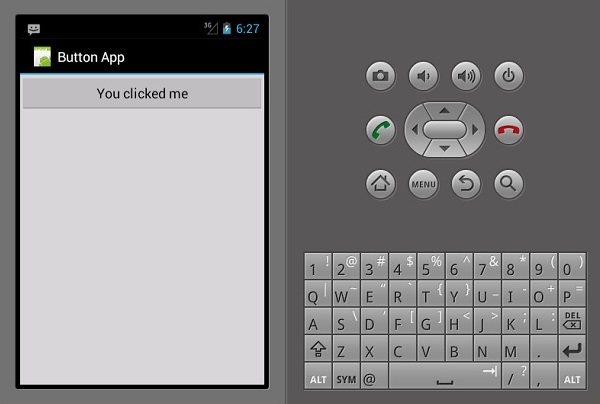
以上代码提供了我们创建的按钮的值。接下来,我们打开MainActivity.cs并创建在点击按钮时要执行的操作。在base.OnCreate(bundle)方法下键入以下代码。
Button button = FindViewById<Button>(Resource.Id.MyButton);
button.Click += delegate { button.Text = "You clicked me"; };
以上代码在用户点击按钮时显示“您点击了我”。
FindViewById<< --> 此方法查找已识别的视图的 ID。它在 .axml 布局文件中搜索 ID。
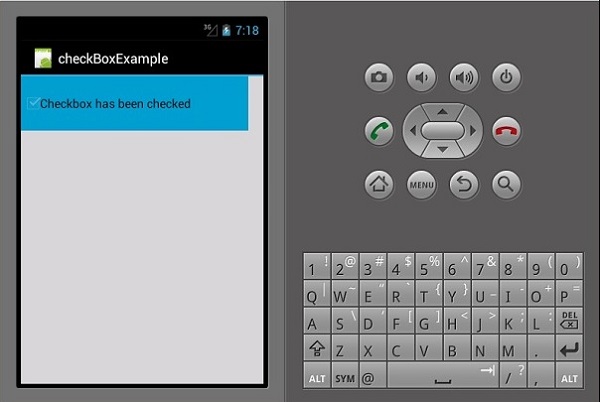
Checkbox
当想要从一组选项中选择多个选项时使用复选框。在本例中,我们将创建一个复选框,选中时显示已选中消息,否则显示未选中。
首先,我们打开项目中的Main.axml文件,并键入以下代码行以创建复选框。
<?xml version = "1.0" encoding = "utf-8"?>
<LinearLayout xmlns:android = "http://schemas.android.com/apk/res/android"
   android:orientation = "vertical"
   android:background = "#d3d3d3"
   android:layout_width = "fill_parent"
   android:layout_height = "fill_parent">
   <CheckBox
      android:text = "CheckBox"
      android:padding = "25dp"
      android:layout_width = "300dp"
      android:layout_height = "wrap_content"
      android:id = "@+id/checkBox1"
      android:textColor = "@android:color/black"
      android:background = "@android:color/holo_blue_dark" />
</LinearLayout>
接下来,转到MainActivity.cs添加功能代码。
CheckBox checkMe = FindViewById<CheckBox>(Resource.Id.checkBox1);
checkMe.CheckedChange += (object sender, CompoundButton.CheckedChangeEventArgs e) => {
   CheckBox check = (CheckBox)sender;
   if(check.Checked) {
      check.Text = "Checkbox has been checked";
   } else {
      check.Text = "Checkbox has not been checked";
   }
};
从以上代码中,我们首先使用findViewById查找复选框。接下来,我们为复选框创建一个处理程序方法,在处理程序中,我们创建一个 if else 语句,根据所选结果显示消息。
CompoundButton.CheckedChangeEventArgs → 此方法在复选框状态更改时触发事件。
ProgressBar
进度条是一个用于显示操作进度的控件。要添加进度条,请在Main.axml文件中添加以下代码行。
<ProgressBar
   style="?android:attr/progressBarStyleHorizontal"
   android:layout_width = "match_parent"
   android:layout_height = "wrap_content"
   android:id = "@+id/progressBar1" />
接下来,转到MainActivity.cs并设置进度条的值。
ProgressBar pb = FindViewById<ProgressBar>(Resource.Id.progressBar1);
pb.Progress = 35;
在上面的代码中,我们创建了一个值为 35 的进度条。
Radio Buttons
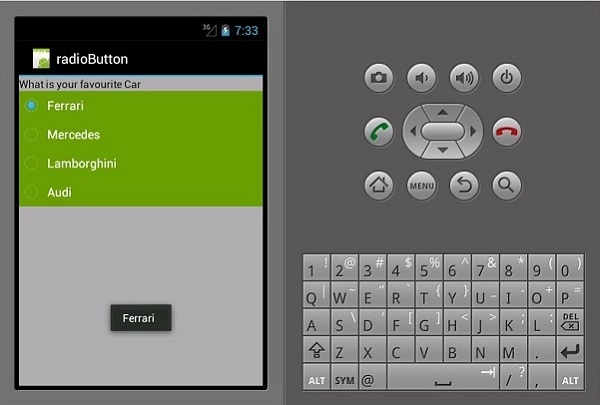
这是一个 Android 小部件,允许用户从一组选项中选择一个。在本节中,我们将创建一个包含汽车列表的单选组,该列表将检索选中的单选按钮。
首先,我们添加一个单选组和一个TextView,如下面的代码所示 -
<?xml version = "1.0" encoding = "utf-8"?>
<LinearLayout xmlns:android = "http://schemas.android.com/apk/res/android"
   android:orientation = "vertical"
   android:background = "@android:color/darker_gray"
   android:layout_width = "fill_parent"
   android:layout_height = "fill_parent">
   <TextView
      android:text = "What is your favourite Car"
      android:layout_width = "match_parent"
      android:layout_height = "wrap_content"
      android:id = "@+id/textView1"
      android:textColor = "@android:color/black" />
   <RadioGroup
      android:layout_width = "match_parent"
      android:layout_height = "wrap_content"
      android:id = "@+id/radioGroup1"
      android:backgroundTint = "#a52a2aff"
      android:background = "@android:color/holo_green_dark">
   <RadioButton
      android:layout_width = "wrap_content"
      android:layout_height = "wrap_content"
      android:text = "Ferrari"
      android:id = "@+id/radioFerrari" />
   <RadioButton
      android:layout_width = "wrap_content"
      android:layout_height = "wrap_content"
      android:text = "Mercedes"
      android:id = "@+id/radioMercedes" />
   <RadioButton
      android:layout_width = "wrap_content"
      android:layout_height = "wrap_content"
      android:text = "Lamborghini"
      android:id = "@+id/radioLamborghini" />
   <RadioButton
      android:text = "Audi"
      android:layout_width = "match_parent"
      android:layout_height = "wrap_content"
      android:id = "@+id/radioAudi" />
   </RadioGroup>
</LinearLayout>
要执行操作,当点击单选按钮时,我们添加一个活动。转到MainActivity.cs并创建一个新的事件处理程序,如下所示。
private void onClickRadioButton(object sender, EventArgs e) {
   RadioButton cars = (RadioButton)sender;
   Toast.MakeText(this, cars.Text, ToastLength.Short).Show
   ();
}
Toast.MakeText() → 这是一个视图方法,用于在一个小的弹出窗口中显示消息/输出。在OnCreate()方法的底部,就在SetContentView()之后,添加以下代码段。这将捕获每个单选按钮并将它们添加到我们创建的事件处理程序中。
RadioButton radio_Ferrari = FindViewById<RadioButton>
   (Resource.Id.radioFerrari);
   RadioButton radio_Mercedes = FindViewById<RadioButton>
   (Resource.Id.radioMercedes);
   RadioButton radio_Lambo = FindViewById<RadioButton>
   (Resource.Id.radioLamborghini);
   RadioButton radio_Audi = FindViewById<RadioButton>
   (Resource.Id.radioAudi);
   radio_Ferrari.Click += onClickRadioButton;
   radio_Mercedes.Click += onClickRadioButton;
   radio_Lambo.Click += onClickRadioButton;
   radio_Audi.Click += onClickRadioButton;
现在,运行您的应用程序。它应该显示以下屏幕作为输出 -
Toggle Buttons
切换按钮用于在两种状态之间切换,例如,它可以在打开和关闭之间切换。打开Resources\layout\Main.axml并添加以下代码行以创建切换按钮。
<?xml version = "1.0" encoding = "utf-8"?>
<LinearLayout xmlns:android = "http://schemas.android.com/apk/res/android"
   android:orientation = "vertical"
   android:background = "#d3d3d3"
   android:layout_width = "fill_parent"
   android:layout_height = "fill_parent">
   <ToggleButton
      android:id = "@+id/togglebutton"
      android:layout_width = "wrap_content"
      android:layout_height = "wrap_content"
      android:textOn = "Torch ON"
      android:textOff = "Torch OFF"
      android:textColor = "@android:color/black" />
</LinearLayout>
当点击切换栏时,我们可以向其添加操作。打开MainActivity.cs并在OnCreate()方法类之后添加以下代码行。
ToggleButton togglebutton = FindViewById<ToggleButton> (Resource.Id.togglebutton);
togglebutton.Click += (o, e) => {
   if (togglebutton.Checked)
      Toast.MakeText(this, "Torch is ON", ToastLength.Short).Show ();
   else
      Toast.MakeText(this, "Torch is OFF",
      ToastLength.Short).Show();
};
现在,当您运行应用程序时,它应该显示以下输出 -

Ratings Bar
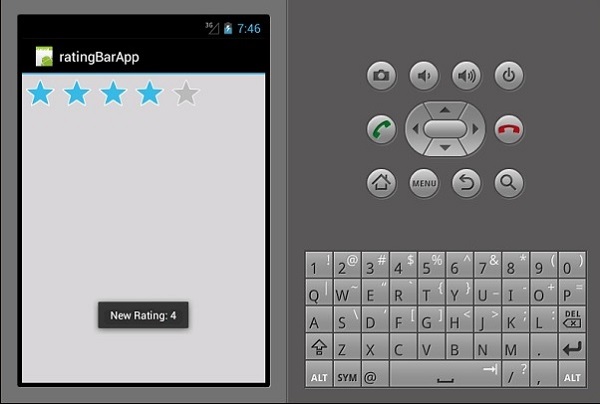
评分栏是一种表单元素,由星形组成,应用程序用户可以使用它来评价您为他们提供的服务。在您的Main.axml文件中,创建一个包含 5 颗星的新评分栏。
<?xml version = "1.0" encoding = "utf-8"?>
<LinearLayout xmlns:android = "http://schemas.android.com/apk/res/android"
   android:orientation = "vertical"
   android:background = "#d3d3d3"
   android:layout_width = "fill_parent"
   android:layout_height = "fill_parent">
   <RatingBar
      android:layout_width = "wrap_content"
      android:layout_height = "wrap_content"
      android:id = "@+id/ratingBar1"
      android:numStars = "5"
      android:stepSize = "1.0" />
</LinearLayout>
运行应用程序后,它应该显示以下输出 -
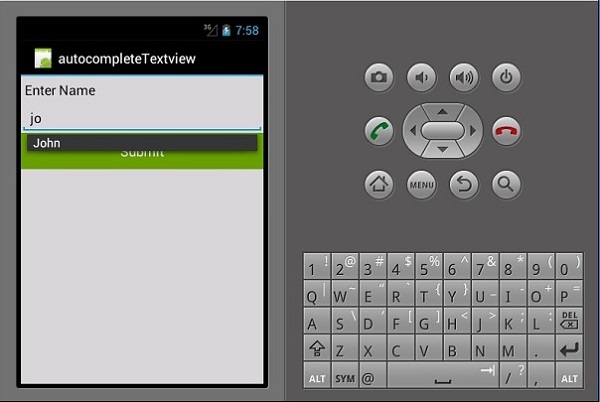
Autocomplete TextView
这是一个文本视图,在用户键入时显示完整建议。我们将创建一个包含人员姓名列表的自动完成文本视图,以及一个按钮,单击该按钮将显示我们从文本视图中输入的选定名称。
打开Main.axml并编写以下代码。
<?xml version = "1.0" encoding = "utf-8"?>
<LinearLayout xmlns:android = "http://schemas.android.com/apk/res/android"
   android:orientation = "vertical"
   android:layout_width = "fill_parent"
   android:background = "#d3d3d3"
   android:layout_height = "fill_parent">
   <TextView
      android:text = "Enter Name"
      android:textAppearance = "?android:attr/textAppearanceMedium"
      android:layout_width = "fill_parent"
      android:layout_height = "wrap_content"
      android:id = "@+id/textView1"
      android:padding = "5dp"
      android:textColor = "@android:color/black" />
   <AutoCompleteTextView
      android:layout_width = "fill_parent"
      android:layout_height = "wrap_content"
      android:id = "@+id/autoComplete1"
      android:textColor = "@android:color/black" />
   <Button
      android:text = "Submit"
      android:layout_width = "fill_parent"
      android:layout_height = "wrap_content"
      android:id = "@+id/btn_Submit"
      android:background="@android:color/holo_green_dark" />
</LinearLayout>
以上代码生成一个用于键入的 TextView、一个用于显示建议的AutoCompleteTextView和一个用于显示从 TextView 中输入的名称的按钮。转到MainActivity.cs添加功能。
创建一个新的事件处理程序方法,如下所示。
protected void ClickedBtnSubmit(object sender, System.EventArgs e){
   if (autoComplete1.Text != ""){
      Toast.MakeText(this, "The Name Entered ="
         + autoComplete1.Text, ToastLength.Short).Show();
   } else {
      Toast.MakeText(this, "Enter a Name!", ToastLength.Short).Show();
   }
}
创建的处理程序检查自动完成文本视图是否为空。如果它不为空,则显示选定的自动完成文本。在OnCreate()类中键入以下代码。
autoComplete1 = FindViewById<AutoCompleteTextView>(Resource.Id.autoComplete1);
btn_Submit = FindViewById<Button>(Resource.Id.btn_Submit);
var names = new string[] { "John", "Peter", "Jane", "Britney" };
ArrayAdapter adapter = new ArrayAdapter<string>(this,
   Android.Resource.Layout.SimpleSpinnerItem, names);
autoComplete1.Adapter = adapter;
btn_Submit.Click += ClickedBtnSubmit;
ArrayAdapter - 这是一个集合处理程序,它从列表集合中读取数据项并将其作为视图返回或在屏幕上显示它们。
现在,当您运行应用程序时,它应该显示以下输出。