
- Xamarin 教程
- Xamarin - 首页
- Xamarin - 安装
- Xamarin - 第一个应用程序
- Xamarin - 应用程序清单
- Xamarin - Android 资源
- Xamarin - Android 活动生命周期
- Xamarin - 权限
- Xamarin - 构建应用程序 GUI
- Xamarin - 菜单
- Xamarin - 布局
- Xamarin - Android 控件
- Xamarin - Android 对话框
- Xamarin - 图库
- Xamarin - Android 视图
- Xamarin - 多屏幕应用程序
- Xamarin - 部署您的应用程序
- Xamarin 有用资源
- Xamarin 快速指南
- Xamarin - 有用资源
- Xamarin - 讨论
Xamarin 快速指南
Xamarin - 安装
Xamarin 基于 .NET Framework 构建。它允许创建可在多个平台上轻松运行的应用程序。在本教程中,我们将解释如何使用 Xamarin 提供原生 iOS、Android 和 Windows 应用程序。
让我们从讨论如何在 Windows 和 Mac 系统上安装 Xamarin 开始本教程。
系统要求
Windows
至少具有 2GB RAM 并运行 Windows 7 或更高版本的计算机 (强烈推荐 Windows 8-10)
Visual Studio 2012 专业版或更高版本
适用于 Visual Studio 的 Xamarin
Mac
- 运行 OS X Yosemite (10.10) 或更高版本的 Mac 计算机
- Xamarin iOS SDK
- Apple 的 Xcode (7+) IDE 和 iOS SDK
- Xamarin Studio
在 Windows 上安装
从 https://www.xamarin.com/download 下载 Xamarin 安装程序。在运行 Xamarin 安装程序之前,请确保已在您的计算机上安装 Android SDK 和 Java SDK。
运行下载的安装程序以开始安装过程:
将出现 Xamarin 许可协议屏幕。单击下一步按钮以接受协议。
安装程序将搜索任何缺失的组件,并提示您下载并安装它们。
Xamarin 安装完成后,单击关闭按钮退出,然后准备开始使用 Xamarin。
在 Mac 上安装
在您的 Mac 系统上下载 Xamarin Studio 安装程序。
运行您下载的 Xamarin 安装程序,并按照安装向导中的步骤操作。
安装完成后,您就可以开始在您的系统上使用 Xamarin 了。
Xamarin - 第一个应用程序
在本章中,我们将学习如何使用 Xamarin 创建一个小型 Android 应用程序。
Hello Xamarin!应用程序
首先,启动 Visual Studio 的新实例,然后转到文件→新建→项目。

在出现的菜单对话框上,转到模板→Visual C#→Android→空白应用程序 (Android)。
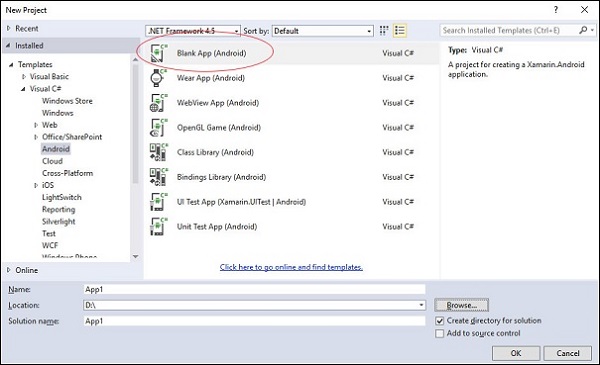
为您的应用程序指定一个合适的名称。在本例中,我们将其命名为“helloWorld”并将其保存在提供的默认位置。接下来,单击确定按钮以加载新的“helloXamarin”项目。
在解决方案中,打开资源→布局→Main.axml文件。从设计视图切换到源文件,并键入以下几行代码来构建您的应用程序。
<?xml version = "1.0" encoding = "utf-8"?>
<LinearLayout xmlns:android = "http://schemas.android.com/apk/res/android"
   android:orientation = "vertical"
   android:background = "#d3d3d3"
   android:layout_width = "fill_parent"
   android:layout_height = "fill_parent">
   <TextView
      android:text = "@string/HelloXamarin"
      android:textAppearance = "?android:attr/textAppearanceLarge"
      android:layout_width = "match_parent"
      android:layout_height = "wrap_content"
      android:id = "@+id/textView2"
      android:textColor = "@android:color/black" />
</LinearLayout>
在上面的代码中,我们创建了一个新的 Android textview。接下来,打开 values 文件夹并双击Strings.xml以打开它。在这里,我们将存储关于上面创建的按钮的信息和值。
<?xml version = "1.0" encoding = "utf-8"?>
<resources>
   <string name = "HelloXamarin">Hello World, I am Xamarin!</string>
   <string name = "ApplicationName">helloWorld</string>
</resources>
打开MainActivity.cs文件,并将现有代码替换为以下几行代码。
using System;
using Android.App;
using Android.Content;
using Android.Runtime;
using Android.Views;
using Android.Widget;
using Android.OS;

namespace HelloXamarin {
   public class MainActivity : Activity {
      protected override void OnCreate(Bundle bundle) {
         base.OnCreate(bundle);
         SetContentView(Resource.Layout.Main);
      }
   }
}
保存应用程序。构建并运行它以在 Android 模拟器中显示创建的应用程序。
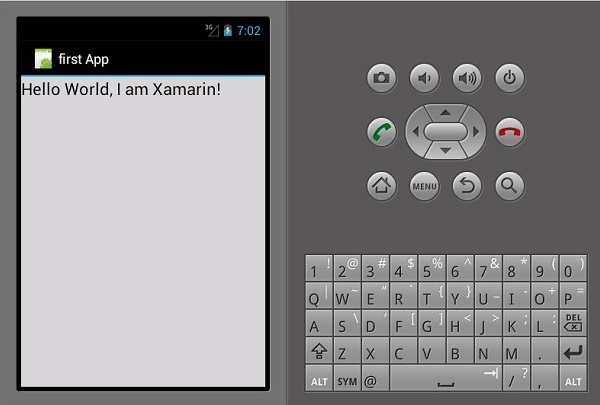
如果您没有 Android 模拟器,请按照下一节中的步骤创建一个。
设置 Android 模拟器
在您的 Visual Studio 菜单上,转到工具→Android→Android 模拟器管理器。在出现的弹出窗口中,单击创建按钮。它将显示以下屏幕。
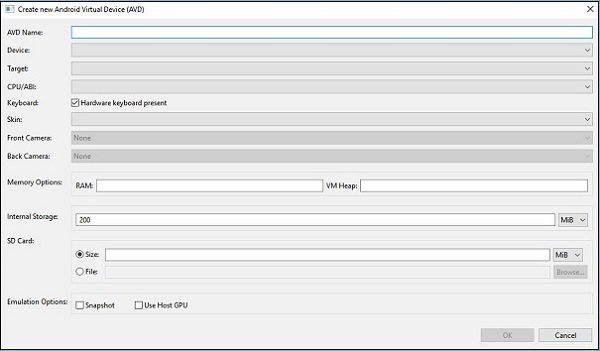
在上面的屏幕上,提供您想要的AVD 名称。选择适合您显示器的设备,例如 Nexus 4” 显示器。选择您的目标平台。始终建议在最低目标平台(例如 API 10 Android 2.3(姜饼))上进行测试,以确保您的应用程序可在所有 Android 平台上运行。
填写其余字段并单击确定按钮。您的模拟器现在已准备就绪。您可以从现有 Android 虚拟设备列表中选择它,然后单击启动以启动它。

修改 HelloXamarin 应用程序
在本节中,我们将修改我们的项目并创建一个按钮,单击该按钮将显示文本。打开main.axml并切换到源视图。在我们创建的textview之后,我们将添加一个按钮,如下所示。
<Button
   android:id = "@+id/MyButton"
   android:layout_width = "fill_parent"
   android:layout_height = "wrap_content"
   android:text = "@string/ButtonClick" />
添加按钮后,我们的完整代码如下所示:
<?xml version = "1.0" encoding = "utf-8"?>
<LinearLayout xmlns:android = "http://schemas.android.com/apk/res/android"
   android:orientation = "vertical"
   android:layout_width = "fill_parent"
   android:layout_height = "fill_parent">
   <TextView
      android:text = "@string/HelloXamarin"
      android:textAppearance = "?android:attr/textAppearanceLarge"
      android:layout_width = "match_parent"
      android:layout_height = "wrap_content"
      android:id = "@+id/textView2" />

   <Button
      android:id = "@+id/MyButton"
      android:layout_width = "fill_parent"
      android:layout_height = "wrap_content"
      android:text = "@string/ButtonClick" />
</LinearLayout>
接下来,我们在strings.xml文件中注册我们的按钮值。
<string name = "ButtonClick">Click Me!</string>
在strings.xml文件中添加按钮后,我们将打开MainActivity.cs文件,为单击按钮添加操作,如下面的代码所示。
using System;
using Android.App;
using Android.Content;
using Android.Runtime;
using Android.Views;
using Android.Widget;
using Android.OS;

namespace HelloXamarin {
   [Activity(Label = "HelloXamarin", MainLauncher = true, Icon = "@drawable/icon")]
   public class MainActivity : Activity {
      protected override void OnCreate(Bundle bundle) {
         base.OnCreate(bundle);
         SetContentView(Resource.Layout.Main);
         Button button = FindViewById<Button>(Resource.Id.MyButton);
         button.Click += delegate { button.Text = "Hello world I am your first App"; };
      }
   }
}
接下来,构建并运行您的应用程序。
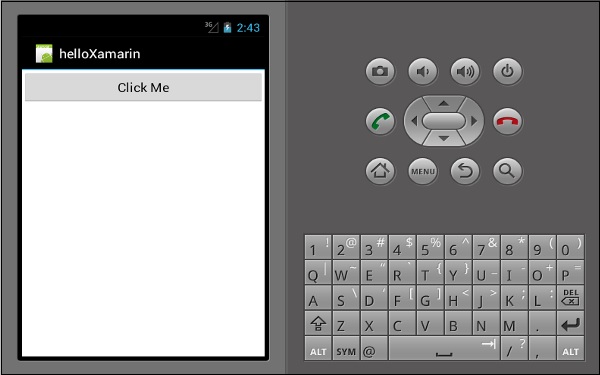
单击按钮后,您将获得以下输出:

Xamarin - 应用程序清单
所有 Android 应用程序都具有一个清单文件,通常称为AndroidManifest.xml。清单文件包含 Android 平台的应用程序成功运行所需的一切。
在这里,我们列出了一些清单文件的重要功能:
它声明应用程序所需的最低 API 级别。
它声明应用程序所需的权限,例如相机、位置等。
它授予应用程序使用或需要的硬件和软件功能的权限。
它列出必须链接的库。
以下屏幕截图显示了一个清单文件。
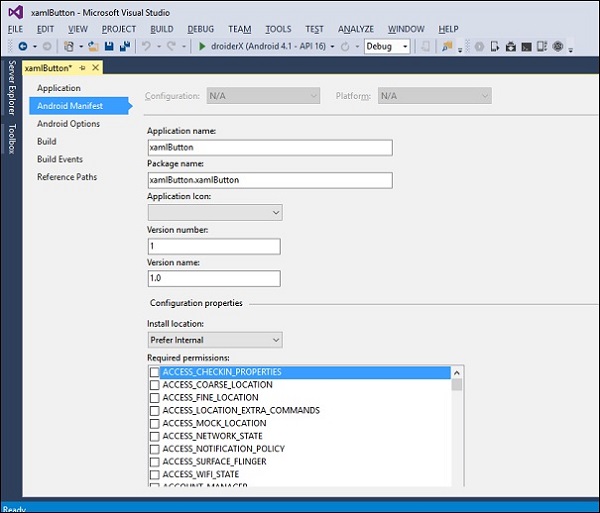
应用程序名称 - 指的是您的应用程序的标题
包名称 - 用于标识您的应用程序的唯一名称。
应用程序图标 - 是在您的应用程序的 Android 主屏幕上显示的图标。
版本号 - 用于显示您的应用程序的一个版本比另一个版本更新的单个数字。
<manifest xmlns:android="http://schemas.android.com/apk/res/android"
   android:versionCode="1" >
版本名称 - 是您的应用程序的用户友好版本字符串,用户将在您的应用程序设置和 Google Play 商店中看到。以下代码显示了版本名称的示例。
<manifest xmlns:android="http://schemas.android.com/apk/res/android"
   android:versionName="1.0.0">
最低 Android 版本 - 您的应用程序支持的最低 Android 版本平台。
<uses-sdk android:minSdkVersion="16" />
在上面的示例中,我们的最低 Android 版本是 API 级别 16,通常称为JELLY BEAN。
目标 Android 版本 - 您的应用程序针对其进行编译的 Android 版本。
Xamarin - Android 资源
创建新的 Android 项目时,默认情况下会向项目添加一些文件。我们将这些默认项目文件和文件夹称为Android 资源。请查看以下屏幕截图。
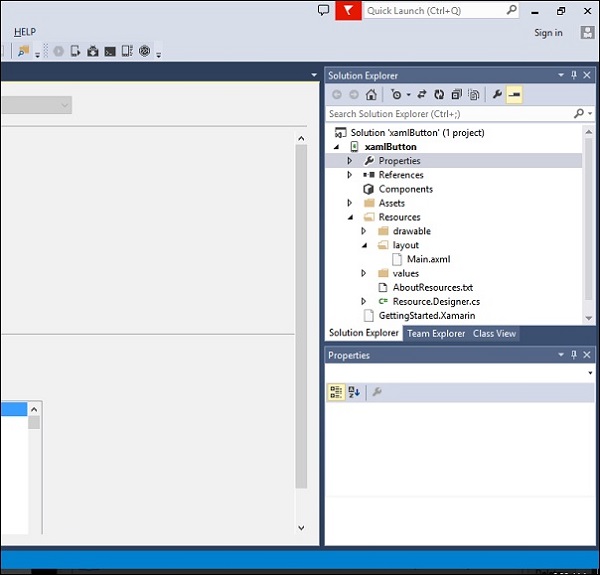
默认 Android 资源包括以下内容:
AndroidManifest.xml 文件 - 包含有关您的 Android 应用程序的信息,例如应用程序名称、权限等。
资源文件夹 - 资源可以是图像、布局、字符串等,可以通过 Android 的资源系统加载。
Resources/drawable 文件夹 - 存储您将在应用程序中使用的所有图像。
Resources/layout 文件夹 - 包含 Android 用于构建用户界面的所有 Android XML 文件 (.axml)。
Resources/values 文件夹 - 包含 XML 文件,用于声明整个应用程序中的字符串(和其他类型)的键值对。这就是通常在 Android 上设置多种语言的本地化的方式。
Resources.designer.cs - 创建 Android 项目时会自动创建此文件,其中包含引用 Android 资源的唯一标识符。
MainActivity.cs 文件 - 这是您的 Android 应用程序的第一个活动,也是从那里启动主要应用程序操作的地方。
可以通过存储在resources.designer.cs文件中的唯一 ID以编程方式访问资源文件。ID 包含在一个名为Resource的类中。添加到项目的任何资源都会自动生成在resource 类中。
以下代码显示如何创建一个包含七张图像的 gridview 项目:
namespace HelloGridView {
   [System.CodeDom.Compiler.GeneratedCodeAttribute
      ("Xamarin.Android.Build.Tas ks",
      "1.0.0.0")]
   public partial class Resource {
      static Resource() {
         global::Android.Runtime.ResourceIdManager.UpdateIdValues();
      }

      public static void UpdateIdValues() {}
      public partial class Attribute {
         static Attribute() {
            global::Android.Runtime.ResourceIdManager.UpdateIdValues();
         }

         private Attribute() {}
      }

      public partial class Drawable {
         // aapt resource value: 0x7f020000
         public const int Icon = 2130837504;

         // aapt resource value: 0x7f020001
         public const int img1 = 2130837505;

         // aapt resource value: 0x7f020002
         public const int img2 = 2130837506;

         // aapt resource value: 0x7f020003
         public const int img3 = 2130837507;

         // aapt resource value: 0x7f020004
         public const int img4 = 2130837508;

         // aapt resource value: 0x7f020005
         public const int img5 = 2130837509;

         // aapt resource value: 0x7f020006
         public const int img6 = 2130837510;

         // aapt resource value: 0x7f020007
         public const int img7 = 2130837511;

         static Drawable() {
            global::Android.Runtime.ResourceIdManager.UpdateIdValues();
         }

         private Drawable() {}
      }

      public partial class Id {
         // aapt resource value: 0x7f050000
         public const int gridview = 2131034112;

         static Id() {
            global::Android.Runtime.ResourceIdManager.UpdateIdValues();
         }

         private Id() {}
      }

      public partial class Layout {
         // aapt resource value: 0x7f030000
         public const int Main = 2130903040;
         static Layout() {
            global::Android.Runtime.ResourceIdManager.UpdateIdValues();
         }
         private Layout() {}
      }

      public partial class String {
         // aapt resource value: 0x7f040001
         public const int ApplicationName = 2130968577;

         // aapt resource value: 0x7f040000
         public const int Hello = 2130968576;

         static String() {
            global::Android.Runtime.ResourceIdManager.UpdateIdValues();
         }
         private String() {}
      }
   }
}
从上面的代码中,七张图像在一个名为drawable的类中引用。这些图像是以编程方式添加的。如果用户向项目添加另一张图像,它也将添加到drawable类中。项目中包含的gridview也会被添加并存储在它自己的类中。资源文件夹中包含的每个项目都会自动生成并存储在一个类中。
Xamarin - Android 活动生命周期
当用户浏览 Android 应用程序时,会发生一系列事件。例如,当用户启动应用程序(例如 Facebook 应用程序)时,它会启动并对用户在前景中可见,onCreate() → onStart() → onResume()。
如果启动另一个活动(例如,来电),则 Facebook 应用程序将转到后台,并且来电转到前景。我们现在有两个正在运行的进程。
onPause() --- > onStop()
电话结束后,Facebook 应用程序返回前景。将调用三种方法。
onRestart() --- > onStart() --- > onResume()
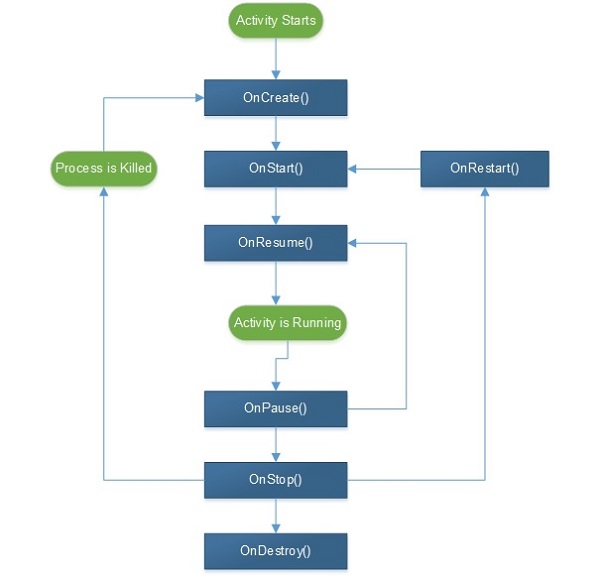
Android 活动中有 7 个生命周期进程。它们包括:
onCreate - 在第一次创建活动时调用。
onStart - 当活动启动并对用户可见时调用。
onResume - 当活动开始与用户交互时调用。用户输入在此阶段发生。
onPause - 当活动在后台运行但尚未被杀死时调用。
onStop - 当活动不再对用户可见时调用。
onRestart - 在活动停止后、再次启动之前调用。当用户返回到已停止的先前活动时,通常会调用它。
onDestroy - 这是在活动从内存中删除之前的最后一次调用。
下图显示了 Android 活动生命周期:
Xamarin - 权限
在 Android 中,默认情况下,没有任何应用程序具有执行任何会影响用户或操作系统的操作的权限。为了让应用程序执行任务,它必须声明权限。在 Android 系统授予权限之前,应用程序无法执行该任务。这种权限机制阻止应用程序在未经用户同意的情况下随意操作。
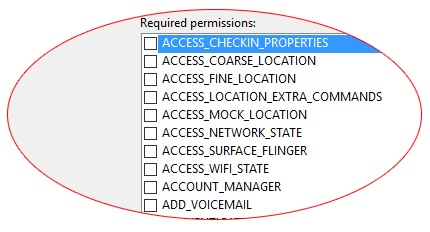
权限需要记录在AndroidManifest.xml文件中。要添加权限,我们双击属性,然后转到 Android Man...必需权限将出现。选中您希望添加的相应权限。
相机 - 它提供访问设备相机的权限。
<uses-permission android:name="android.permission.CAMERA" />
互联网 − 提供访问网络资源。
<uses-permission android:name="android.permission.INTERNET" />
读取联系人 − 提供读取设备上联系人的权限。
<uses-permission android:name="android.permission.READ_CONTACTS" />
读取外部存储 − 提供读取和存储外部存储数据。
<uses-permission android:name="android.permission.READ_EXTERNAL_STORAGE" />
日历 − 允许应用访问用户设备上的日历和事件。此权限可能很危险,因为它允许应用在所有者不知情的情况下向来宾发送电子邮件。添加此权限的语法如下所示:
<uses-permission android:name="android.permission-group.CALENADAR" />
短信 − 拥有此权限的应用可以访问设备的消息服务。包括读取、写入和编辑短信和彩信。其语法如下所示。
<uses-permission android:name="android.permission-group.SMS" />
位置 − 拥有此权限的应用可以使用 GPS 网络访问设备的位置。
<uses-permission android:name="android.permission-group.LOCATION" />
蓝牙 − 拥有此权限的应用可以与其他支持蓝牙的设备无线交换数据文件。
<uses-permission android:name="android.permission.BLUETOOTH" />
Xamarin - 构建应用程序 GUI
TextView
TextView 是 Android 控件中非常重要的组件。它主要用于在 Android 屏幕上显示文本。
要创建一个 TextView,只需打开main.axml并在线性布局标签之间添加以下代码。
<TextView
   android:text = "Hello I am a text View"
   android:layout_width = "match_parent"
   android:layout_height = "wrap_content"
   android:id = "@+id/textview1" />
按钮
按钮是一个控件,用于在单击时触发事件。在您的Main.axml文件中,键入以下代码以创建按钮。
<Button
   android:id = "@+id/MyButton"
   android:layout_width = "fill_parent"
   android:layout_height = "wrap_content"
   android:text = "@string/Hello" />
打开Resources\Values\Strings.xml,并在`
<string name="Hello">Click Me!</string>
以上代码提供了我们创建的按钮的值。接下来,我们打开MainActivity.cs并创建单击按钮时要执行的操作。在base.OnCreate (bundle) 方法下键入以下代码。
Button button = FindViewById<Button>(Resource.Id.MyButton);
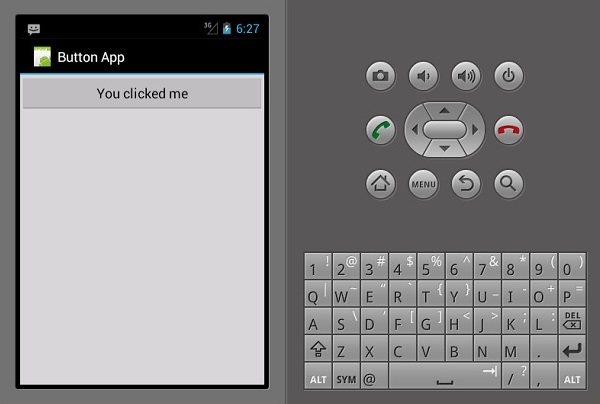
button.Click += delegate { button.Text = "You clicked me"; };
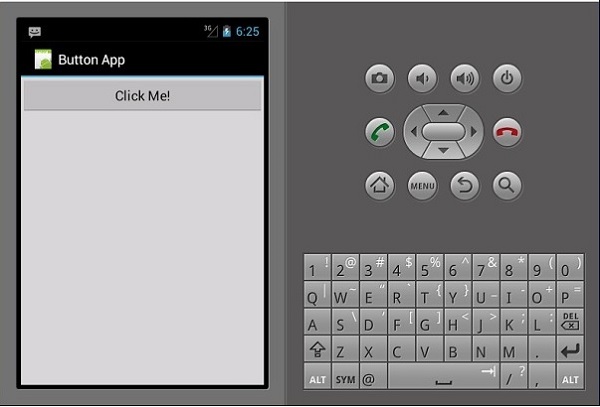
以上代码在用户单击按钮时显示“您点击了我”。
FindViewById<< --> 此方法查找已识别的视图的 ID。它在 .axml 布局文件中搜索 ID。
复选框
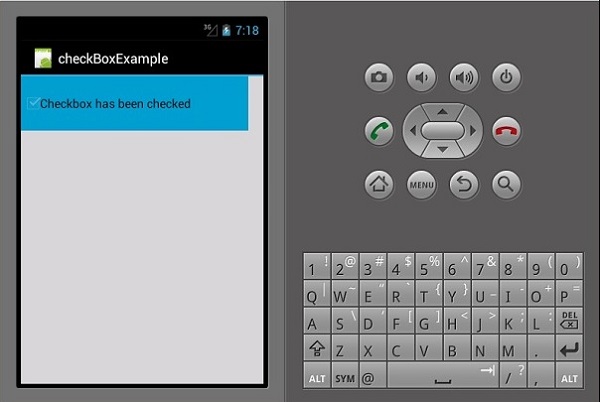
当需要从一组选项中选择多个选项时,使用复选框。在此示例中,我们将创建一个复选框,选中时显示已选中消息,否则显示未选中。
首先,我们打开项目中的Main.axml文件,并键入以下代码行以创建复选框。
<?xml version = "1.0" encoding = "utf-8"?>
<LinearLayout xmlns:android = "http://schemas.android.com/apk/res/android"
   android:orientation = "vertical"
   android:background = "#d3d3d3"
   android:layout_width = "fill_parent"
   android:layout_height = "fill_parent">
   <CheckBox
      android:text = "CheckBox"
      android:padding = "25dp"
      android:layout_width = "300dp"
      android:layout_height = "wrap_content"
      android:id = "@+id/checkBox1"
      android:textColor = "@android:color/black"
      android:background = "@android:color/holo_blue_dark" />
</LinearLayout>
接下来,转到MainActivity.cs添加功能代码。
CheckBox checkMe = FindViewById<CheckBox>(Resource.Id.checkBox1);
checkMe.CheckedChange += (object sender, CompoundButton.CheckedChangeEventArgs e) => {
   CheckBox check = (CheckBox)sender;
   if(check.Checked) {
      check.Text = "Checkbox has been checked";
   } else {
      check.Text = "Checkbox has not been checked";
   }
};
在上面的代码中,我们首先使用findViewById查找复选框。接下来,我们为复选框创建一个处理程序方法,并在处理程序中创建一个 if else 语句,根据选择的输出显示消息。
CompoundButton.CheckedChangeEventArgs → 此方法在复选框状态更改时触发事件。
进度条
进度条是用于显示操作进度的控件。要添加进度条,请在Main.axml文件中添加以下代码行。
<ProgressBar
   style="?android:attr/progressBarStyleHorizontal"
   android:layout_width = "match_parent"
   android:layout_height = "wrap_content"
   android:id = "@+id/progressBar1" />
接下来,转到MainActivity.cs并设置进度条的值。
ProgressBar pb = FindViewById<ProgressBar>(Resource.Id.progressBar1);
pb.Progress = 35;
在上面的代码中,我们创建了一个值为 35 的进度条。
单选按钮
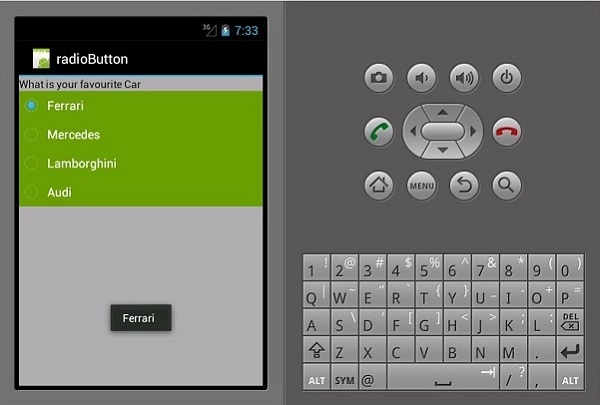
这是一个 Android 控件,允许用户从一组选项中选择一个。在本节中,我们将创建一个包含汽车列表的单选组,该组将检索选中的单选按钮。
首先,我们添加一个单选组和一个textview,如下面的代码所示:
<?xml version = "1.0" encoding = "utf-8"?>
<LinearLayout xmlns:android = "http://schemas.android.com/apk/res/android"
   android:orientation = "vertical"
   android:background = "@android:color/darker_gray"
   android:layout_width = "fill_parent"
   android:layout_height = "fill_parent">
   <TextView
      android:text = "What is your favourite Car"
      android:layout_width = "match_parent"
      android:layout_height = "wrap_content"
      android:id = "@+id/textView1"
      android:textColor = "@android:color/black" />
   <RadioGroup
      android:layout_width = "match_parent"
      android:layout_height = "wrap_content"
      android:id = "@+id/radioGroup1"
      android:backgroundTint = "#a52a2aff"
      android:background = "@android:color/holo_green_dark">
   <RadioButton
      android:layout_width = "wrap_content"
      android:layout_height = "wrap_content"
      android:text = "Ferrari"
      android:id = "@+id/radioFerrari" />
   <RadioButton
      android:layout_width = "wrap_content"
      android:layout_height = "wrap_content"
      android:text = "Mercedes"
      android:id = "@+id/radioMercedes" />
   <RadioButton
      android:layout_width = "wrap_content"
      android:layout_height = "wrap_content"
      android:text = "Lamborghini"
      android:id = "@+id/radioLamborghini" />
   <RadioButton
      android:text = "Audi"
      android:layout_width = "match_parent"
      android:layout_height = "wrap_content"
      android:id = "@+id/radioAudi" />
   </RadioGroup>
</LinearLayout>
要执行操作,当单击单选按钮时,我们添加一个活动。转到MainActivity.cs并创建一个新的事件处理程序,如下所示。
private void onClickRadioButton(object sender, EventArgs e) {
   RadioButton cars = (RadioButton)sender;
   Toast.MakeText(this, cars.Text, ToastLength.Short).Show
   ();
}
Toast.MakeText() → 这是一种视图方法,用于在一个小的弹出窗口中显示消息/输出。在OnCreate()方法的底部,就在SetContentView()之后,添加以下代码段。这将捕获每个单选按钮并将它们添加到我们创建的事件处理程序中。
RadioButton radio_Ferrari = FindViewById<RadioButton>
   (Resource.Id.radioFerrari);
   RadioButton radio_Mercedes = FindViewById<RadioButton>
   (Resource.Id.radioMercedes);
   RadioButton radio_Lambo = FindViewById<RadioButton>
   (Resource.Id.radioLamborghini);
   RadioButton radio_Audi = FindViewById<RadioButton>
   (Resource.Id.radioAudi);
   radio_Ferrari.Click += onClickRadioButton;
   radio_Mercedes.Click += onClickRadioButton;
   radio_Lambo.Click += onClickRadioButton;
   radio_Audi.Click += onClickRadioButton;
现在,运行您的应用程序。它应该显示以下屏幕作为输出:
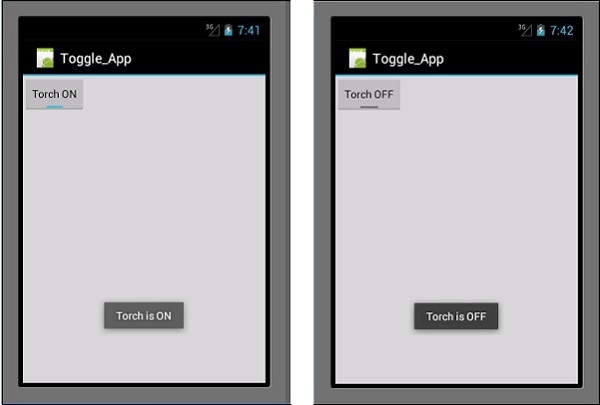
开关按钮
开关按钮用于在两种状态之间切换,例如,它可以在开启和关闭之间切换。打开Resources\layout\Main.axml并添加以下代码行以创建开关按钮。
<?xml version = "1.0" encoding = "utf-8"?>
<LinearLayout xmlns:android = "http://schemas.android.com/apk/res/android"
   android:orientation = "vertical"
   android:background = "#d3d3d3"
   android:layout_width = "fill_parent"
   android:layout_height = "fill_parent">
   <ToggleButton
      android:id = "@+id/togglebutton"
      android:layout_width = "wrap_content"
      android:layout_height = "wrap_content"
      android:textOn = "Torch ON"
      android:textOff = "Torch OFF"
      android:textColor = "@android:color/black" />
</LinearLayout>
单击开关栏时,我们可以向其中添加操作。打开MainActivity.cs并在OnCreate()方法类之后添加以下代码行。
ToggleButton togglebutton = FindViewById<ToggleButton> (Resource.Id.togglebutton);
togglebutton.Click += (o, e) => {
   if (togglebutton.Checked)
      Toast.MakeText(this, "Torch is ON", ToastLength.Short).Show ();
   else
      Toast.MakeText(this, "Torch is OFF",
      ToastLength.Short).Show();
};
现在,当您运行应用程序时,它应该显示以下输出:
评分条
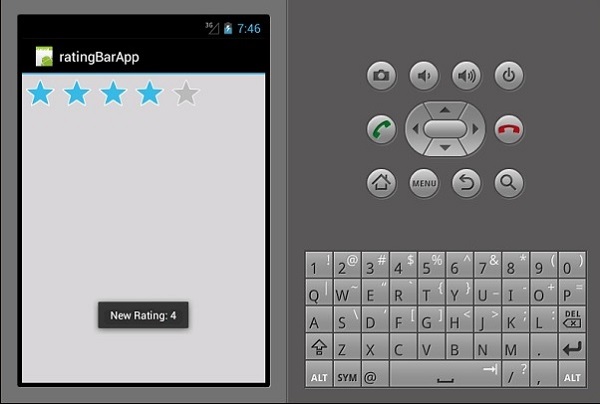
评分条是由星组成的表单元素,应用程序用户可以使用它来评价您为他们提供的项目。在您的Main.axml文件中,创建一个包含 5 颗星的新评分条。
<?xml version = "1.0" encoding = "utf-8"?>
<LinearLayout xmlns:android = "http://schemas.android.com/apk/res/android"
   android:orientation = "vertical"
   android:background = "#d3d3d3"
   android:layout_width = "fill_parent"
   android:layout_height = "fill_parent">
   <RatingBar
      android:layout_width = "wrap_content"
      android:layout_height = "wrap_content"
      android:id = "@+id/ratingBar1"
      android:numStars = "5"
      android:stepSize = "1.0" />
</LinearLayout>
运行应用程序后,它应该显示以下输出:
自动完成 TextView
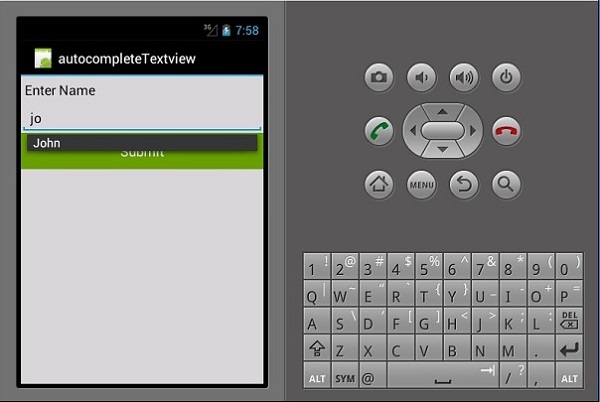
这是一个 TextView,在用户键入时显示完整建议。我们将创建一个包含人员姓名列表的自动完成 TextView,以及一个按钮,单击该按钮将显示从 TextView 输入的所选名称。
打开Main.axml并编写以下代码。
<?xml version = "1.0" encoding = "utf-8"?>
<LinearLayout xmlns:android = "http://schemas.android.com/apk/res/android"
   android:orientation = "vertical"
   android:layout_width = "fill_parent"
   android:background = "#d3d3d3"
   android:layout_height = "fill_parent">
   <TextView
      android:text = "Enter Name"
      android:textAppearance = "?android:attr/textAppearanceMedium"
      android:layout_width = "fill_parent"
      android:layout_height = "wrap_content"
      android:id = "@+id/textView1"
      android:padding = "5dp"
      android:textColor = "@android:color/black" />
   <AutoCompleteTextView
      android:layout_width = "fill_parent"
      android:layout_height = "wrap_content"
      android:id = "@+id/autoComplete1"
      android:textColor = "@android:color/black" />
   <Button
      android:text = "Submit"
      android:layout_width = "fill_parent"
      android:layout_height = "wrap_content"
      android:id = "@+id/btn_Submit"
      android:background="@android:color/holo_green_dark" />
</LinearLayout>
上面的代码生成一个用于键入的 TextView、一个用于显示建议的AutoCompleteTextView和一个用于显示从 TextView 输入的名称的按钮。转到MainActivity.cs添加功能。
创建一个新的事件处理程序方法,如下所示。
protected void ClickedBtnSubmit(object sender, System.EventArgs e){
   if (autoComplete1.Text != ""){
      Toast.MakeText(this, "The Name Entered ="
         + autoComplete1.Text, ToastLength.Short).Show();
   } else {
      Toast.MakeText(this, "Enter a Name!", ToastLength.Short).Show();
   }
}
创建的处理程序检查自动完成 TextView 是否为空。如果它不为空,则显示选定的自动完成文本。在OnCreate()类中键入以下代码。
autoComplete1 = FindViewById<AutoCompleteTextView>(Resource.Id.autoComplete1);
btn_Submit = FindViewById<Button>(Resource.Id.btn_Submit);
var names = new string[] { "John", "Peter", "Jane", "Britney" };
ArrayAdapter adapter = new ArrayAdapter<string>(this,
   Android.Resource.Layout.SimpleSpinnerItem, names);
autoComplete1.Adapter = adapter;
btn_Submit.Click += ClickedBtnSubmit;
ArrayAdapter − 这是一种集合处理程序,它从列表集合中读取数据项并将其作为视图返回或在屏幕上显示它们。
现在,运行应用程序时,它应该显示以下输出。
Xamarin - 菜单
弹出菜单
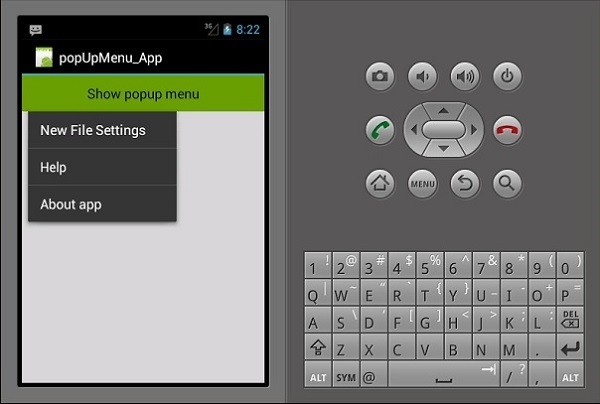
弹出菜单是指附加到视图的菜单;它也称为快捷菜单。让我们看看如何将弹出菜单添加到 Android 应用程序。
创建一个新项目并将其命名为popUpMenu App。打开Main.axml并创建一个按钮,该按钮将用于显示弹出菜单。
<?xml version = "1.0" encoding = "utf-8"?>
<LinearLayout xmlns:android = "http://schemas.android.com/apk/res/android"
   android:orientation = "vertical"
   android:background = "#d3d3d3"
   android:layout_width = "fill_parent"
   android:layout_height = "fill_parent">
   <Button
      android:id = "@+id/popupButton"
      android:layout_width = "fill_parent"
      android:layout_height = "wrap_content"
      android:text = "Show popup menu"
      android:background = "@android:color/holo_green_dark"
      android:textColor = "@android:color/black" />
</LinearLayout>
在Resources文件夹下创建一个新文件夹,并将其命名为Menu。在 Menu 文件夹中,添加一个名为popMenu.xml的新 xml 文件。
在popMenu.xml下,添加以下菜单项。
<?xml version = "1.0" encoding="utf-8"?>
<menu xmlns:android = "http://schemas.android.com/apk/res/android">
   <item
      android:id = "@+id/file_settings"
      android:icon = "@drawable/img_settings"
      android:title = "Settings"
      android:showAsAction = "ifRoom">

      <item
         android:id = "@+id/new_game1"
         android:icon = "@drawable/imgNew"
         android:title = "New File Settings"/>
      <item
         android:id = "@+id/help"
         android:icon = "@drawable/img_help"
         android:title = "Help" />
      <item
         android:id = "@+id/about_app"
         android:icon = "@drawable/img_help"
         android:title = "About app"/>
   </item>
</menu>
添加菜单项后,转到mainActivity.cs以在单击按钮时显示弹出菜单。
protected override void OnCreate(Bundle bundle) {
   base.OnCreate(bundle);
   SetContentView(Resource.Layout.Main);
   Button showPopupMenu = FindViewById<Button>(Resource.Id.popupButton);
   showPopupMenu.Click += (s, arg) => {
      PopupMenu menu = new PopupMenu(this, showPopupMenu);
      menu.Inflate(Resource.Menu.popMenu);
      menu.Show();
   };
}
现在,构建并运行您的应用程序。它应该产生以下输出:
选项菜单
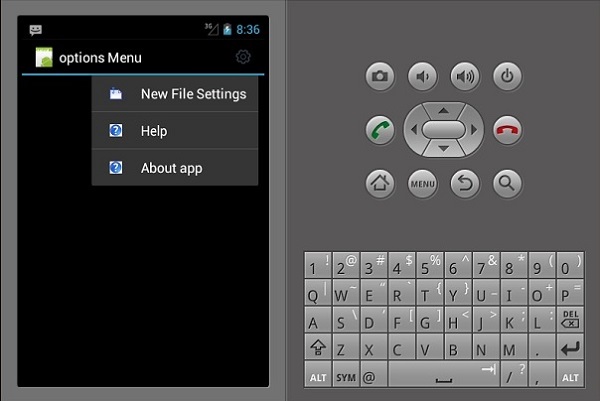
选项菜单是应用程序的主要菜单集合,主要用于存储设置、搜索等。在这里,我们将创建一个包含三个项目的设置菜单,即新建文件设置、帮助和关于应用程序。
要创建选项菜单,我们必须在资源文件夹中创建一个新的 XML 布局文件。首先,我们将添加一个新的 XML 文件。右键单击Layout 文件夹,然后转到添加→新建项→Visual C#→XML 文件。
为布局文件选择一个合适的名称。在我们的示例中,我们将文件命名为myMenu.xml。
在myMenu.xml中,我们将创建一个新菜单并在其中添加项目。以下代码显示了如何操作。
<?xml version = "1.0" encoding = "utf-8"?>
<menu xmlns:android = "http://schemas.android.com/apk/res/android">
  <item
      android:id = "@+id/file_settings"
      android:icon = "@drawable/img_settings"
      android:title = "Settings"
      android:showAsAction = "ifRoom">

      <menu>
         <item
            android:id = "@+id/new_game1"
            android:icon = "@drawable/imgNew"
            android:title = "New File Settings" />
         <item
            android:id = "@+id/help"
            android:icon = "@drawable/img_help"
            android:title = "Help" />
         <item
            android:id = "@+id/about_app"
            android:icon = "@drawable/img_help"
            android:title = "About app"/>
      </menu>
   </item>
</menu>
接下来,我们导航到MainActivity.cs并为onOptionsMenu()创建一个重写类。
public override bool OnCreateOptionsMenu(IMenu menu) {
   MenuInflater.Inflate(Resource.Menu.myMenu, menu);
   return base.OnPrepareOptionsMenu(menu);
}
接下来,我们创建一个操作来响应选择设置菜单时。为此,我们为OnOptionsItemSelected()菜单创建另一个重写类。
public override bool OnOptionsItemSelected(IMenuItem item) {
   if (item.ItemId == Resource.Id.file_settings) {
      // do something here...
      return true;
   }
   return base.OnOptionsItemSelected(item);
}
我们的最终完整代码如下所示:
namespace optionsMenuApp {
   [Activity(Label = "options Menu", MainLauncher = true, Icon = "@drawable/icon")]
   public class MainActivity : Activity {
      public override bool OnCreateOptionsMenu(IMenu menu) {
         MenuInflater.Inflate(Resource.Menu.myMenu, menu);
         return base.OnPrepareOptionsMenu(menu);
      }
      public override bool OnOptionsItemSelected(IMenuItem item) {
         if (item.ItemId == Resource.Id.file_settings) {
            // do something here...
            return true;
         }
         return base.OnOptionsItemSelected(item);
      }
   }
}
现在,构建并运行您的应用程序。它应该产生以下输出:
Xamarin - 布局
线性布局
在线性布局中,内容以水平或垂直方式排列。
线性布局─水平
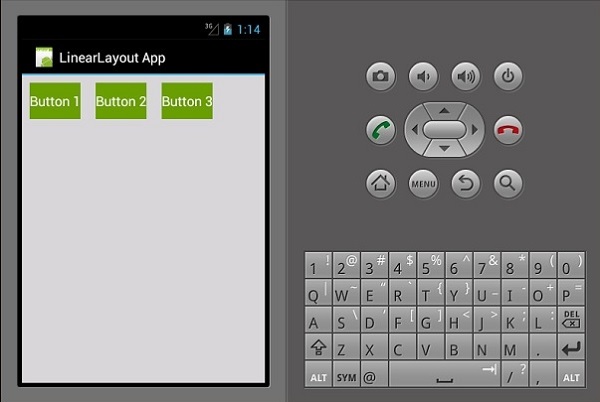
此布局的内容水平排列。在此演示中,我们将创建 3 个按钮,并将它们水平排列在线性布局中。
<?xml version = "1.0" encoding = "utf-8"?>
<LinearLayout xmlns:android = "http://schemas.android.com/apk/res/android"
   android:orientation = "horizontal"
   android:layout_width = "fill_parent"
   android:layout_height = "fill_parent"
   android:background = "#d3d3d3"
   android:minWidth="25px"
   android:minHeight="25px">
   <Button
      android:id="@+id/MyButton1"
      android:layout_width="wrap_content"
      android:layout_margin="10dp"
      android:layout_height="wrap_content"
      android:text="Button 1"
      android:background="@android:color/holo_green_dark" />
   <Button
      android:id="@+id/MyButton2"
      android:layout_width="wrap_content"
      android:layout_margin="10dp"
      android:layout_height="wrap_content"
      android:text="Button 2"
      android:background="@android:color/holo_green_dark" />
   <Button
      android:id="@+id/MyButton3"
      android:layout_width="wrap_content"
      android:layout_margin="10dp"
      android:layout_height="wrap_content"
      android:text="Button 3"
      android:background="@android:color/holo_green_dark" />
</LinearLayout>
结果输出如下所示:
线性布局─垂直
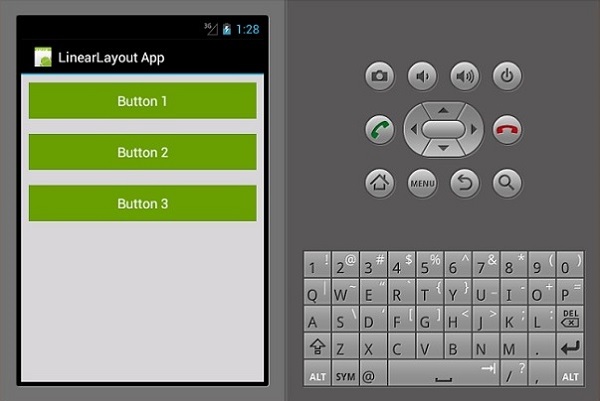
这种类型的布局以垂直方式放置子视图。
<?xml version = "1.0" encoding = "utf-8"?>
<LinearLayout xmlns:android = "http://schemas.android.com/apk/res/android"
   android:orientation = "vertical"
   android:layout_width = "fill_parent"
   android:layout_height = "fill_parent"
   android:background = "#d3d3d3"
   android:minWidth = "25px"
   android:minHeight = "25px">
   <Button
      android:id = "@+id/MyButton1"
      android:layout_width = "fill_parent"
      android:layout_margin = "10dp"
      android:layout_height = "wrap_content"
      android:text = "Button 1"
      android:background = "@android:color/holo_green_dark" />
   <Button
      android:id = "@+id/MyButton2"
      android:layout_width = "fill_parent"
      android:layout_margin = "10dp"
      android:layout_height = "wrap_content"
      android:text = "Button 2"
      android:background = "@android:color/holo_green_dark" />
   <Button
      android:id = "@+id/MyButton3"
      android:layout_width = "fill_parent"
      android:layout_margin = "10dp"
      android:layout_height = "wrap_content"
      android:text="Button 3"
      android:background = "@android:color/holo_green_dark" />
</LinearLayout>
其结果输出如下:
相对布局
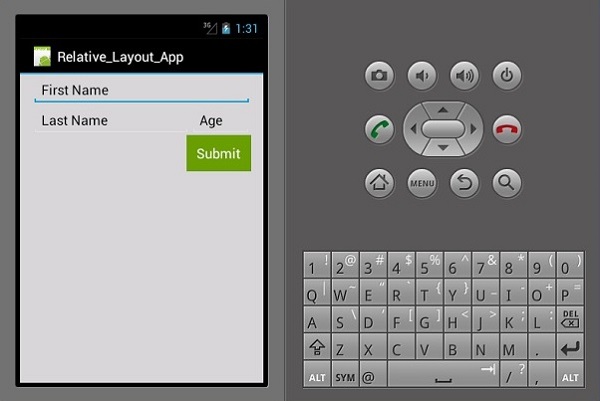
在此视图中,子视图的位置相对于其父视图或其同级视图。在下面的示例中,我们将创建 3 个 EditText 视图和一个按钮,然后相对地对齐它们。
创建一个新项目并将其命名为relative layout app。打开main.axml并添加以下代码。
<?xml version = "1.0" encoding = "utf-8"?>
<RelativeLayout xmlns:android = "http://schemas.android.com/apk/res/android"
   android:layout_width = "match_parent"
   android:layout_height = "match_parent"
   android:paddingLeft = "16dp"
   android:background = "#d3d3d3"
   android:paddingRight = "16dp">
   <EditText
      android:id = "@+id/name"
      android:layout_width = "match_parent"
      android:layout_height = "wrap_content"
      android:hint = "First Name"
      android:textColorHint = "@android:color/background_dark"
      android:textColor = "@android:color/background_dark" />
   <EditText
      android:id = "@+id/lastName"
      android:layout_width = "0dp"
      android:layout_height = "wrap_content"
      android:hint = "Last Name"
      android:layout_below = "@id/name"
      android:textColorHint = "@android:color/background_dark"
      android:textColor = "@android:color/background_dark"
      android:layout_alignParentLeft = "true"
      android:layout_toLeftOf = "@+id/age" />
   <EditText
      android:id = "@id/age"
      android:layout_width = "80dp"
      android:layout_height = "wrap_content"
      android:layout_below = "@id/name"
      android:hint = "Age"
      android:textColorHint = "@android:color/background_dark"
      android:textColor = "@android:color/background_dark"
      android:layout_alignParentRight = "true" />
   <Button
      android:layout_width = "85dp"
      android:layout_height = "wrap_content"
      android:layout_below = "@id/age"
      android:layout_alignParentRight = "true"
      android:text = "Submit"
      android:background = "@android:color/holo_green_dark" />
</RelativeLayout>
我们在本代码中使用的重要参数是:
android:layout_below − 将子视图元素与其父元素对齐。
android:layout_alignParentLeft − 将父元素与左侧对齐。
android:layout_toLeftOf − 此属性将元素与另一个元素的左侧对齐。
android:layout_alignParentRight − 将父元素与右侧对齐。
现在构建并运行应用程序时,它将产生以下输出屏幕:
框架布局
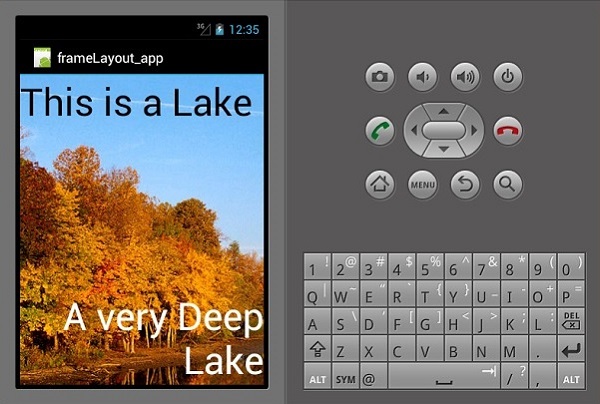
框架布局用于仅显示一个项目。很难在此布局中排列多个项目而不会使它们相互重叠。
启动一个新项目并将其命名为frameLayoutApp。创建一个新的框架布局,如下所示。
<?xml version = "1.0" encoding = "utf-8"?>
<FrameLayout xmlns:android = "http://schemas.android.com/apk/res/android"
   android:layout_width = "fill_parent"
   android:layout_height = "fill_parent">
  <ImageView
      android:id = "@+id/ImageView1"
      android:scaleType = "matrix"
      android:layout_height = "fill_parent"
      android:layout_width = "fill_parent"
      android:src = "@drawable/img1" />
   <TextView
      android:layout_width = "fill_parent"
      android:layout_height = "wrap_content"
      android:textSize = "50dp"
      android:textColor = "#000"
      android:text = "This is a Lake" />
   <TextView
      android:gravity = "right"
      android:layout_width = "fill_parent"
      android:layout_height = "wrap_content"
      android:textSize = "50dp"
      android:text = "A very Deep Lake"
      android:layout_gravity = "bottom"
      android:textColor = "#fff" />
</FrameLayout>
上面的代码创建了一个imageView,它填充了整个屏幕。然后,两个 TextView 浮在imageView上方。
现在,构建并运行您的应用程序。它将显示以下输出:
表格布局
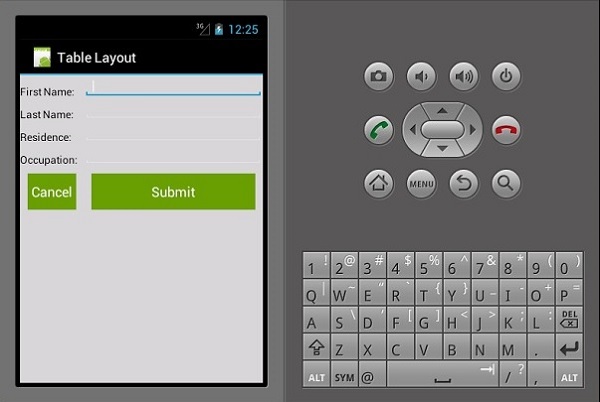
在此布局中,视图被排列成行和列。让我们看看它是如何工作的。
<?xml version = "1.0" encoding = "utf-8"?>
<TableLayout xmlns:android = "http://schemas.android.com/apk/res/android"
   android:layout_width = "fill_parent"
   android:background = "#d3d3d3"
   android:layout_height = "fill_parent"
   android:stretchColumns = "1">

   <TableRow>
      <TextView
         android:text = "First Name:"
         android:layout_width = "wrap_content"
         android:layout_height = "wrap_content"
         android:textColor = "@android:color/black" />
      <EditText
         android:width = "100px"
         android:layout_width = "fill_parent"
         android:layout_height = "30dp"
         android:textColor = "@android:color/black" />
   </TableRow>

   <TableRow>
      <TextView
         android:text = "Last Name:"
         android:layout_width = "wrap_content"
         android:layout_height = "wrap_content"
         android:textColor = "@android:color/black" />
      <EditText
         android:width = "50px"
         android:layout_width = "fill_parent"
         android:layout_height = "30dp"
         android:textColor = "@android:color/black" />
   </TableRow>

   <TableRow>
      <TextView
         android:text = "Residence:"
         android:layout_width = "wrap_content"
         android:layout_height = "wrap_content"
         android:textColor = "@android:color/black" />
      <EditText
         android:width = "100px"
         android:layout_width = "fill_parent"
         android:layout_height = "30dp"
         android:textColor = "@android:color/black" />
   </TableRow>

   <TableRow>
      <TextView
         android:text = "Occupation:"
         android:layout_width = "wrap_content"
         android:layout_height = "wrap_content"
         android:textColor = "@android:color/black" />
      <EditText
         android:width = "100px"
         android:layout_width = "fill_parent"
         android:layout_height = "30dp"
         android:textColor = "@android:color/black" />
   </TableRow>

   <TableRow>
      <Button
         android:text = "Cancel"
         android:layout_width = "wrap_content"
         android:layout_margin = "10dp"
         android:layout_height = "wrap_content"
         android:background = "@android:color/holo_green_dark" />
      <Button
         android:text = "Submit"
         android:width = "100px"
         android:layout_margin = "10dp"
         android:layout_width = "wrap_content"
         android:layout_height = "wrap_content"
         android:background = "@android:color/holo_green_dark" />
   </TableRow>
</TableLayout>
上面的代码创建了一个使用表格和行排列的简单数据输入表单。
Xamarin - Android 控件
日期选择器
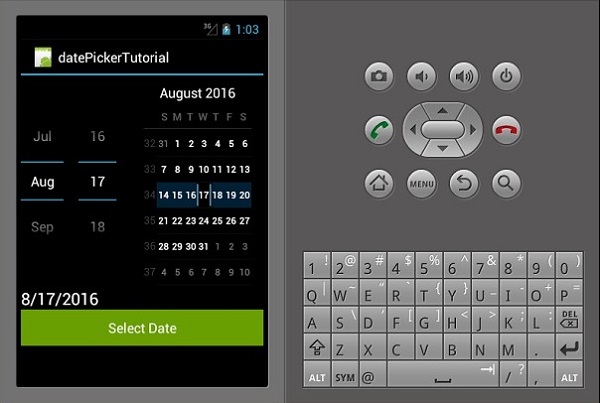
这是一个用于显示日期的小部件。在此示例中,我们将创建一个日期选择器,该选择器在 TextView 上显示设置的日期。
首先,创建一个新项目并将其命名为datePickerExample。打开Main.axml并创建一个datepicker、textview和一个button。
<?xml version = "1.0" encoding = "utf-8"?>
<LinearLayout xmlns:android = "http://schemas.android.com/apk/res/android"
   android:orientation = "vertical"
   android:layout_width = "fill_parent"
   android:layout_height = "fill_parent">
   <DatePicker
      android:layout_width = "match_parent"
      android:layout_height = "wrap_content"
      android:id = "@+id/datePicker1" />
   <TextView
      android:text = "Current Date"
      android:textAppearance = "?android:attr/textAppearanceLarge"
      android:layout_width = "match_parent"
      android:layout_height = "wrap_content"
      android:id = "@+id/txtShowDate" />
   <Button
      android:text = "Select Date"
      android:layout_width = "match_parent"
      android:layout_height = "wrap_content"
      android:id = "@+id/btnSetDate" />
</LinearLayout>
接下来,转到Mainactivity.cs。我们首先在mainActivity:Activity类中创建一个 TextView 的私有实例。
该实例将用于存储选定的日期或默认日期。
private TextView showCurrentDate;
接下来,在setContentView()方法之后添加以下代码。
DatePicker pickDate = FindViewById<DatePicker>(Resource.Id.datePicker1);
showCurrentDate = FindViewById<TextView>(Resource.Id.txtShowDate);
setCurrentDate();
Button button = FindViewById<Button>(Resource.Id.btnSetDate);
button.Click += delegate {
   showCurrentDate.Text = String.Format("{0}/{1}/{2}",
      pickDate.Month, pickDate.DayOfMonth, pickDate.Year);
};
在上面的代码中,我们通过使用FindViewById类从我们的main.axml文件中查找它们来引用我们的日期选择器、TextView 和按钮。
引用后,我们设置按钮单击事件,该事件负责将从日期选择器选择的日期传递到 TextView。
接下来,我们创建setCurrentDate()方法以将默认当前日期显示到我们的 TextView。以下代码解释了它是如何完成的。
private void setCurrentDate() {
   string TodaysDate = string.Format("{0}",
      DateTime.Now.ToString("M/d/yyyy").PadLeft(2, '0'));
   showCurrentDate.Text = TodaysDate;
}
DateTime.Now.ToString()类将今天的日期时间绑定到字符串对象。
现在,构建并运行应用程序。它应该显示以下输出:
时间选择器
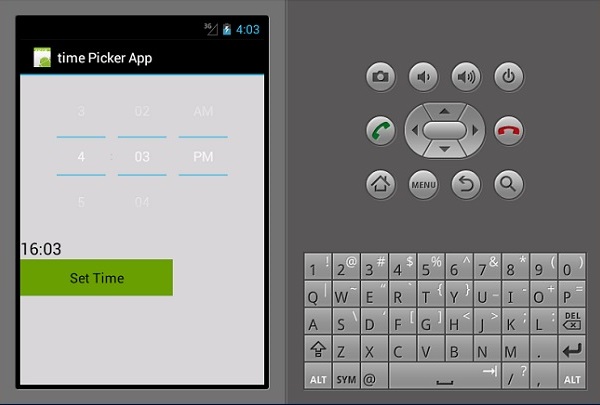
时间选择器是一个用于显示时间的小部件,还允许用户选择和设置时间。我们将创建一个基本的时间选择器应用程序,它显示时间并允许用户更改时间。
转到main.axml并添加一个新的按钮、TextView 和一个时间选择器,如下面的代码所示。
<?xml version = "1.0" encoding = "utf-8"?>
<LinearLayout xmlns:android = "http://schemas.android.com/apk/res/android"
   android:orientation = "vertical"
   android:background = "#d3d3d3"
   android:layout_width = "fill_parent"
   android:layout_height = "fill_parent">
   <TimePicker
      android:layout_width = "match_parent"
      android:layout_height = "wrap_content"
      android:id = "@+id/timePicker1" />
   <TextView
      android:text = "Time"
      android:textAppearance = "?android:attr/textAppearanceLarge"
      android:layout_width = "match_parent"
      android:layout_height = "wrap_content"
      android:id = "@+id/txt_showTime"
      android:textColor = "@android:color/black" />
   <Button
      android:text = "Set Time"
      android:layout_width = "200dp"
      android:layout_height = "wrap_content"
      android:id = "@+id/btnSetTime"
      android:textColor = "@android:color/black"
      android:background = "@android:color/holo_green_dark" />
</LinearLayout>
转到MainActivity.cs以添加在创建的 TextView 上显示设置日期的功能。
public class MainActivity : Activity {

   private TextView showCurrentTime;

   protected override void OnCreate(Bundle bundle) {

      base.OnCreate(bundle);
      SetContentView(Resource.Layout.Main);
      TimePicker Tpicker = FindViewById<TimePicker>(Resource.Id.timePicker1);
      showCurrentTime = FindViewById<TextView>(Resource.Id.txt_showTime);
      setCurrentTime();
      Button button = FindViewById<Button>(Resource.Id.btnSetTime);

      button.Click += delegate {
         showCurrentTime.Text = String.Format("{0}:{1}",
            Tpicker.CurrentHour, Tpicker.CurrentMinute);
      };
   }
   private void setCurrentTime() {
      string time = string.Format("{0}",
         DateTime.Now.ToString("HH:mm").PadLeft(2, '0'));
      showCurrentTime.Text = time;
   }
}
在上面的代码中,我们首先通过FindViewById<>类引用timepicker、设置时间按钮和用于显示时间的 TextView。然后,我们为“设置时间”按钮创建了一个单击事件,该事件在单击时将时间设置为用户选择的时间。默认情况下,它显示当前系统时间。
setCurrentTime()方法类初始化txt_showTime TextView 以显示当前时间。
现在,构建并运行您的应用程序。它应该显示以下输出:
微调框
微调框是一个用于从一组选项中选择一个选项的小部件。它相当于下拉列表/组合框。首先,创建一个新项目并将其命名为Spinner App Tutorial。
打开layout文件夹下的Main.axml文件,并创建一个新的spinner(下拉菜单)。
<?xml version = "1.0" encoding = "utf-8"?>
<LinearLayout xmlns:android = "http://schemas.android.com/apk/res/android"
   android:orientation = "vertical"
   android:layout_width = "fill_parent"
   android:layout_height = "fill_parent">
   <Spinner
      android:layout_width = "match_parent"
      android:layout_height = "wrap_content"
      android:id = "@+id/spinner1"
      android:prompt = "@string/daysOfWeek" />
</LinearLayout>
打开位于values文件夹下的Strings.xml文件,并添加以下代码来创建spinner的选项。
<resources>
  <string name = "daysOfWeek">Choose a planet</string>
  <string-array name = "days_array">
      <item>Sunday</item>
      <item>Monday</item>
      <item>Tuesday</item>
      <item>Wednesday</item>
      <item>Thursday</item>
      <item>Friday</item>
      <item>Saturday</item>
      <item>Sunday</item>
   </string-array>
</resources>
接下来,打开MainActivity.cs文件,添加显示所选星期几的功能。
protected override void OnCreate(Bundle bundle) {
   base.OnCreate(bundle);
   // Set our view from the "main" layout resource
   SetContentView(Resource.Layout.Main);
   Spinner spinnerDays = FindViewById<Spinner>(Resource.Id.spinner1);
   spinnerDays.ItemSelected += new EventHandler
      <AdapterView.ItemSelectedEventArgs>(SelectedDay);
   var adapter = ArrayAdapter.CreateFromResource(this,
      Resource.Array.days_array, Android.Resource.Layout.SimpleSpinnerItem);
   adapter.SetDropDownViewResource(Android.Resource.Layout.SimpleSpinnerDropD ownItem);
   spinnerDays.Adapter = adapter;
}
private void SelectedDay(object sender, AdapterView.ItemSelectedEventArgs e) {
   Spinner spinner = (Spinner)sender;
   string toast = string.Format("The selected
      day is {0}", spinner.GetItemAtPosition(e.Position));
   Toast.MakeText(this, toast, ToastLength.Long).Show();
}
现在,构建并运行应用程序。它应该显示以下输出:
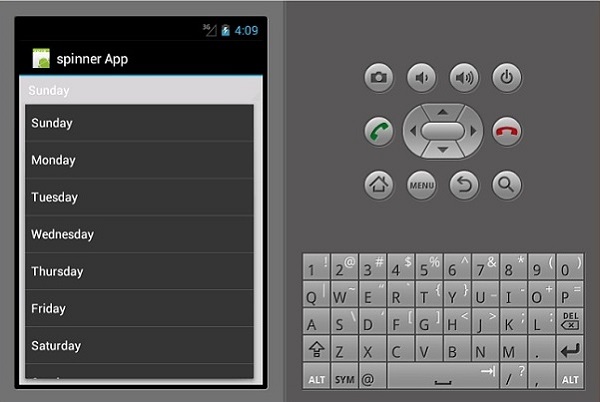
在上面的代码中,我们通过FindViewById<>类引用了在main.axml文件中创建的spinner。然后,我们创建了一个新的arrayAdapter(),用于从strings.xml文件中绑定我们的数组项。
最后,我们创建了SelectedDay()方法,用于显示所选的星期几。
Xamarin - Android 对话框
警告对话框
在本节中,我们将创建一个按钮,单击该按钮会显示一个警告对话框。该对话框包含两个按钮,即删除和取消按钮。
首先,转到main.axml并在线性布局内创建一个新的按钮,如下面的代码所示。
<?xml version = "1.0" encoding = "utf-8"?>
<LinearLayout xmlns:android = "http://schemas.android.com/apk/res/android"
   android:orientation = "vertical"
   android:layout_width = "fill_parent"
   android:background = "#d3d3d3"
   android:layout_height = "fill_parent">
   <Button
      android:id="@+id/MyButton"
      android:layout_width = "fill_parent"
      android:layout_height = "wrap_content"
      android:text = "Click to Delete"
      android:textColor = "@android:color/background_dark"
      android:background = "@android:color/holo_green_dark" />
</LinearLayout>
接下来,打开MainActivity.cs创建警告对话框并添加其功能。
protected override void OnCreate(Bundle bundle) {
   base.OnCreate(bundle);
   SetContentView(Resource.Layout.Main);
   Button button = FindViewById<Button>(Resource.Id.MyButton);
   button.Click += delegate {
      AlertDialog.Builder alertDiag = new AlertDialog.Builder(this);
      alertDiag.SetTitle("Confirm delete");
      alertDiag.SetMessage("Once deleted the move cannot be undone");
      alertDiag.SetPositiveButton("Delete", (senderAlert, args) => {
         Toast.MakeText(this, "Deleted", ToastLength.Short).Show();
      });
      alertDiag.SetNegativeButton("Cancel", (senderAlert, args) => {
         alertDiag.Dispose();
      });
      Dialog diag = alertDiag.Create();
      diag.Show();
   };
}
完成后,构建并运行您的应用程序以查看结果。
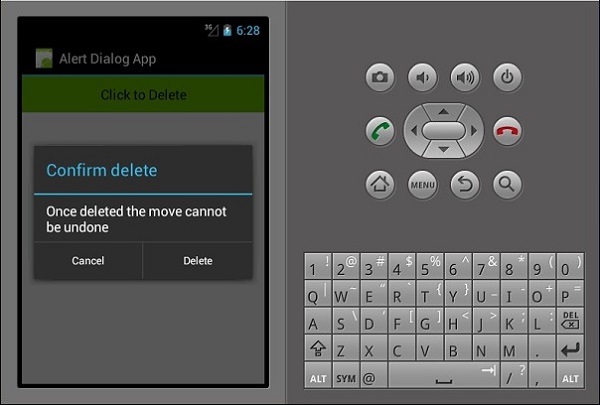
在上面的代码中,我们创建了一个名为alertDiag的警告对话框,其中包含以下两个按钮:
setPositiveButton - 它包含删除按钮操作,单击该按钮会显示确认消息已删除。
setNegativeButton - 它包含一个取消按钮,单击该按钮会简单地关闭警告对话框。
Xamarin - 图库
Gallery是一种视图类型,用于以水平可滚动列表显示项目。然后在中心显示所选项目。在此示例中,您将创建一个包含水平可滚动图像的Gallery。单击图像将显示所选图像的编号。
首先,创建一个新项目并命名它,例如Gallery App Tutorial。在开始编写代码之前,将7张图像粘贴到资源/drawable文件夹中。导航到资源文件夹下的main.axml,并在线性布局标签之间添加一个Gallery。
<?xml version="1.0" encoding="utf-8"?>
<LinearLayout xmlns:android="http://schemas.android.com/apk/res/android"
   android:orientation="vertical"
   android:layout_width="fill_parent"
   android:layout_height="fill_parent"
   android:background="#d3d3d3">
   <Gallery
      android:id="@+id/gallery"
      android:layout_width="fill_parent"
      android:layout_height="wrap_content"
      android:padding="10dp" />
</LinearLayout>
创建一个名为ImageAdapter的新类。此类将用于将图像绑定到我们上面创建的Gallery。
第一步是添加一个包含上下文cont的类,我们用它来存储字段。
public class ImageAdapter : BaseAdapter {
   Context cont;
   public ImageAdapter(Context ct) {
      cont = ct;
   }
}
接下来,我们计算包含图像的数组列表并返回其大小。
public override int Count {
   get {
      return imageArraylist.Length;
   }
}
下一步,我们获取项目的position。以下代码显示了如何操作。
public override Java.Lang.Object GetItem(int position) {
   return null;
}
public override long GetItemId(int position) {
   return 0;
}
下一步,我们为适配器引用的项目创建一个imageview。
public override View GetView(int position,View convertView, ViewGroup parent) {
   ImageView img = new ImageView(cont);
   img.SetImageResource(imageArraylist[position]);
   img.SetScaleType(ImageView.ScaleType.FitXy);
   img.LayoutParameters = new Gallery.LayoutParams(200, 100);
   return img;
}
最后一步,我们创建对在resources.drawable文件夹中添加的图像的引用。为此,我们创建一个数组来保存图像集合。以下代码解释了如何操作。
int[] imageArraylist = {
   Resource.Drawable.img1,
   Resource.Drawable.img2,
   Resource.Drawable.img3,
   Resource.Drawable.img4,
   Resource.Drawable.img5,
   Resource.Drawable.img6,
  };
}
接下来,我们转到mainActivity.cs并在OnCreate()方法下插入以下代码。
Gallery myGallery = (Gallery)FindViewById<Gallery>(Resource.Id.gallery);
myGallery.Adapter = new ImageAdapter(this);
myGallery.ItemClick += delegate(object sender, AdapterView.ItemClickEventArgs args) {
   Toast.MakeText(this,
      args.Position.ToString(), ToastLength.Short).Show();
}
最后,构建并运行您的应用程序以查看输出。

Xamarin - Android 视图
ListViews
ListView是一个用户界面元素,用于显示可滚动的项目列表。
将数据绑定到ListViews
在此示例中,您将创建一个显示星期几的ListView。首先,让我们创建一个新的XML文件并将其命名为listViewTemplate.xml。
在listViewTemplate.xml中,我们添加一个新的textview,如下所示。
<?xml version = "1.0" encoding = "utf-8" ?>
<TextView xmlns:android = "http://schemas.android.com/apk/res/android"
android:id = "@+id/textItem"
android:textSize ="20sp"
android:layout_width = "fill_parent"
android:layout_height = "wrap_content"/>
接下来,转到Main.axml并在线性布局内创建一个新的listview。
<ListView
   android:minWidth="25px"
   android:minHeight="25px"
   android:layout_width="match_parent"
   android:layout_height="match_parent"
   android:id="@+id/listView1" />
打开MainActivity.cs并键入以下代码以将数据绑定到我们创建的listview。代码必须写在OnCreate()方法内。
SetContentView(Resource.Layout.Main);
var listView = FindViewById<ListView>(Resource.Id.listView1);
var data = new string[] {
   "Sunday", "Monday", "Tuesday", "Wednesday", "Thursday", "Friday", "Saturday"
};
listView.Adapter = new ArrayAdapter(this, Resource.Layout.ListViewTemplate, data);
Var data = new string[]只是将我们的项目作为数组保存。
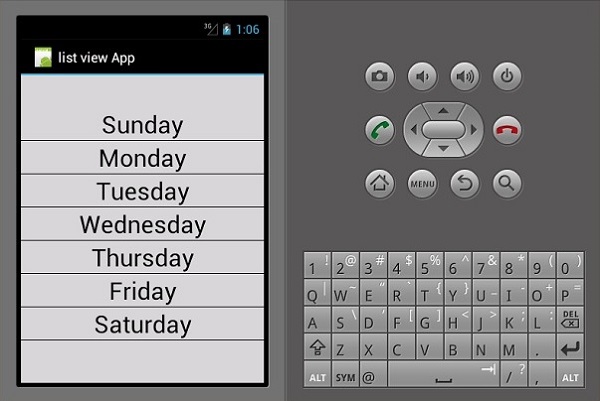
数组适配器将集合中的项目作为视图返回。默认情况下,数组适配器使用默认的textView来显示每个项目。在上面的代码中,我们在ListViewTemplate.xml中创建了自己的textview,并使用如下所示的构造函数引用它。
ArrayAdapter(this, Resource.Layout.ListViewTemplate, data);
最后,构建并运行您的应用程序以查看输出。
GridViews
GridView是一个视图组,允许应用程序以二维方式布局内容,可滚动的网格。
要添加GridView,请创建一个新项目并将其命名为gridViewApp。转到Main.axml并添加一个grid,如下所示。
<?xml version = "1.0" encoding="utf-8"?>
<GridView xmlns:android = "http://schemas.android.com/apk/res/android"
   android:id = "@+id/gridview"
   android:layout_width = "fill_parent"
   android:layout_height = "fill_parent"
   android:columnWidth = "90dp"
   android:numColumns = "auto_fit"
   android:verticalSpacing = "10dp"
   android:horizontalSpacing = "10dp"
   android:stretchMode = "columnWidth"
   android:gravity = "center" />
接下来,创建一个新类并将其命名为ImageAdpter.cs。此类将包含将显示在网格中的所有项目的适配器类。
在ImageAdapter中,添加以下代码:
public class ImageAdapter : BaseAdapter {
   Context context;
   public ImageAdapter(Context ch) {
      context = ch;
   }

   public override int Count {
      get {
         return cars.Length;
      }
   }

   public override long GetItemId(int position) {
   return 0;
   }

   public override Java.Lang.Object GetItem(int position) {
      return null;
   }

   public override View GetView(int position,
      View convertView, ViewGroup parent) {
      ImageView imageView;
      if (convertView == null) {
         imageView = new ImageView(context);
         imageView.LayoutParameters = new GridView.LayoutParams(100, 100);
         imageView.SetScaleType(ImageView.ScaleType.CenterCrop);
         imageView.SetPadding(8, 8, 8, 8);
      } else {
         imageView = (ImageView)convertView;
      }

      imageView.SetImageResource(cars[position]);
      return imageView;
   }

   int[] cars = {
      Resource.Drawable.img1, Resource.Drawable.img2,
      Resource.Drawable.img3, Resource.Drawable.img4,
      Resource.Drawable.img5, Resource.Drawable.img6,
   };
}
在上面的代码中,我们只是将我们的汽车图像绑定到图像适配器。接下来,打开MainActivity.cs并在setContentView()之后添加以下代码。
var gridview = FindViewById<GridView>(Resource.Id.gridview);
gridview.Adapter = new ImageAdapter(this);
gridview.ItemClick += delegate(object sender,
   AdapterView.ItemClickEventArgs args) {
      Toast.MakeText(this,
         args.Position.ToString(), ToastLength.Short).Show();
};
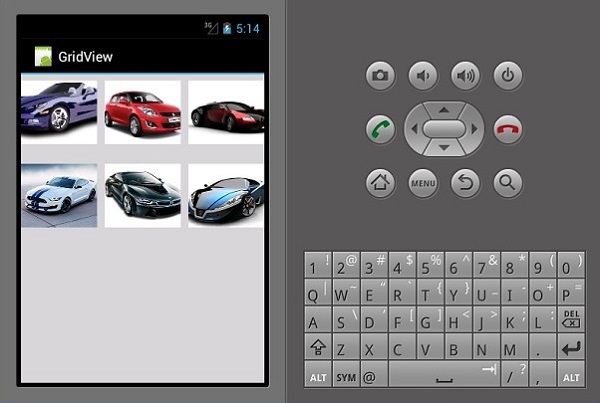
上面的代码在main.axml中查找GridView并将其绑定到imageAdapter类。Gridview.ItemClick创建一个onClick事件,当用户单击图像时,该事件会返回所选图像的位置。
现在,构建并运行您的应用程序以查看输出。
Xamarin - 多屏幕应用程序
在本章中,我们将创建一个登录系统,允许用户注册。然后,在成功登录后,我们将注册用户带到应用程序的主屏幕。
首先,创建一个新项目并将其命名为Login System。在您的新项目中,转到main.axml并添加两个按钮和一个进度条,如下所示。
<?xml version = "1.0" encoding = "utf-8"?>
<LinearLayout xmlns:android = "http://schemas.android.com/apk/res/android"
   android:orientation = "vertical"
   android:layout_width = "fill_parent"
   android:layout_height = "fill_parent"
   android:background = "@android:color/background_light"
   android:weightSum = "100"
   android:minWidth = "25px"
   android:minHeight = "25px">
   <TextView
      android:text = "Login App"
      android:textAppearance = "?android:attr/textAppearanceMedium"
      android:layout_width = "match_parent"
      android:layout_weight = "20"
      android:layout_height = "0dp"
      android:textColor = "#368DEB"
      android:id = "@+id/txtCreatAccount"
      android:gravity = "center"
      android:textStyle = "bold"
      android:textSize = "25sp" />
   <Button
      android:text = "Sign In"
      android:layout_width = "match_parent"
      android:layout_weight = "15"
      android:layout_height = "0dp"
      android:background = "@drawable/btnSignInStyle"
      android:id = "@+id/btnSignIn"
      android:layout_marginLeft = "20dp"
      android:layout_marginRight = "20dp"
      android:textSize = "15sp" />
   <Button
      android:text = "Sign Up"
      android:layout_width = "match_parent"
      android:layout_weight = "15"
      android:layout_height = "0dp"
      android:background = "@drawable/btnSignUpStyle"
      android:id = "@+id/btnSignUp"
      android:layout_marginLeft = "20dp"
      android:layout_marginRight = "20dp"
      android:textSize = "15sp" />
   <RelativeLayout
      android:layout_width = "match_parent"
      android:layout_height = "0dp"
      android:layout_weight = "50"
      android:minWidth = "25px"
      android:minHeight = "25px">
      <ProgressBar
         android:layout_width = "wrap_content"
         android:layout_height = "wrap_content"
         android:id = "@+id/progressBar1"
         android:background = "@drawable/progressBarStyle"
         android:layout_centerInParent="true"
         android:indeterminate = "true"
         xmlns:tools = "
            http://schemas.android.com/tools"
         tools:visibility = "invisible" />
   </RelativeLayout>
</LinearLayout>
创建用户界面后,务必设置按钮的样式以使其看起来更具吸引力。为此,在drawable文件夹下创建一个新的XML文件,并将文件命名为btnSignInStyle.xml。
在XML文件中,添加以下代码行:
<selector xmlns:android = "http://schemas.android.com/apk/res/android">
   <item android:state_pressed = "false">
      <layer-list>
         <item android:right = "5dp" android:top = "5dp">
            <shape>
               <corners android:radius = "2dp"/>
               <solid android:color = "#D6D6D6"/>
            </shape>
         </item>
         <item android:left = "2dp" android:bottom = "2dp">
            <shape>
               <corners android:radius = "4dp"/>
               <gradient android:angle = "270"
                  android:endColor = "#486EA9" android:startColor = "#486EA9"/>
               <stroke android:width = "1dp" android:color = "#BABABA"/>
               <padding android:bottom = "10dp"
                  android:right = "10dp" android:left = "10dp" android:top = "10dp"/>
            </shape>
         </item>
      </layer-list>
   </item>
   <item android:state_pressed = "true">
      <layer-list>
         <item android:right = "5dp" android:top = "5dp">
            <shape>
               <corners android:radius = "2dp"/>
               <solid android:color = "#D6D6D6"/>
            </shape>
         </item>
         <item android:left = "2dp" android:bottom = "2dp">
            <shape>
               <corners android:radius = "4dp"/>
               <gradient android:angle = "270"
                  android:endColor = "#79C791" android:startColor = "#486EA9"/>
               <stroke android:radius = "4dp" android:color = "#BABABA"/>
               <padding android:bottom = "10dp"
                  android:right = "10dp" android:left = "10dp" android:top = "10dp"/>
            </shape>
         </item>
      </layer-list>
  </item>
</selector>
上面的代码设置加载时按钮的颜色,以及单击时的颜色,还设置按钮的圆角。
接下来,我们为signup按钮创建与上面类似的样式XML。为此,在drawable文件夹下创建另一个XML,并将其命名为btnSignUpStyle.xml。它将继承btnSignInStyle.xml中的所有内容。唯一的区别是按钮的渐变开始和结束颜色。
将btnSignUpStyle.xml中的startColor和endColor更改为
<gradient android:angle="270"
   android:endColor="#008000" android:startColor="#008000"/>
转到layout文件夹并创建一个新的AXML文件,并将其命名为registerDailog.axml。此文件将包含应用程序中新用户的注册详细信息。此页面将包含三个EditTexts和一个提交数据的按钮。在您的线性布局代码中添加以下代码。
<EditText
   android:layout_width = "match_parent"
   android:layout_marginBottom = "10dp"
   android:layout_marginTop = "25dp"
   android:layout_marginRight = "25dp"
   android:layout_marginLeft = "25dp"
   android:layout_height = "35dp"
   android:paddingLeft = "10dp"
   android:id = "@+id/txtUsername"
   android:hint = "Username"
   android:textColor = "#000" />
<EditText
   android:layout_width = "match_parent"
   android:layout_height = "35dp"
   android:id = "@+id/txtEmail"
   android:layout_marginBottom = "10dp"
   android:layout_marginTop = "25dp"
   android:layout_marginRight = "25dp"
   android:layout_marginLeft = "25dp"
   android:paddingLeft = "10dp"
   android:textColor = "#000"
   android:hint = "Email" />
<EditText
   android:layout_width = "match_parent"
   android:layout_height = "35dp"
   android:layout_marginBottom = "10dp"
   android:layout_marginTop = "25dp"
   android:layout_marginRight = "25dp"
   android:layout_marginLeft = "25dp"
   android:paddingLeft = "10dp"
   android:textColor = "#000"
   android:id = "@+id/txtPassword"
   android:hint = "Password" />
<Button
   android:text = "Sign Up"
   android:layout_width = "match_parent"
   android:layout_height = "wrap_content"
   android:id = "@+id/btnSave"
   android:textSize = "20dp"
   android:textColor = "#fff"
   android:textStyle = "bold"
   android:height = "70dp"
   android:background = "@drawable/btnSignUpStyle"
   android:paddingLeft = "5dp"
   android:paddingRight = "5dp"
   android:paddingTop = "5dp"
   android:paddingBottom = "5dp"
   android:layout_marginLeft = "25dp"
   android:layout_marginRight = "25dp"
   android:layout_centerHorizontal = "true" />
接下来,添加一个名为signUpDialog.cs的新类。此类将包含创建对话框所需的代码。以下示例显示了代码。
public class OnSignUpEvent:EventArgs {
   private string myUserName;
   private string myEmail;
   private string myPassword;
   public string UserName {
      get {
         return myUserName;
      }
      set{
         myUserName = value;
      }
   }

   public string Email {
      get {
         return myEmail;
      }
      set {
         myEmail = value;
      }
   }

   public string Password {
      get {
         return myPassword;
      }
      set {
         myPassword = value;
      }
   }
   public OnSignUpEvent(string username, string
      email, string password):base() {
      UserName = username;
      Email = email;
      Password = password;
   }

   class SignUpDialog:DialogFragment {
      private EditText txtUsername;
      private EditText txtEmail;
      private EditText txtPassword;
      private Button btnSaveSignUp;
      public event EventHandler<OnSignUpEvent> onSignUpComplete;
      public override View OnCreateView(LayoutInflater inflater,
         ViewGroup container, Bundle savedInstanceState) {
         base.OnCreateView(inflater, container, savedInstanceState);
         var view = inflater.Inflate(Resource.Layout.registerDialog, container, false);
         txtUsername = view.FindViewById<EditText>(Resource.Id.txtUsername);
         txtEmail = view.FindViewById<EditText>(Resource.Id.txtEmail);
         txtPassword = view.FindViewById<EditText>(Resource.Id.txtPassword);
         btnSaveSignUp = view.FindViewById<Button>(Resource.Id.btnSave);
         btnSaveSignUp.Click += btnSaveSignUp_Click;
         return view;
      }
      void btnSaveSignUp_Click(object sender, EventArgs e) {
         onSignUpComplete.Invoke(this, new OnSignUpEvent(txtUsername.Text,

            txtEmail.Text, txtPassword.Text));
         this.Dismiss();
      }
   }
}
在上面的代码中,我们使用了get和set属性。get方法返回一个变量,而set方法为返回的变量赋值。这是一个示例:
public string Color {
   get {
      return color;
   }
   set {
      color = value;
   }
}
在我们之前的示例中,我们创建了一个覆盖视图的方法。在方法内部,我们创建了一个名为view的var,它引用了layout文件夹中包含的registerDialog.axml。
接下来,转到mainActivity.cs创建对话框片段。
private Button signUp;
private Button submitNewUser;
private EditText txtUsername;
private EditText txtEmail;
private EditText txtPassword;

protected override void OnCreate(Bundle bundle) {
   base.OnCreate(bundle);
   SetContentView(Resource.Layout.Main);
   signUp = FindViewById<Button>(Resource.Id.btnSignUp);
   submitNewUser = FindViewById<Button>(Resource.Id.btnSave);
   txtUsername = FindViewById<EditText>(Resource.Id.txtUsername);
   txtEmail = FindViewById<EditText>(Resource.Id.txtEmail);
   txtPassword = FindViewById<EditText>(Resource.Id.txtPassword);

   signUp.Click += (object sender, EventArgs args) => {
      FragmentTransaction transFrag = FragmentManager.BeginTransaction();
      SignUpDialog diagSignUp = new SignUpDialog();
      diagSignUp.Show(transFrag, "Fragment Dialog");
      diagSignUp.onSignUpComplete += diagSignUp_onSignUpComplete;
   };
}
void diagSignUp_onSignUpComplete(object sender, OnSignUpEvent e) {
   StartActivity(typeof(Activity2));
}
上面的代码包含一个按钮单击事件,单击该事件将加载signUp对话框。在按钮单击事件中,我们创建了一个SignUpDialog类,该类加载registerDialog.axml文件。
然后,我们使用FragmentTransaction transFrag = FragmentManager.BeginTransaction();将我们的registerDialog页面显示为Android对话框片段。
我们将添加另一个名为home.axml的.axml文件。此布局将是用户成功登录系统后的登录屏幕。在此布局中,我们将添加一个textview,如下面的代码所示。
<TextView
   android:text = "You have been succesfully registered. Welcome!"
   android:textAppearance = "?android:attr/textAppearanceLarge"
   android:layout_width = "match_parent"
   android:layout_height = "wrap_content"
   android:id = "@+id/textView1" />
接下来,我们创建一个名为Activity2.cs的最终活动。在此活动中,我们将使用findViewById查找home.axml。
最后,构建并运行您的应用程序。它将显示以下屏幕作为输出。
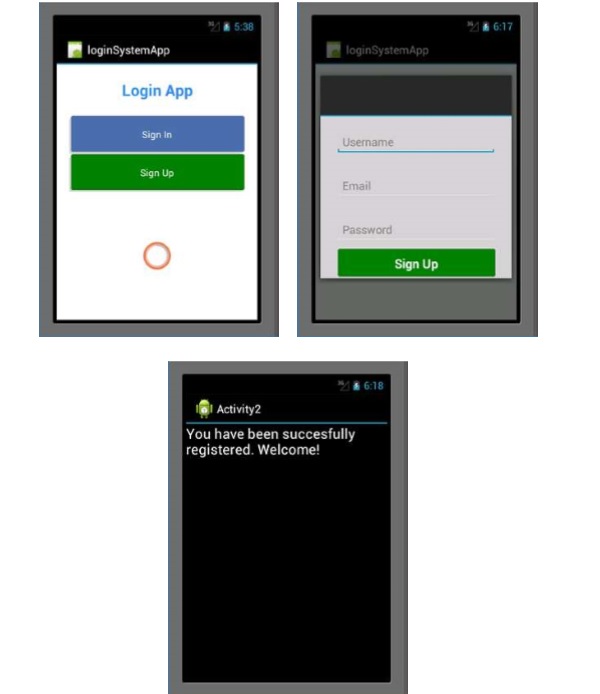
Xamarin - 部署您的应用程序
完成应用程序构建过程后,务必在物理Android设备上使用此应用程序,或允许其他人下载您的应用程序并将其安装到他们的设备上。
发布您的应用程序
在发布您的应用程序之前,务必将其转换为Android系统可以读取的格式。这种格式称为apk文件。要创建apk文件。
打开您的项目。
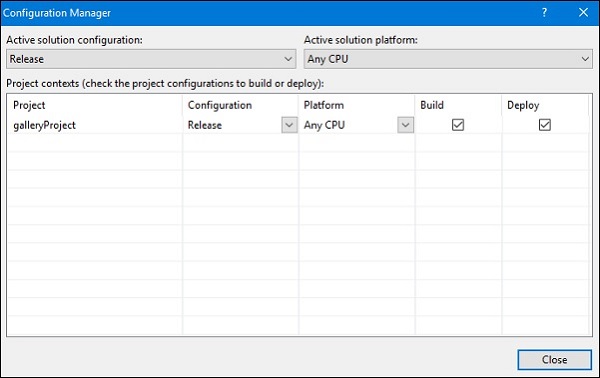
转到构建菜单并选择配置管理器
在配置管理器上,将活动解决方案配置设置为发布应用程序。
接下来,再次单击构建菜单并选择导出Android包(.apk)。
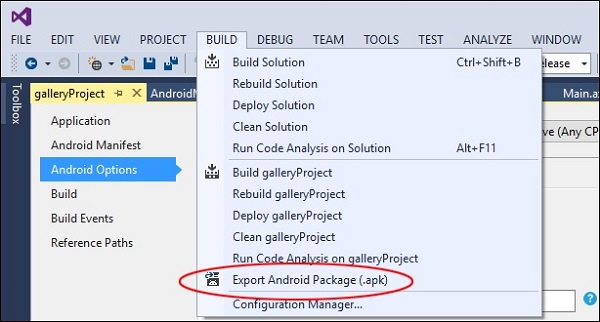
完成后,apk文件将存储在您的项目文件夹/bin/Release中。
发布您的应用程序
有三种发布应用程序的方法:
在线附件
这涉及将您的apk文件作为附件上传到网上。然后,拥有Android设备的用户可以下载并直接将您的应用程序安装到他们的设备上。
Google Play商店
Play商店是Android应用程序最大的市场。要将您的应用程序上传到Play商店,您需要拥有Google的开发者帐户。开发者帐户创建一次,获得许可证的费用为25美元。
手动安装
手动安装涉及将生成的.apk文件直接安装到物理设备上。将文件复制到Android设备的物理内存或SD卡中,然后从设备运行该文件。
默认情况下,Android会阻止安装非Play商店的应用程序。要安装您的应用程序,您必须启用它以接受来自设置的应用程序安装。为此,请转到设备上的设置,查找安全菜单,然后选中“允许安装来自未知来源的应用程序”。
