- Electron 教程
- Electron - 首页
- Electron - 概述
- Electron - 安装
- Electron 的工作原理?
- Electron - Hello World
- Electron - 构建 UI
- Electron - 文件处理
- Electron - 原生 Node 库
- 进程间通信 (IPC)
- Electron - 系统对话框
- Electron - 菜单
- Electron - 系统托盘
- Electron - 通知
- Electron - Webview
- Electron - 音频和视频捕获
- Electron - 定义快捷键
- Electron - 环境变量
- Electron - 调试
- Electron - 打包应用
- Electron - 资源
- Electron 有用资源
- Electron - 快速指南
- Electron - 有用资源
- Electron - 讨论
Electron - 原生 Node 库
我们在上一章中使用了 Node 模块 fs。现在我们将了解一些其他可以与 Electron 一起使用的 Node 模块。
OS 模块
使用 OS 模块,我们可以获取有关应用程序运行所在系统的许多信息。以下是一些在创建应用程序时有帮助的方法。这些方法帮助我们根据应用程序运行的操作系统定制应用程序。
| 序号 | 函数和描述 |
|---|---|
| 1 | os.userInfo([options]) os.userInfo() 方法返回有关当前有效用户的信息。即使没有明确请求信息,此信息也可用于为用户个性化应用程序。 |
| 2 | os.platform() os.platform() 方法返回一个字符串,用于标识操作系统平台。这可以用于根据用户操作系统定制应用程序。 |
| 3 | os.homedir() os.homedir() 方法返回当前用户的 home 目录(作为字符串)。通常,所有用户的配置都位于用户的 home 目录中。因此,这可以用于应用程序的相同目的。 |
| 4 | os.arch() os.arch() 方法返回一个字符串,用于标识操作系统的 CPU 架构。这可以在运行奇特架构时用于使您的应用程序适应该系统。 |
| 5 | os.EOL 一个字符串常量,定义操作系统特定的行尾标记。在主机操作系统上的文件中结束行时,应使用此标记。 |
使用相同的 main.js 文件和以下 HTML 文件,我们可以在屏幕上打印这些属性:
<html>
   <head>
      <title>OS Module</title>
   </head>

   <body>
      <script>
         let os = require('os')
         document.write('User Info: ' + JSON.stringify(os.userInfo()) + '<br>' +
            'Platform: ' + os.platform() + '<br>' +
            'User home directory: ' +  os.homedir() + '<br>' +
            'OS Architecture: ' + os.arch() + '<br>')
      </script>
   </body>
</html>
现在使用以下命令运行应用程序:
$ electron ./main.js
上述命令将生成以下输出:
User Info: {"uid":1000,"gid":1000,"username":"ayushgp","homedir":"/home/ayushgp",
   "shell":"/usr/bin/zsh"}
Platform: linux
User home directory: /home/ayushgp
OS Architecture: x64
Net 模块
Net 模块用于应用程序中的网络相关工作。我们可以使用此模块创建服务器和套接字连接。通常,建议使用 npm 的包装器模块而不是 net 模块来执行网络相关任务。
下表列出了该模块中最有用的方法:
| 序号 | 函数和描述 |
|---|---|
| 1 | net.createServer([options][, connectionListener]) 创建一个新的 TCP 服务器。connectionListener 参数自动设置为 'connection' 事件的侦听器。 |
| 2 | net.createConnection(options[, connectionListener]) 一个工厂方法,它返回一个新的 'net.Socket' 并连接到指定的地址和端口。 |
| 3 | net.Server.listen(port[, host][, backlog][, callback]) 开始在指定的端口和主机上接受连接。如果省略主机,则服务器将接受定向到任何 IPv4 地址的连接。 |
| 4 | net.Server.close([callback]) 当所有连接都结束并且服务器发出 'close' 事件时最终关闭。 |
| 5 | net.Socket.connect(port[, host][, connectListener]) 为给定的套接字打开连接。如果给出端口和主机,则套接字将作为 TCP 套接字打开。 |
net 模块还附带一些其他方法。要获取更全面的列表,请参阅此处。
现在,让我们创建一个使用 net 模块创建到服务器的连接的 Electron 应用程序。我们需要创建一个新文件,server.js:
var net = require('net');
var server = net.createServer(function(connection) {
   console.log('Client Connected');

   connection.on('end', function() {
      console.log('client disconnected');
   });

   connection.write('Hello World!\r\n');
   connection.pipe(connection);
});

server.listen(8080, function() {
   console.log('Server running on https://:8080');
});
使用相同的 main.js 文件,将 HTML 文件替换为以下内容:
<html>
   <head>
      <title>net Module</title>
   </head>

   <body>
      <script>
         var net = require('net');
         var client = net.connect({port: 8080}, function() {
            console.log('Connection established!');
         });

         client.on('data', function(data) {
            document.write(data.toString());
            client.end();
         });

         client.on('end', function() {
            console.log('Disconnected :(');
         });
      </script>
   </body>
</html>
使用以下命令运行服务器:
$ node server.js
使用以下命令运行应用程序:
$ electron ./main.js
上述命令将生成以下输出:
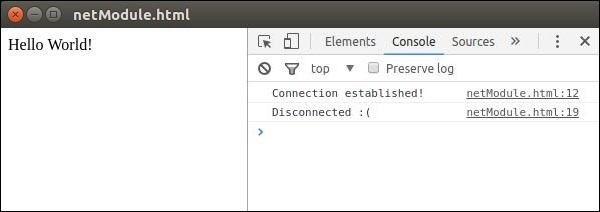
观察到我们自动连接到服务器并自动断开连接。
我们还有一些其他 Node 模块可以直接在 Electron 的前端使用。这些模块的使用取决于您使用它们的场景。