
 数据结构
数据结构 网络
网络 关系数据库管理系统
 操作系统
操作系统 Java
Java iOS
iOS HTML
HTML CSS
CSS Android
 Python
 C 编程
C 编程 C++
C++ C#
C# MongoDB
 MySQL
MySQL Javascript
 PHP
PHP如何在 Material UI 中创建增强型传输列表?
在这篇文章中,我们将看到一个逐步指南,用于在 React MUI 中创建增强型传输列表。
传输列表是一种列表类型,允许用户将一个或多个列表项移动到另一个列表。在这里,如果第一个列表中有多个项目,并且用户希望将某些项目传输到第二个列表,那么我们使用传输列表组件。在 React MUI 中,没有专门用于传输列表的组件;而是,我们自己创建它。
Material UI 中还有一个增强列表的概念,它只是基本传输列表的更高级或增强版本。我们可以在增强列表中包含各种内容,例如复选框、应用自定义颜色等。
创建增强型传输列表的步骤
以下是创建 Material UI 中增强型传输列表的步骤:
步骤 1:创建 React 应用程序
在 MUI 中创建传输列表的第一步是创建一个 React 应用程序。要创建一个新的 React 应用程序,请在您的终端中运行以下命令:
npx create react app formcontrolproject
项目创建完成后,通过运行以下命令导航到其目录:
cd formcontrolproject
步骤 2:将 MUI 添加到 React
创建 React 应用程序后,是时候将 Material UI 安装到 React 应用程序中了。要安装 MUI,请运行以下命令:
npm install @mui/material @emotion/react @emotion/styled
步骤 3:定义项目
在创建传输列表之前,我们必须定义列表项,并在左右两侧设置一些值。以下是定义项目项的语法:
const [lftItems, setLftItems] = useState([1, 2, 3 ]);
const [rytItems, setRytItems] = useState([4, 5, 6]);
const [chosenLftItems, setChosenLftItems] = useState([]);
const [chosenRytItems, setChosenRytItems] = useState([]);
步骤 4:创建传输按钮
要传输列表项,我们必须定义具有处理函数的传输按钮。以下是如何在 React 中创建四个不同的按钮:
const handlePush = () => {
   …
};

const handlePull = () => {
   …
};

const selectLftItem = (i) => {
   …
};

const selectRightItem = (i) => {
   …
};
步骤 5:在 Main 中呈现列表项
最后,一旦我们定义了所有处理列表传输的函数,我们现在必须使用 Stack 在 App.js 组件中呈现列表项。以下是呈现列表项的语法:
function App() {
   return (
      <Stack>
         <Stack item sx={{ gap: 2 }}>
            {lftItems.map((item, index) => (
               <ListItem key={index}>
                  …
               </ListItem>
            ))}
         </Stack>
         <Stack item>
            <Stack>
               <Button>
                  >
               </Button>
               <Button>
                  <
               </Button>
            </Stack>
         </Stack>
         <Stack sx={{ gap: 2 }}>
            {rytItems.map((item, index) => (
               <ListItem key={index}>
                  …
               </ListItem>
            ))}
         </Stack>
      </Stack>
   )
}

export default App;
就是这样!现在我们已经成功地学习了在 MUI 中创建增强型传输列表的步骤。所以,让我们看看一些不同方法的示例。
示例
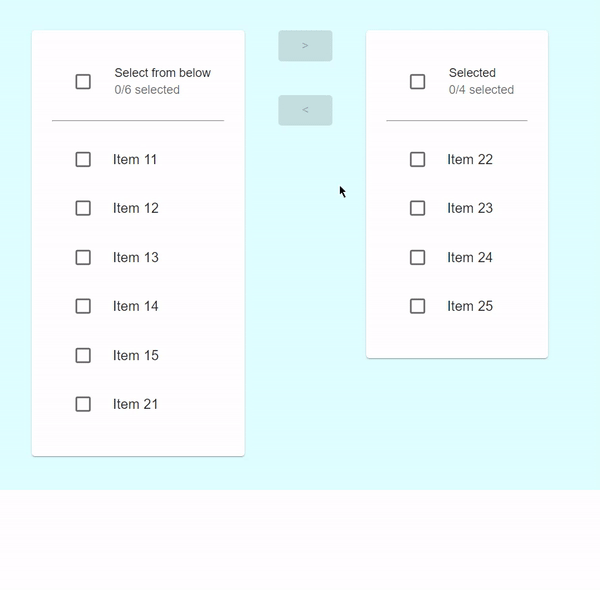
在此示例中,我们创建了一个自定义的增强型传输列表,当用户选择任何要传输的项目时,复选框将被启用。在这里,用户还可以一次选择所有列表项以传输到其他列表。
import React from "react";
import { useState } from "react";
import { Stack } from "@mui/material";
import {List, ListItem, ListItemText, ListItemIcon} from '@mui/material';
import Checkbox from '@mui/material/Checkbox';
import Button from '@mui/material/Button';
import {Card, CardHeader} from '@mui/material/';

function not(a, b) {
   return a.filter((value) => b.indexOf(value) === -1);
}

function intersection(a, b) {
   return a.filter((value) => b.indexOf(value) !== -1);
}

function union(a, b) {
   return [...a, ...not(b, a)];
}

const App = () => {
   const [chk, setChk] = useState([]);
   const [lftItems, setLftItems] = useState(["Item 11",
      "Item 12",
      "Item 13",
      "Item 14",
      "Item 15"]);
   const [rightItems, setRightItems] = useState(["Item 21",
      "Item 22",
      "Item 23",
      "Item 24",
      "Item 25"]);

   const chkLeftChecked = intersection(chk, lftItems);
   const chkRightChecked = intersection(chk, rightItems);

   const handleSingleToggle = (val) => () => {
      const currentIdx = chk.indexOf(val);
      const latestChecked = [...chk];

      if (currentIdx === -1) {
         latestChecked.push(val);
      } else {
         latestChecked.splice(currentIdx, 1);
      }

      setChk(latestChecked);
   };

   const chkNo = (items) => intersection(chk, items).length;

   const handleMultipleToggle = (i) => () => {
      if (chkNo(i) === i.length) {
         setChk(not(chk, i));
      } else {
         setChk(union(chk, i));
      }
   };

   const pushRight = () => {
      setRightItems(rightItems.concat(chkLeftChecked));
      setLftItems(not(lftItems, chkLeftChecked));
      setChk(not(chk, chkLeftChecked));
   };

   const pushLeft = () => {
      setLftItems(lftItems.concat(chkRightChecked));
      setRightItems(not(rightItems, chkRightChecked));
      setChk(not(chk, chkRightChecked));
   };

   const ListComponent = (listItemName, ListItems) => (
      <Card sx={{ p: 3 }}>
         <CardHeader
            sx={{ p: 2 }}
            avatar={
               <Checkbox
                  onClick={handleMultipleToggle(ListItems)}
                  checked={chkNo(ListItems) === ListItems.length && ListItems.length !== 0}
                  indeterminate={
                     chkNo(ListItems) !== ListItems.length && chkNo(ListItems) !== 0
                  }
                  disabled={ListItems.length === 0}
               />
            }
            title={listItemName}
            subheader={`${chkNo(ListItems)}/${ListItems.length} selected`}
         />
         <hr />
         <List sx={{overflow: 'auto',}}>
            {ListItems.map((value) => {
               const labelId = `transfer-list-all-item-${value}-label`;
               return (
                  <ListItem
                     key={value}
                     onClick={handleSingleToggle(value)}
                     >
                     <ListItemIcon>
                        <Checkbox
                           checked={chk.indexOf(value) !== -1}
                           tabIndex={-1}
                           disableRipple
                        />
                     </ListItemIcon>
                     <ListItemText id={labelId} primary={value} />
                  </ListItem>
               );
            })}
         </List>
      </Card>
   );

   return (
      <div style={{
            padding: 40,
            display: 'flex',
            flexDirection: 'column',
            gap: 20,
            backgroundColor: 'lightcyan'
         }}>
         <Stack direction="row" container spacing={5}>
            <Stack item>{ListComponent('Select from below', lftItems)}</Stack>
            <Stack item>
               <Stack container direction="column" sx={{ gap: 5 }} alignItems="center">
                  <Button
                     variant="contained"
                     color="info"
                     onClick={pushRight}
                     disabled={chkLeftChecked.length === 0}
                     >
                     >
                  </Button>
                  <Button
                     variant="contained"
                     color="info"
                     onClick={pushLeft}
                     disabled={chkRightChecked.length === 0}
                     >
                     <
                  </Button>
               </Stack>
            </Stack>
            <Stack item>{ListComponent('Selected', rightItems)}</Stack>
         </Stack>
      </div>
   );
};

export default App;
输出
示例
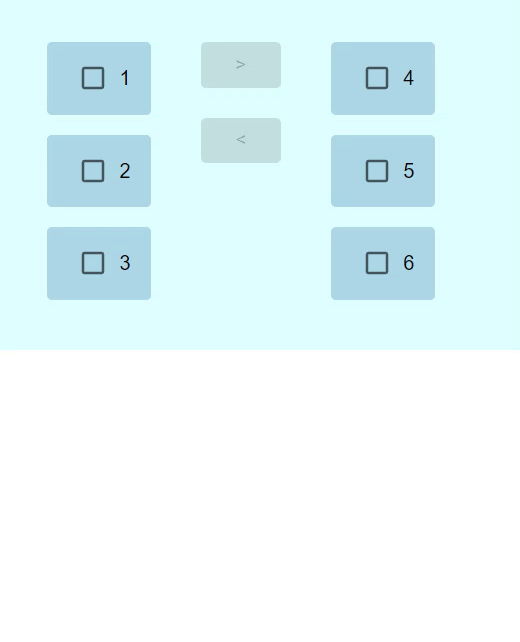
在此示例中,我们创建了一个自定义的增强型传输列表,当用户选择任何要传输的项目时,复选框将被启用。在这里,列表项使用不同的颜色进行自定义。
import React, { useState } from "react";
import { Stack, Checkbox, ListItem, ListItemText, Button } from "@mui/material";

const App = () => {
   const [lftItems, setLftItems] = useState([1, 2, 3]);
   const [rytItems, setRytItems] = useState([4, 5, 6]);
   const [chosenLftItems, setChosenLftItems] = useState([]);
   const [chosenRytItems, setChosenRytItems] = useState([]);

   const handlePush = () => {
      setRytItems((before) => [...before, ...chosenLftItems]);
      setLftItems((prevItems) =>
         prevItems.filter((_, index) => !chosenLftItems.includes(index))
      );
      setChosenLftItems([]);
   };

   const handlePull = () => {
      setLftItems((before) => [...before, ...chosenRytItems]);
      setRytItems((prevItems) =>
         prevItems.filter((_, index) => !chosenRytItems.includes(index))
      );
      setChosenRytItems([]);
   };

   const selectLftItem = (i) => {
      if (chosenLftItems.includes(i)) {
         setChosenLftItems((beforeSelected) =>
            beforeSelected.filter((item) => item !== i)
         );
      } else {
         setChosenLftItems((beforeSelected) => [...beforeSelected, i]);
      }
   };

   const selectRightItem = (i) => {
      if (chosenRytItems.includes(i)) {
         setChosenRytItems((beforeSelected) =>
            beforeSelected.filter((item) => item !== i)
         );
      } else {
         setChosenRytItems((beforeSelected) => [...beforeSelected, i]);
      }
   };

   return (
      <div
         style={{
            padding: 40,
            display: "flex",
            flexDirection: "column",
            gap: 20,
            backgroundColor: "lightcyan"
         }}>
         <Stack direction="row" container spacing={5}>
            <Stack sx={{ gap: 2 }}>
               {lftItems.map((item, index) => (
                  <ListItem
                     key={index}
                     onClick={() => selectLftItem(index)}
                     sx={{
                        backgroundColor: "lightblue",
                        borderRadius: 1,
                        cursor: "pointer"
                     }}>
                     <Checkbox
                        checked={chosenLftItems.includes(index)}
                        color="primary"
                     />
                     <ListItemText primary={item} />
                  </ListItem>
               ))}
            </Stack>
            <Stack item>
               <Stack
                  container
                  justifyContent="center"
                  direction="column"
                  sx={{ gap: 3 }}
                  alignItems="center"
                  >
                  <Button
                     variant="contained"
                     color="info"
                     onClick={handlePush}
                     disabled={chosenLftItems.length === 0}
                     >
                     >
                  </Button>
                  <Button
                     variant="contained"
                     color="info"
                     onClick={handlePull}
                     disabled={chosenRytItems.length === 0}
                     >
                     <
                  </Button>
               </Stack>
            </Stack>
            <Stack sx={{ gap: 2 }}>
               {rytItems.map((item, index) => (
                  <ListItem
                     key={index}
                     onClick={() => selectRightItem(index)}
                     sx={{
                        backgroundColor: "lightblue",
                        borderRadius: 1,
                        cursor: "pointer"
                     }}
                     >
                     <Checkbox
                        checked={chosenRytItems.includes(index)}
                        color="primary"
                     />
                     <ListItemText primary={item} />
                  </ListItem>
               ))}
            </Stack>
         </Stack>
      </div>
   );
};

export default App;
输出
结论
本文讨论了在 React MUI 中创建增强型传输列表的完整细节。在本文中,我们学习了创建增强型传输列表的完整步骤,以及使用不同方法的不同示例。

511 次浏览
