- JasmineJS 教程
- JasmineJS - 首页
- JasmineJS - 概述
- JasmineJS - 环境设置
- JasmineJS - 编写测试 & 执行
- JasmineJS - BDD 架构
- JasmineJS - 测试的构建块
- JasmineJS - 断言
- JasmineJS - 跳过块
- JasmineJS - 等值检查
- JasmineJS - 布尔值检查
- JasmineJS - 顺序检查
- JasmineJS - 空值检查
- JasmineJS - 不等值检查
- JasmineJS - 非数字检查
- JasmineJS - 异常检查
- JasmineJS - beforeEach()
- JasmineJS - afterEach()
- JasmineJS - 间谍
- JasmineJS 有用资源
- JasmineJS - 快速指南
- JasmineJS - 有用资源
- JasmineJS - 讨论
JasmineJS - 测试的构建块
在本章中,我们将讨论 Jasmine 测试的构建块。
套件块
Jasmine 是一个 JavaScript 测试框架。套件是 Jasmine 框架的基本构建块。为特定文件或函数编写的类似类型的测试用例的集合称为一个套件。它包含另外两个块,一个是“Describe()”,另一个是“It()”。
一个套件块只能有两个参数,一个是“套件的名称”,另一个是“函数声明”,它实际上调用了要测试的单元功能。
在下面的示例中,我们将创建一个套件来单元测试add.js 文件中的 add 函数。在这个示例中,我们有一个名为“calculator.js”的 JS 文件,它将通过 Jasmine 进行测试,相应的 Jasmine 规范文件是“CalCulatorSpec.js”。
Calculator.js
window.Calculator = {

   currentVal:0,
   varAfterEachExmaple:0,

   add:function (num1) {
      this.currentVal += num1;
      return this.currentVal;
   },

   addAny:function () {
      var sum = this.currentVal;

      for(var i = 0; i < arguments.length; i++) {
         sum += arguments[i];
      }

      this.currentVal = sum;
      Return  this.currentVal;
   },
};
CalCulatorSpec.js
describe("calculator",function() {

   //test case: 1
   it("Should retain the current value of all time", function () {
      expect(Calculator.currentVal).toBeDefined();
      expect(Calculator.currentVal).toEqual(0);
   });

   //test case: 2
   it("should add numbers",function() {
      expect(Calculator.add(5)).toEqual(5);
      expect(Calculator.add(5)).toEqual(10);
   });

   //test case :3
   it("Should add any number of numbers",function () {
      expect(Calculator.addAny(1,2,3)).toEqual(6);
   });
});
在上面的函数中,我们声明了两个函数。函数add将添加作为参数传递给该函数的两个数字,另一个函数addAny应该添加作为参数传递的任何数字。
创建此文件后,我们需要在“SpecRunner.html”的头部部分添加此文件。成功编译后,这将生成以下输出作为结果。

嵌套套件块
套件块可以在另一个套件块内包含多个套件块。下面的示例将向您展示如何在另一个套件块内创建不同的套件块。我们将创建两个 JavaScript 文件,一个名为“NestedSpec.js”,另一个名为“nested.js”。
NestedSpec.js
describe("nested",function() {

   // Starting of first suite block
   // First block

   describe("Retaining values ",function () {

      //test case:1
      it ("Should retain the current value of all time", function () {
         expect(nested.currentVal).toBeDefined();
         expect(nested.currentVal).toEqual(0);
      });
   }); //end of the suite block

   //second suite block
   describe("Adding single number ",function () {

      //test case:2
      it("should add numbers",function() {
         expect(nested.add(5)).toEqual(5);
         expect(nested.add(5)).toEqual(10);
      });
   }); //end of the suite block

   //third suite block
   describe("Adding Different Numbers",function () {

      //test case:3
      it("Should add any number of numbers",function() {
         expect(nested.addAny(1,2,3)).toEqual(6);
      });
   }); //end of the suite block
});
Nested.js
window.nested = {

   currentVal: 0,

   add:function (num1) {
      this.currentVal += num1;
      return this.currentVal;
   },

   addAny:function () {
      Var sum = this.currentVal;

      for(var i = 0;i < arguments.length; i++) {
         sum += arguments[i];
      }

      this.currentVal = sum;
      return this.currentVal;
   }
};
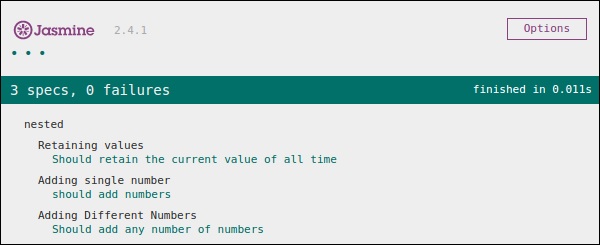
上面的代码片段将在添加此文件到头部部分后,运行specRunner.html文件的结果中生成以下输出。

Describe 块
如前所述,describe 块是套件块的一部分。与套件块类似,它包含两个参数,一个是“describe 块的名称”,另一个是“函数声明”。在我们即将到来的示例中,我们将遍历许多 describe 块以了解 Jasmine 套件块的工作流程。下面是一个完整的 describe 块示例。
describe("Adding single number ",function () {

   it("should add numbers",function() {
      expect(nested.add(5)).toEqual(5);
      expect(nested.add(5)).toEqual(10);
   });
}
IT 块
就像我们已经介绍过的 describe 块一样,我们也介绍了 IT 块。它位于 describe 块内。这实际上是包含每个单元测试用例的块。在下面的代码中,在一个describe块内有多个IT块。
describe("Adding single number ",function () {

   // test case : 1
   it("should add numbers",function() {
      expect(nested.add(5)).toEqual(5);
      expect(nested.add(5)).toEqual(10);
   });

   //test case : 2
   it("should add numbers",function() {
      expect(nested.addAny(1,2,3)).toEqual(6);
   });
}
Expect 块
Jasmine Expect 允许您编写对所需函数或 JavaScript 文件的期望。它位于IT块内。一个 IT 块可以有多个 Expect 块。
下面是一个 Expect 块的示例。此 expect 块提供了各种方法来单元测试您的 JavaScript 函数或 JavaScript 文件。每个 Expect 块也称为匹配器。匹配器有两种类型,一种是内置匹配器,另一种是用户定义的匹配器。
describe("Adding single number ",function () {

   // test case : 1
   it("should add numbers",function() {
      expect(nested.add(5)).toEqual(5);
      expect(nested.add(5)).toEqual(10);
   });

   //test case : 2
   it("should add numbers",function() {
      expect(nested.addAny(1,2,3)).toEqual(6);
   });
}
在接下来的章节中,我们将讨论 Expect 块中各种内置方法的各种用途。